

 Rules
Rules
by Oldenginerod Today at 1:59 am
» Draco Goes Flying, But Misses the Eclipse
by HalfaDave Yesterday at 9:59 pm
» A prototype Cox Reed-valve marine engine
by davidll1984 Yesterday at 9:15 pm
» Enya .09 II Questions
by Surfer_kris Yesterday at 2:45 pm
» Wen Mac .049 - Conditioning.
by MauricioB Yesterday at 12:21 pm
» Happy 53rd birthday Mauricio!!!
by MauricioB Yesterday at 11:47 am
» Jim Walker Firebaby
by rdw777 Yesterday at 11:22 am
» Testers Sprite engine swap
by Greenman38633 Yesterday at 10:57 am
» UV Restore of Yellowed Decals
by Levent Suberk Yesterday at 8:59 am
» 22mm 2-blade nylon marine prop and solid-shaft drive
by roddie Yesterday at 6:46 am
» Post edit??
by roddie Yesterday at 5:33 am
» Original Super Power fuel formula?
by HalfaDave Wed Apr 17, 2024 7:28 pm


Broken nose, all fixed... Final Installment(s)
Page 1 of 5 • 1, 2, 3, 4, 5 ![]()

Broken nose, all fixed... Final Installment(s)
![]() RknRusty Thu Aug 20, 2015 10:07 pm
RknRusty Thu Aug 20, 2015 10:07 pm
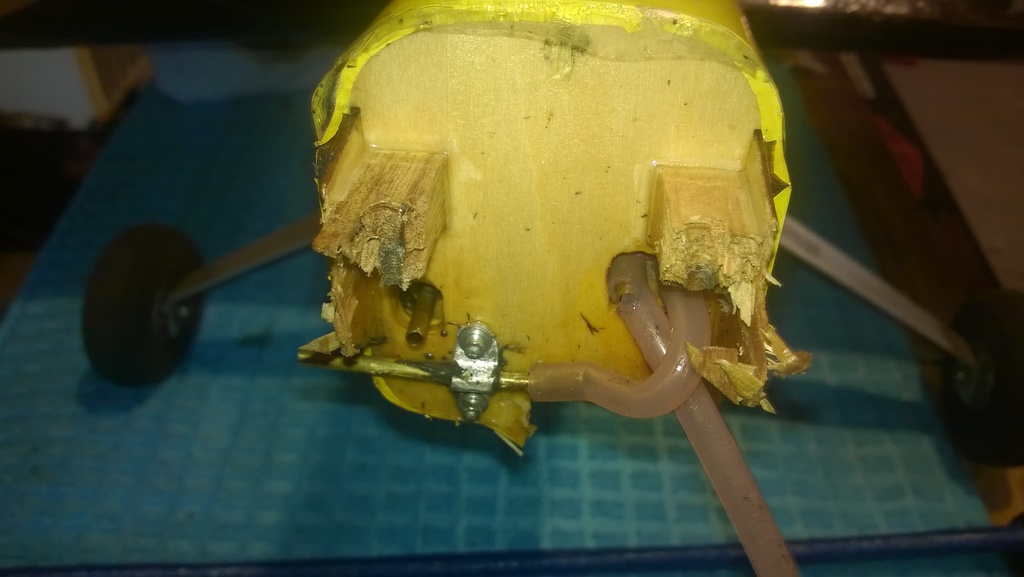
The crutches snapped off at the rear engine bolts.
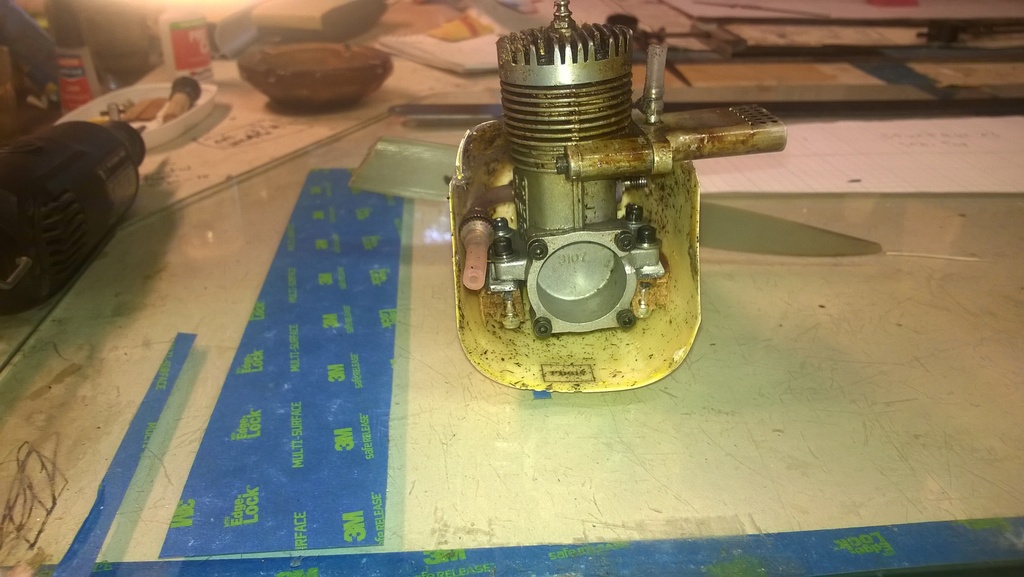

I know how to fix this.
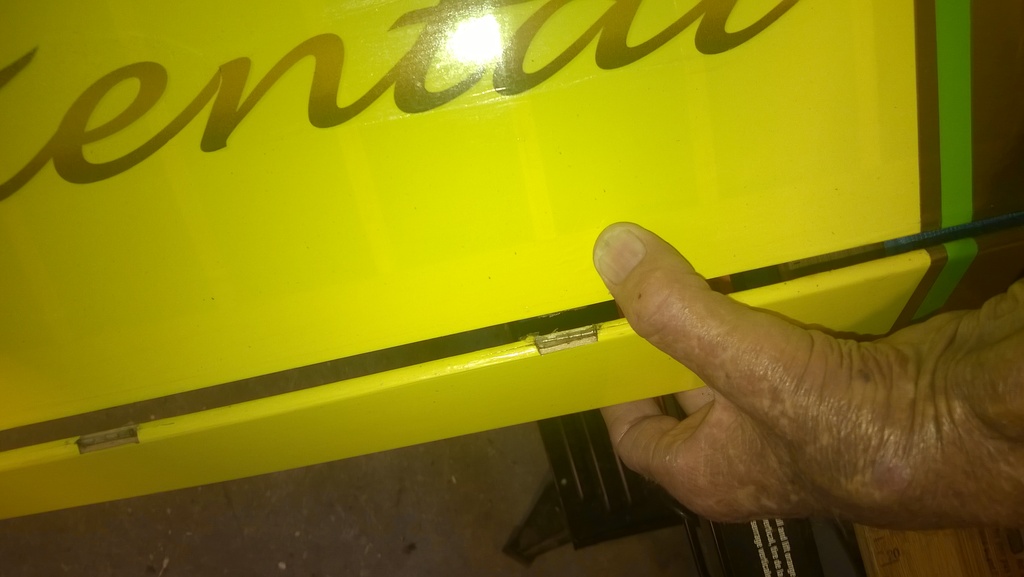
Hinges on both flaps were broken. And the outboard wing is broken somewhere at the LE. At the root for sure but probably inside too.
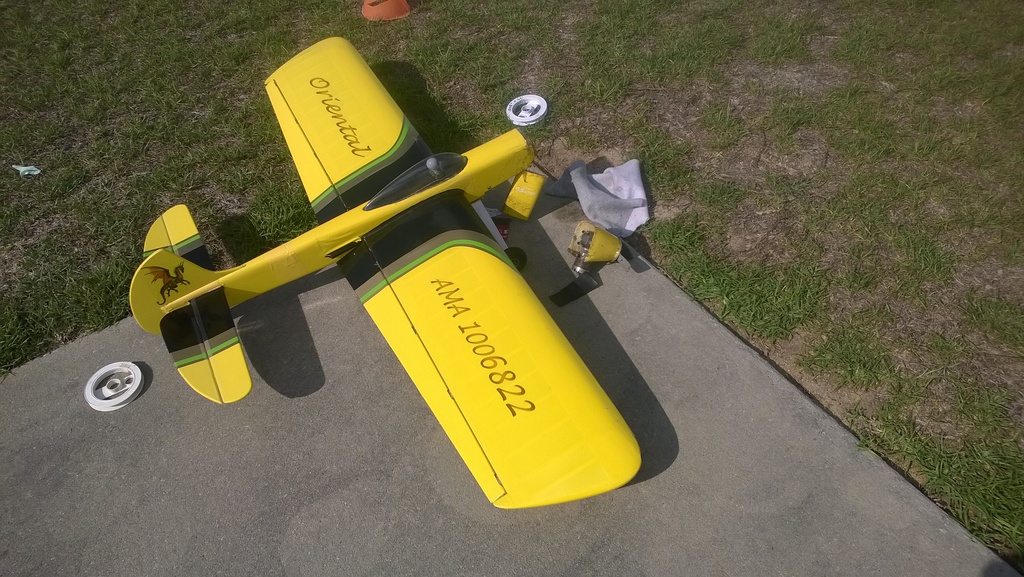
It was just sitting on its wheels like nothing was wrong, with the nose 3' in front of it.
It had been a quality flight up until this. I had won 3rd and 2nd with this plane, I was hoping for first and booted soon.
Very disappointing.
Rusty
Last edited by RknRusty on Fri Aug 21, 2015 11:21 am; edited 1 time in total (Reason for editing : fixed picture link)
_________________
...and never Ever think about how good you are at something...
while you're doing it!
My Hot Rock & Blues Playlist

RknRusty- Rest In Peace

- Posts : 10869
Join date : 2011-08-10
Age : 68
Location : South Carolina, USA
Re: Broken nose, all fixed... Final Installment(s)
![]() NEW222 Thu Aug 20, 2015 10:45 pm
NEW222 Thu Aug 20, 2015 10:45 pm
Not knowing what the motor side of the beams look like, they might fit tight together without makinh them straight, an only using a dowel.
Anyways, this is just my .02 and what I would try as it would be quickest.

NEW222- Top Poster

- Posts : 3892
Join date : 2011-08-13
Age : 45
Location : oakbank, mb
Re: Broken nose, all fixed... Final Installment(s)
![]() Cribbs74 Thu Aug 20, 2015 10:48 pm
Cribbs74 Thu Aug 20, 2015 10:48 pm
You are not going to like it, but you already know what needs to happen.
It looks like the bulkhead/firewall is fully epoxied, it's going to be a pain. Still doable though, I use a pencil soldering iron and the Epoxy just melts away. Well, crumbles is a more accurate description.
After that it just a matter of remove and replace the beams.
Tough break friend, sorry.

Cribbs74- Moderator


Posts : 11895
Join date : 2011-10-24
Age : 50
Location : Tuttle, OK
Re: Broken nose, all fixed... Final Installment(s)
![]() gossie Fri Aug 21, 2015 3:20 am
gossie Fri Aug 21, 2015 3:20 am
The model is too good to trash IMHO.

gossie- Gold Member

- Posts : 133
Join date : 2011-10-18
Location : Gold Coast Australia.
Re: Broken nose, all fixed... Final Installment(s)
![]() Ken Cook Fri Aug 21, 2015 3:55 am
Ken Cook Fri Aug 21, 2015 3:55 am

Ken Cook- Top Poster
- Posts : 5442
Join date : 2012-03-27
Location : pennsylvania
Re: Broken nose, all fixed... Final Installment(s)
![]() RknRusty Fri Aug 21, 2015 4:17 am
RknRusty Fri Aug 21, 2015 4:17 am
Rusty
_________________
...and never Ever think about how good you are at something...
while you're doing it!
My Hot Rock & Blues Playlist
RknRusty- Rest In Peace
- Posts : 10869
Join date : 2011-08-10
Age : 68
Location : South Carolina, USA
Re: Broken nose, all fixed... Final Installment(s)
![]() getback Fri Aug 21, 2015 8:43 am
getback Fri Aug 21, 2015 8:43 am

getback- Top Poster
-
Posts : 10095
Join date : 2013-01-18
Age : 66
Location : julian , NC
Re: Broken nose, all fixed... Final Installment(s)
![]() Cribbs74 Fri Aug 21, 2015 8:50 am
Cribbs74 Fri Aug 21, 2015 8:50 am
Cribbs74- Moderator
-
Posts : 11895
Join date : 2011-10-24
Age : 50
Location : Tuttle, OK
Re: Broken nose, all fixed... Final Installment(s)
![]() RknRusty Fri Aug 21, 2015 11:01 am
RknRusty Fri Aug 21, 2015 11:01 am
Thanks all.
Rusty
_________________
...and never Ever think about how good you are at something...
while you're doing it!
My Hot Rock & Blues Playlist
RknRusty- Rest In Peace
- Posts : 10869
Join date : 2011-08-10
Age : 68
Location : South Carolina, USA
Re: Broken nose, all fixed... Final Installment(s)
![]() RknRusty Fri Aug 21, 2015 11:18 am
RknRusty Fri Aug 21, 2015 11:18 am
Eric turn 3 of the clover is straight overhead, and more, just after climbing straight up from 6' off the deck following turn 2, actually behind me as I stand planted. It's at the limit of my peripheral vision while I wait for it to come back around to enter the last turn 4.getback wrote:Mr Rusty said : Blown off the top of turn 3 on the clover, ended like this: Does that mean the engine came off ? or what Un fortunate either way but a least it didn't get the wing ribs , I think that's when repairs get to bee a real pain making ribs and recovering . getback
I flew into a li'l twister way up and behind me, and got slapped, momentarily caught it, but couldn't get eyes on it before it was swept away again. I caught it again with my back to it and had no way to know which way to turn it. I had line tension for an instant, but I never saw it hit the ground. I had a 50/50 chance of pulling it the right way... Whop!
And that ain't no whopper.
Rusty
_________________
...and never Ever think about how good you are at something...
while you're doing it!
My Hot Rock & Blues Playlist
RknRusty- Rest In Peace
- Posts : 10869
Join date : 2011-08-10
Age : 68
Location : South Carolina, USA
Re: Broken nose, all fixed... Final Installment(s)
![]() Ken Cook Fri Aug 21, 2015 3:19 pm
Ken Cook Fri Aug 21, 2015 3:19 pm
Ken Cook- Top Poster
- Posts : 5442
Join date : 2012-03-27
Location : pennsylvania
Re: Broken nose, all fixed... Final Installment(s)
![]() RknRusty Fri Aug 21, 2015 5:28 pm
RknRusty Fri Aug 21, 2015 5:28 pm
I will, because I know it might need tweaking. It's going to make the whole machine a tad shorter too, so I might be re-balancing. I only have built-in tail weight, but let's just hope I get that far along.Ken Cook wrote:Make certain you align the engine centerline or make it so you can shim your tank if needed. If the mount is mounted too high that could be problematic. Ken
I could have another Oriental in the box from Wayne for the asking. He doesn't even know about this little problem yet. So another option is to build a new one quick. I could probably do it pretty fast(don't laugh too hard) without all the time spent pondering, engineering, questioning and nitpicking.
Rusty
_________________
...and never Ever think about how good you are at something...
while you're doing it!
My Hot Rock & Blues Playlist
RknRusty- Rest In Peace
- Posts : 10869
Join date : 2011-08-10
Age : 68
Location : South Carolina, USA
Re: Broken nose, all fixed... Final Installment(s)
![]() Ken Cook Fri Aug 21, 2015 6:19 pm
Ken Cook Fri Aug 21, 2015 6:19 pm
Ken Cook- Top Poster
- Posts : 5442
Join date : 2012-03-27
Location : pennsylvania
Re: Broken nose, all fixed... Final Installment(s)
![]() RknRusty Fri Aug 21, 2015 10:46 pm
RknRusty Fri Aug 21, 2015 10:46 pm
The center sheeting, top and bottom outside of the fuse may be all that's broken. Does the ARF have a "D" spar at the LE, or is all of the strength in the sheeting alone?
Good news: The flap horn is not bent, all ribs seem intact, and everything aft of the wing is still good as new. Wayne has a mount that my engine will fit, and its position will not interfere at all with the plumbing. The 1/8" firewall seems pretty strong, and I plan to apply another layer of ply for added strength to hold the mount. I will consider whether to add it in front or behind the firewall. Either way will get a girdle of fiberglass all the way around the fuselage. And aircraft aluminum(cut from old LG) bearers behind it to spread the force of the mounting bolts. I think I can get the engine in the exact same position as it originally was.
Rusty
_________________
...and never Ever think about how good you are at something...
while you're doing it!
My Hot Rock & Blues Playlist
RknRusty- Rest In Peace
- Posts : 10869
Join date : 2011-08-10
Age : 68
Location : South Carolina, USA
Re: Broken nose, all fixed... Final Installment(s)
![]() Marleysky Sat Aug 22, 2015 7:20 am
Marleysky Sat Aug 22, 2015 7:20 am
http://t.harborfreight.com/digital-inspection-camera-62359.html

Marleysky- Top Poster
-
Posts : 3618
Join date : 2014-09-28
Age : 71
Location : Grand Rapids, MI
Re: Broken nose, all fixed... Final Installment(s)
![]() RknRusty Sat Aug 22, 2015 8:00 am
RknRusty Sat Aug 22, 2015 8:00 am
Marleysky wrote:Rusty - if you can't borrow a used one from your proctologist, you could buy this:
http://t.harborfreight.com/digital-inspection-camera-62359.html
 That's one of the few types of doctors I'm lucky enough to not have.
Thanks for the lead, I should've guessed HF would have one.
_________________
...and never Ever think about how good you are at something...
while you're doing it!
My Hot Rock & Blues Playlist
RknRusty- Rest In Peace
- Posts : 10869
Join date : 2011-08-10
Age : 68
Location : South Carolina, USA
pkrankow- Top Poster
- Posts : 3025
Join date : 2012-10-02
Location : Ohio
Re: Broken nose, all fixed... Final Installment(s)
![]() roddie Sat Aug 22, 2015 8:29 am
roddie Sat Aug 22, 2015 8:29 am
Your feed(?)line looks split-open at the tank nipple. Is that what I see? That's the end that won-out in the tug of war, when the engine separated


roddie- Top Poster
- Posts : 8233
Join date : 2013-07-17
Age : 64
Location : N. Smithfield, Rhode Island -

Re: Broken nose, all fixed... Final Installment(s)
![]() RknRusty Sat Aug 22, 2015 5:30 pm
RknRusty Sat Aug 22, 2015 5:30 pm
Wait and see, that mount is going to be a thing of beauty. Everything will be in the same location, thrust-wise. The cowl will fit about the same. Worst case is I enlarge the holes for the needle and cylinder. No more than a few mm forward or more likely, backward.
The wing has the same break as after the outta gas tarmac bonk back in July. A bit more area to glue and (this time)glass.. I'm still going to do an exploratory on the center of the LE.
Rusty
_________________
...and never Ever think about how good you are at something...
while you're doing it!
My Hot Rock & Blues Playlist
RknRusty- Rest In Peace
- Posts : 10869
Join date : 2011-08-10
Age : 68
Location : South Carolina, USA
Re: Broken nose, all fixed... Final Installment(s)
![]() TDbandit Sat Aug 22, 2015 8:09 pm
TDbandit Sat Aug 22, 2015 8:09 pm

TDbandit- Platinum Member

- Posts : 897
Join date : 2014-12-01
Age : 52
Location : Riverdale Georgia
Re: Broken nose, all fixed... Final Installment(s)
![]() Ken Cook Sat Aug 22, 2015 8:53 pm
Ken Cook Sat Aug 22, 2015 8:53 pm
I don't know how you installed your canopy, but carefully taking a #11 blade and cutting all the way around it carefully can also be helpful. Don't cut through the stringers. The balsa was formed over the stringers and you just need to cut through the sheeting only. Carefully remove the sheeting that was just cut. If it can be removed in one piece, all the better, You now have access to the top of the wing. The cutout in the stock Oriental wing is very large which will also reveal the bellcrank. You will be able to see any damage to the leading edge through that opening and it can possibly be repaired with a strip of carbon fiber or 1/32" ply. The sheeting can be glued right back onto the fuse. Fill the groove created by cutting with #11 with epoxy and push the canopy down into it holding it down with masking tape or a rubber band around the canopy and fuse. Clean any epoxy off with alcohol.
Ken Cook- Top Poster
- Posts : 5442
Join date : 2012-03-27
Location : pennsylvania
Re: Broken nose, all fixed... Final Installment(s)
![]() RknRusty Mon Aug 24, 2015 11:12 pm
RknRusty Mon Aug 24, 2015 11:12 pm
It passed the pull test without so much as a creak. I did it three times, pulling slightly over the legal pull. That's a relief.
The controls seem fine and free except the flaps are shifted slightly so one is almost touching the fairing and the other has a wider gap. I'm not sure why, but they move freely and are still coupled with no new slop anywhere. It might be because of all the busted hinges, but I'll cut them flush with the edges and stitch new ones. My wire flap hinge retainers are all in place and not bent.
The fuselage had some cracks above the wing root on the side of the fuselage. I pressed them all into place and soaked them with thin CA. The outboard wing has cracked sheeting on the bottom causing it to sag. Same area as the cracks from it's previous deadstick collision with the pavement. I sprung the cracks open some more in order to align the wing. I'm not too sure how that came to be, but I inserted a 1/32 strip of balsa to hold it in place and tacked it with CA. It's aligned now, so tomorrow, I'll finish the area with more shims and fiberglass.
Here she is right now:
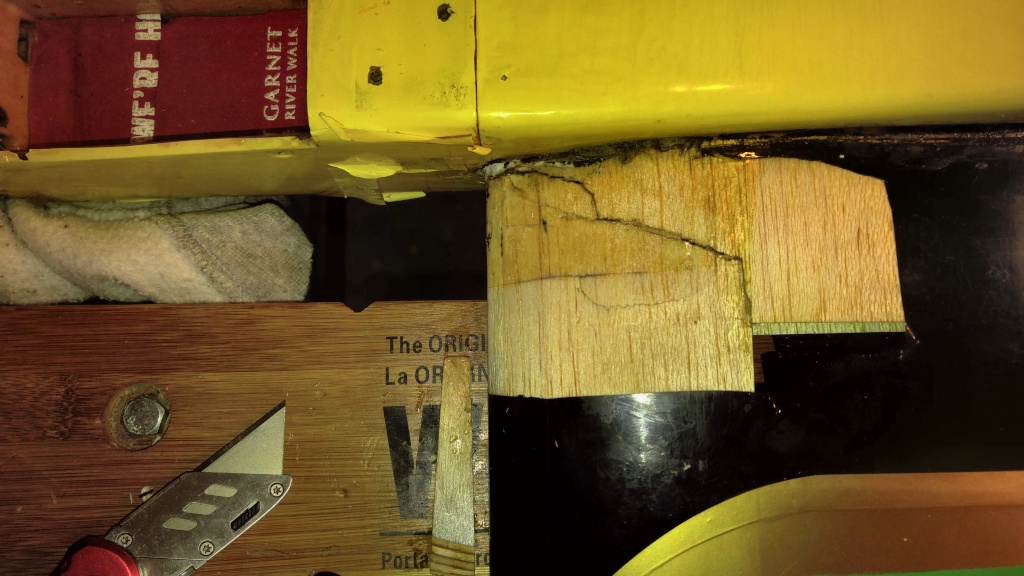
The fuselage cracks. The lengthwise one is invisible.

This is the underside of the outboard wing. There is a shim in that crack, but it's not very visible in the picture.
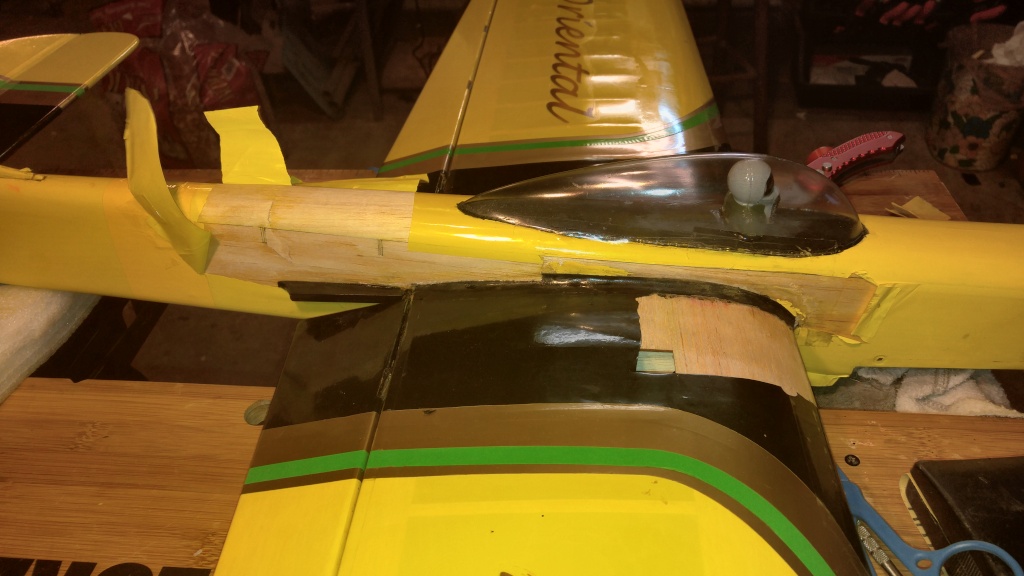
Top view. No cracks in the sheeting there, but the fiberglass is going to wrap around from the underside to partially cover it. I wish I had some lighter glass, but all I get around here is medium weight. But it's good and strong, just unsightly and a bit heavy.
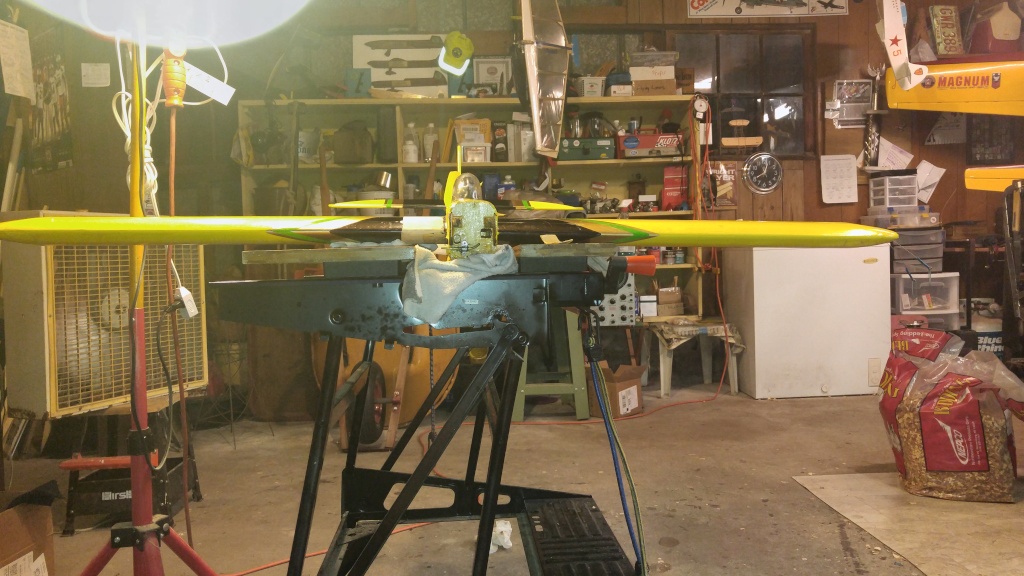
And how's this look for alignment.
I hope to finish the wing tomorrow so I can start figuring how to use the engine mount. I thought of trying to bolt it to the inside of the firewall, so only the beams protrude through the front of the firewall, if it doesn't change the height of the engine. But the old crutches might interfere with that. Otherwise, bolted in front, the engine may be a little farther forward than it was. I hope to figure some way to keep it the same. I have some extra room behind the tank, so I could saw the nose off shorter and make a new firewall. We shall see. I'll let y'all know what I do.
Rusty
_________________
...and never Ever think about how good you are at something...
while you're doing it!
My Hot Rock & Blues Playlist
RknRusty- Rest In Peace
- Posts : 10869
Join date : 2011-08-10
Age : 68
Location : South Carolina, USA
Re: Broken nose, all fixed... Final Installment(s)
![]() Ken Cook Tue Aug 25, 2015 5:46 am
Ken Cook Tue Aug 25, 2015 5:46 am
Ken Cook- Top Poster
- Posts : 5442
Join date : 2012-03-27
Location : pennsylvania
Re: Broken nose, all fixed... Final Installment(s)
![]() RknRusty Sun Aug 30, 2015 9:36 pm
RknRusty Sun Aug 30, 2015 9:36 pm
Now I am working on the flaps. After cutting all of the hinges out, it no longer is "off" and shifted to one side. The flap coupler hinge lays in place just as I built it. That's a relief, no problem there as I had feared. I punched stitch holes on one side and will sew it tomorrow evening, and do the other side too. Then I can get to work on that mount.
I would show pictures, but the glass is almost invisible, so it looks a lot like it did in the previous pre-repair pic. Since I have no yellow Monokote, the front end of the Oriental is going to be aluminum colored, left over from my ex neighbor's P-51.
Will Davis sent me a whole brand new fuselage, wing, flap and tail assembly as spare parts for my Nobler. Hopefully I won't need them for repairs and can one day build a whole new plane from them.
I quit before I got sloppy today. I'm exhausted from a badass concert in Charlotte at the Time Warner Arena last night. Got home and hit the sack about 3:30am. Alice Cooper and Motley Crue. It's been a Looong time since I went to a full blown high end rock show. I'll post videos and pictures this week. My son shucked out $600 bucks for three tickets for Himself, Holley and me. Can't wait to make a thread about it. We have lots of pics and vids.
Rusty
_________________
...and never Ever think about how good you are at something...
while you're doing it!
My Hot Rock & Blues Playlist
RknRusty- Rest In Peace
- Posts : 10869
Join date : 2011-08-10
Age : 68
Location : South Carolina, USA
Re: Broken nose, all fixed... Final Installment(s)
![]() Ken Cook Mon Aug 31, 2015 3:14 pm
Ken Cook Mon Aug 31, 2015 3:14 pm
Ken Cook- Top Poster
- Posts : 5442
Join date : 2012-03-27
Location : pennsylvania
Page 1 of 5 • 1, 2, 3, 4, 5 ![]()
» Cape Girardeau's Christmas Holiday Float...The Baby Snowbird's Last Installment!!!!!
» Cox Stocker 0.49 / Indy Car / Nissan GTP
» Fixed my Fox!
» surestart wont stay running!