

 Rules
Rules
Log in
Search
Latest topics
» music vids.. some of your favoritesby Oldenginerod Today at 1:59 am
» Draco Goes Flying, But Misses the Eclipse
by HalfaDave Yesterday at 9:59 pm
» A prototype Cox Reed-valve marine engine
by davidll1984 Yesterday at 9:15 pm
» Enya .09 II Questions
by Surfer_kris Yesterday at 2:45 pm
» Wen Mac .049 - Conditioning.
by MauricioB Yesterday at 12:21 pm
» Happy 53rd birthday Mauricio!!!
by MauricioB Yesterday at 11:47 am
» Jim Walker Firebaby
by rdw777 Yesterday at 11:22 am
» Testers Sprite engine swap
by Greenman38633 Yesterday at 10:57 am
» UV Restore of Yellowed Decals
by Levent Suberk Yesterday at 8:59 am
» 22mm 2-blade nylon marine prop and solid-shaft drive
by roddie Yesterday at 6:46 am
» Post edit??
by roddie Yesterday at 5:33 am
» Original Super Power fuel formula?
by HalfaDave Wed Apr 17, 2024 7:28 pm
Cox Engine of The Month


CEF Traveling Engine


Win This Engine!

Live on Patrol


A Quick and Dirty CA Hinge Installation
Page 1 of 1

A Quick and Dirty CA Hinge Installation
![]() batjac Wed Sep 02, 2015 1:42 am
batjac Wed Sep 02, 2015 1:42 am
Someone emailed and asked me for some help on CA hinges, so I threw together a little video. I started on it after bedtime, so I just shot it, cut it, and uploaded it fast without adding any title page or captions. Gotta get my beauty rest, y’know…
The Dirty Mark
The Dirty Mark

batjac- Diamond Member


Posts : 2333
Join date : 2013-05-22
Age : 61
Location : Broken Arrow, OK, USA
Re: A Quick and Dirty CA Hinge Installation
![]() akjgardner Wed Sep 02, 2015 2:20 am
akjgardner Wed Sep 02, 2015 2:20 am
Thanks for that Dirty Mark. I liked the way you bent them in the middle, I am going to start doing it that way
akjgardner- Diamond Member
-
Posts : 1469
Join date : 2014-12-28
Age : 64
Location : Greensberg Indiana
Re: A Quick and Dirty CA Hinge Installation
![]() rsv1cox Wed Sep 02, 2015 6:16 am
rsv1cox Wed Sep 02, 2015 6:16 am
Well done.
My Camel bought at a flea market has those hinges but are unsecured. I think I will use your system when I get around to finishing it. But, how did you cut the slots?
My Camel bought at a flea market has those hinges but are unsecured. I think I will use your system when I get around to finishing it. But, how did you cut the slots?

rsv1cox- Top Poster

-
Posts : 10518
Join date : 2014-08-18
Location : West Virginia
Re: A Quick and Dirty CA Hinge Installation
![]() NEW222 Wed Sep 02, 2015 4:15 pm
NEW222 Wed Sep 02, 2015 4:15 pm
Good video. I like the way you pre - work the hinges.

NEW222- Top Poster
- Posts : 3892
Join date : 2011-08-13
Age : 45
Location : oakbank, mb
Re: A Quick and Dirty CA Hinge Installation
![]() RknRusty Wed Sep 02, 2015 8:59 pm
RknRusty Wed Sep 02, 2015 8:59 pm
Ditto that. I've avoided CA hinges like the plague, but I might give them a try now. I think I'll sticky this thread. Ken suggests I use them on the flaps for my current repair. I wish I hadn't already punched holes for stitches. But I may use one at the innermost end of each flap, since there is a wider gap there.akjgardner wrote:Thanks for that Dirty Mark. I liked the way you bent them in the middle, I am going to start doing it that way
Rusty
_________________
Don't Panic!
...and never Ever think about how good you are at something...
while you're doing it!
My Hot Rock & Blues Playlist
...and never Ever think about how good you are at something...
while you're doing it!
My Hot Rock & Blues Playlist

RknRusty- Rest In Peace

- Posts : 10869
Join date : 2011-08-10
Age : 68
Location : South Carolina, USA
Cutting hinge slots and beveling
![]() batjac Thu Sep 03, 2015 9:29 pm
batjac Thu Sep 03, 2015 9:29 pm
Thanks for the comments, Guys.
To answer how I cut the slots, I went ahead and did a second vid on slotting and beveling.
Here's a link for the Great Planes tool. The Goldberg tool you'll just have to hope to find on your local hobby shop shelf as NOS.
Hope it helps,
The Dirtier Mark
To answer how I cut the slots, I went ahead and did a second vid on slotting and beveling.
Here's a link for the Great Planes tool. The Goldberg tool you'll just have to hope to find on your local hobby shop shelf as NOS.
Hope it helps,
The Dirtier Mark
batjac- Diamond Member
-
Posts : 2333
Join date : 2013-05-22
Age : 61
Location : Broken Arrow, OK, USA
Re: A Quick and Dirty CA Hinge Installation
![]() getback Fri Sep 04, 2015 7:29 am
getback Fri Sep 04, 2015 7:29 am
Thanks Mark , That's the way a friend I was building /flying with years ago had showed me and I had forgot how to wick the CA bend and exercise , after I had heard so many on here say that it would stiffing the hinge unusable . I will have to give this a try again // stitched hinges are nice but ... take time and sometimes I just don't have it for building // we never taped over but did mono-cote yes it was larger RC planes 40 size 

getback- Top Poster
-
Posts : 10095
Join date : 2013-01-18
Age : 66
Location : julian , NC
Re: A Quick and Dirty CA Hinge Installation
![]() PeterJGregory Sun Feb 14, 2016 10:20 pm
PeterJGregory Sun Feb 14, 2016 10:20 pm
Good techniques, thanks for the share.

PeterJGregory- Gold Member

- Posts : 144
Join date : 2014-07-28
Age : 61
Location : Hudson Valley, New York
Re: A Quick and Dirty CA Hinge Installation
![]() roddie Mon Feb 15, 2016 2:39 pm
roddie Mon Feb 15, 2016 2:39 pm
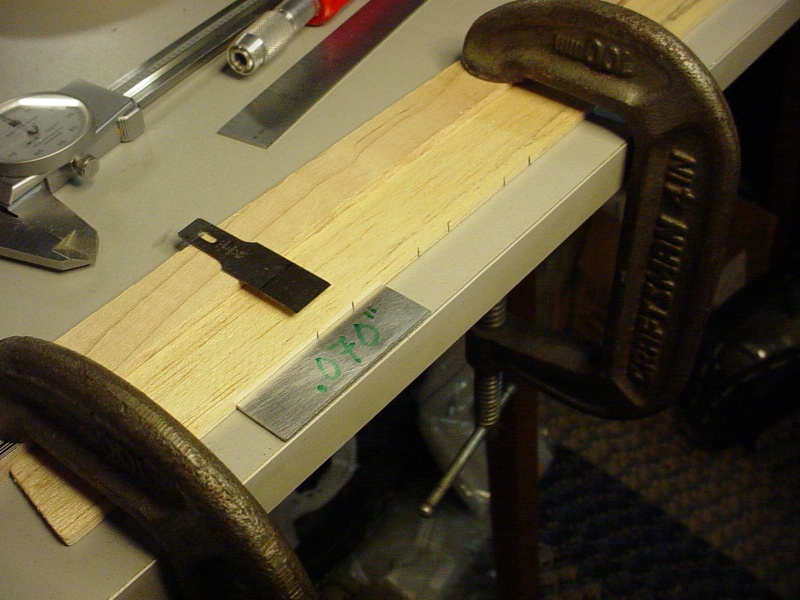
Those are cool tools. I cut my 1/2A hinge slots with an X-acto knife too.. and have been using Sig Easy-Hinges. I use the #17 chisel blade and a "step-plate" at the edge of a table-top. The #17 blade is 1/4"w. This photo shows a piece of 1/8" balsa. I find/make a small rectangular step-plate (approx. 1/2" x 2") from 1/16" thickness stock. Could be plywood, plastic/laminate or in my case I had .060" aluminum handy. I place it at the edge of a tabletop with the balsa behind it and sometimes a fence clamped behind the balsa. It gauges to the center perfectly and guides the blade into the edge squarely. The blade is positioned on the step-plate with the ground bevel on it's end, facing up. Working off the edge of a table keeps the knife's collet/handle from contacting the work. I use my left hand to firmly hold the work-piece down.. and my right hand for exerting firm finger-pressure on the blade, which holds it down and keeps it square. A careful rocking/pushing action into the wood takes just seconds to complete. The #17 blade is long-enough to make a deep slot.. and you can mark the blade for depth of cut too. Marking the "up" side of the blade also helps prevent from using the wrong side. You want to see the chisel's bevel facing up.. or else the slot will be off-center.
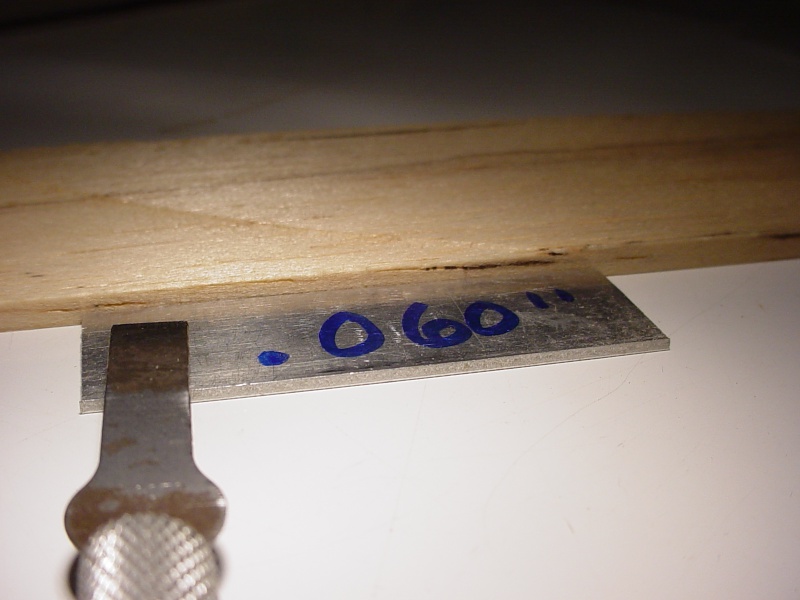
For comparison.. the #18 chisel blade is 1/2"w. and fits the larger collets/handles. 1/2" is much wider than I cut my hinges. I typically cut mine 1/4" to 5/16"w. x 1" long and round the edges like Mark does.
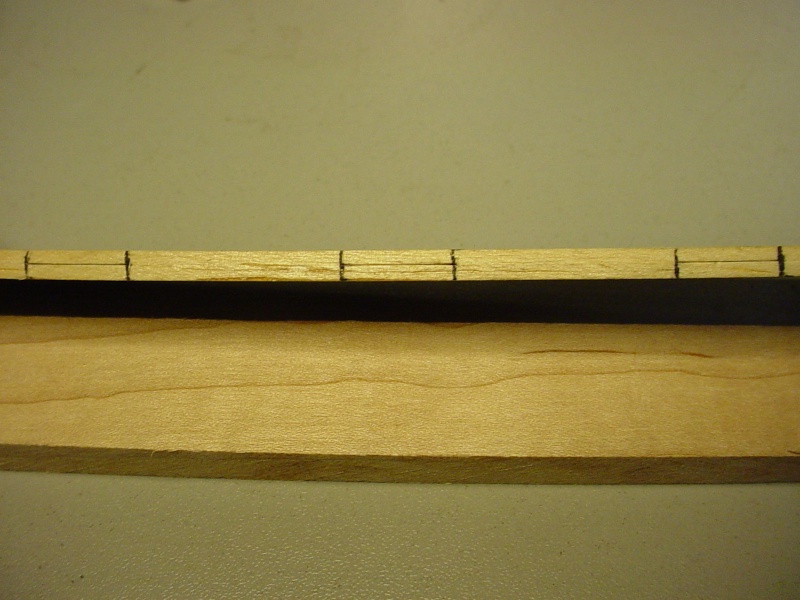
I just made this example with the wider #18 blade this morning. It took longer to post one pic than it did to cut three slots. I used a maple strip for a backing-fence.. C-clamped to the tabletop, which helps keep my concentration more on the hand doing the cutting. I had to shim-up my step-plate with tape on the bottom, to equal 1/2 the thickness of this particular piece of balsa stock. It's well worth the effort to make a good set-up. Most often.. a 1/16" thick plate is going to be perfect for 1/8" balsa.
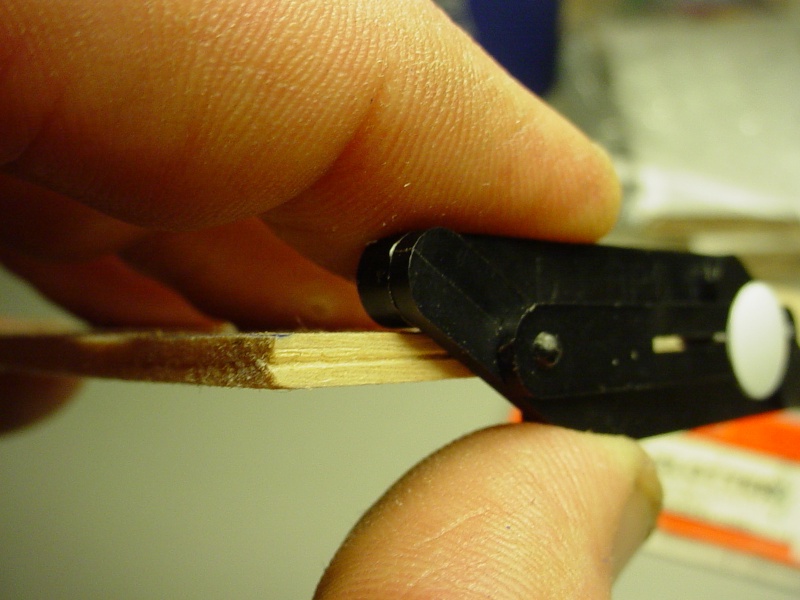
Just another way to do it.. I like Mark's Goldberg tool for tapering. The Dubro hinge-slotting tool can be used to scribe the center of an edge up to 1/2" thick. A thumbtack fits snug in the slot of either of the two slotted attachments.
This qualifies as "quick and dirty" I think.


I've wanted to make a V-angle sanding block for tapering. My thoughts are using two 36" lengths of 3/4" light-gage aluminum angle-stock with abrasive paper on the outside face(s). The pair would fit (angles facing up) into a 36" long groove/slot cut in a board with end-blocks to keep them from sliding. A slot would support the whole length of the angle-stock. The outside of the angles can be shimmed-up with blocks, to establish the taper you desire.
For comparison.. the #18 chisel blade is 1/2"w. and fits the larger collets/handles. 1/2" is much wider than I cut my hinges. I typically cut mine 1/4" to 5/16"w. x 1" long and round the edges like Mark does.
I just made this example with the wider #18 blade this morning. It took longer to post one pic than it did to cut three slots. I used a maple strip for a backing-fence.. C-clamped to the tabletop, which helps keep my concentration more on the hand doing the cutting. I had to shim-up my step-plate with tape on the bottom, to equal 1/2 the thickness of this particular piece of balsa stock. It's well worth the effort to make a good set-up. Most often.. a 1/16" thick plate is going to be perfect for 1/8" balsa.
Just another way to do it.. I like Mark's Goldberg tool for tapering. The Dubro hinge-slotting tool can be used to scribe the center of an edge up to 1/2" thick. A thumbtack fits snug in the slot of either of the two slotted attachments.
This qualifies as "quick and dirty" I think.
I've wanted to make a V-angle sanding block for tapering. My thoughts are using two 36" lengths of 3/4" light-gage aluminum angle-stock with abrasive paper on the outside face(s). The pair would fit (angles facing up) into a 36" long groove/slot cut in a board with end-blocks to keep them from sliding. A slot would support the whole length of the angle-stock. The outside of the angles can be shimmed-up with blocks, to establish the taper you desire.

roddie- Top Poster
- Posts : 8233
Join date : 2013-07-17
Age : 64
Location : N. Smithfield, Rhode Island -

Re: A Quick and Dirty CA Hinge Installation
![]() fredvon4 Mon Feb 15, 2016 2:54 pm
fredvon4 Mon Feb 15, 2016 2:54 pm
Just a note to say....CA hinges are NOT the best way for Control line models as they are way too stiff
I admit I like them for servo controlled surfaces but prefer MUCH loser hinges for CL models....favoring sewn or pre-made barrel hinges... I even make my own barrel hinges frequently from CF rod and CF tube but it is an acquired technique
and the tried and true method of a brass / aluminium tube with piano wire pin works well with zero stiffness
OTOH this set of posts are excellent ways to locate and use the danged things
again not Poo Pooing the methods of using the CA hinges....just that they are usually too stiff for 1/2a use IMO

fredvon4- Top Poster
-
Posts : 4001
Join date : 2011-08-26
Age : 68
Location : Lampasas Texas
Re: A Quick and Dirty CA Hinge Installation
![]() roddie Mon Feb 15, 2016 6:03 pm
roddie Mon Feb 15, 2016 6:03 pm
I agree Fred. I used to use the small Dubro pinned-hinges.. but they took a lot of time and care not to break-through a 1/8" thick control surface using their hinge-slotting tool and wood pick. They do however permit the elevator/flap (sans linkage) to deflect downward with gravity alone. A CA hinge is not going to do that. As I mentioned for 1/2A size airplanes.. I cut the CA hinges to about 1/4" width.. and I'm careful not to use more than needed to get the job done. They're QUICK.. when compared to most other methods of hinging. I need all the help I can get when it comes to cutting down on building time! 
roddie- Top Poster
- Posts : 8233
Join date : 2013-07-17
Age : 64
Location : N. Smithfield, Rhode Island -
Re: A Quick and Dirty CA Hinge Installation
![]() fredvon4 Tue Feb 16, 2016 9:07 am
fredvon4 Tue Feb 16, 2016 9:07 am
Roddie said "I need all the help I can get when it comes to cutting down on building time! Laughing
"
could not agree more...been working off and on with 5 simultaneous builds since last September and just now starting the covering
My production line method did not work out as planned
I must have missed the cut down to smaller (reading too fast some days.) but I can see where that technique would work fine for many 1/2a models with the CA hinges
fredvon4- Top Poster
-
Posts : 4001
Join date : 2011-08-26
Age : 68
Location : Lampasas Texas
CA Hinges
![]() musman69 Thu Dec 16, 2021 1:17 pm
musman69 Thu Dec 16, 2021 1:17 pm
Thanks Mark, just in time for the Flite Streak FredVon sold me.
Randy
Randy

musman69- Moderate Poster

- Posts : 19
Join date : 2021-11-17
Age : 70
Location : Rosharon TX
Re: A Quick and Dirty CA Hinge Installation
![]() Woody Thu Apr 28, 2022 1:32 am
Woody Thu Apr 28, 2022 1:32 am
Thanks Mark.
Excellent Vid!!
We all have our preferences and I fight shy of the CA hinge as they can be a little stiff if the glueing is over done.
For 1/2A control line and similar small models I prefer the very old fashioned method.
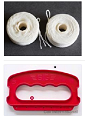
In the old kits decades ago we used to get a 1/2" strip of cotton banding which we had to cut to 1" lengths and to use circa three pairs of hinges for each half of the elevator.
The pieces were glued on with balsa cement so one hinge would be made thus......
Cement one half of the hinge to the top of the elevator stab.
Feed it underneath the hinge line and glue the other half to the elevator.
Cement the other half of the hinge to the bottom of the elevator stab, feed it through the hinge line and cement to the top of the elevator and adjacent to the first half of the hinge.
When all hinges are in place, rub balsa cement over them with the finger to seal them.
Wait 5 minutes and enjoy chewing the balsa cement off the fingers and spitting it off!!!
Remember that boys????.......Oh what fun.
I do not think we can get that tape any more so I use 1/4" strips of kite nylon which is super strong.
These hinges allow the elevator to drop by gravity and it will bend 180 degrees back on itself either way.
Super free movement.
But I am an oldie and set in my ways by these old methods.
Excellent Vid!!
We all have our preferences and I fight shy of the CA hinge as they can be a little stiff if the glueing is over done.
For 1/2A control line and similar small models I prefer the very old fashioned method.
In the old kits decades ago we used to get a 1/2" strip of cotton banding which we had to cut to 1" lengths and to use circa three pairs of hinges for each half of the elevator.
The pieces were glued on with balsa cement so one hinge would be made thus......
Cement one half of the hinge to the top of the elevator stab.
Feed it underneath the hinge line and glue the other half to the elevator.
Cement the other half of the hinge to the bottom of the elevator stab, feed it through the hinge line and cement to the top of the elevator and adjacent to the first half of the hinge.
When all hinges are in place, rub balsa cement over them with the finger to seal them.
Wait 5 minutes and enjoy chewing the balsa cement off the fingers and spitting it off!!!
Remember that boys????.......Oh what fun.
I do not think we can get that tape any more so I use 1/4" strips of kite nylon which is super strong.
These hinges allow the elevator to drop by gravity and it will bend 180 degrees back on itself either way.
Super free movement.
But I am an oldie and set in my ways by these old methods.

Woody- Gold Member
- Posts : 133
Join date : 2022-04-20
Re: A Quick and Dirty CA Hinge Installation
![]() 706jim Thu Apr 28, 2022 10:25 am
706jim Thu Apr 28, 2022 10:25 am
I used CA hinges only once and don't care for them. I prefer pinned hinges and I glue them in place with white glue. Should any glue get into the hinge line it easily breaks away when the hinge is flexed. I've never had one come loose.
I usually remove the factory pin and replace it with a thin piano wire that goes through all of them.
This facilitates repair or recovering should you ever have a crash.
I usually remove the factory pin and replace it with a thin piano wire that goes through all of them.
This facilitates repair or recovering should you ever have a crash.

706jim- Gold Member
- Posts : 458
Join date : 2013-11-29
Re: A Quick and Dirty CA Hinge Installation
![]() TD ABUSER Fri Feb 24, 2023 8:05 pm
TD ABUSER Fri Feb 24, 2023 8:05 pm
Some CA hinges are garbage...the ones that have the fuzzy outer layer seperate from the inner smooth layer delaminate. These are the ones that need to be pinned.
Another problem is using too much CA..then having the hinge material get brittle and fail.
If I'm building a .40 sized rocket...then pinning is a must..but I pin these hinges for 1/2A flight loads mainly due to paranoia and the fact that pinning is easy to do.
I probably pinned these hinges.....but I'm not sure...
https://youtu.be/lcRfpaS7rdE
TD ABUSER- Gold Member
- Posts : 179
Join date : 2020-11-01
Age : 68
Location : Washington
Re: A Quick and Dirty CA Hinge Installation
![]() andrew Sat Feb 25, 2023 10:08 am
andrew Sat Feb 25, 2023 10:08 am
I confess, I like the CA hinges, but have had some break after extensive use.
My approach:
1. Slot the surface and drill a hole centered where the hinge will be inserted.
2. Insert the hinge, but don't drill it. Add CA to the hole; with the hinge intact, CA will wick out from the center to the edges, but not to the hinge line. Add CA to both sides.
3. Once cured, now drill through the hinge and pin. (toothpick or bamboo skewer)

andrew- Diamond Member
- Posts : 1813
Join date : 2011-08-11
Age : 76
Location : Western Kentucky -
» The Dirty Duo
» FF trim tab 'hinge'
» Canadian Variant P-51 Build
» No good,,dirty,,rotten!!!!!!
» TD 51 RC Carb Installation?
» FF trim tab 'hinge'
» Canadian Variant P-51 Build
» No good,,dirty,,rotten!!!!!!
» TD 51 RC Carb Installation?
Page 1 of 1
Permissions in this forum:
You cannot reply to topics in this forum