

 Rules
Rules
by Greenman38633 Today at 5:02 pm
» World's largest weathervane
by Cox International Today at 3:38 pm
» My Cox .049 Marine inboard engine
by 1/2A Nut Today at 2:42 pm
» A prototype Cox Reed-valve marine engine
by F4D Phantom II Today at 2:22 pm
» Help Pee Wee tank cap .020
by rdw777 Today at 1:30 pm
» **VOTE-ON-THE-NEXT-COX-ENGINE-OF-THE-MONTH** (May 2024)
by GallopingGhostler Today at 11:34 am
» Jim Walker Firebaby
by rdw777 Today at 10:32 am
» Here we go again... another Lawn-Boy
by rdw777 Today at 9:17 am
» Revivng Some Childhood Classics
by getback Today at 8:21 am
» Roddie-Rigger.. a 2005 original design
by getback Today at 6:31 am
» Jim Walkers FireBee - This is going to be fun
by rsv1cox Yesterday at 7:29 am
» Post your Older books
by rsv1cox Mon May 06, 2024 7:51 pm


Enya 06 11 Stunter glow engine crank/prop nut help.

 Enya 06 11 Stunter glow engine crank/prop nut help.
![]() Coxfledgling Sat Sep 04, 2021 7:20 am
Coxfledgling Sat Sep 04, 2021 7:20 am
As said it's an Enya 06 11 ( mark 2? ) Glow Stunter motor having a slotted alloy head that the glow plug screws into, both beam and 3 holed radial mount. The c/case round end cover is held on via 2 screws and the alloy carb unit, solid Venturi and brass spray bar/ needle assembly, is held onto a rectangular flat faced area on the c/case snout via 2 vertical screws.
I am missing the crank/prop nut.
It seems to be 5mm dia. by 0.9 pitch ?
Does this sound right for this 06 engine please ?
My measurements are quite accurate.
Can you confirm please, then I can enquire with the UK stockists for Enya parts, who do not have any info on this smallish engine.
Thanks in advance, rich.
Ps might you have an RC carb and/or picture of an RC carb for this near new motor ?
Thanks...

Coxfledgling- Gold Member

- Posts : 375
Join date : 2021-01-10
Location : Near Caernarfon, Snowdonia, Wales, UK
Re: Enya 06 11 Stunter glow engine crank/prop nut help.
![]() sosam117 Sat Sep 04, 2021 10:37 am
sosam117 Sat Sep 04, 2021 10:37 am
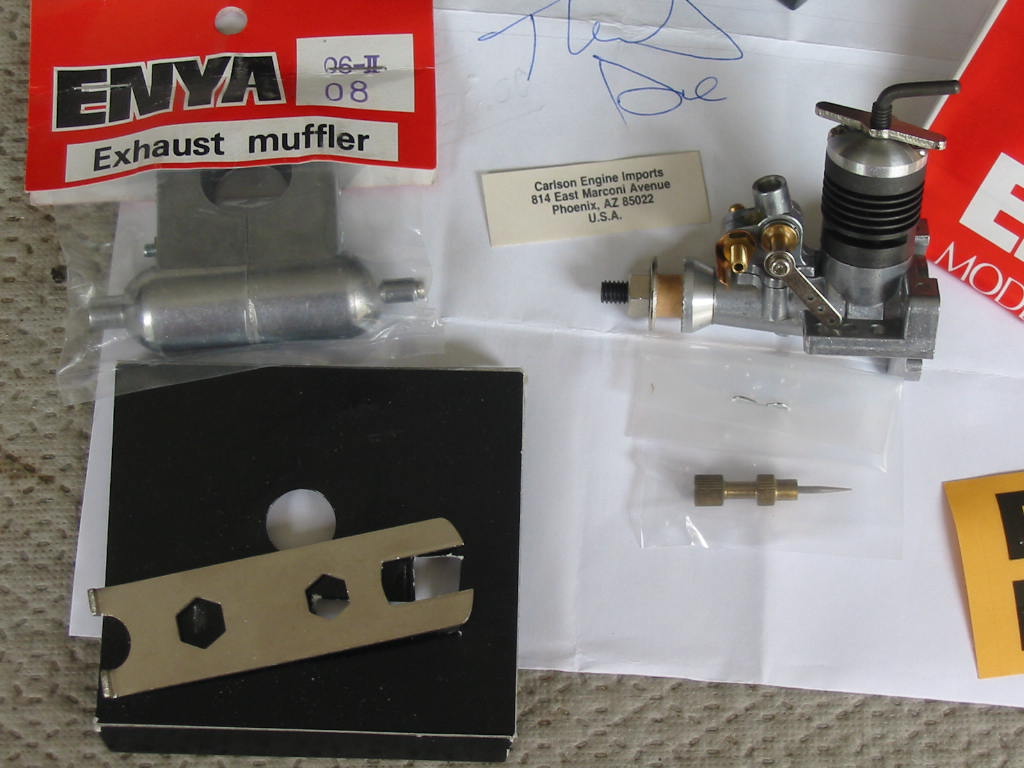
For your Enya .06-II glow engine parts you are missing, here is the part numbers:
Prop nut --- 09214 (M5 x P0.9)
Prop washer --- 06205
http://www.enya-engine.com/store156C_1/index.php?main_page=product_info&cPath=3_25_36&products_id=499
Here is Ken Enya's email address:
sales@enya-engines.com
You can get the parts from Ken Enya direct.
He does take PayPal. Just put *** Attention Parts Order *** in the subject line so Ken knows that you want to order parts.
If you have the part numbers it is helpful for Ken to get the correct parts for your engine.
If you do not have the part numbers, then sending an attached photo of the part from the bad engine will help.
As for accessories for your engine:
Throttle Valve (T.V. -- R/C carburetor), the part number is for your Enya .06-II is 06216
Muffler part number: M063
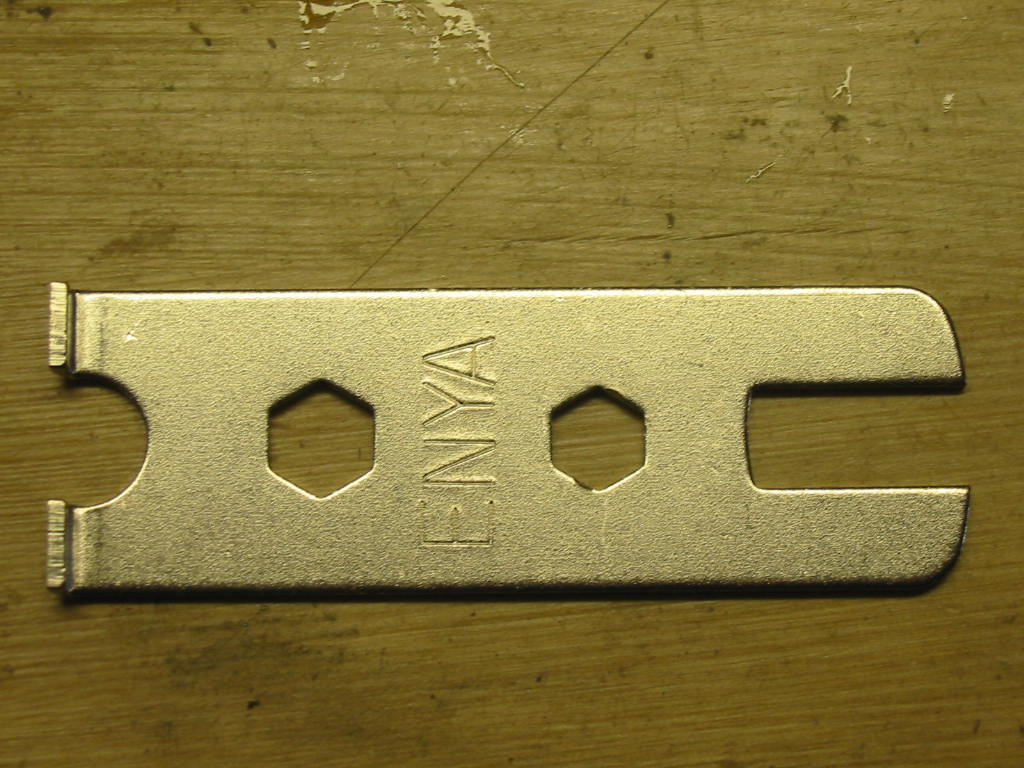
Engine wrench for your .06-II engine WRE00
Here is a list of parts and part numbers for your engine "if" you need them?
Enya .06-II parts and prices ( as of 01/05/21 -- dd/mm/yr)
description part # cost(yen)
propeller nut ----------- 09214 ---100
propeller washer -------- 06205 ---100
drive washer ----------- 06203 ---250
crankshaft --- none available
crankcase ---------------- 06201 ---1300
carburetor gasket -------06214 ---100
carburetor assy. (T.V.) ---06216 ---2,050
throttle lever -----------06216D ---150
spring setting nut 4mm -06211D ---150
needle setting spring ----06211C ---165
needle valve -------------06211B ---385
needle valve assy. --------06211 ---770
back plate gasket --------06212 ---100
back plate ----------??? ---0
cylinder head ------------06207 ---400
cylinder head (Diesel) -------??? ---0
Diesel Compression adjustment screw ---06D208 ---330
Locking handle --------06D208A ---200
normal muffler -----------M063 ---2,255
wrench for 049-10 --------WRE ---300
Back plate/carburetor screws --06215A ---50
By the way it is nice to have the wrench because it tightens/loosens the prop nut.
It also is good to tighten/loosen the glow plug and tighten/ loosen the cylinder head.
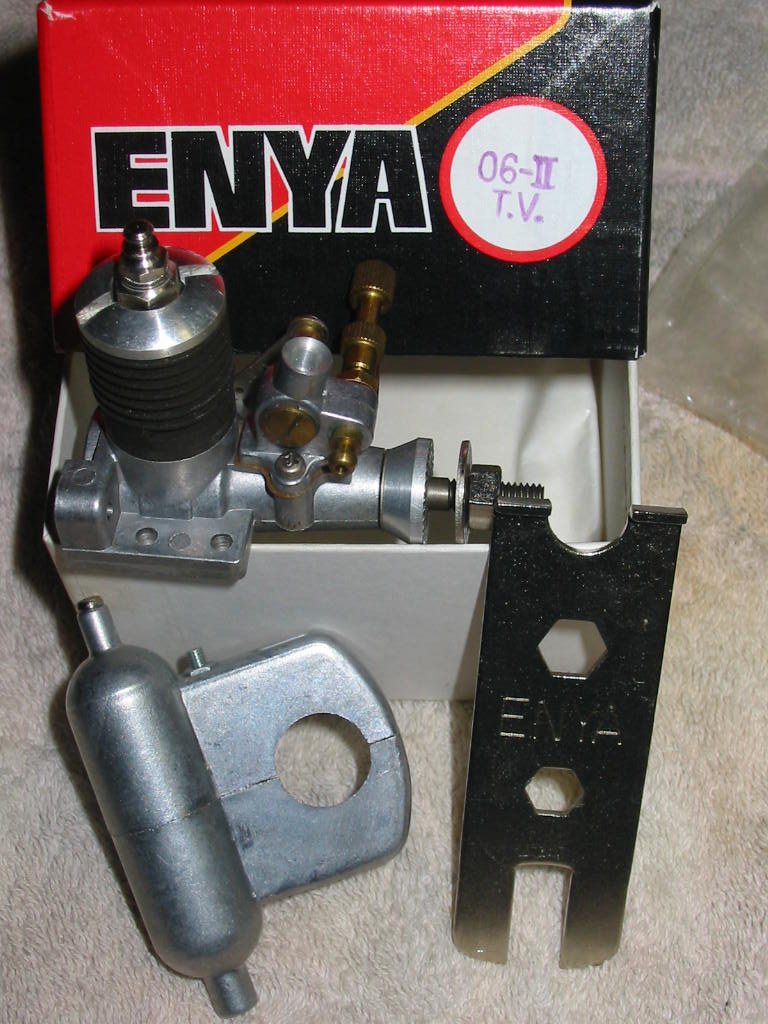
Here are the photos you want of the T.V. (R/C carburetor) then the muffler and last is the wrench.

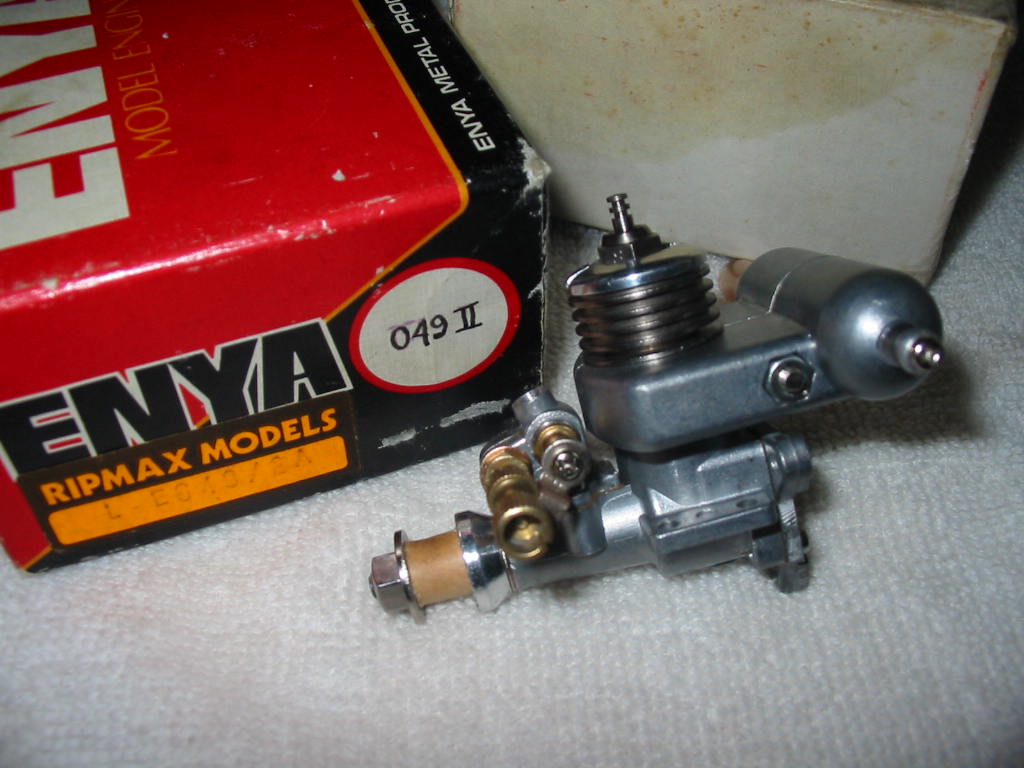
Here is one of many of the small Enya .06-II that I have besides the .049, the .08, and the .10 Enya.
Enya .049-II --- purchased years ago in 1989 from Ripmax and shipped to the USA
Enya .06D-II (diesel)
Enya .08
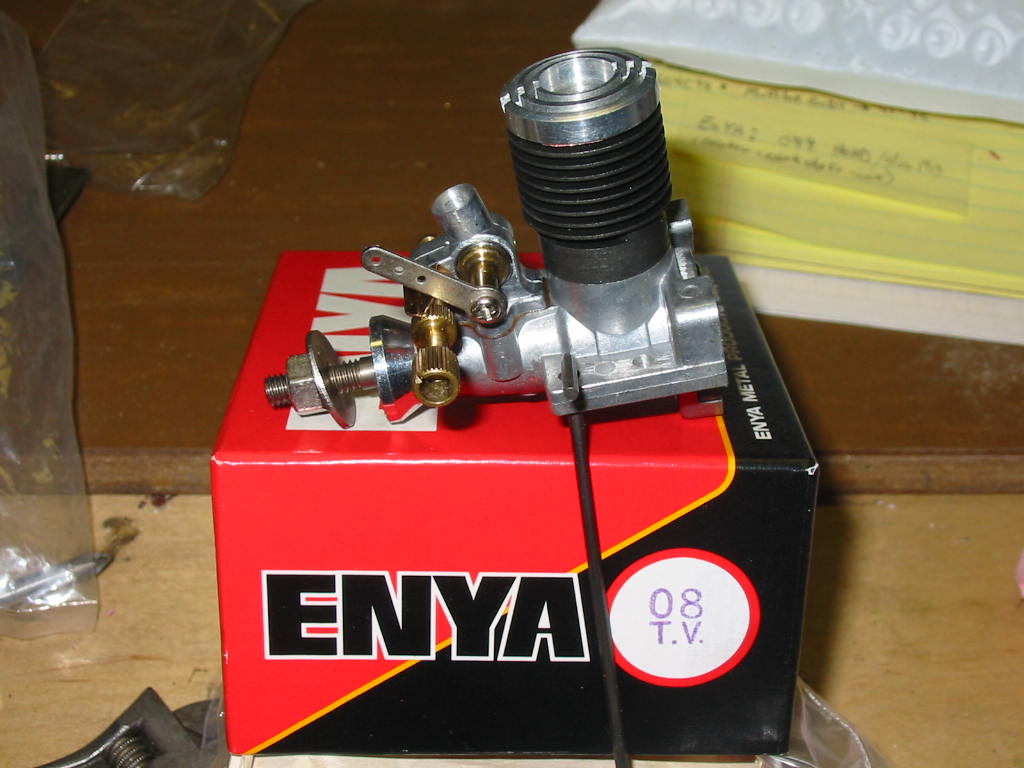
and Enya .10

I have all versions (reed, and front induction #1 and #2) and series (#1, #2, #3, and #4) of the Enya .049, .06, .08, and .10
Totaling about 189 engines. (collected)
An the instructions (translated) for the T.V. carburetor

1) ス ロ ー ス ピ ー ド 時 の エ ヤ ー 孔 巾 約 mm に セ ッ ト す る
Set the air hole width at slow speed to approximately 1 mm
2) 全 開 時
When fully opened
3) ハ イ
High
4) ス ロ-
Slow (throw)
5) ネ ジ を ゆ る め て レ バ い づ れ に も を 上 か え ら れ る 。
Unscrew the screw to lift the lever.
6) 後 方
Back
7) ス ロ ー
Slow (throw)
8.) レ バ ー が 下 向 き の 場 合 は 与 型 に 曲 げ る
If the lever is facing down, bend it into a “Y” form
9) ハ イ
High
10) 両 方 の 燃 料 孔 が 合 う 位 置 に ス プ レ ー バ ー を 組 立 て る こ と 。
Assemble the spray bar at the place where both fuel holes fit.
11) 燃 料 孔 は 前 向 き
Fuel hole facing forward
12) 前 方
Front
13) マ ー ク は 10 用
Mark is for 10
14) マ ー ク は 08 用
The mark is for 08
15) ノ ー マ ー ク は 06-06D 用
No mark is for 06-06D
16) 049 用 は 小 型 で す 。
For 049 is a small type.
One more thing:
Make sure you use after run-in oil so your 4-piece piston stays free to rotate!
I have made a special tool to get access to the snap ring to remove it. (and It is not easy!)
This is where the Enya wrench comes in handy to remove the cylinder sleeve from the crankcase (with a little heat)
NEVER TRY TO REMOVE THE CYLINDER HEAD (WHERE THE GLOW PLUG SCREWS IN) BECAUSE ENYA USED A THREAD SEALANT ON THE THREADS AND WILL BE VERY HARD TO UNSCREW! (I know)
Engine I purchased where piston was stuck:

After cleaning the piston to where it would be free to rotate.

sosam117- Diamond Member

- Posts : 1292
Join date : 2016-03-23
Location : Suburb of Chicago, Illinois
Fledgling
![]() Coxfledgling Sat Sep 04, 2021 1:42 pm
Coxfledgling Sat Sep 04, 2021 1:42 pm
So my measurement was accurate.
An engine spanner came with it, it was in the box.
I will do some more research about the parts, I presume the guy is based in Japan.
I will be getting a jis screwdriver set ordered Monday so the small screws don't get damaged, I have been after them for some time now, they are on offer at the moment.
I don't think the engine has been run much as there is only slight combustion traces on the piston crown visible through the exhaust ports.
I will come back to this thread when I have got a nut at least.
I intend allowing the engine to soak in meths first to loosen it off, then rinse.
It clean outside but a little stiff being in storage in its box for a good twenty years, and sometime before that I suspect.
Do you happen to know if there is a shallow lube groove in the c/case snout for crank main bearing lube please ?
I assume the prop driver is on a taper ?
Over....
Coxfledgling- Gold Member
- Posts : 375
Join date : 2021-01-10
Location : Near Caernarfon, Snowdonia, Wales, UK
Re: Enya 06 11 Stunter glow engine crank/prop nut help.
![]() rsv1cox Sat Sep 04, 2021 2:17 pm
rsv1cox Sat Sep 04, 2021 2:17 pm

rsv1cox- Top Poster


Posts : 10605
Join date : 2014-08-18
Location : West Virginia
Disassembly of a Enya .06-II engine
![]() sosam117 Sun Sep 05, 2021 9:19 am
sosam117 Sun Sep 05, 2021 9:19 am
Good to see that you have ordered jis screwdriver set. Many people try to disassemble Enya engines with the wrong screwdrivers (Philips).
If the engine has been run at all or even from Enya mfg., the engine will be a little tight either by the caster oil from being run or the rust preventative oil from Enya.
I have soaked engines in Mineral Spirits and it has worked out well.
Also using some heat from a heat gun that I use to when covering an airplane works as well to loosen up stuck parts.
Now for the prop driver. It is not tapered but is keyed. Flats 180° from each other.
“IF” you are going to disassemble your Enya .06-II engine here are some photos to help you out.
I have had to learn the hard way of how to disassemble/re-assemble these engines.
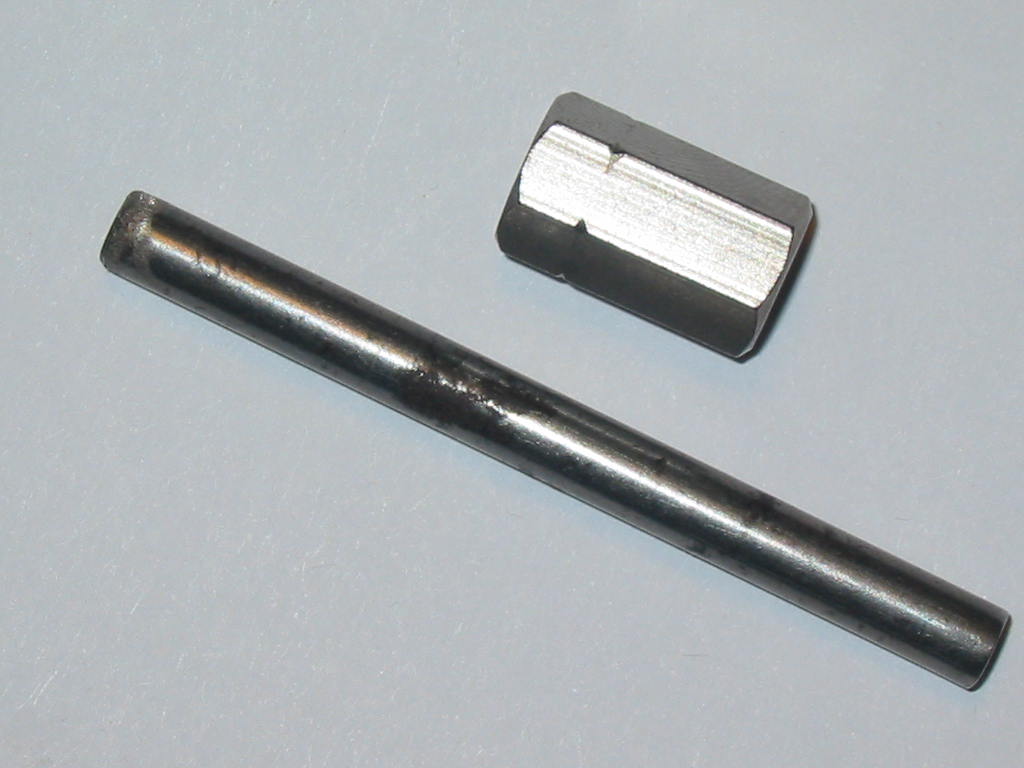
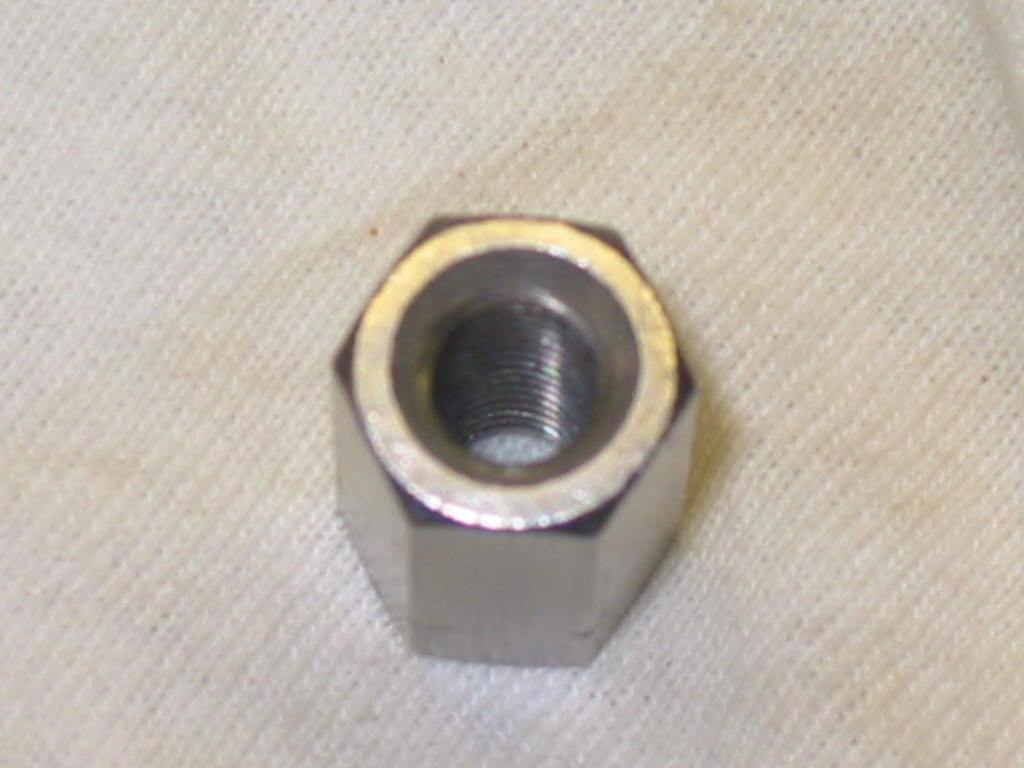
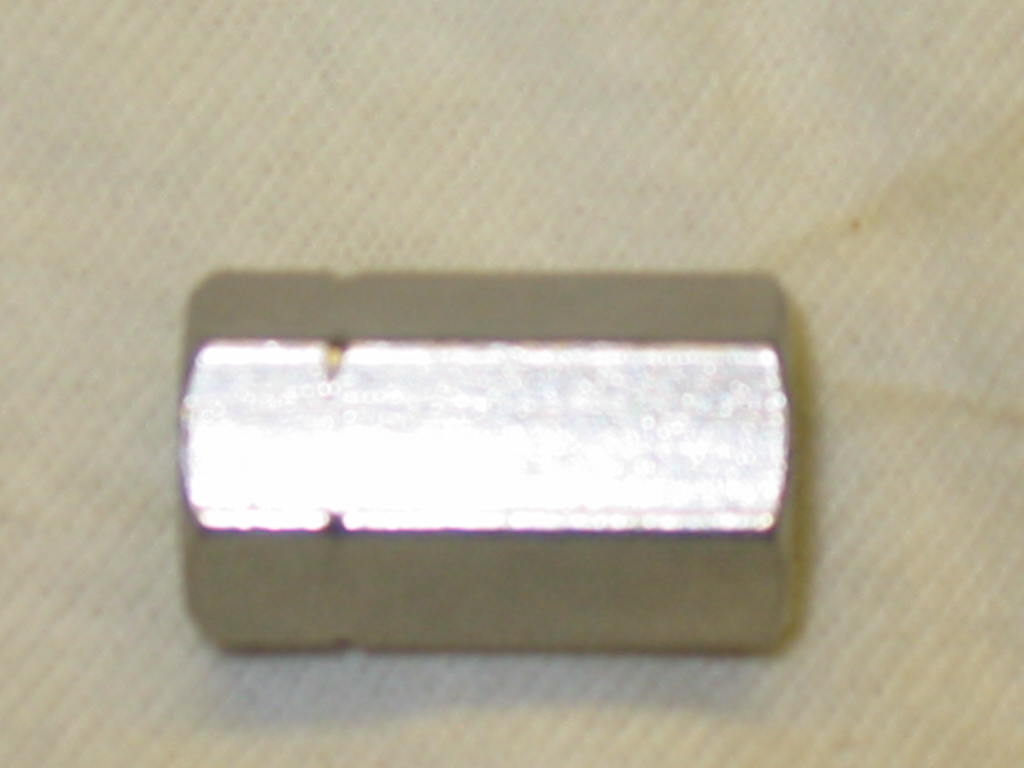
1.)Tools --- jis screwdrivers, 5.5mm x 45mm rod, 6.0mm i.d. x 1.0mm o.d. x 20mm long coupling.
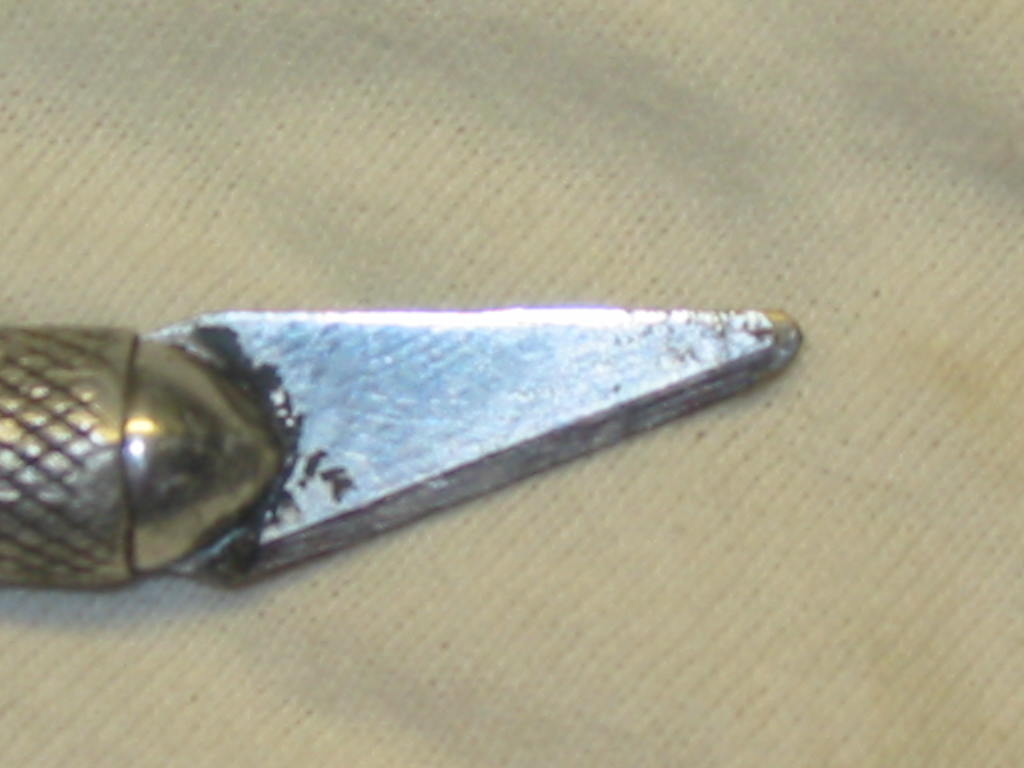
2.)Special ground (rounded tip) on an X-acto blade to help removal of C-clips on the T.V. (carb)
3.)Heat gun, machinist’s vice (will not clamp down hard on engine case!)
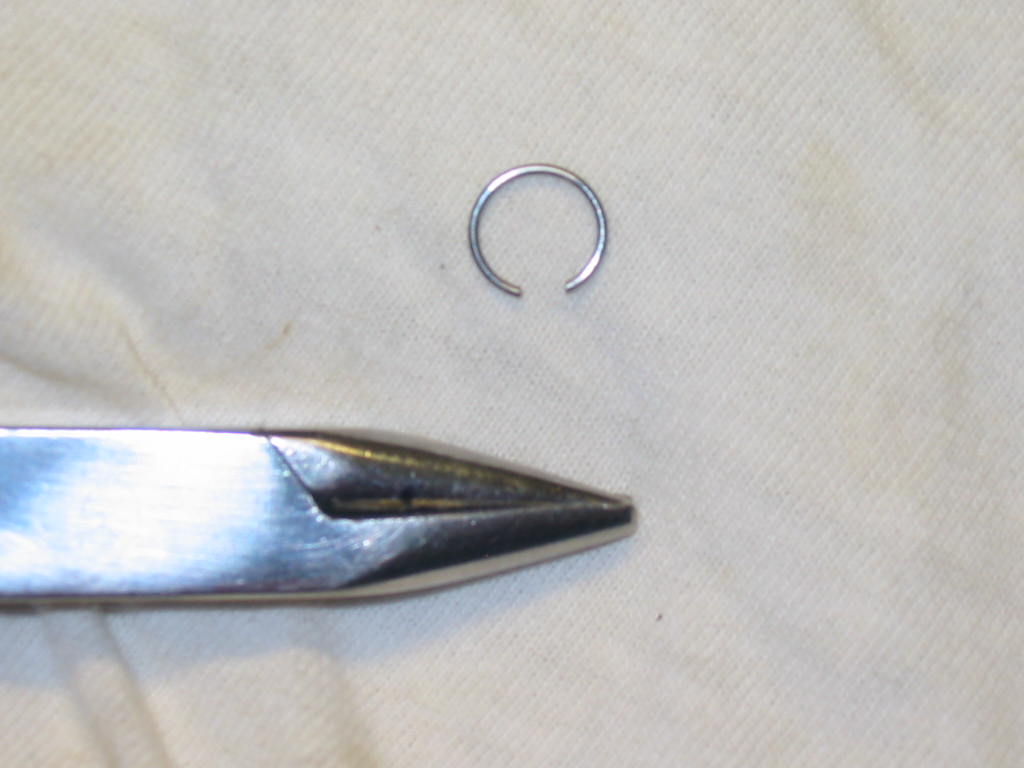
4.)Small brass hammer and Special ring (making) pliers?
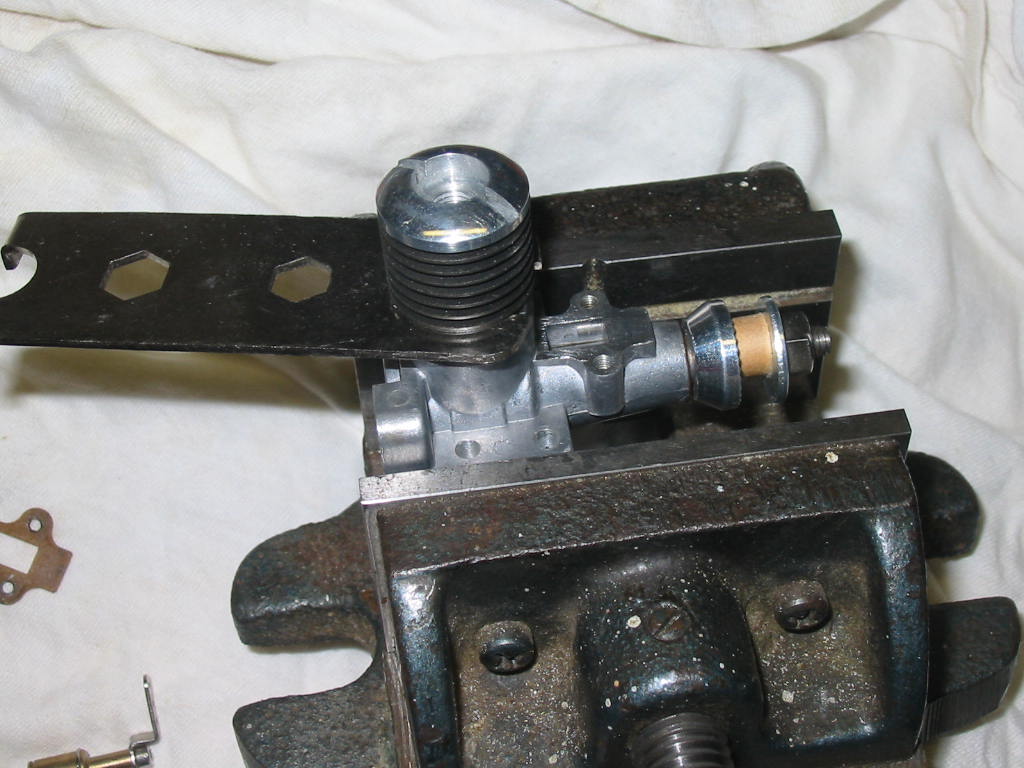
On to the engine:
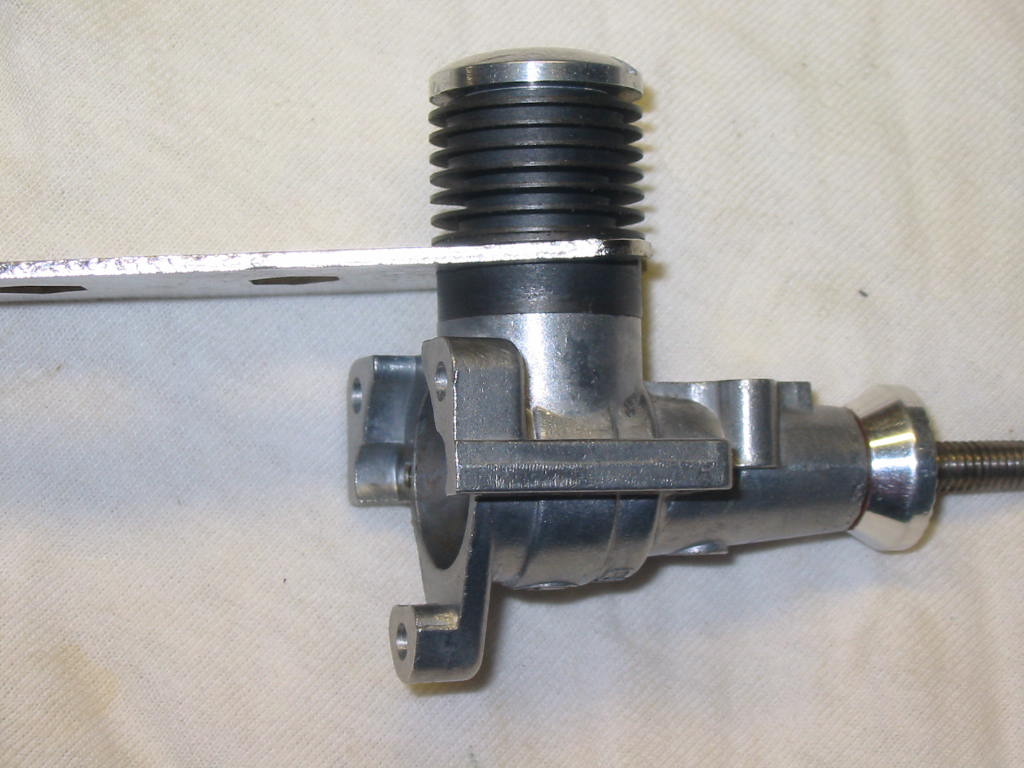
The photo here is an Enya .06-II Series #3 engine
(As you can see with the carb right up to the cylinder sleeve – no way to install a muffler)

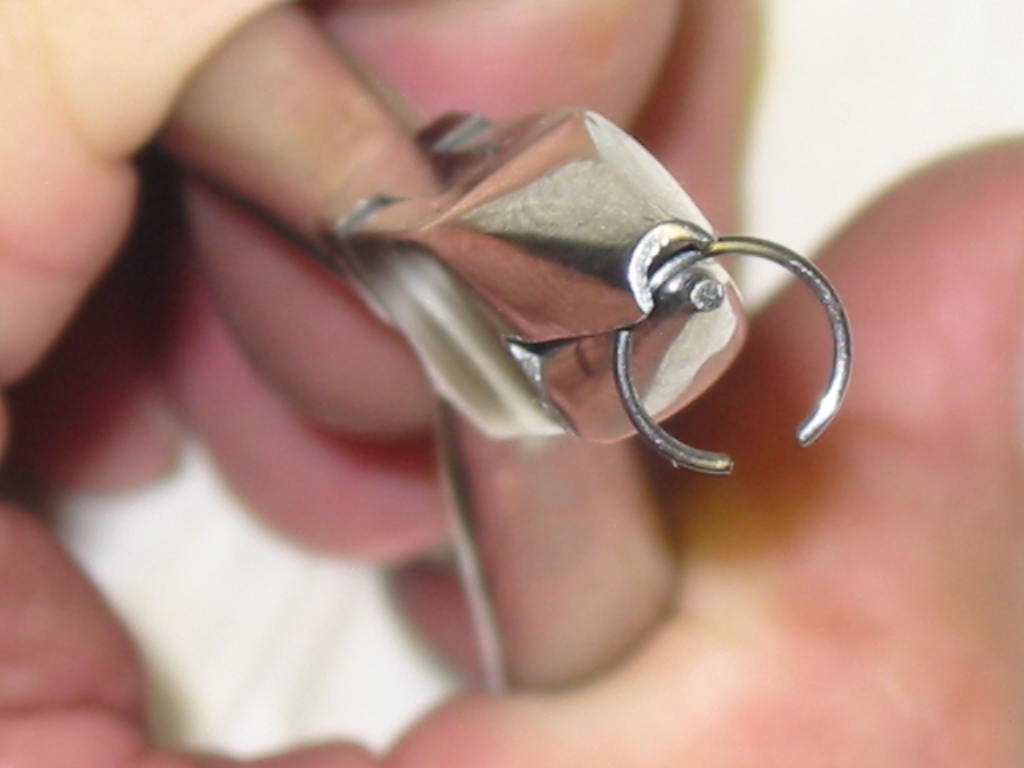
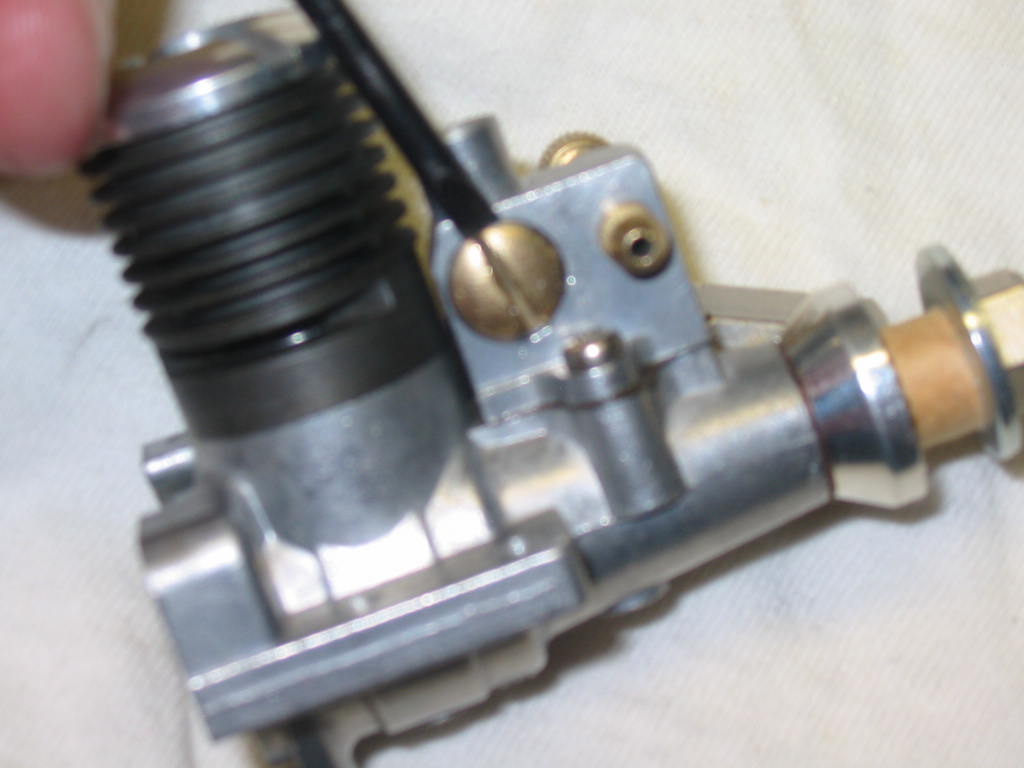
1.)First is to remove the T.V. C-clip using the modified X-acto knife blade.
Place your finger over the T.V. barrel so you don’t lose the C-clip, while carefully using the X-acto knife to remove the C-clip. If the clip runs around in the groove press down on the T.V. barrel to stop it from moving around. Just try to pry the one end of the clip to where it is out of the groove. The follow the clip the rest of the way around with the knife. All this while done carefully under your finger.
If you haven’t lost the C-clip we’ll move on to the next step.
If you have that is where the ring pliers come in to make a replacement.
One option you can try is to place the engine in a larger 2-gallon bag and try to remove the clip inside the bag.
If it does fly off, it should be somewhere in the bag?
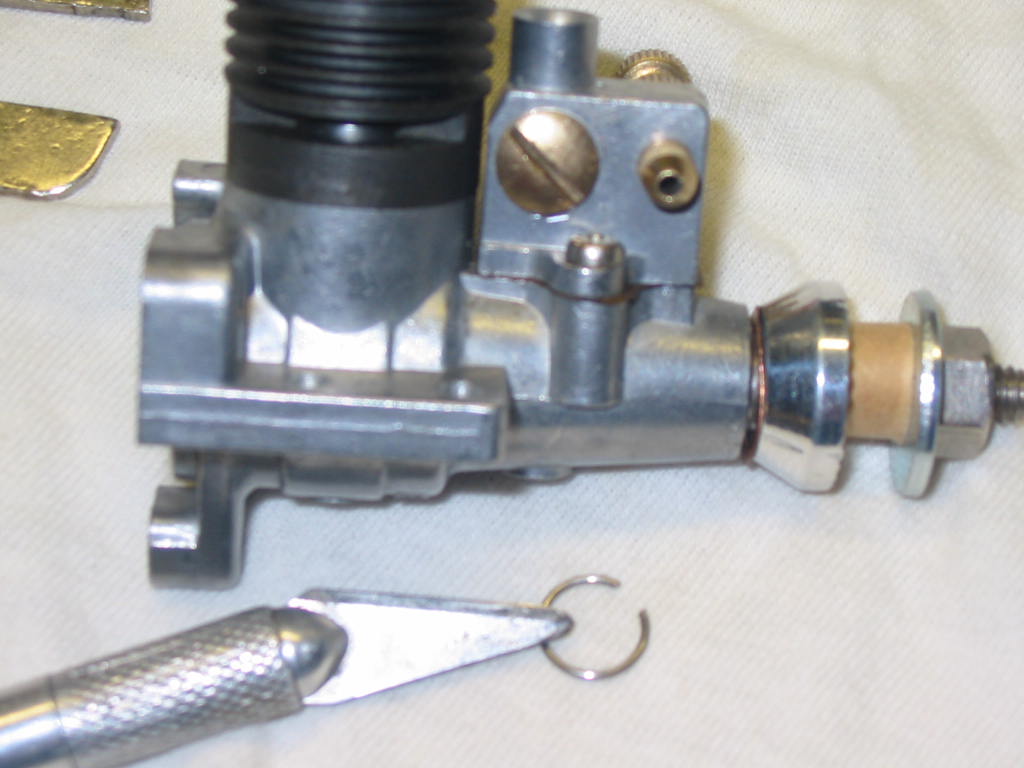
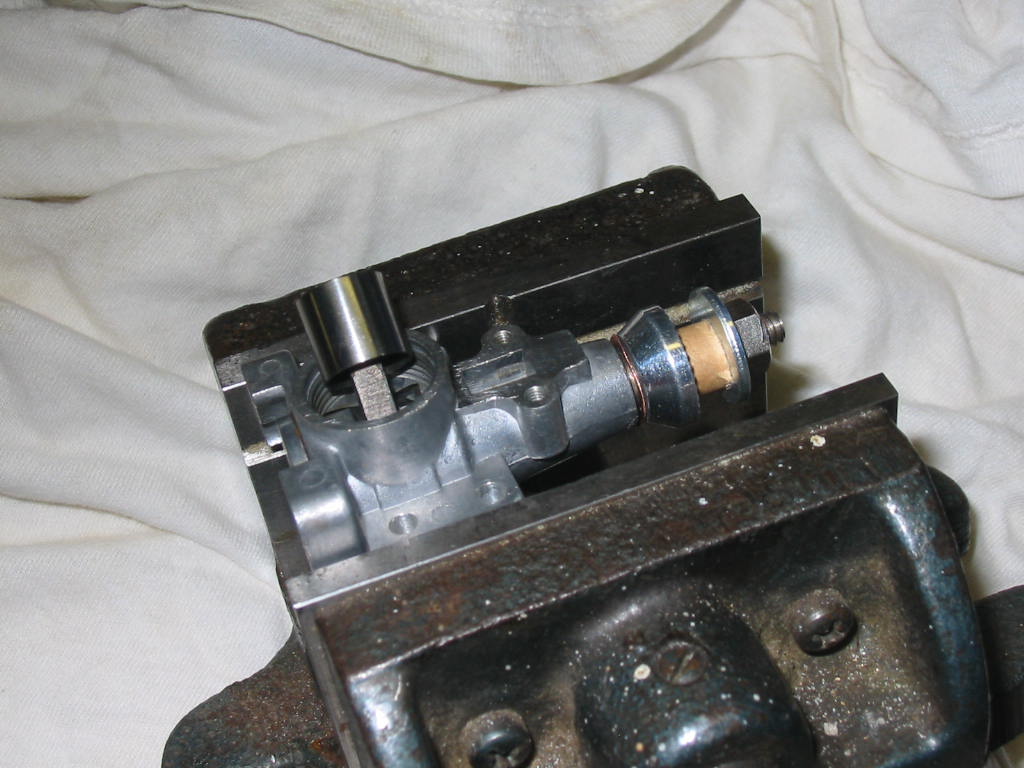
2.)Remove the T.V. barrel (drum)
3.)Remove the T.V. (carb) from the crankcase
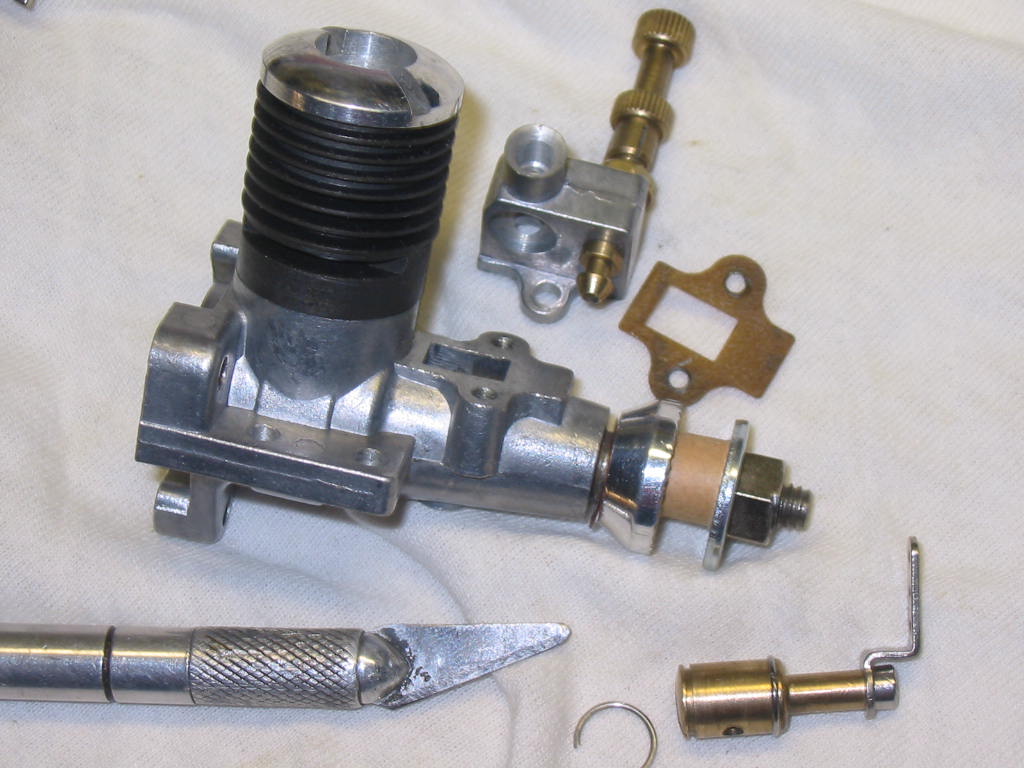
4.)Removal of the cylinder sleeve.
I have a machinist’s vice that has a groove in the upper part of the jaws that I rest the engine in.
The engine crankcase is not tightened in the jaws but is only resting in the groove in the jaws.
I do it this way so I have one had free to use the heat gun to expand the crankcase from the heat
To loosen up the cylinder sleeve for its removal.
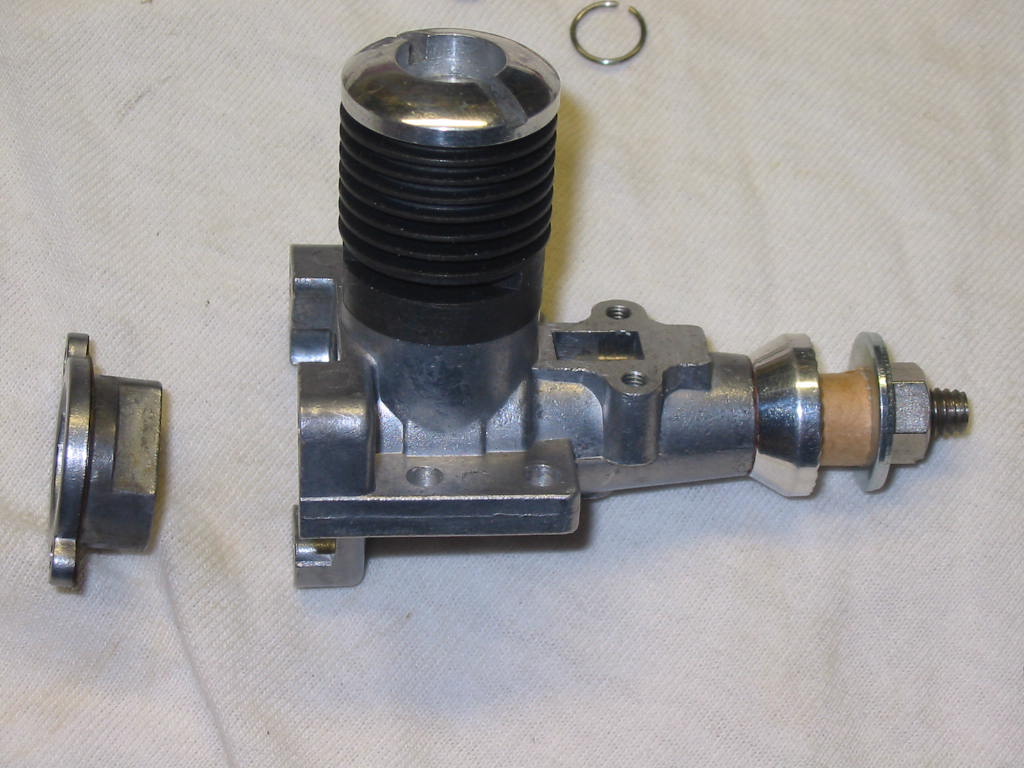
5.)Cylinder sleeve removed. This is a good time to see “if” the piston is free to spin, if not then the piston assembly is gummed up and needs to be toughly cleaned.
6.)Remove the back plate screws along with the back plate then the piston.

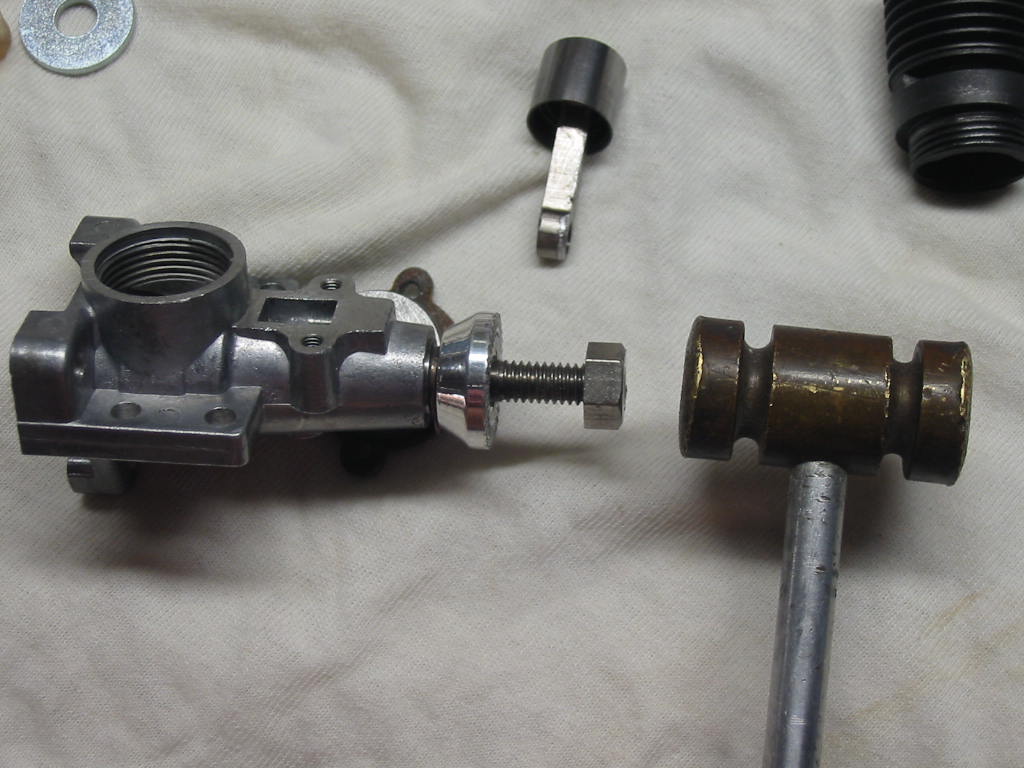
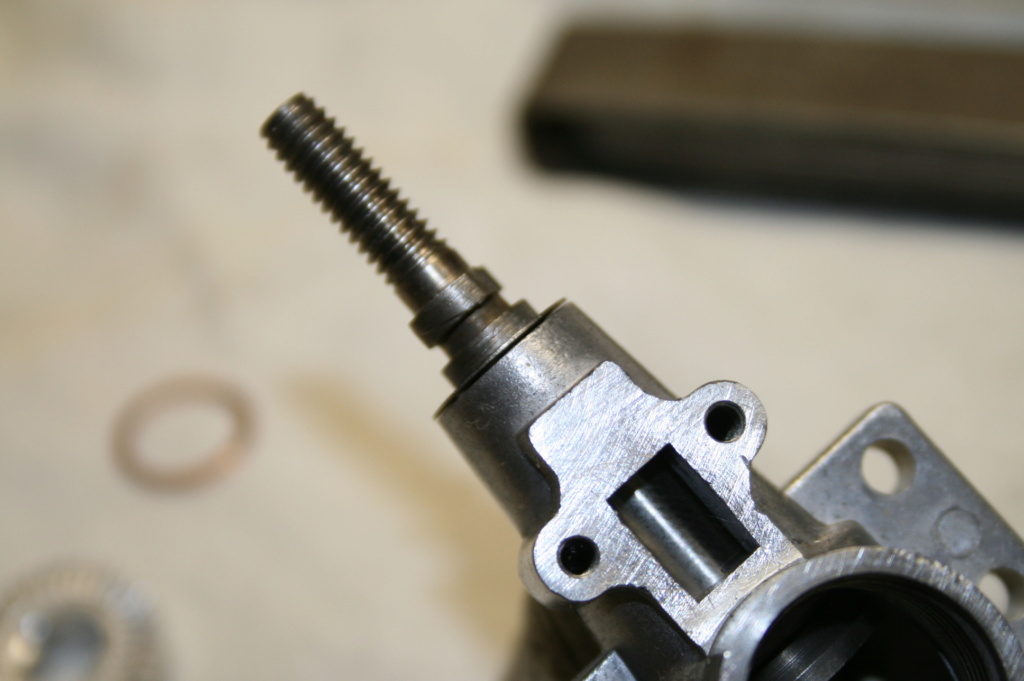
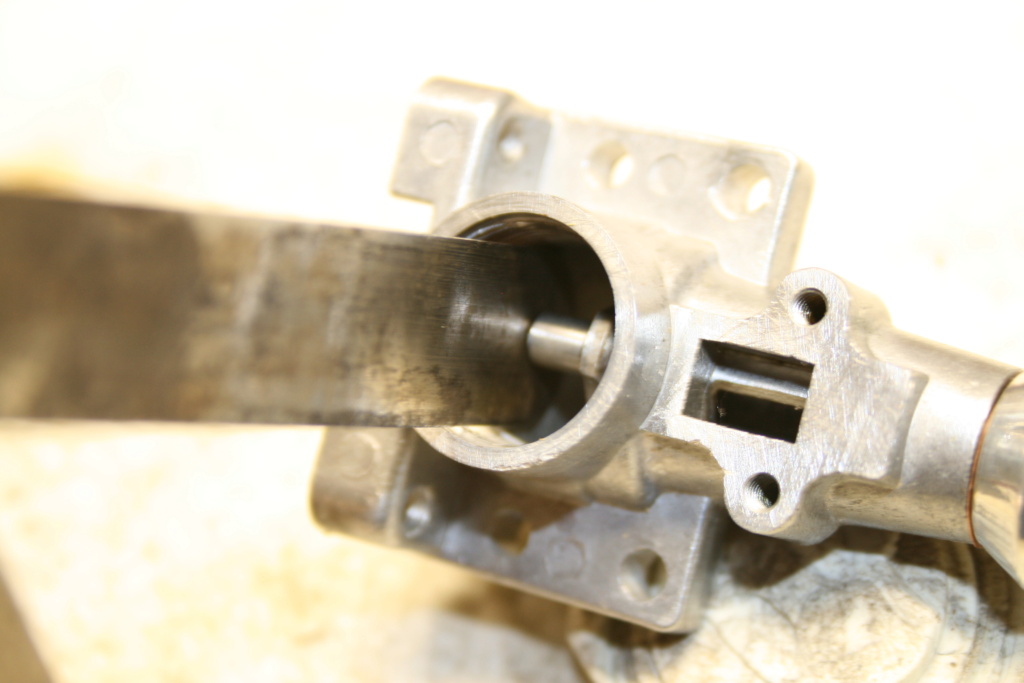
7.)Next is removal of the prop driver using a small brass hammer.
Screw the prop nut onto the prop shaft to where it is at the very end of the shaft.
Place the crankcase to where the crank shaft is facing up.
Now give the crank shaft light taps to remove the prop driver from the crankshaft.
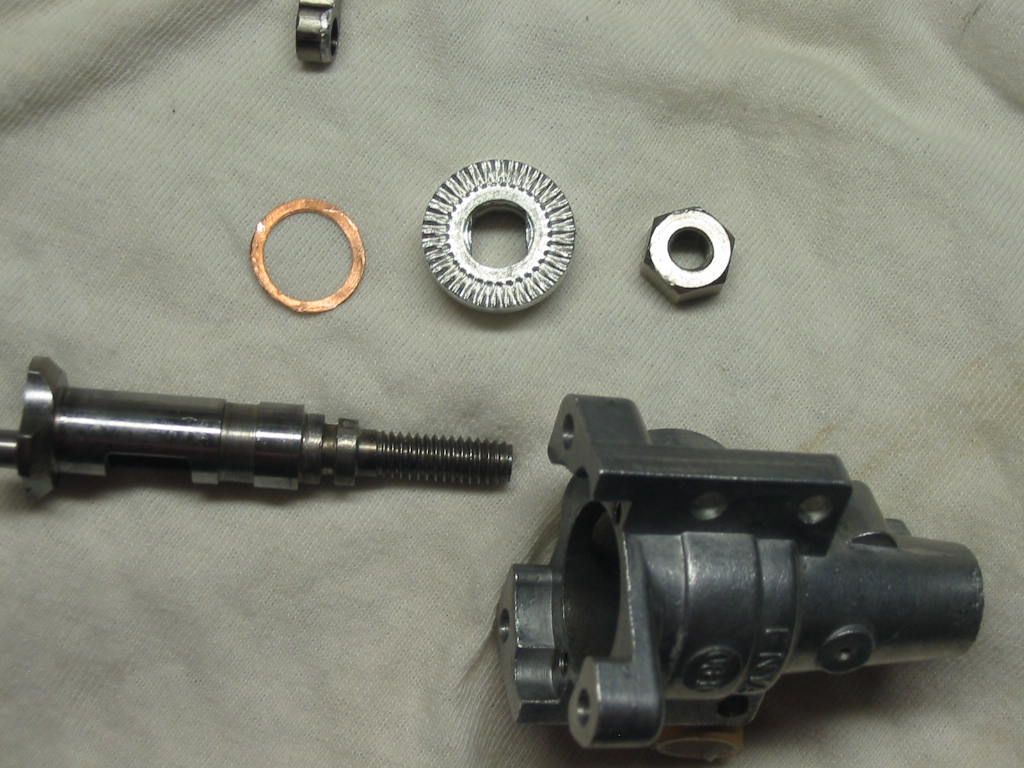
Remove the crankshaft from the crankcase housing.
As you can see, there is a relief area on the crankshaft for oil lubrication, similar to the Cox Baby Bee engines.
There is no bushing material, just the crankcase (again like the Cox Baby Bee engines.)


There you have it.
You have successfully disassembled your Enya .06-II engine for a good cleaning in an ultrasonic tank?
Now for the re-assembly:
Use light weight oil when you re-assemble your (any) engine and use new gaskets when possible.
I use Turbine lubricating oil made by Norvey, Inc. If you can’t get it After-run oil will work.
1.)Insert the crankshaft into the crankcase (you did give a light bit of oil?)
2.)Clamp your 5.5mm x 45mm rod into a vice.

3.)Next is to insert the 5.5mm rod into the hole in the crankshaft.
I reinstall the prop driver this way because I tried to use a prop and the threads on the crankshaft and tried to screw the prop driver (using the prop nut) onto the crankshaft but I broke off the threaded section of the crankshaft and lucky for me, I found a replacement crankshaft on an Australian auction site and bid on it. It was an Enya .06 engine for parts. No cylinder, piston assembly, back plate, and a modified crankcase housing (no back plate mounting holes (3) to a firewall.) ---junk.
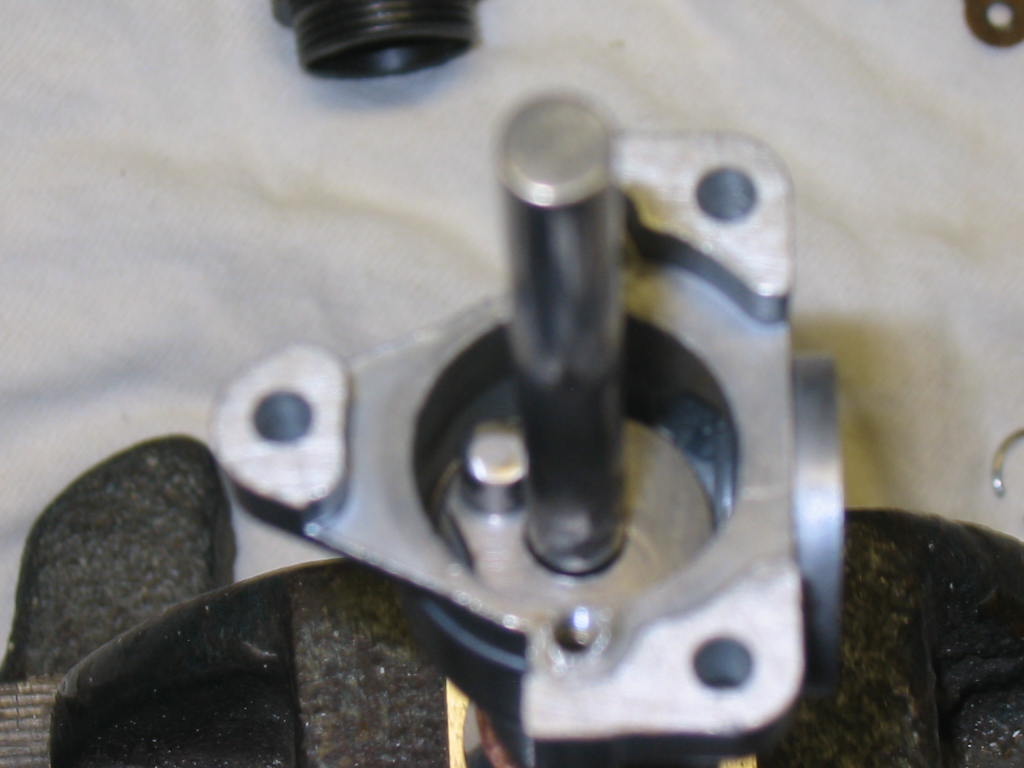
4.)With the crankshaft over the pin and the crankcase housing over the crankshaft, install the thrust washer (if it had one?) then the prop driver. Try to line up the flat spots on the prop driver to the flat spots on the crankshaft. It should start onto the crankshaft, if not turn the prop driver 180° and try again. It should start a little on the crankshaft?
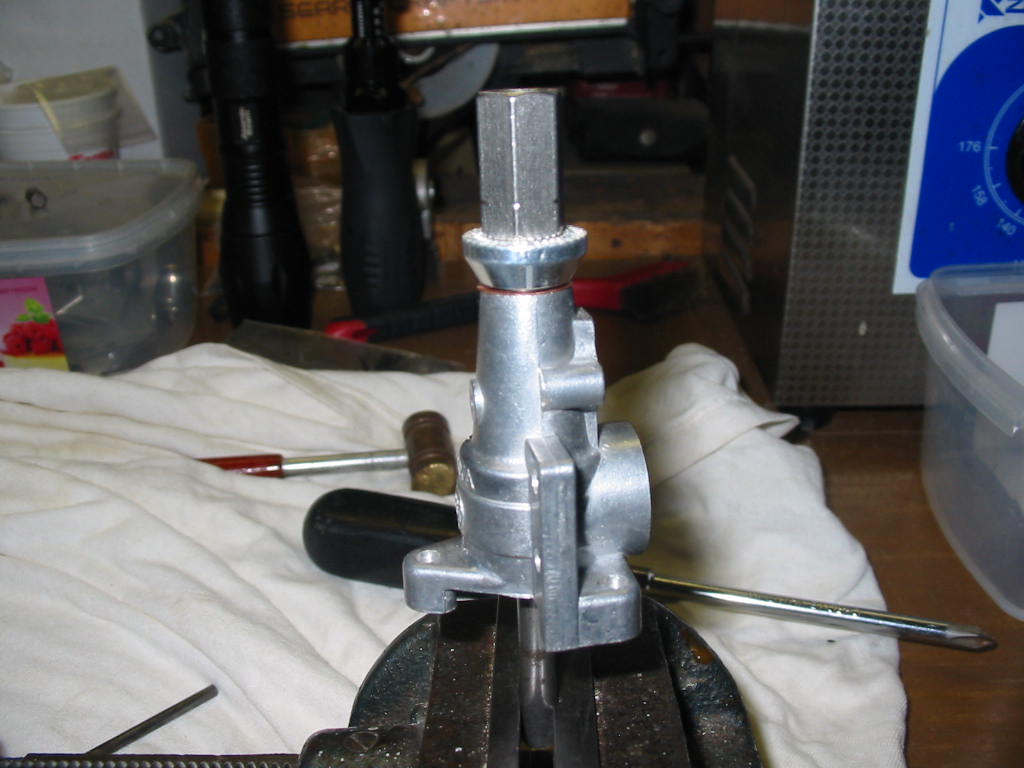
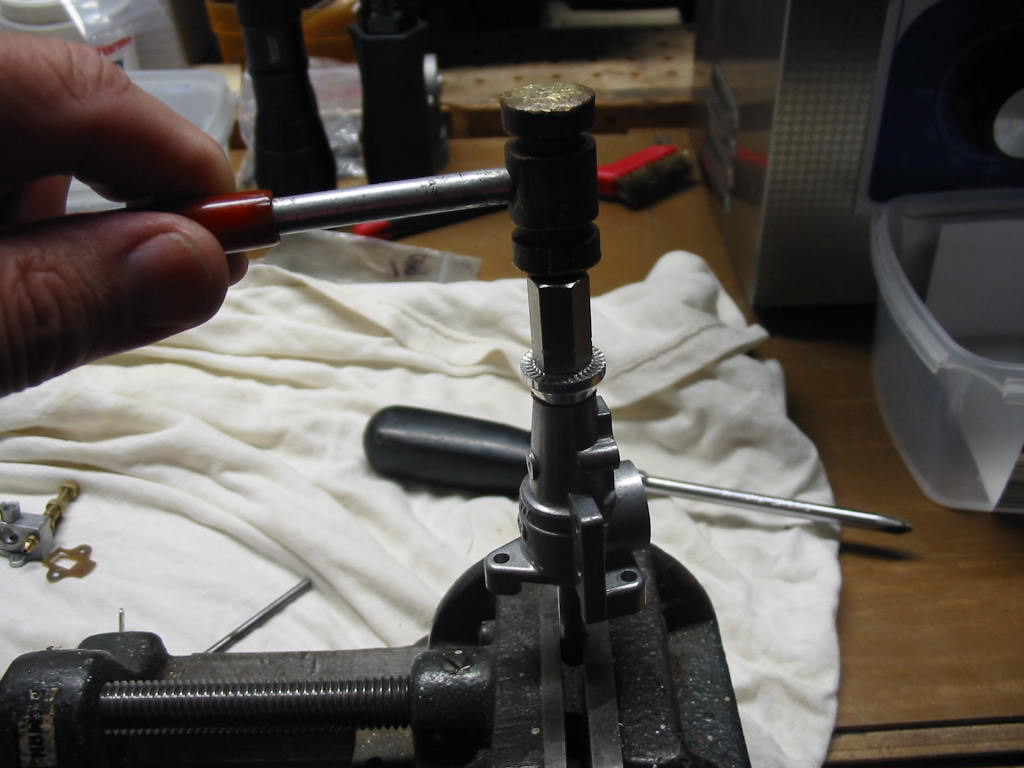
5.)Install the sleeve (coupling) over the crankshaft threads, and tap the prop driver into place.
6.)Reinstall the piston assembly remember to have the flatter side of the connecting rod facing forward and the rounded side to the back plate. It is noticeable different from one side to the other.

7.)Reinstall the cylinder sleeve and hand tighten using the Enya wrench (spanner)
8.)Now install the back plate along with a new gasket with the two 2.6mm x 5mm screws.
9.)Reinstall the T.V. (carb.) with a new gasket and the 2.6mm x 5mm screws.

10.)Install the T.V. barrel(drum) into the T.V. housing.
11.)Last is to install the C-clip into the groove on the T.V. barrel.
There you have it. Your Enya .06-II engine is re-assembled and ready for use.
Next will be on how to disassemble the T.V. and how to re-assemble it after cleaning.
sosam117- Diamond Member
- Posts : 1292
Join date : 2016-03-23
Location : Suburb of Chicago, Illinois
Disassembly / re-assembly of a Enya .06-II T.V. (carburetor)
![]() sosam117 Sun Sep 05, 2021 9:56 am
sosam117 Sun Sep 05, 2021 9:56 am
On to the T.V. (throttle valve - carburetor):
After you have removed the T.V (carb.) from the Enya engine. The disassemble is rather simple.
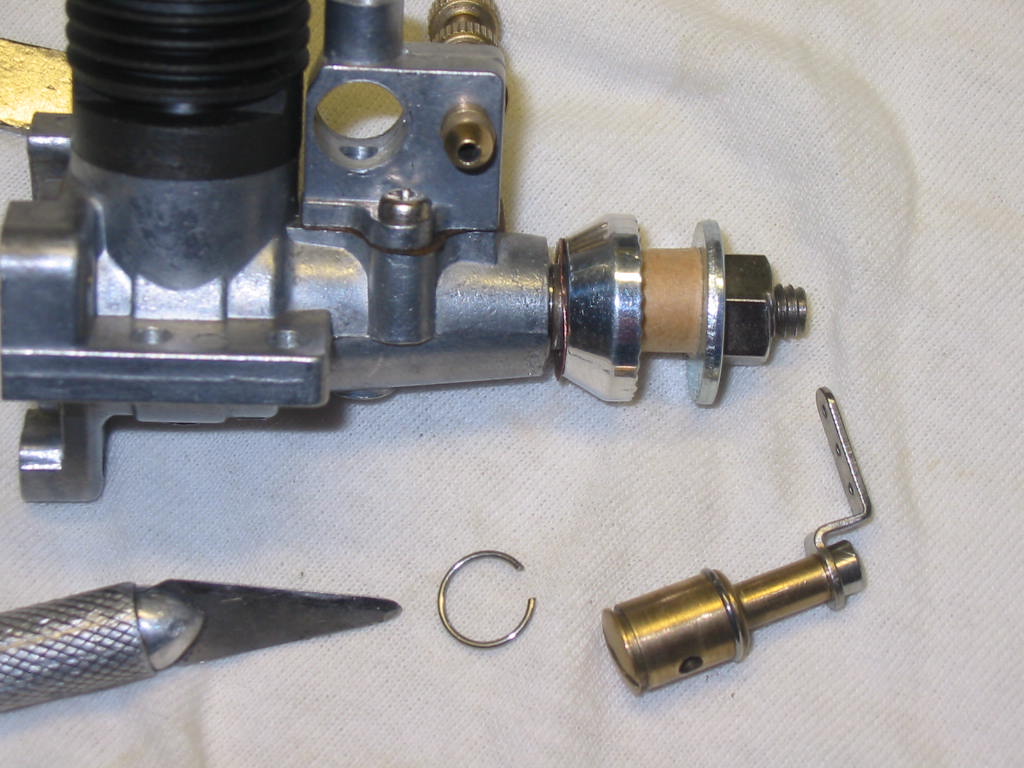
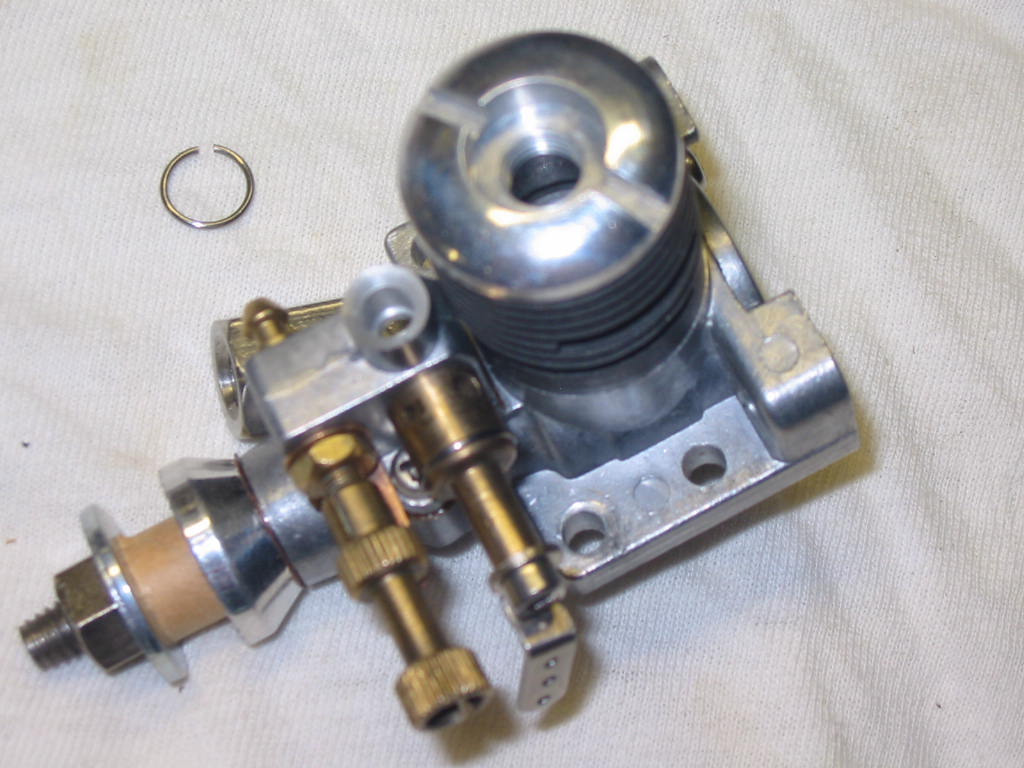
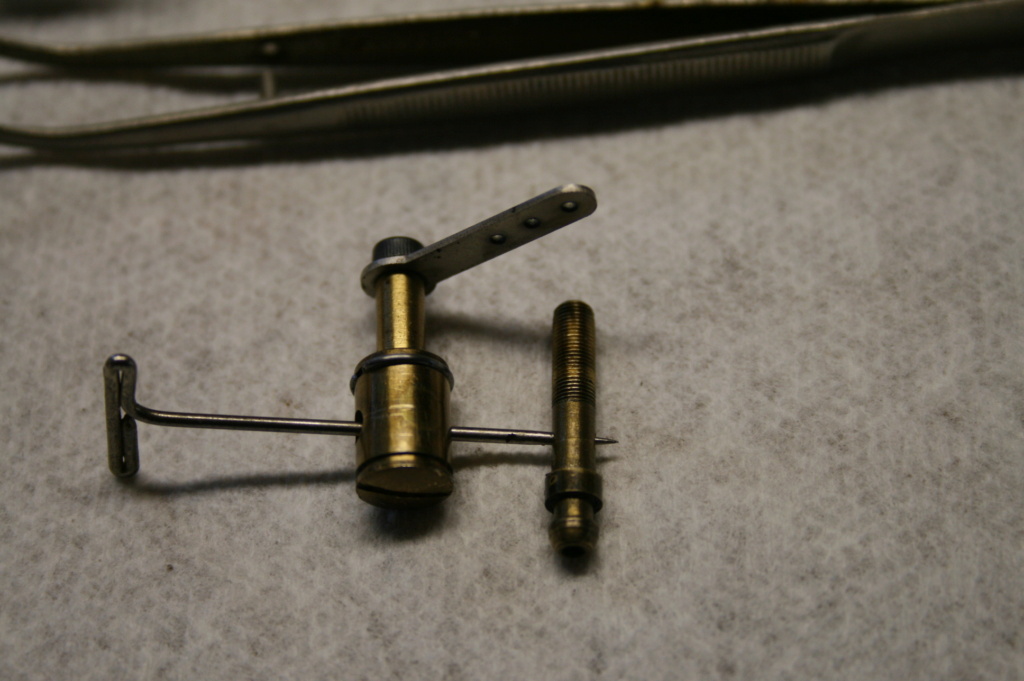
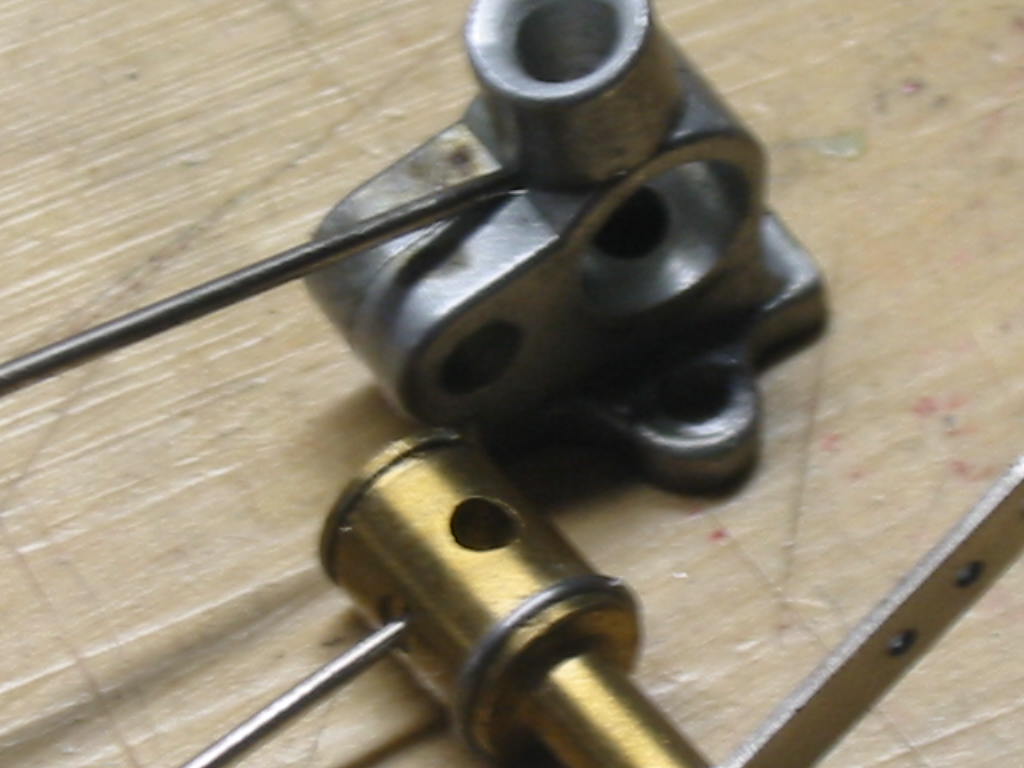
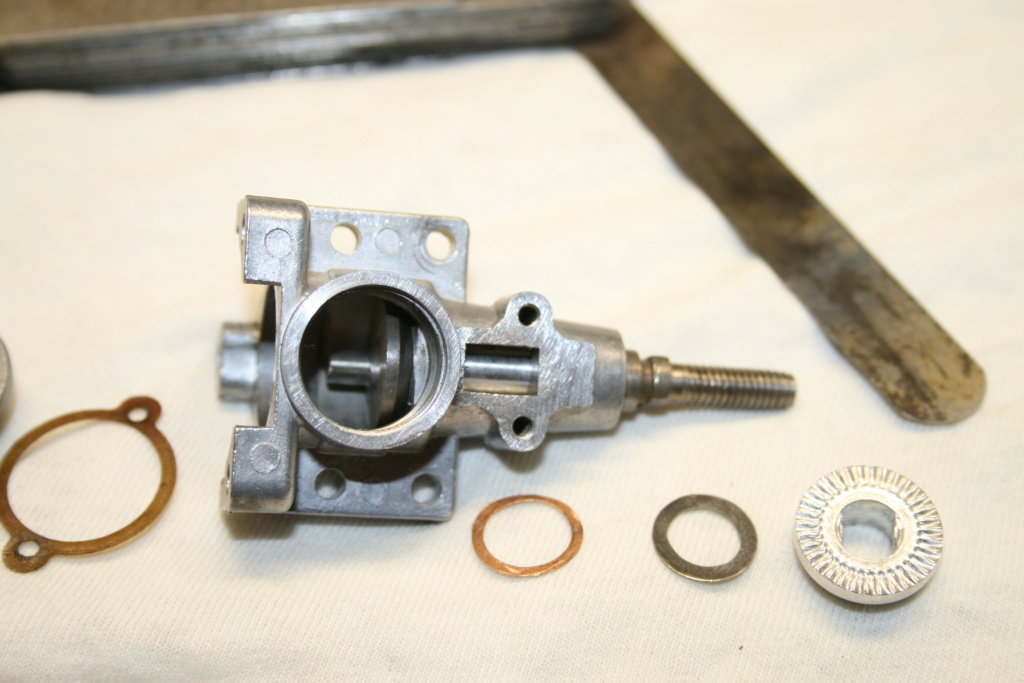
The photo here is of a disassembled (dirty) Enya .06-II T.V. (carb.)
You have:
1.) The T.V. housing
2.) Qty of 2 -- 2.6mmx 5mm mounting screws
3.) T.V. barrel with (2) C-clips
4.) servo arm with one 2.6mm x 5mm screw
5.) needle setting spring
6.) spring setting nut (4mm)
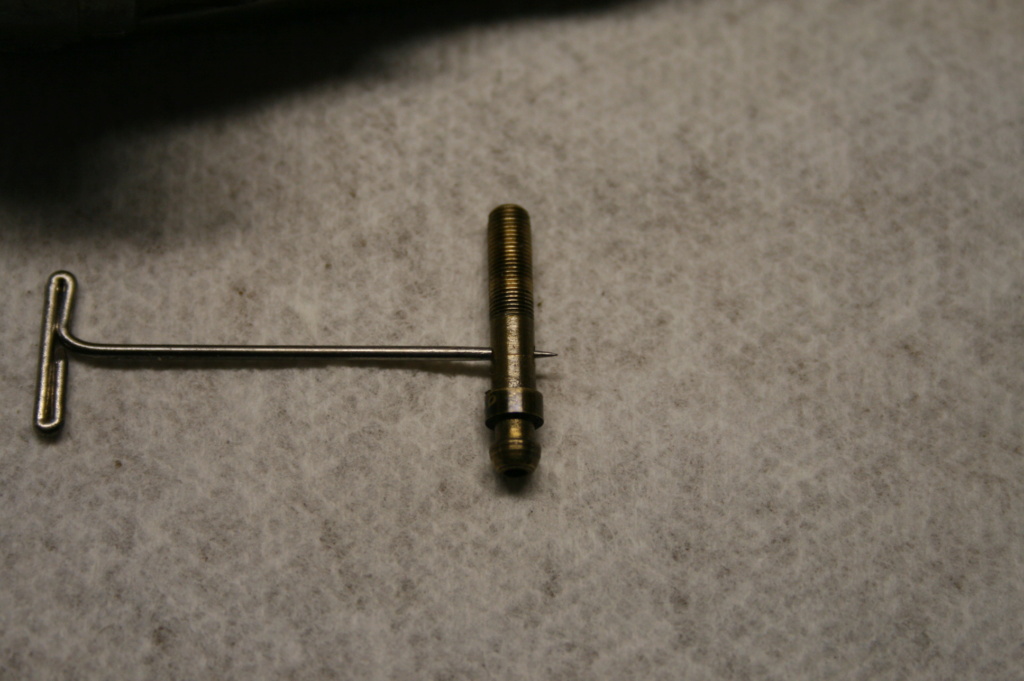
7.) spray bar and needle valve

After you have taken it apart and cleaned it toughly, you can now re-assemble it.
Enya has this T.V. as a type “G” carburetor.
This type has a precisely machined fuel metering groove on the surface of the throttle barrel (drum) to feed the engine always with a slightly rich mixture from the idling to medium speed. Also, the fuel suction is reasonably strong at this speed range. The mixture control at full throttle is made by the adjustment of the main needle valve.
Now an explanation of all of the passageways in the T.V. and how to assemble the T.V. correctly for the “G” type carburetor to work properly.
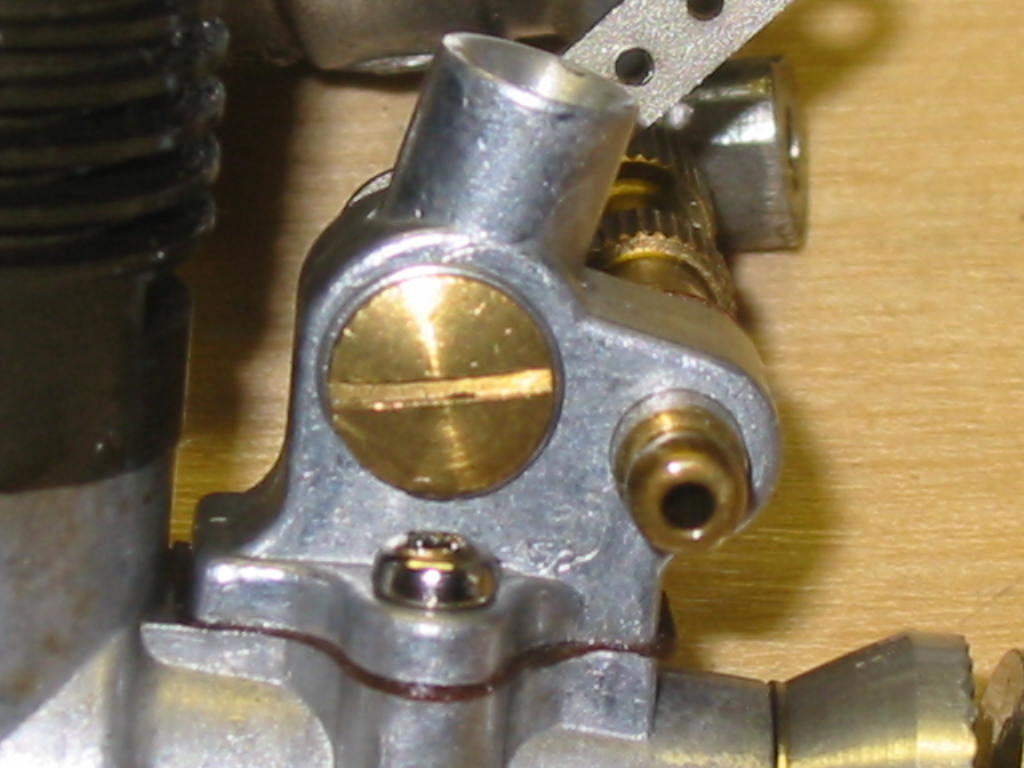
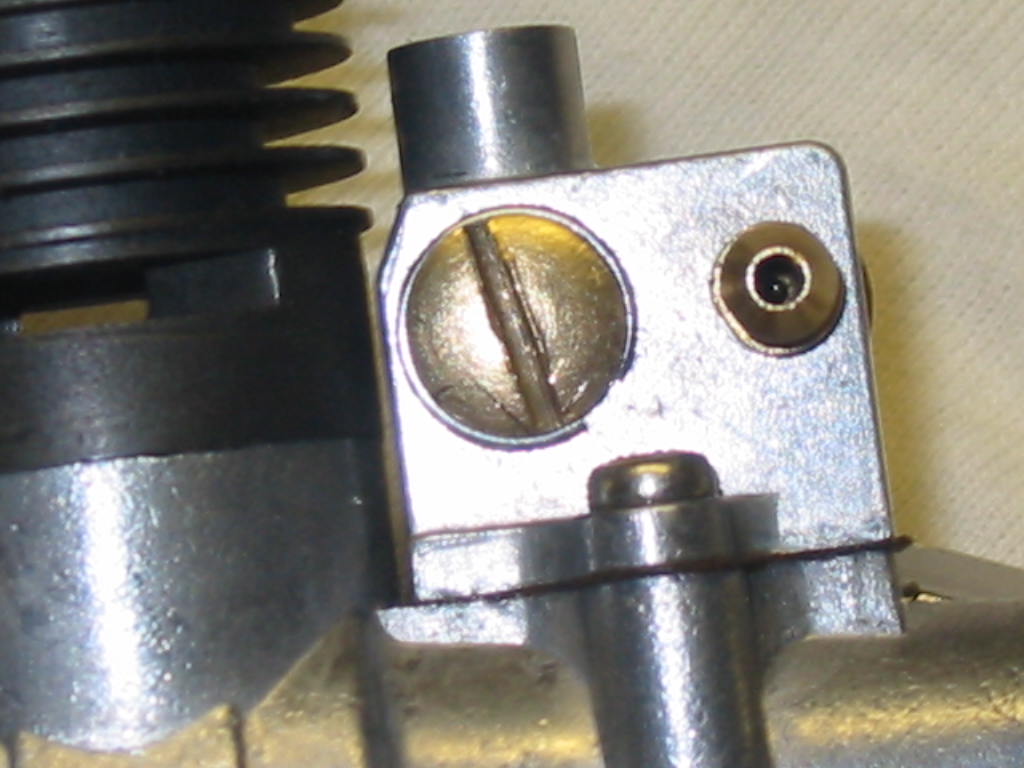
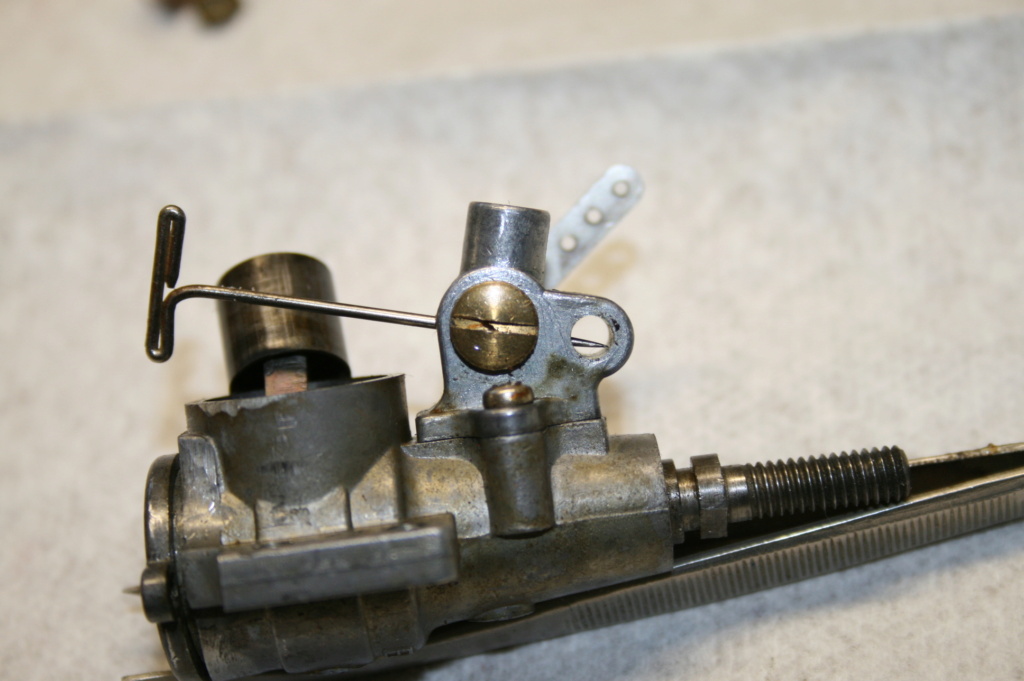
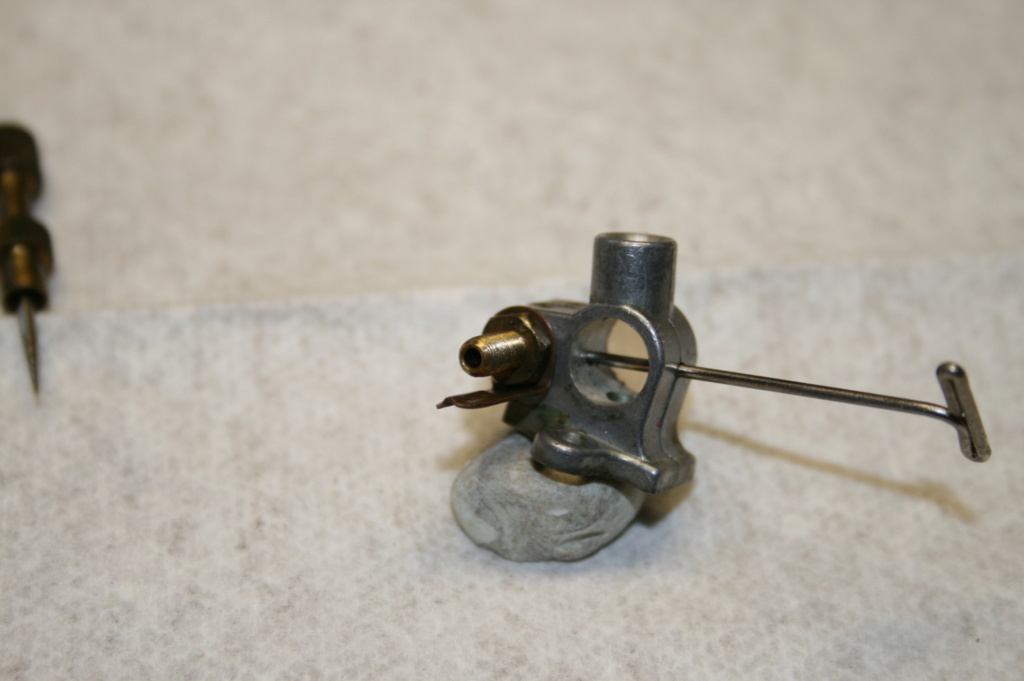
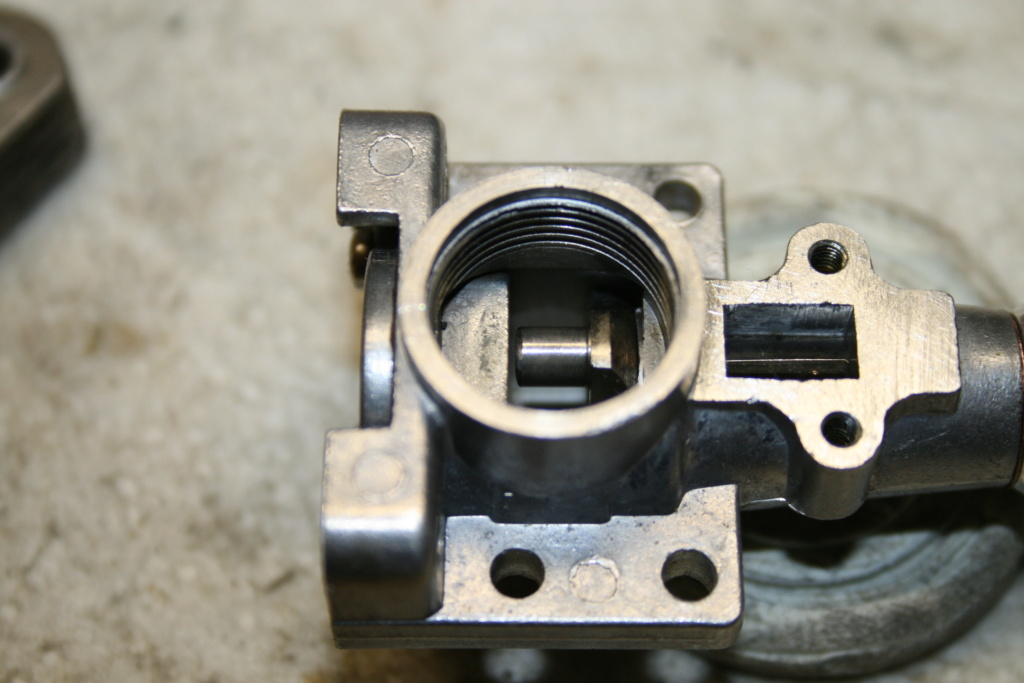
The next photo shows the T.V. housing with a “T” pin showing the holes in the housing.
These photos show the metered hole in the front of the T.V. housing and the metered hole in the barrel (drum).

These photos show you the main hole and the metered hole on the barrel (drum).


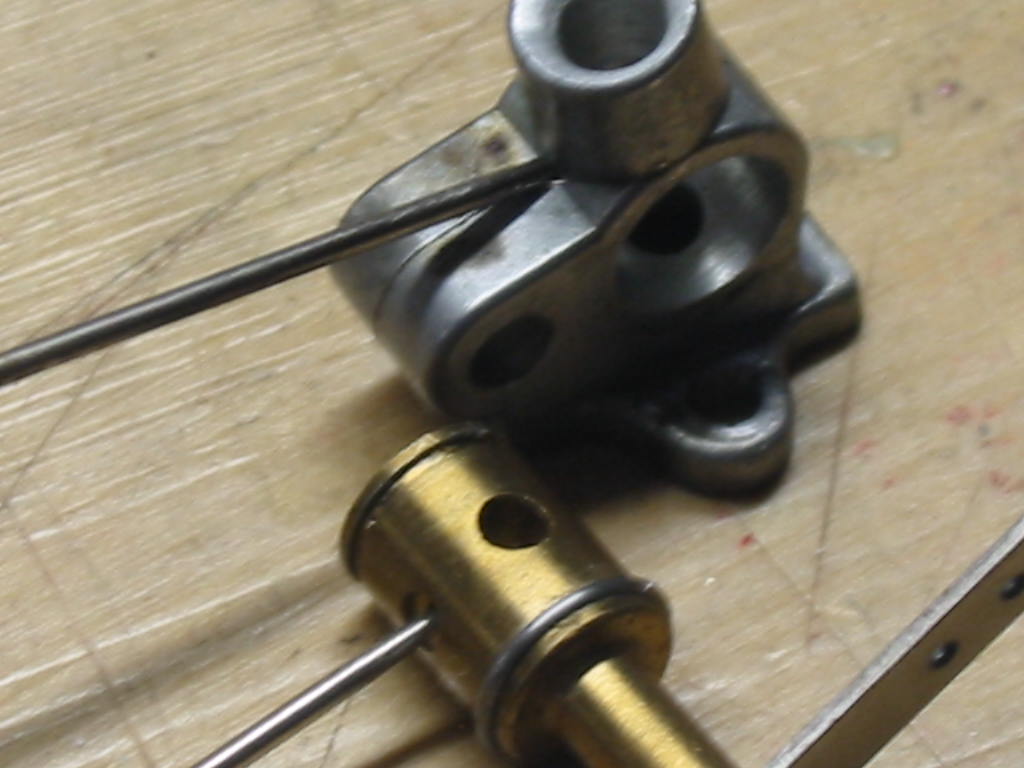
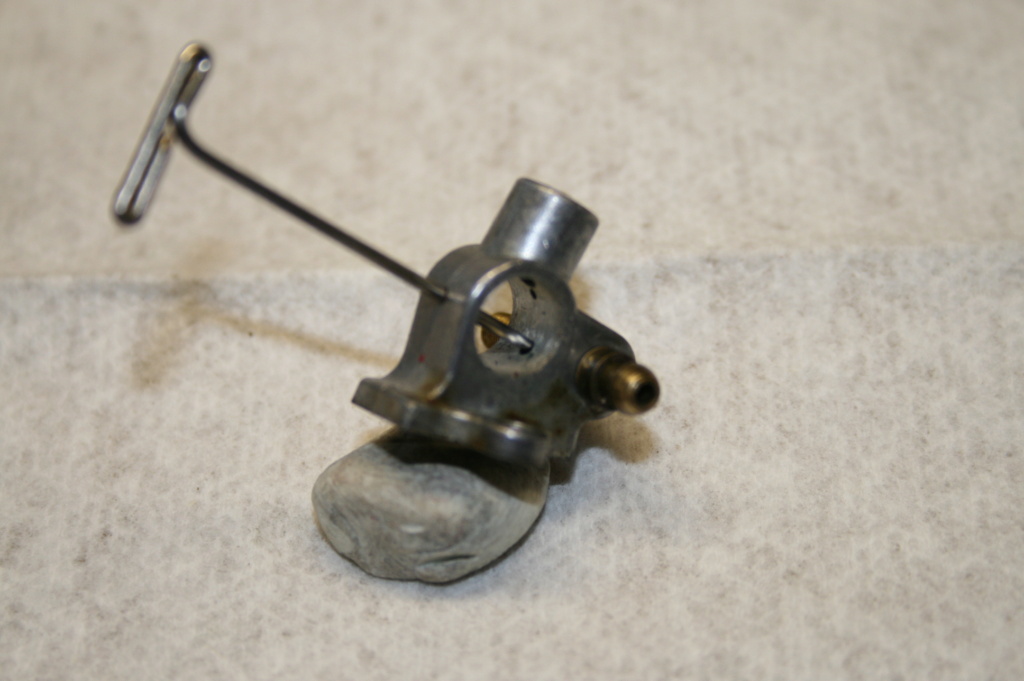
This photo shows the hole through the spray bar (main)
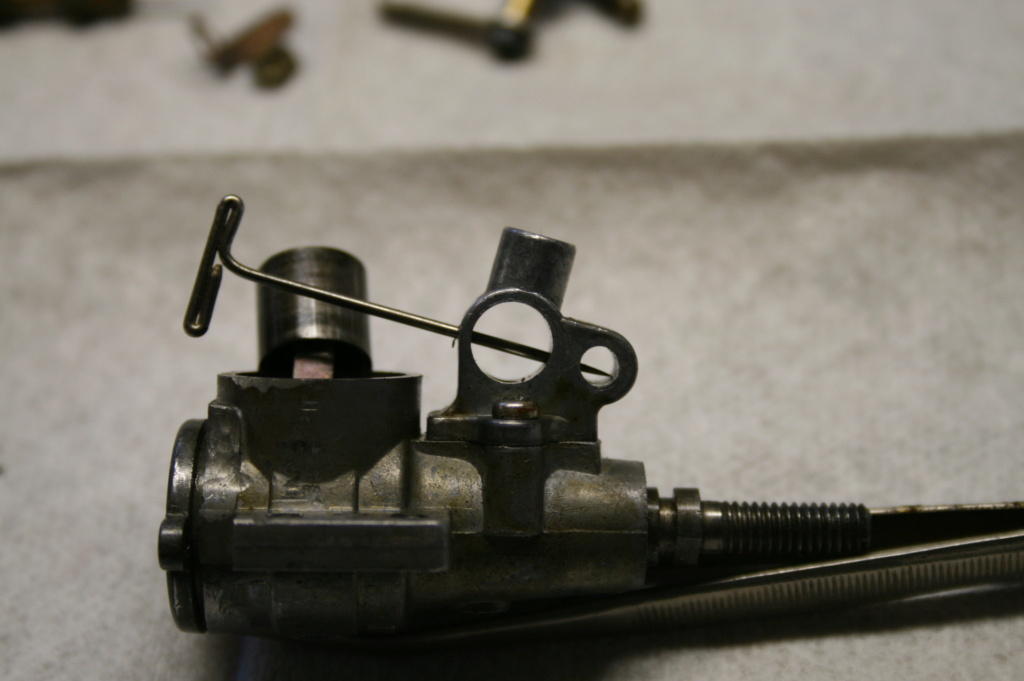
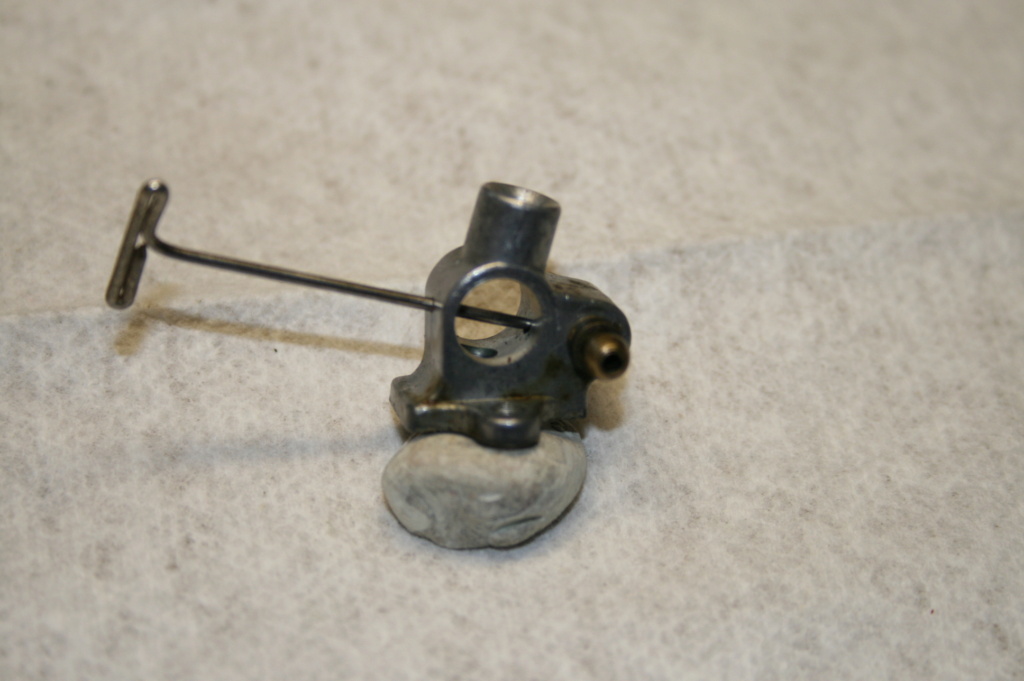
This photo shows the lineup of the spray bar and the T.V. barrel (drum) without the T.V. housing.
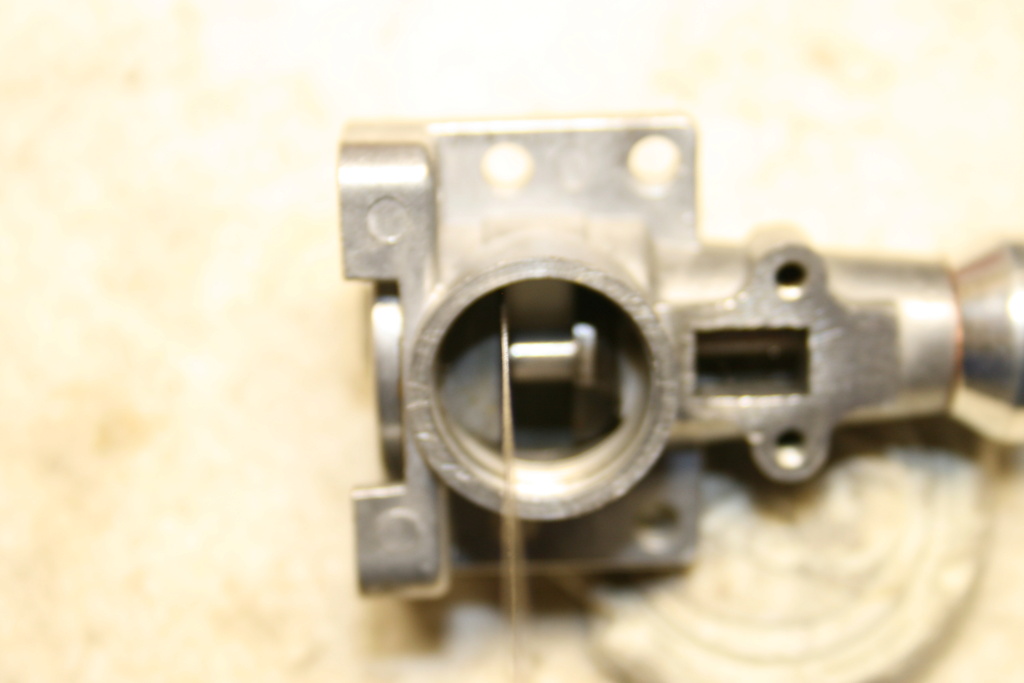
Now the photo (F) of the lineup of the holes in the T.V. without the spray bar and T.V. drum.

On to the assembly after showing you all of the metering holes on the T.V. “G” carburetor.
Tools to use:
One dress pin or a wire that is .03” (0.75mm) in diameter.
Small wrench to fit over the 4mm nut.
1.)With the cleaned T.V. housing, insert the spray bar into the T.V. housing into the front hole where the spray bar was when you disassembled it.
2.)Insert the pin into the backside of the T.V. housing as in the photos below, while turning the spray bar until you feel the needle go in a little farther.


Photo below shows what the pin looks like when the spray bar is not installed. What you are doing is aligning up the spray bar hole to the metering holes in the T.V.
This is an important step.
3.)Next is to install the needle setting spring and spring setting nut. Remember to leave the pin (wire) in the metering holes to keep the alignment as you tighten the nut to the needle setting spring.
4.)After this part of the assembly is completed, you now can remove the(alignment) pin.
5.)Now setting the T.V. barrel (drum) in the correct position. The metering hole on the drum should line up to the metered hole on the front of the T.V. housing (NOT ON THE METERED HOLE ON THE BACKSIDE OF THE T.V. HOUSING.)
as seen in the photo below. Also look at the diagram below of the throttle settings.
If you set it up on the back metering hole, it will only run like it is idling. When you advance the throttle, the engine will die.
That is it.
I hope you understand the operation and re-assembly of the “G” type carburetor for this engine?
Below is the drawing that “sometimes” comes with the Enya .06 engine.
I have only really seen them in the boxes that came from Japan?
And my translation from Japanese to English.
Mike McIntyre
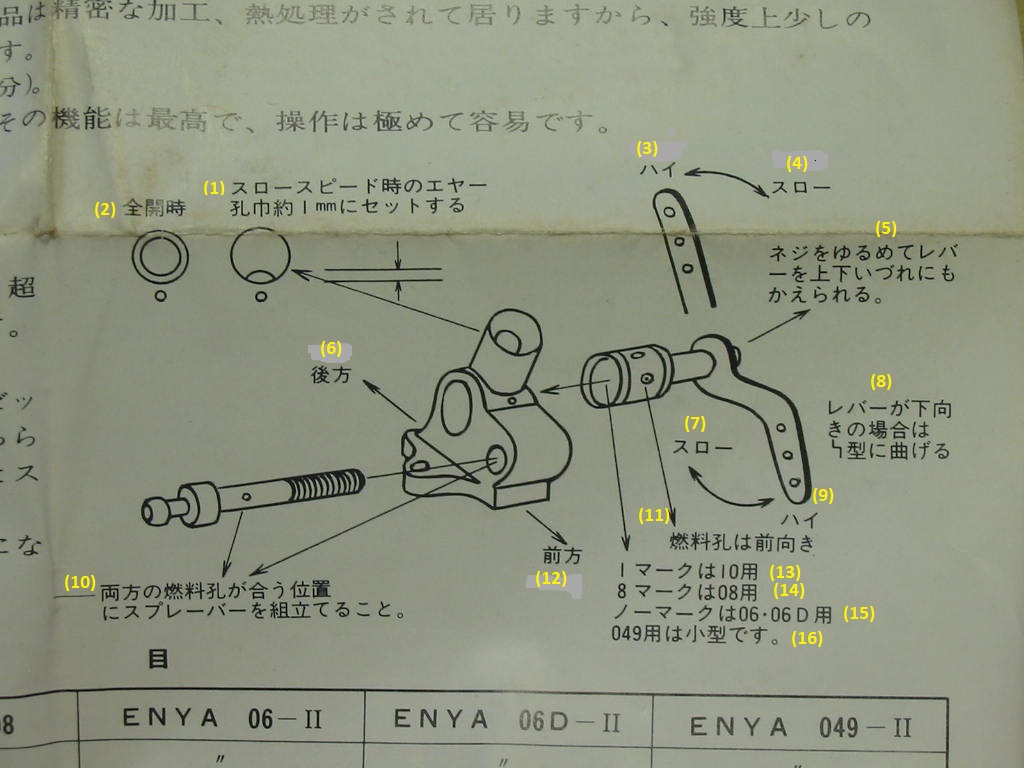
1) ス ロ ー ス ピ ー ド 時 の エ ヤ ー 孔 巾 約 mm に セ ッ ト す る
Set the air hole width at slow speed to approximately 1 mm
2) 全 開 時
When fully opened
3) ハ イ
High
4) ス ロ-
Slow (throw)
5) ネ ジ を ゆ る め て レ バ い づ れ に も を 上 か え ら れ る 。
Unscrew the screw to lift the lever.
6) 後 方
Back
7) ス ロ ー
Slow (throw)
8.) レ バ ー が 下 向 き の 場 合 は 与 型 に 曲 げ る
If the lever is facing down, bend it into a “Y” form
9) ハ イ
High
10) 両 方 の 燃 料 孔 が 合 う 位 置 に ス プ レ ー バ ー を 組 立 て る こ と 。
Assemble the spray bar at the place where both fuel holes fit.
11) 燃 料 孔 は 前 向 き
Fuel hole facing forward
12) 前 方
Front
13) マ ー ク は 10 用
Mark is for 10
14) マ ー ク は 08 用
The mark is for 08
15) ノ ー マ ー ク は 06-06D 用
No mark is for 06-06D
16) 049 用 は 小 型 で す 。
For 049 is a small type.
sosam117- Diamond Member
- Posts : 1292
Join date : 2016-03-23
Location : Suburb of Chicago, Illinois
Re: Enya 06 11 Stunter glow engine crank/prop nut help.
![]() sosam117 Sun Sep 05, 2021 10:21 am
sosam117 Sun Sep 05, 2021 10:21 am
And out...Coxfledgling wrote:Oh wow, thank you so so much sosam, very novel idea with the piston !
my answers are in bold print below fledgling's questions --sosam117
So my measurement was accurate.
Yes!
An engine spanner came with it, it was in the box.
Sometimes those get lost when the engine is bought and sold over time (one of the owner keeps it or losses it?)
I will do some more research about the parts, I presume the guy is based in Japan.
Ken Enya is the owner and they are indeed in Japan.
Here is the web address: http://www.enya-engine.com/index_E.htm
I will be getting a jis screwdriver set ordered Monday so the small screws don't get damaged, I have been after them for some time now, they are on offer at the moment.
I don't think the engine has been run much as there is only slight combustion traces on the piston crown visible through the exhaust ports.
I will come back to this thread when I have got a nut at least.
I intend allowing the engine to soak in meths first to loosen it off, then rinse.
It clean outside but a little stiff being in storage in its box for a good twenty years, and sometime before that I suspect.
Do you happen to know if there is a shallow lube groove in the c/case snout for crank main bearing lube please ?
No groove in the crankcase, the groove is in the crankshaft, just like the Cox Baby Bee engines along with the bearing surface, which is just like Cox Baby Bee type engines.
The little Enya engines -- .049 / .06 / .08 and .10 were to compete against Cox (domestically) in Japan.
Though some of the engines made their way out of Japan.
I assume the prop driver is on a taper ?
No, it has two keys 180° apart and are keyed to the crankshaft.
Over....
Here is some interesting information of these "little" engines by Bob Allen.
The “Small” Enya engines i.e.. 049, 06, 08 & 10
Why did Enya have such a proliferation of small capacity engines? The very first one to appear
(in late 1958) was the 06 glow, followed closely by the 06 Diesel, and in late 1961 by the 049. All
these first generation engines featured rear induction by reed valve. The “small” Enya’s were the
work (personal project?) of Yoshiro (youngest of the three Enya brothers) and whilst they ran
quite well, they were obviously made “down to a price”, rather than “up to a standard” like the
larger Enya’s. That is not to say that they were shoddily made – far from it. The thinking was
more “budget” or “no frills” - as an example, all the crankshafts ran directly in the light alloy case
rather than in a bronze bush, as well, the con-rods were fabricated from stamped flat metal sheet,
and the prop driver was fixed to the shaft by splines, rather than the more usual taper lock.
They also did not suffer from a lack of power – the 08, although 0.22 cc smaller than the hot little
09-III, is still quoted as having equal power output, as well as being almost half an ounce lighter,
possibly pinpointing the main difference ie. maybe being less rugged than the “big” Enya 09. All of
the “small” Enya’s, with the possible exception of the very first reed valve 06 glow and Diesel (ie.
the 049, 06-II, 08 & I0) were intended mainly for the home market, and were only offered for sale
outside Japan very sporadically. They may have been intended for use in model air-boats & prop
driven cars, as these are depicted in the included Japanese language instructions, or maybe they
were just trying to compete with Cox in the small engine home market. The most obvious visual
difference between these small engines and the 09 and larger sizes was the 360 deg. exhaust
porting (meaning of course, that they all had flat top pistons, devoid of a baffle), a non-detachable
front housing and the engine size nomenclature which was cast onto the bottom of the crankcase.
The material and process used to make the piston’s in these little Enya’s would appear to differ
from the bigger ones too – shiny metal, Cox like, with no visible machining or lapping marks
(these were never claimed to be “Hand Lapped”), and internally, they utilized a circlip retained
thimble or carrier in the piston for the gudgeon pin. Also not unlike a Cox engine, the first 06 glow
had a “two journal” crankshaft (ie. relieved in the center) to reduce drag. Rather uniquely too, the
later Mk. II versions, having flange mounted venturi tubes or throttles must have been about the
first small engines to employ this feature. It had been seen before in a few larger engines from
the 1940’s (eg. Edco “Sky Devil” ) and of course, later FOX’s, but not in such small capacity units.
Another “trademark” of the small Enya’s was the NVA, which was always un-plated brass and
rigid, never flexible. As well, all the later ones had cast-in radial mount facility in conjunction with
the usual beam mounts, the earlier ones with a detachable, bolt-on stamped metal radial mount.
Several photo’s of Yoshiro and his models powered by these small capacity engines appeared
over the years in various magazines. In MAN August 1966 he was reported as flying an R/C
model, powered by four Enya I0-TV engines! The very first throttle equipped small Enya was
advertised by I.M.I. in the States when they listed, in January 1961, a 06 glow with TV. This
consisted of a simple butterfly valve in the venturi tube, which then had to be extended back
about double normal length so the wire operating arm did not foul the optional anodised alloy
radial mount, when utilized. The later TV versions (with front rotary shaft induction) all had
carburetors specific (and stamped) for each size. Early models had vertical intakes, later ones
with venturi angled forward to clear the annular muffler. In his 1966 Global Engine Review (as
well as numerous other times over the years) Chinn stated that several of the small Enya’s “are
not handled by the official U.S. Enya importers”, but that the 06, 08 & I0 models were released
onto the Japanese home market “early this year” (1965). While spare parts for these “littlies”
never seemed to appear outside of Japan, strangely in late 2009 some did start to appear on
eBay (mainly just NVA’s). Unlike the larger engines, most of the small Enya’s came in a 2 piece,
plastic bubble box with a clear lid, although much later versions came in the black/red factory box.
Rather strangely, and as far as we know, no Engine Test was ever done on a small Enya, at least
in an English language magazine. After all, they have been around for half a century, and quite
reasonable numbers must have been sold, especially in their homeland. The later throttle units
(flange mounted) appear to be quite unique, and an expert’s evaluation on these in particular,
would be most interesting. Rather incongruously, a factory sheet which came with an SS 40 BB
purchased in 2005 depicts & lists the 049-IITV, 06-IITV, 08TV and the I0TV! No mention is made
however, of these 4 in the specification columns, suggesting maybe (once again) that these
engines were, at that time, still available in Japan but not exported to the West.
sosam117- Diamond Member
- Posts : 1292
Join date : 2016-03-23
Location : Suburb of Chicago, Illinois
Fledgling
![]() Coxfledgling Sun Sep 05, 2021 2:39 pm
Coxfledgling Sun Sep 05, 2021 2:39 pm
Coxfledgling- Gold Member
- Posts : 375
Join date : 2021-01-10
Location : Near Caernarfon, Snowdonia, Wales, UK
Fledgling
![]() Coxfledgling Sun Sep 05, 2021 2:54 pm
Coxfledgling Sun Sep 05, 2021 2:54 pm
Engine back plate has been removed, the screws were not tight. Some wear on the back plate inner surface suggesting an electric starter has been used, or a pusher prop.
Anyways engine soaking to soften the gummy castor, will finish cleaning tomorrow.
Will re read the added info and make the tool for prop driver...
Coxfledgling- Gold Member
- Posts : 375
Join date : 2021-01-10
Location : Near Caernarfon, Snowdonia, Wales, UK
Re: Enya 06 11 Stunter glow engine crank/prop nut help.
![]() sosam117 Mon Sep 06, 2021 8:14 am
sosam117 Mon Sep 06, 2021 8:14 am
Coxfledgling wrote:Just seen added info, very complete answers and additional info, thank you so much, very informative, thanks.
Engine back plate has been removed, the screws were not tight. Some wear on the back plate inner surface suggesting an electric starter has been used, or a pusher prop.
Anyways engine soaking to soften the gummy castor, will finish cleaning tomorrow.
Will re read the added info and make the tool for prop driver...
Fledgling,
If you have some wear on the back plate check the clearance between the prop driver and crank case housing?
I have noticed when rebuilding many of the Enya .049 / .06 / .08 and .10 that the thrust washer behind the prop driver is missing.
I have made my own prop river washers from copper. I have a punch set to make my own.
I have also added shims behind the prop driver to reduce the excessive play between the prop driver and crank case.
Here is how to check the problem of the crankshaft rubbing on the back plate (back plate should not be rubbing at all)
You should have the crankshaft and prop driver assembled. No piston assembly or piston cylinder on the crankshaft, case.
Now install the back plate with the gasket ( it can be a used one - if it is still in good shape?) and push the crank backwards to the back plate and turn the crank. If you feel rubbing then you'll need to shims behind the prop driver.
Probably the reason for the back plate screws being loose is because the crank was rubbing on the back plate whilt it was running and robbing the engine of some power?
I'll take some photos later today of the prop driver thrust washer and the shims I have made to correct the scuffing of the back plate.
sosam117- Diamond Member
- Posts : 1292
Join date : 2016-03-23
Location : Suburb of Chicago, Illinois
Fledgling
![]() Coxfledgling Mon Sep 06, 2021 8:29 am
Coxfledgling Mon Sep 06, 2021 8:29 am
Will reassume engine cleaning this evening after doing some more "cementing" up the holes made for the roof timber reinforcement, then new sheets weather permitting. Winter is getting closer...
Coxfledgling- Gold Member
- Posts : 375
Join date : 2021-01-10
Location : Near Caernarfon, Snowdonia, Wales, UK
Clearance for the backplate to crankshaft pin
![]() sosam117 Mon Sep 06, 2021 3:33 pm
sosam117 Mon Sep 06, 2021 3:33 pm
When you take your backplate off your Enya .06-II engine and notice a circular mark that was made from your crankshaft, you need to correct the clearance problem.
If it is a new engine, then you have an engine that had parts that overlapped on the manufacturing tolerances.
Example, the crankshaft is 90mm long, the crankcase housing is 110mm long, and your backplate is 10mm long.
So, crankcase (110mm) – shaft (90mm) = 20mm, But, your backplate slips into the crankcase 10mm.
So, 20mm from above – 10mm thickness of the backplate and 10mm of slips into crankcase the = 0.00mm
Now add in the manufacturing tolerances of any of those parts on the plus side then you have too much material and the crank is rubbing on the back plate.
But if you had either the crank and/or the backplate shorter (minus tolerance) then you have clearance between the crank and the backplate.
With a worn engine, it usually is the front of the crankcase that has been worn down and excessive play between the prop washer (or prop driver thrust washer) and the crankcase?
This can be fixed by adding copper shims between the prop driver/thrust washer and the crankcase.
This photo shows a undersized crankcase

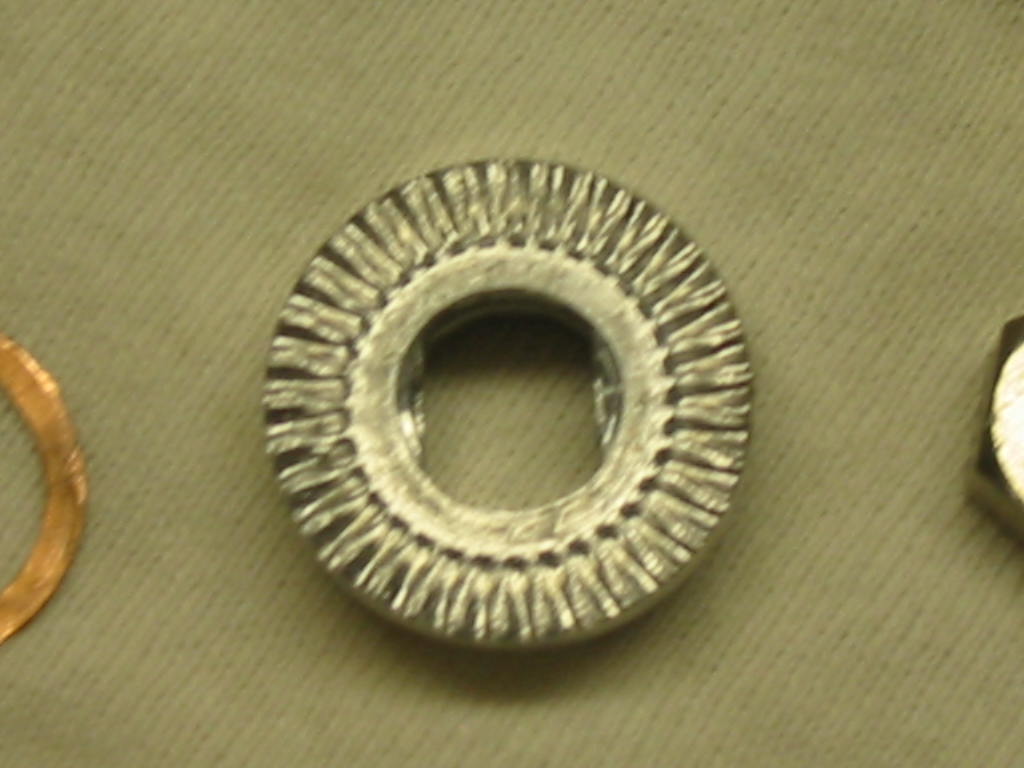
This photos shows a copper shim to correct the housing problem
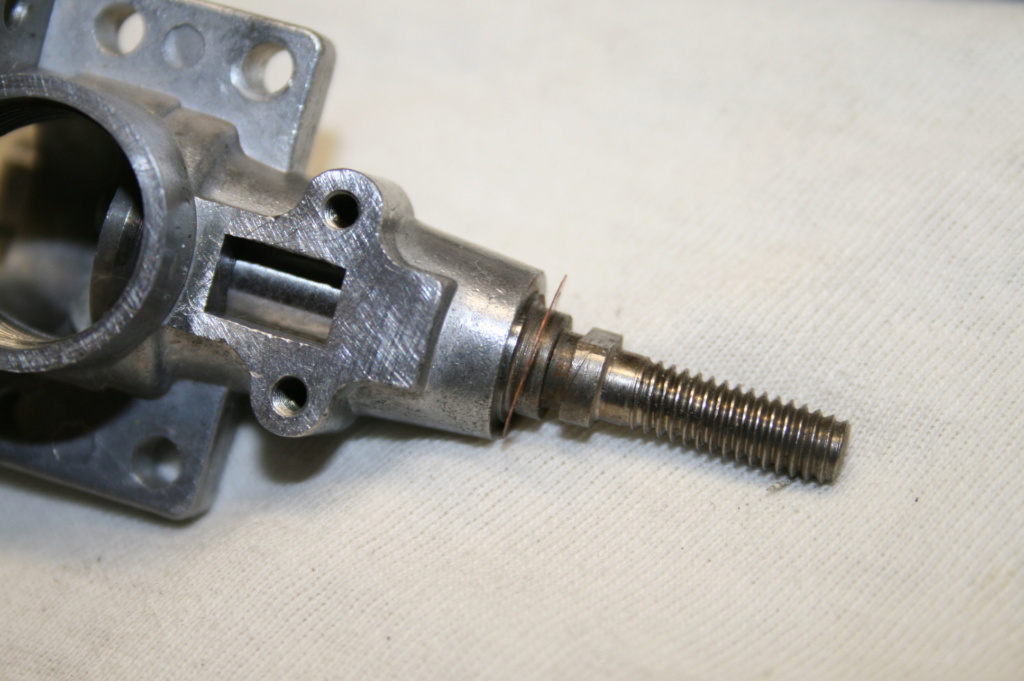
This photo shows the copper shim on the crankshaft
This photo shows the prop driver, thrust bearing washer, and copper shim to correct clearance problem
When I get an engine (especially used), I tear it down and look it over for excessively worn parts and see if replacement parts are available or make something to shim the parts back to acceptable mfg. spec.?
Now on with correcting the crank to backplate clearance on the Enya .06-II engine.
If you have followed the teardown thread that has been written, you are ahead of the game here.
What you need of the engine is, the cylinder removed along with the piston assembly from the crankcase.
Of course, the backplate had to be removed to remove the upper end of the engine.
Now while the backplate is removed, look at it to see “if” you have the circular mark from the crankpin on the backplate? If you do, then you will need to adjust the clearance from the crank to backplate.
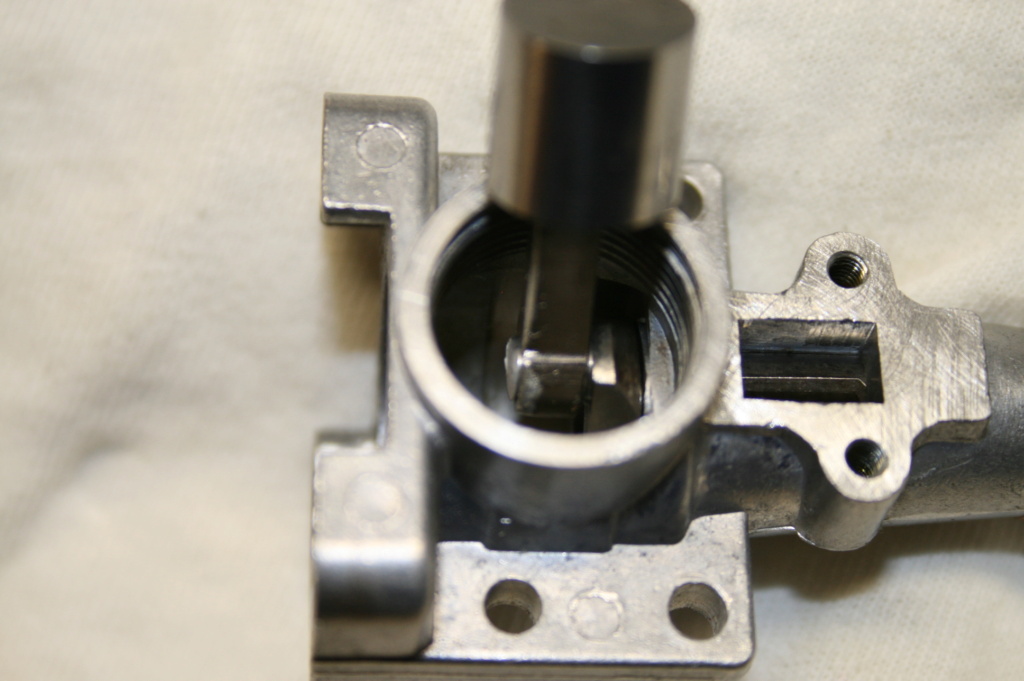
Insert the back plate (with no gasket!) into the end of the crankcase. Now move the crank back and forth while turning it.
When it is pulled forward, there is no rubbing on the backplate? O.K., that’s a good sign.
Does it rub when you push the crank back towards the back plate? O.K., your housing may have too much play in the front and needs to be shimmed?
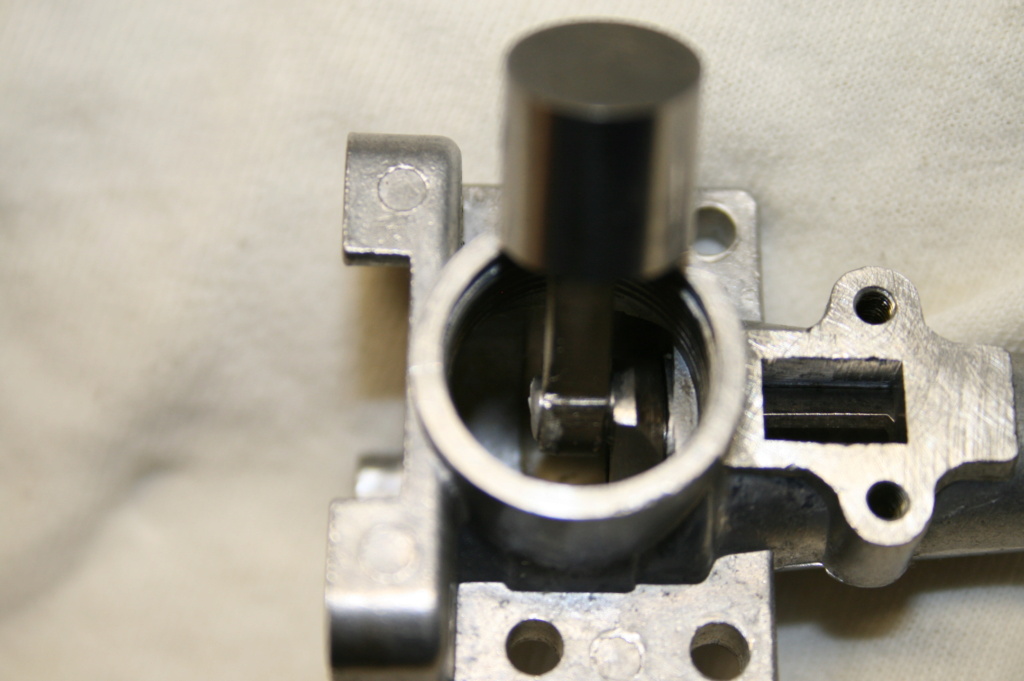
These photos show the .008" shim with the gasket on the endplate for the correct clearance

Your gasket is about .008” thick
Now add the gasket to the back plate. Does this reduce the rubbing?
If not, read on
This photo shows the correct clearance.
Now try one more gasket. That now makes it two gaskets on the backplate.
Now is the rubbing gone from the back plate? If it is, that means that a .005” shim can be used behind the prop driver.
Or you can use the two gaskets on the back plate to do the shimming?
If you have the ability to make your own shim. If you don’t, you could do the option of using two gaskets on the backplate or remove .008” off the backplate (by grinding – but I wouldn’t do that. I did it once and it didn’t work out well.)
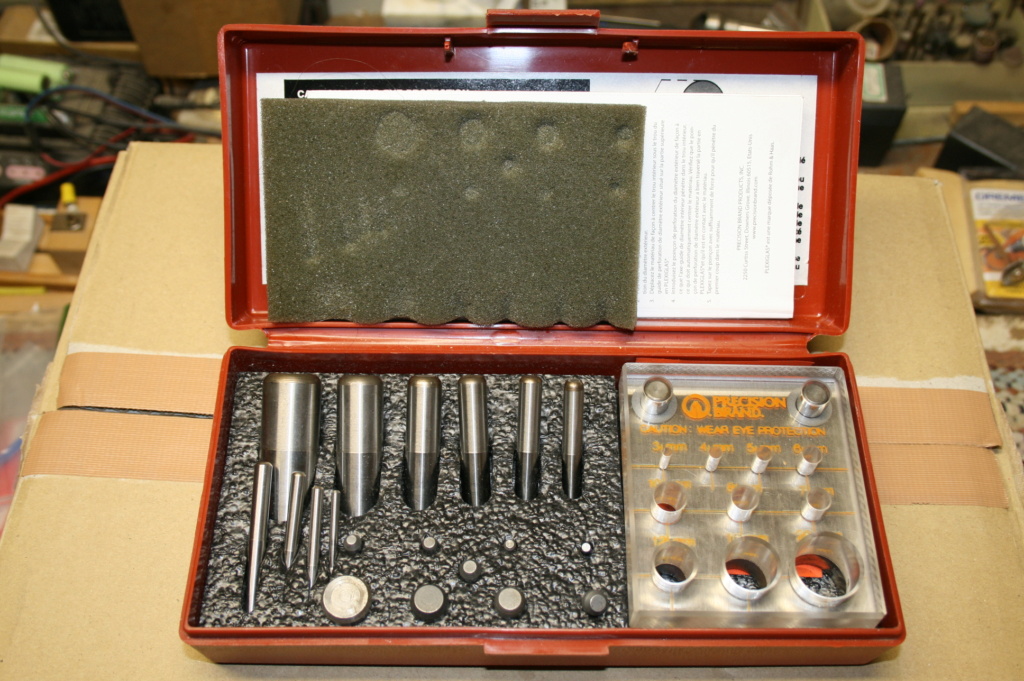
I have a metric set of punches and make my own copper shims to insert between the crankcase housing and the thrust washer/ prop driver.
Normally I have to make copper shims that very in size from .003 to .008 inches for the engines that I rebuild for the backplate clearances.
I had one engine (new) where the shimming (and it did not have excessive play) did not work and I removed some material from the crankshaft pin, but not too much. It is just slightly wider that the connecting rod.
sosam117- Diamond Member
- Posts : 1292
Join date : 2016-03-23
Location : Suburb of Chicago, Illinois
Fledgling
![]() Coxfledgling Mon Sep 13, 2021 1:40 pm
Coxfledgling Mon Sep 13, 2021 1:40 pm
For control line...
For radio control...
Thanks...
Coxfledgling- Gold Member
- Posts : 375
Join date : 2021-01-10
Location : Near Caernarfon, Snowdonia, Wales, UK
Re: Enya 06 11 Stunter glow engine crank/prop nut help.
![]() sosam117 Tue Sep 14, 2021 10:15 am
sosam117 Tue Sep 14, 2021 10:15 am
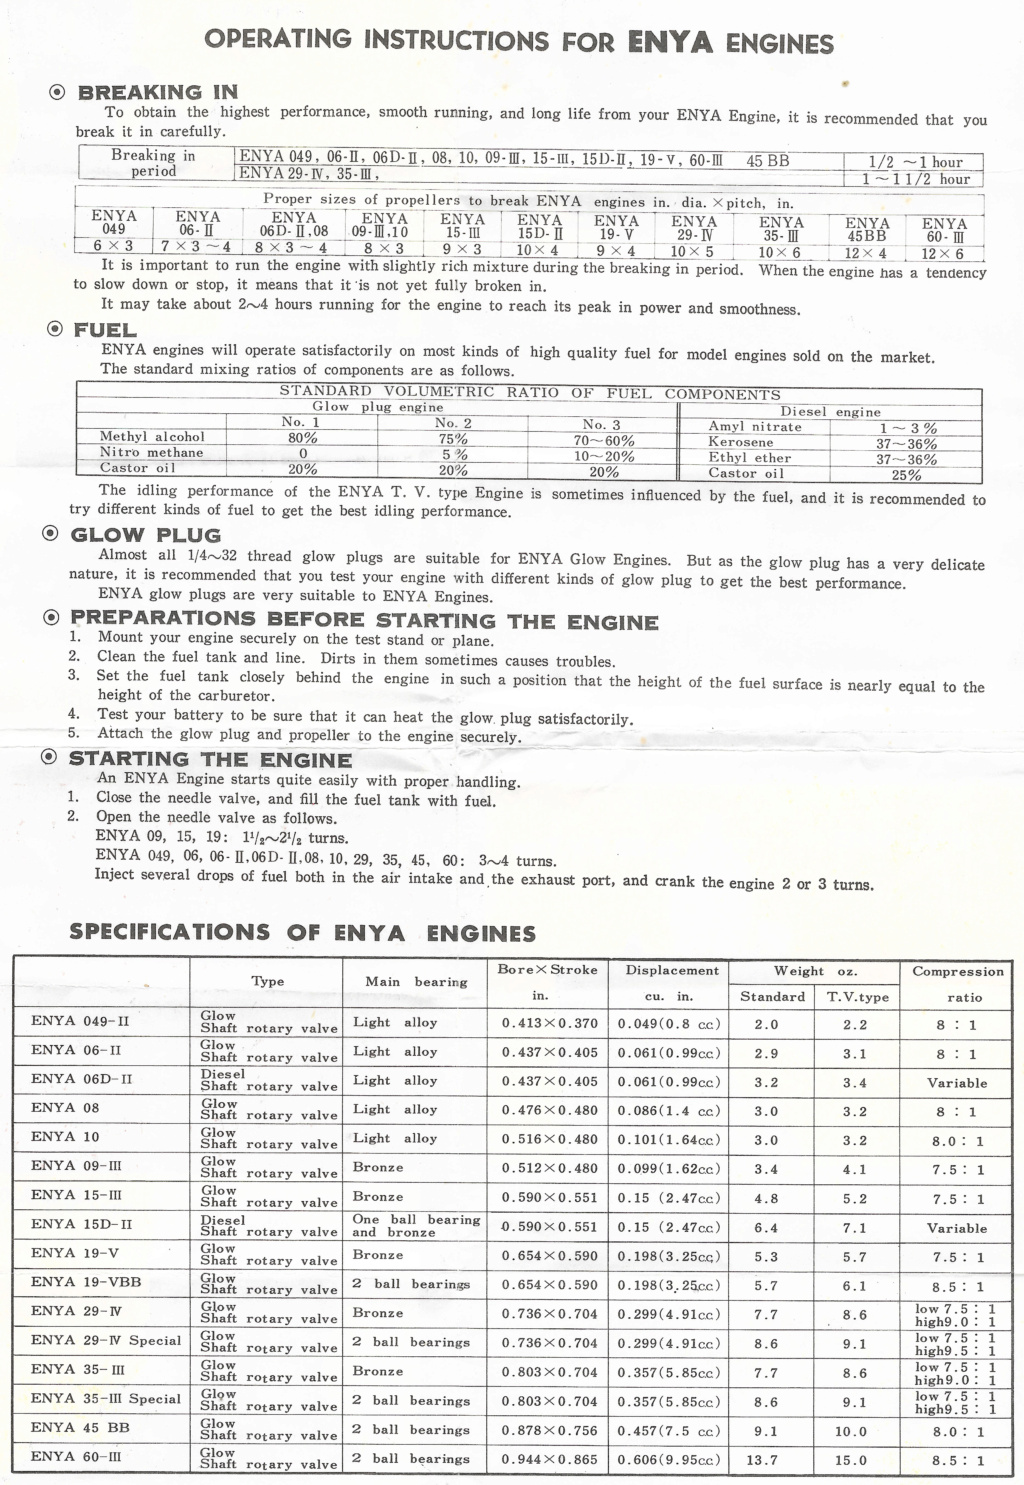
Here is the normal instructions that would come with the engine (in Japan).
I have taken photos of page one, and there is more on the back side of page one (page two).
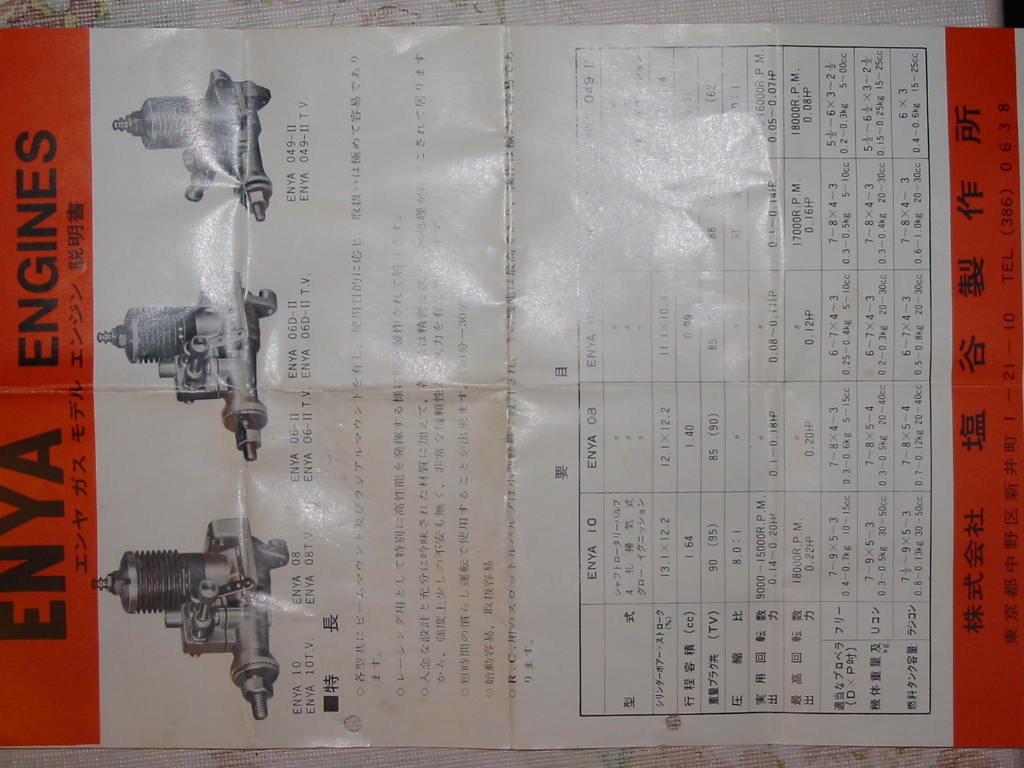

Here are the close up photos of the specification section on the instruction sheet.
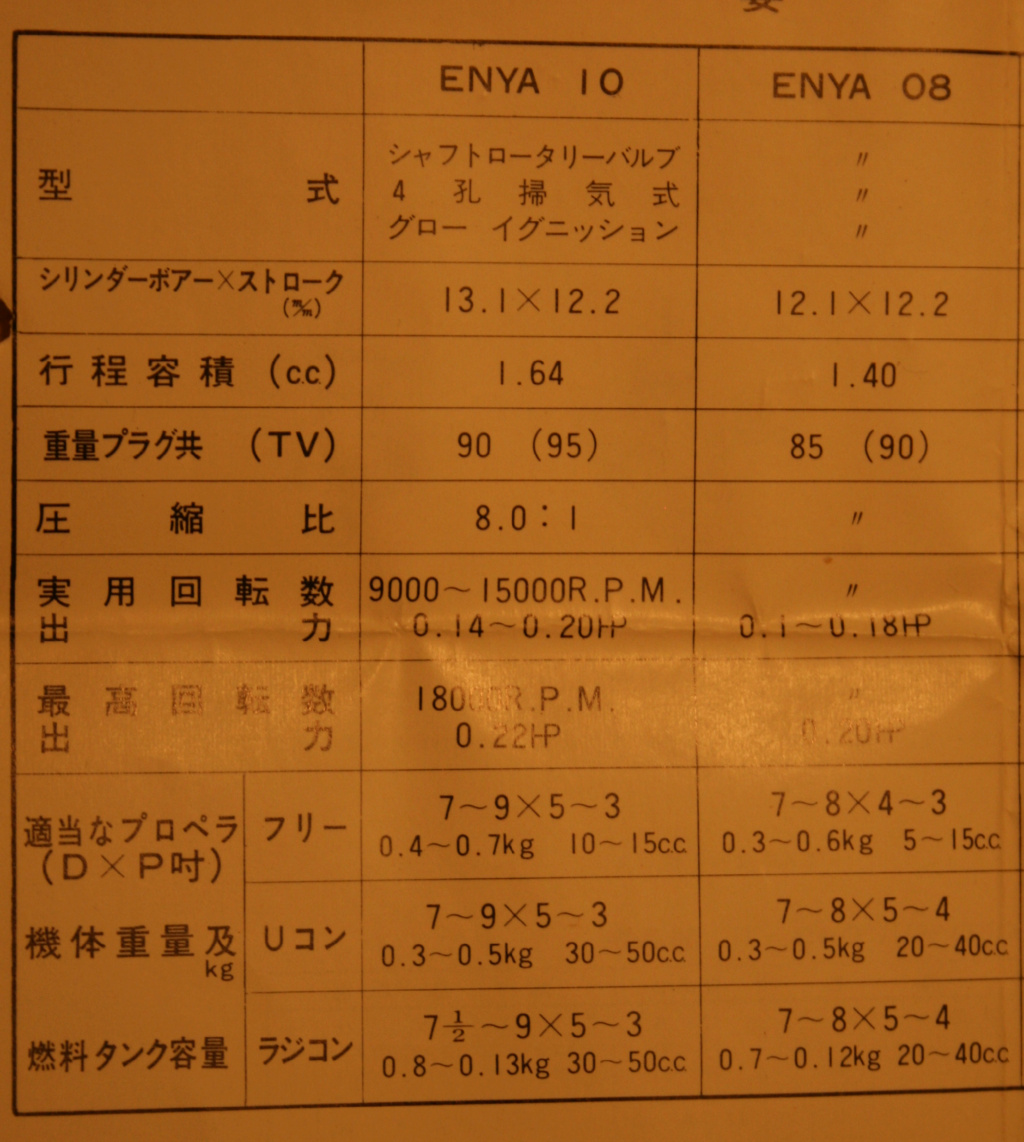

Of course it is in Japanese, so I was able to translate the specifications on page one to English.
Problem is, it is in Excel spread sheet and I can't up load it here?
I'll send it to you by email
Last edited by sosam117 on Tue Sep 14, 2021 10:32 am; edited 2 times in total (Reason for editing : sent wrong photo --- same page 2 sent not page one and two)
sosam117- Diamond Member
- Posts : 1292
Join date : 2016-03-23
Location : Suburb of Chicago, Illinois
Coxfledgling- Gold Member
- Posts : 375
Join date : 2021-01-10
Location : Near Caernarfon, Snowdonia, Wales, UK
Re: Enya 06 11 Stunter glow engine crank/prop nut help.
![]() Oldenginerod Wed Sep 15, 2021 12:16 am
Oldenginerod Wed Sep 15, 2021 12:16 am
sosam117 wrote:
Problem is, it is in Excel spread sheet and I can't up load it here?
You could just open the file, take a screen-shot and attach it here as a JPG/Picture.

Oldenginerod- Top Poster
- Posts : 3973
Join date : 2012-06-15
Age : 61
Location : Drouin, Victoria
Re: Enya 06 11 Stunter glow engine crank/prop nut help.
![]() Oldenginerod Wed Sep 15, 2021 12:52 am
Oldenginerod Wed Sep 15, 2021 12:52 am
Oldenginerod- Top Poster
- Posts : 3973
Join date : 2012-06-15
Age : 61
Location : Drouin, Victoria
Re: Enya 06 11 Stunter glow engine crank/prop nut help.
![]() sosam117 Wed Sep 15, 2021 6:58 am
sosam117 Wed Sep 15, 2021 6:58 am
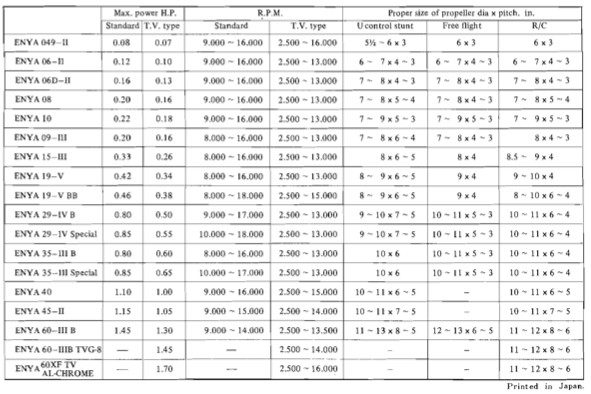
Oldenginerod wrote:I have this! Sorry it's so fuzzy.
Where did you get this table from?
I see that it was printed in Japan, so it came from Enya?
Was this information in one of Enya's fliers that came with an engine?
Thanks
sosam117- Diamond Member
- Posts : 1292
Join date : 2016-03-23
Location : Suburb of Chicago, Illinois
Re: Enya 06 11 Stunter glow engine crank/prop nut help.
![]() rsv1cox Wed Sep 15, 2021 7:38 am
rsv1cox Wed Sep 15, 2021 7:38 am

Two pages connected and tightly folded they were stamped with the engines displacement and price and included with the crystal cased and later cardboard boxes. There were variations over the years but mostly followed the same theme. This style used only on engines with a displacement of .09 and greater.

rsv1cox- Top Poster
-
Posts : 10605
Join date : 2014-08-18
Location : West Virginia
Re: Enya 06 11 Stunter glow engine crank/prop nut help.
![]() sosam117 Wed Sep 15, 2021 11:19 am
sosam117 Wed Sep 15, 2021 11:19 am
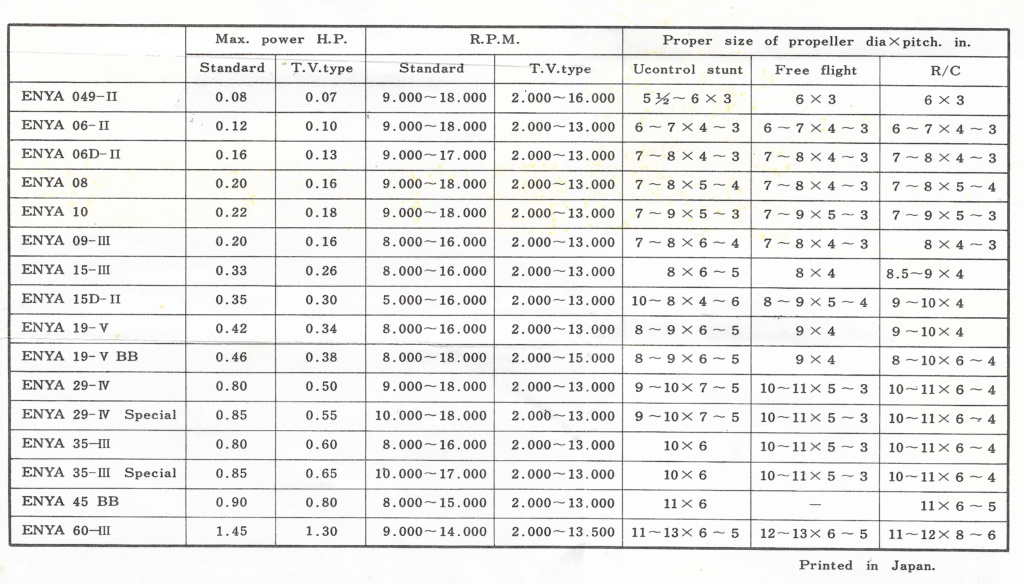
I did find the same information but had to dig around in my Enya collection for one that had the smaller engine information.
Hope mine is clear as well?

Same information as what you posted rsv1cox
sosam117- Diamond Member
- Posts : 1292
Join date : 2016-03-23
Location : Suburb of Chicago, Illinois
Re: Enya 06 11 Stunter glow engine crank/prop nut help.
![]() Oldenginerod Wed Sep 15, 2021 4:43 pm
Oldenginerod Wed Sep 15, 2021 4:43 pm
Oldenginerod wrote:I have this! Sorry it's so fuzzy.
Wow, thanks Bob. That's a much better copy. I can't remember where I got mine, although I do have some original printed material that came with new engines. I'm thinking it was lifted off the 'net, looking at the poor resolution. Then again, my scanner isn't the best.
Oldenginerod- Top Poster
- Posts : 3973
Join date : 2012-06-15
Age : 61
Location : Drouin, Victoria
F
![]() Coxfledgling Sun Oct 03, 2021 5:13 am
Coxfledgling Sun Oct 03, 2021 5:13 am
I have emailed ken Enya, just waiting for feedback from him.
Ps, anyone on here called DAVE who is emailing me ?
Dave emailed at about 1:20am , can only think it may be someone on here due to time.
If so, please PM me on here as I am treating these Dave emails as possible scam, there is insufficient data in the address to say who it is, certainly no Dave I know.
This has been happening for some time now this year...
Coxfledgling- Gold Member
- Posts : 375
Join date : 2021-01-10
Location : Near Caernarfon, Snowdonia, Wales, UK
Re: Enya 06 11 Stunter glow engine crank/prop nut help.
![]() Oldenginerod Sun Oct 03, 2021 5:58 am
Oldenginerod Sun Oct 03, 2021 5:58 am
Coxfledgling wrote:Hi sosam,
I have emailed ken Enya, just waiting for feedback from him.
Ps, anyone on here called DAVE who is emailing me ?
Dave emailed at about 1:20am , can only think it may be someone on here due to time.
If so, please PM me on here as I am treating these Dave emails as possible scam, there is insufficient data in the address to say who it is, certainly no Dave I know.
This has been happening for some time now this year...
With an email coming through at 1.20am, we have a Dave in New Zealand. Not to say that it's him, just that the time of the message leads me that way.
Oldenginerod- Top Poster
- Posts : 3973
Join date : 2012-06-15
Age : 61
Location : Drouin, Victoria
Re: Enya 06 11 Stunter glow engine crank/prop nut help.
![]() sosam117 Sun Oct 03, 2021 8:03 am
sosam117 Sun Oct 03, 2021 8:03 am
It takes Ken Enya awhile to reply with Japan having lockdowns and tight quarantining because of Covid-19.
If you don't hear from Ken Enya in about 2 or 3 weeks for the throttle valve or the silencer,
then contact Bob Brooks (here in the USA).
He has the Enya throttle valve and silencer for your Enya 06-II engines.
Bob Brooks email:
shtterman@aol.com
on line store:
Bob Brooks eBay store
Website location for Enya 06-II throttle valve (carburetor) on Bob Brook's site:
T.V. -- R/C carb.
Website location for Enya 06-II silencer (muffler) on Bob Brook's site:
Silencer / Muffler
sosam117- Diamond Member
- Posts : 1292
Join date : 2016-03-23
Location : Suburb of Chicago, Illinois
» Enya .049 glow engine
» Another evilBay Enya .06II Throttle Valve
» Translated Engine instructions for Enya .049-II / Enya .06-II / Enya .08 and Enya .10
» Standard Enya .049-II engine vs. the Mikoken Enya engine -- What is different?