

 Rules
Rules
by getback Today at 8:31 am
» Jim Walkers FireBee - This is going to be fun
by getback Today at 6:44 am
» Fox .35 Modifications
by Ken Cook Today at 4:16 am
» Three -- sold out (making two more) Cox .010 Carburetors with wrench
by 1/2A Nut Today at 1:08 am
» Happy Anzac Day!
by Boats13 Today at 12:03 am
» Project Cox .049 r/c & Citabrian Champion
by MauricioB Yesterday at 5:08 pm
» Introducing our Cox .049 TD Engines
by getback Yesterday at 7:20 am
» Roddie's flat-bottomed boat..
by Levent Suberk Yesterday at 1:23 am
» Cox powered jet-pump for model Sprint Boat
by roddie Thu Apr 25, 2024 11:25 pm
» Micro Draco Gets to Fly on a Beautiful Morning.
by rdw777 Thu Apr 25, 2024 9:15 pm
» Jim Walker Firebaby
by rdw777 Thu Apr 25, 2024 9:06 pm
» Hydro-bat by Vic Smeed: engine probs
by GallopingGhostler Thu Apr 25, 2024 6:12 pm


Ring Master Gold KIt

 Ring Master Gold KIt
![]() fredvon4 Mon Jun 13, 2016 4:38 pm
fredvon4 Mon Jun 13, 2016 4:38 pm
And fortunately....many won't believe it..... but we have BETTER resources today than when I was a 1950~1970s kid shopping at the Army Base Post Exchange, some LHS, Dime store, Grocery store (yes Virginia I bought a model airplane kit in SafeWay around 1968, or mail order from the ads in magazines
The access to building advice and specific supplies is much better now than when we learned from a neighbor or magazine 40 or 50 years ago
In 1958 when my dad bought a McCoy .35, a Sterling Ringmaster, a tube of Ambroid, and a can of Dope...it never would have occurred to him to modify the airplane, use different materials or glues, or deviate ANY from the PLAN
Today I see MOST of the CEF denizens deviating from "THE PLAN" daily, having fun, and being successful....or not...grin
Later in this thread I will try to show how I adapted a 1950 (Matt Kaina Ring Master) with modern Engine (well sort of --the OS FP 20 has been discontinued for many years now) modern glues, carbon fiber, Fiber Glass, contest balsa, plywood, and still do a traditional Silk and Randolph dope finish

fredvon4- Top Poster


Posts : 4001
Join date : 2011-08-26
Age : 68
Location : Lampasas Texas
The Fuselage
![]() fredvon4 Mon Jun 13, 2016 5:41 pm
fredvon4 Mon Jun 13, 2016 5:41 pm
I like many of the other cottage industry guys, and Brodak or other commercial businesses, but this particular Gold kit is mostly complete minus engine, covering, and wheels for a mere $89 plus shipping ($13 to me)...note the reduced price kit is withOUT a full sized plan (avilable anywhere for free)
A look around many of the forums there are ways to make this plane even lighter than the target 24~25oz AUW
I am shooting for 26oz using silk n dope
Another note is Pat's version os designed for a non vibrating modern 20~25 engine and he specificaly warns that a Fox 35 is not a good choice ( weight reduction is mostly the thin lite ply doublers on the nose and short Maple bearers)
I happen to have a Lew Woolard Fox 35 I am dying to use on a RM so I set about to use the lite ply but reinforce the fusealage enough to consider the 9oz vibrator...fall back is... an on the way OS FP 20
Raw fuselage starting weight 74 grams, here is the idea...lightem the fuselage and then use modern materiels to bring it back near or under starting weight...to this end I reduced the outer perimiter of the fuse a bit and capped with 1/64th ply strips top and bottom
Net wegiht gain with glue...zero...side to side rigidity increased
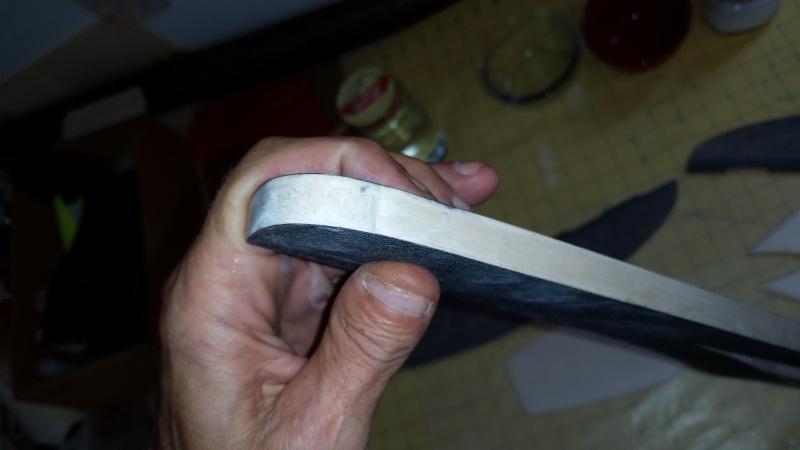
Long bar sand the fuse slightly thinner than the 1/2"....Add many lightening holes then laminate two layers of .3oz carbon fiber with dope (I have .2oz .3oz and.5oz ACP soured CF veil in one yard lengths)

net gain .9 grams ...now 74.9g... increased torsional ridgidity and reduced aft of wing breakeage potential
I used non tautening dope to adhere and same dope with Zink Sterate to fill and sanded back to flat exact 1/2" design thickness

Note the second layers of CF are from doublers aft
Last edited by fredvon4 on Tue Jun 14, 2016 10:55 am; edited 1 time in total
fredvon4- Top Poster
-
Posts : 4001
Join date : 2011-08-26
Age : 68
Location : Lampasas Texas
Re: Ring Master Gold KIt
![]() badbill Tue Jun 14, 2016 9:52 am
badbill Tue Jun 14, 2016 9:52 am

badbill- Gold Member

- Posts : 312
Join date : 2015-08-13
Age : 67
Location : Centerville, Georgia
Re: Ring Master Gold KIt
![]() fredvon4 Tue Jun 14, 2016 10:59 am
fredvon4 Tue Jun 14, 2016 10:59 am
fredvon4- Top Poster
-
Posts : 4001
Join date : 2011-08-26
Age : 68
Location : Lampasas Texas
Re: Ring Master Gold KIt
![]() badbill Tue Jun 14, 2016 2:01 pm
badbill Tue Jun 14, 2016 2:01 pm
fredvon4 wrote:I did round over the Top from Front of canopy to before the rudder. But yes, the front nose and entire bottom is full width square with slight radius on all corners
Aaahhh, ok. That's how my Brodak ARF Ringmaster is. I prefer and oval top to bottom shape. At some point I want to try the carbon veil. I ordered some CF tubes for pushrods from CST a few days ago, and looked at the price of the veil and it scared me away....
badbill- Gold Member
- Posts : 312
Join date : 2015-08-13
Age : 67
Location : Centerville, Georgia
Re: Ring Master Gold KIt
![]() fredvon4 Tue Jun 14, 2016 2:22 pm
fredvon4 Tue Jun 14, 2016 2:22 pm
Jut got a new order delivered this week the .2oz stuff a yard was $14.50
the .3 was $15.00
and the .5 was 17.50
a 48 inch stick of the .156 OD rod I use for push rods was $4.15
I will not need any more from them for several years
fredvon4- Top Poster
-
Posts : 4001
Join date : 2011-08-26
Age : 68
Location : Lampasas Texas
Re: Ring Master Gold KIt
![]() ian1954 Tue Jun 14, 2016 7:01 pm
ian1954 Tue Jun 14, 2016 7:01 pm

ian1954- Diamond Member

- Posts : 2688
Join date : 2011-11-16
Age : 69
Location : England
Tool for balsa slots
![]() fredvon4 Wed Jun 15, 2016 12:01 pm
fredvon4 Wed Jun 15, 2016 12:01 pm
A stack of band saw blades will work but I use sections of my small format band saw (broken) blades after I straighten several 8 inch sections
in my case 2 together so teeth fit together and heat shrink tubing either end gives me a perfect 1/16th slot
and three done up give me 3/32nds, the 4 section one is 1/8th wide slot cutter ( not pictured)
fredvon4- Top Poster
-
Posts : 4001
Join date : 2011-08-26
Age : 68
Location : Lampasas Texas
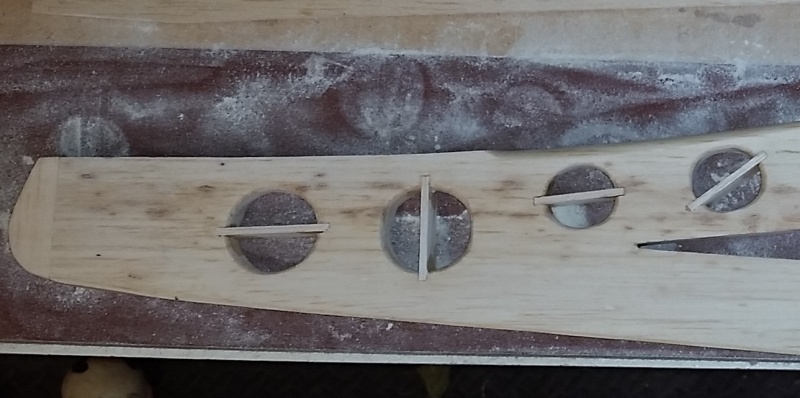
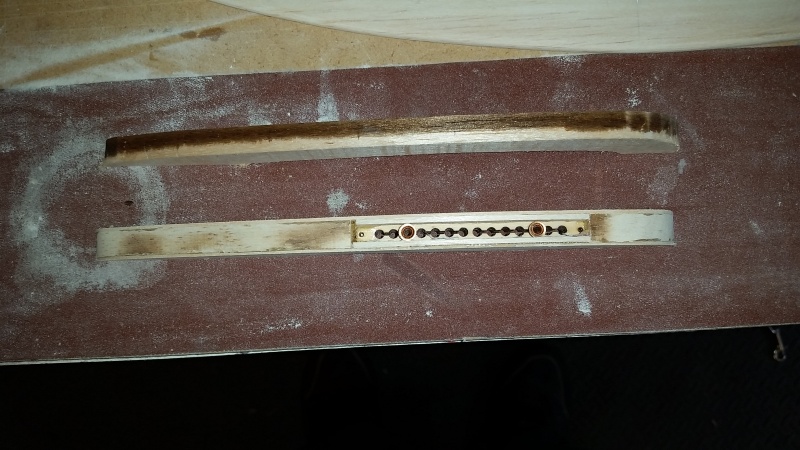
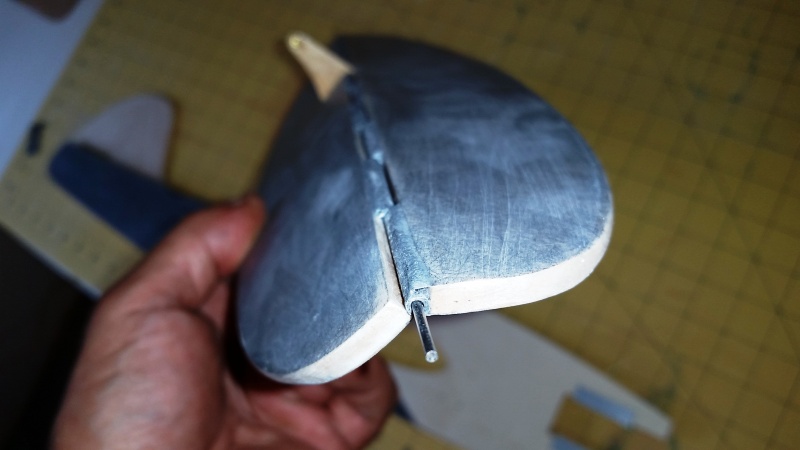
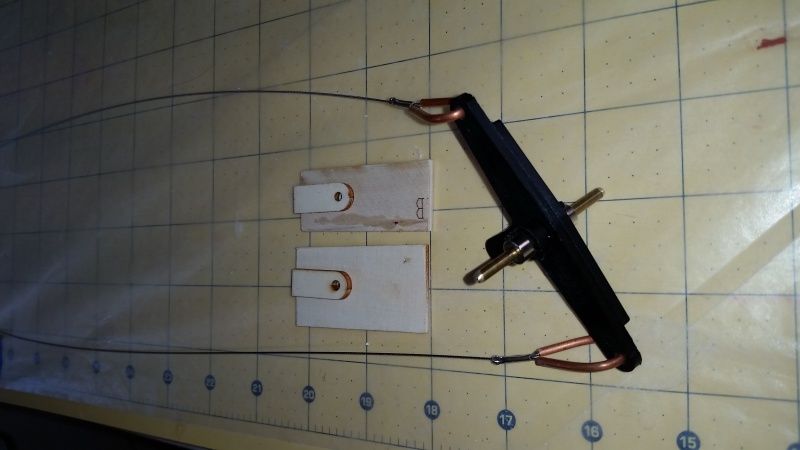
Adjustable Lead Out (ALO)
![]() fredvon4 Wed Jun 15, 2016 1:31 pm
fredvon4 Wed Jun 15, 2016 1:31 pm
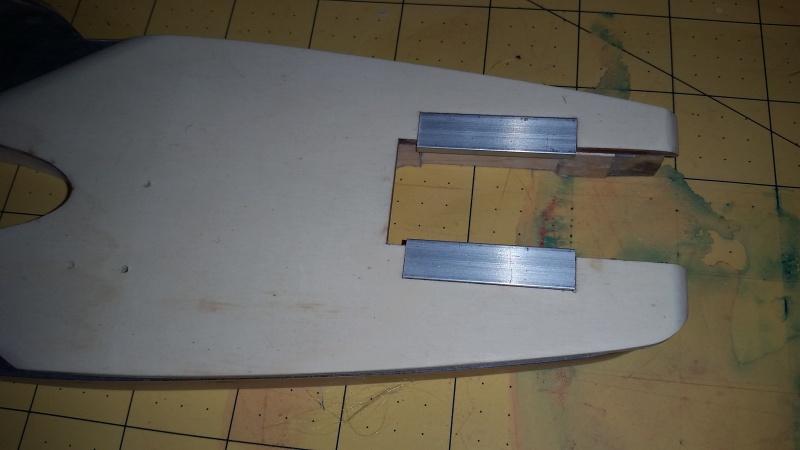
TO adjust you grab the thimble with needle nose, pull out and re-insert in a different hole
sorry did not take a assembled photo of his method...but in the final assy photo you should see and get it
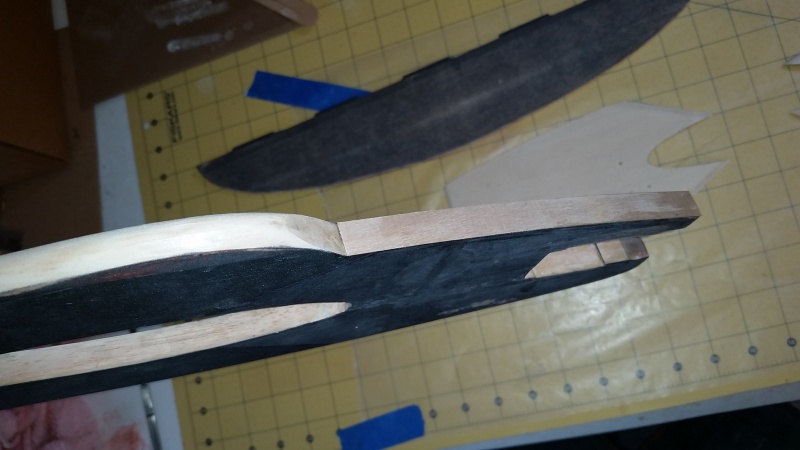
The kit has two wing tips, laser cut from light 3/8th balsa
I need to adapt the inner tip for the adjustable lead out (ALO) stack
First I copied the shape on 1/32 ply ( could have / should have used 1/64th)
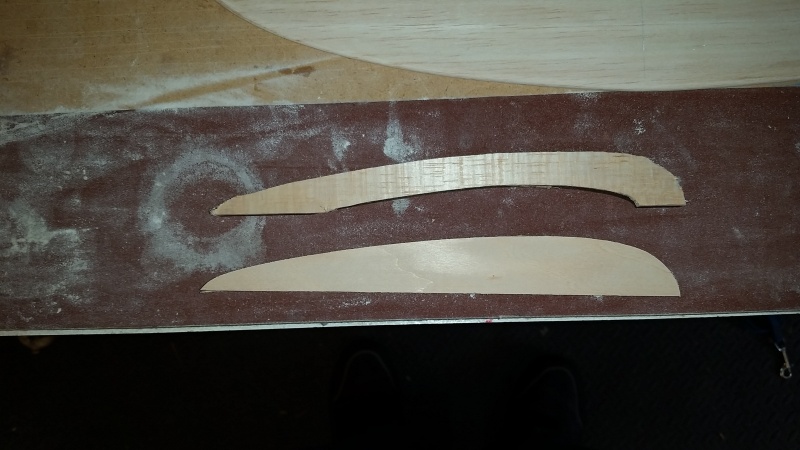
I made a top and bottom then glued on one, located the area for the ALO, and cut it out of the balsa resulting with the original wing tip front and rear with ALO gap bridged by the ply
The ALO is 1/8th thinner than the original 3/8th wing tip piece, so need two 1/16th spacers to center the ALO in the sandwich
When all glued up and sanded it is 7/16th vs the out tip at 3/8th...I can live with the slight dissimilarity ...I did not have confidence I could thin the original 3/8th balsa properly

Last edited by fredvon4 on Thu Jun 16, 2016 1:46 pm; edited 1 time in total
fredvon4- Top Poster
-
Posts : 4001
Join date : 2011-08-26
Age : 68
Location : Lampasas Texas
Prep Dope with out waste or mess
![]() fredvon4 Wed Jun 15, 2016 3:46 pm
fredvon4 Wed Jun 15, 2016 3:46 pm
The Sig stuff is usually bought in 1/2 pint colors, Pints and quarts of clear, but price per gallon is way up there...fortunately the color goes a long way on the smallish planes I build
Planning a lot of Nostalgia combat wings and some of these old skool stunt planes I am building I desired to re-learn silk and needed a goodly amount of dope. Trip to Dalas to visit daughter and stopped at an aircraft supplier for the Randolph stuff
Still pricey at $48 per gallon including the thinner also at $48.....$250 trip (2 dopes 3 thinner) but enough for several years
The problem with Gallons is how to use it and not make a mess or screw up the lid seal
I mail ordered a bunch of these:
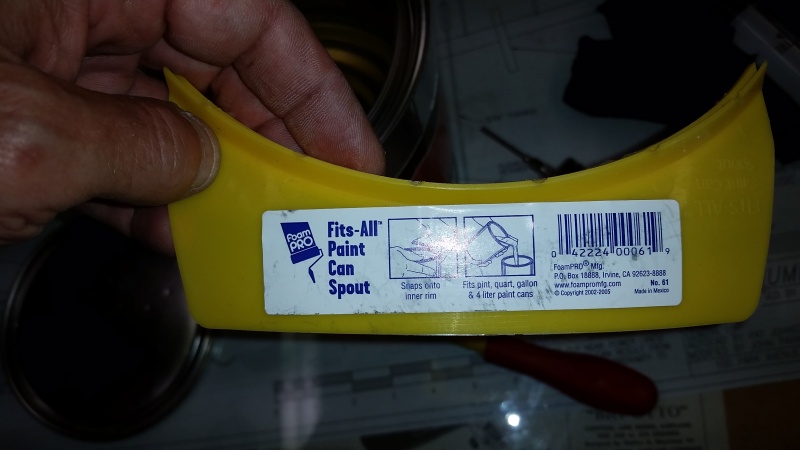
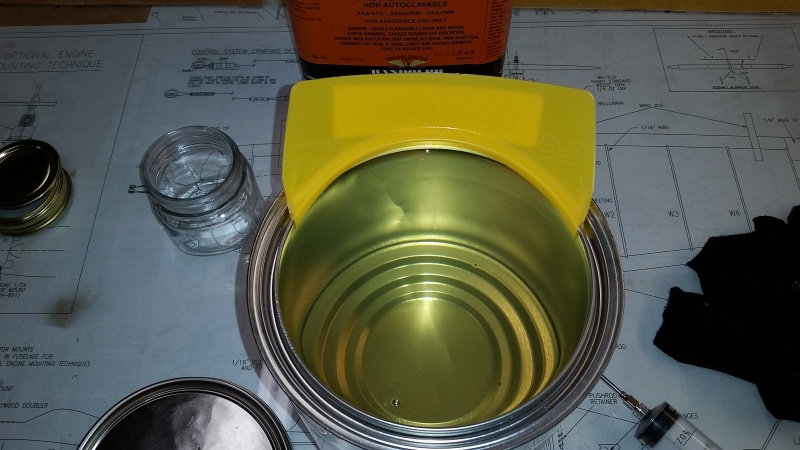
But I want to mix in 1/2Pint Mason jars and the pour spouts and weight of the gallon make it hard to do
In another thread I mentioned that WalMart BBQ section sells .88cent 2oz meat marinade injectors. I did a test to see if the thinner would melt or seize up one of them...15 min later had a plan
The thinner sucks into the needle easily (watery) but the dope is too thick so I hacked off the nose and made a bigger suck it in hole
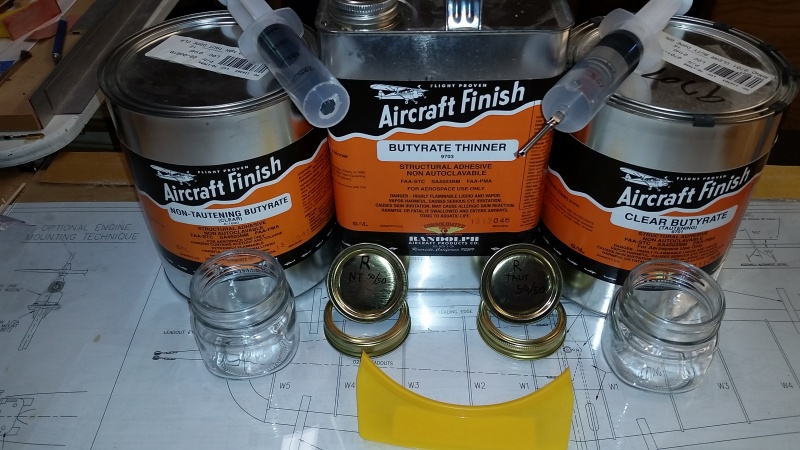
crummy camera work but I did mark the lids with the 50/50 mix of each different dope

I also now use Zink Sterate as the filler mixed in the thinner then add some dope
Randy Smith Aero Hobbies sells a tub of very finely ground ZS for about $18 enough for years

fredvon4- Top Poster
-
Posts : 4001
Join date : 2011-08-26
Age : 68
Location : Lampasas Texas
Re: Ring Master Gold KIt
![]() getback Wed Jun 15, 2016 8:48 pm
getback Wed Jun 15, 2016 8:48 pm


getback- Top Poster
-

Posts : 10116
Join date : 2013-01-18
Age : 66
Location : julian , NC
Re: Ring Master Gold KIt
![]() fredvon4 Thu Jun 16, 2016 11:26 am
fredvon4 Thu Jun 16, 2016 11:26 am
I had a jar of dope in my stuff from 1973 when I built a lot of balsa combat planes. In 2012 when I retired and set up my hobby shop I found it and the dope was slightly darkened but still thinned and worked well.
I do plan to decant both dopes from the gallon paint cans into some of the 1/2 gallon and quart cans I just bought (pictured in the fuel blending thread)
I would suspect , if just a little used from the gallon paint cans, the increasing volume of air would promote early degradation,
fredvon4- Top Poster
-
Posts : 4001
Join date : 2011-08-26
Age : 68
Location : Lampasas Texas
Hinge detail for Stab/Elevator
![]() fredvon4 Thu Jun 16, 2016 1:38 pm
fredvon4 Thu Jun 16, 2016 1:38 pm
That and I don't do cloth ones very well, and sewn look good to me DONE right but are tedious on bigger tails
I have been sort of successful with Klett type but always seem to get one slot slightly too high or angled causing a bind and rework
A lot of stunt guys use barrel (Klett /DuBro) hinges but take out the pins and use a long thin piano wire so they can remove the elevator.
I tried one time to do the hinge from MonoKote per internet directions and it was way stiff! I prefer elevator to fall under it's own weight and not be sloppy at the same time...Covering hing method seemed to return to neutral if deflected by hand
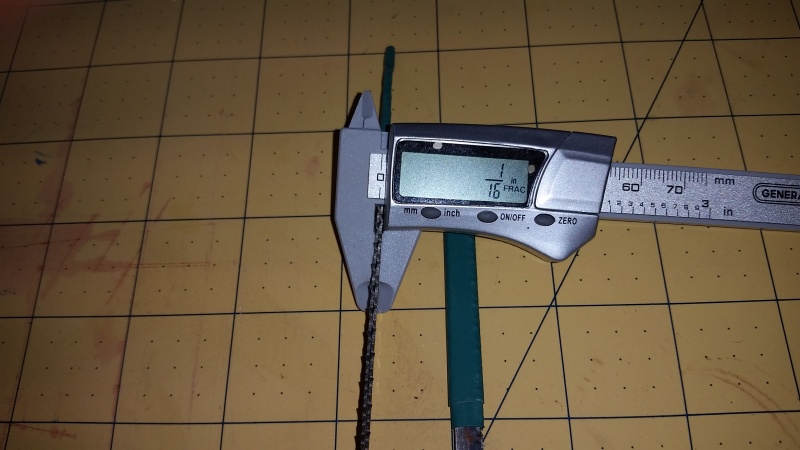
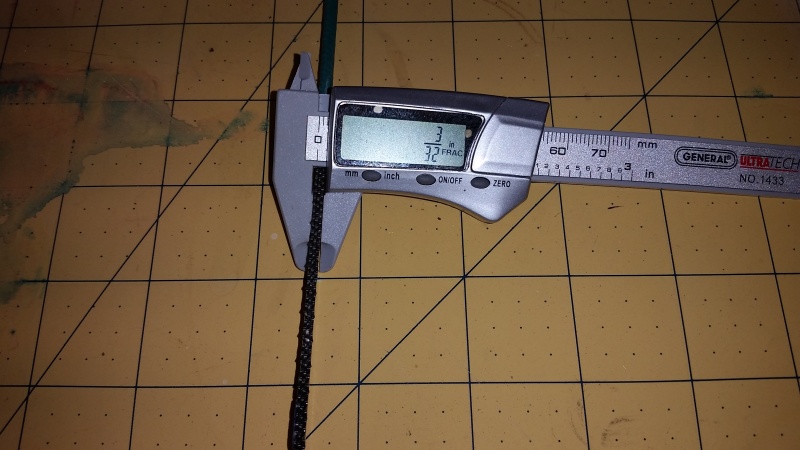
The hinge line on this bird is 17 inches long so I found a length of Carbon tube left over that would work and cut segment 1.5" long after finding a section of piano wire that was good but loose fit
Last note ...the balsa is out of 3/16th well selected wood, flat, light, good grain and resists flex or twist in each plane. The selected tube to be centered needed a shim under (on my building board using a thin strip of 1/164th cellophane taped down). I decide to use WalMart E-6000 tube glue... tacky, sets fast, and slightly flexible once dry...beware this stuff does NOT sand at all
I just needed to get each segment stuck to it's aligned position, no cross bleed into the wire (used for alignment) and the final attachment strength by the doped on CF veil. I tried this previously using CA to stick and too often I dropped too much and locked up the pin barrel even with medium thick CA


fredvon4- Top Poster
-
Posts : 4001
Join date : 2011-08-26
Age : 68
Location : Lampasas Texas
Re: Ring Master Gold KIt
![]() ian1954 Thu Jun 16, 2016 1:42 pm
ian1954 Thu Jun 16, 2016 1:42 pm
It is difficult for me to follow a lot of the posts on finishing because the products mentioned are not available in the UK and have no equivalent. Butyrate dope is a rarity - all the dopes freely available here are Cellulose/Nitrate (but they smell nice!).
Even the terminology is different - taughtening = shrinking.
I notice though that you have both shrinking and non-shrinking dope. Do you blend them or use them separately for specific purposes?
When I watch the "Windy" videos, I am left clueless. He always promotes Brodak dope but from listening to many of his videos - I gather that although that is a "secret" formula that he helped develop - it is a blend of shrinking and non-shrinking dope. I have looked closely at the cans of the stuff he employs and do not see "taughtening" or "non-taughtening" anywhere.
I see Nitrate, Butyrate, Retarder, Rejuvinator ......... on the Brodak site but no mention of shrinking non-shrinking.
We also don't have retarder here!
ian1954- Diamond Member
- Posts : 2688
Join date : 2011-11-16
Age : 69
Location : England
For Ian
![]() fredvon4 Thu Jun 16, 2016 2:30 pm
fredvon4 Thu Jun 16, 2016 2:30 pm
Some things I learned...in the early years NITRATE dope was mostly to water proof* balsa and provide and easy to melt** substrate for the next steps of adding silk, paper ( tissue), or paper/silk composites (silk span). With rubber power, Nitrate was good enough-- but for fuel engine power, Butyrate dopes were needed. Early they learned that Nitrate dope ALWAYS needed to be the first and never on top of any other coating or paint
Retarders, and plasticizers came later as the desire to work in high humidity (dope blushing) or have a pristine finished model last for decades (additives to prevent cracking of the dope because it is always shrinking)
Ian I know you know this but I am writing for all the neophytes lurking also
* water proof because Balsa changes shape and size dramatically if wet and we are applying watered wet covering with silk or paper/silk blends because they shrink tight once dry
** melt... when the Nitrate is dry we need a way to glue down the paper, silk or silk/paper covering. Thinned Nitrate OR Butyrate dope will flow through the wet covering and the thinner will melt the dope in the balsa and cross-link with the new dope holding the covering down
I personally learned that the Nitrate can be replaced by Butyrate for every layer and no real noticeable adhesion issues
Ian...we still have Dope here in the USA because there are thousands of old time cloth wing full sized airplanes in existence that must periodically replace the covering...I have to believe that this is the same in the UK...I would find a airplane repair shop and go ask the guys what are the current products...I seriously think the exact same dopes, thinners, and additives exist in your world
Perhaps not at the hobby shop variety and quantity
Sig MFG and Brodak both contract with the Full sized suppliers to produce the smaller Qty products we use in modeling
Final thought... I learn a lot from others and my own mistakes...Silk and dope is as much an art as a specific formula.....lots of variables.... reducing the variables produces good/better/acceptable results
I never mix brands
I never use off brand thinners
I try to control humidity
I spend a lot of time sanding, cleaning, between steps
I prohibit ANY silicone product near my hobby space
I clean and dry my hands a lot or use gloves...both cloth and rubber versions
I use automotive paint finishing wax impregnated "tack" cloths, air pressure, and alcohol rag to remove all dust prior to any spray painting
BUT with all the experience and knowledge I still screw up a finish some way and I am never in search of a Concurs 20 point perfect model...just dry, the right color, fuel proof, and shiny
Edited in:
Silicone with ruin ANY painting
I never run a glow engine in my work space...
I never spary any oil based product in my work space
I keep all engines, Balsa stock, silk, tissue, and other covering materials in a container, bag, or original packaging so my heavy smoking will not contaminate... tar residue will discolor and ruin a lot of stuff
Last edited by fredvon4 on Thu Jun 16, 2016 2:46 pm; edited 1 time in total (Reason for editing : added in after re-reading)
fredvon4- Top Poster
-
Posts : 4001
Join date : 2011-08-26
Age : 68
Location : Lampasas Texas
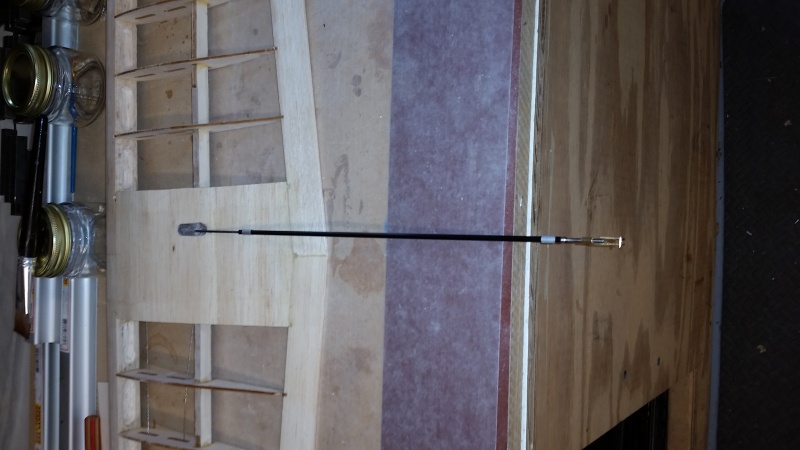
Bell Crank set up before wing build
![]() fredvon4 Thu Jun 16, 2016 4:18 pm
fredvon4 Thu Jun 16, 2016 4:18 pm
Long Music wire no bends with guide mid way will work just fine ...but I have the items for CF tube and no need for a guide/stand off
I much prefer a free floating suspended BC supported both top AND bottom...easy to fabricate
Note also this set up has the BC outboard and the push-rod lever inboard (photo not the supplied BC just so you get the orientation)
In this configuration the elevator horn is under, so up line in front pushes the elevator up
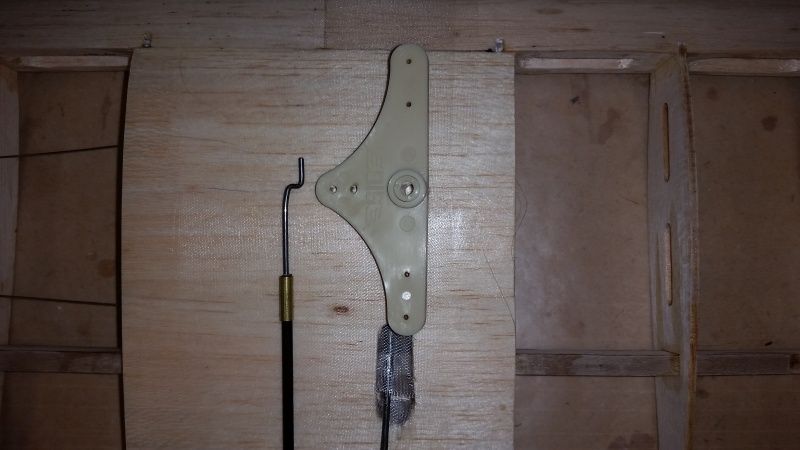
As stated I prefer top and bottom support
To this end I used a piece of 1/8th wire (smaller then the ID of the supplied BC. I used 1/8th ID a brass sleeve to bush the BC ID so no loose rocking fit
In this photo we see the BOTTOM plate is original and the two ply fillers and the piece with he "B" is the top plate I cut
I used wheel collars and Lock tight to center the BC, bearing, and 1/8th rod....later to be cut to length
Not this BC has offset top and bottom arms so the LO wires and Push rod do not interfere with each other...hard to see in my poor photos
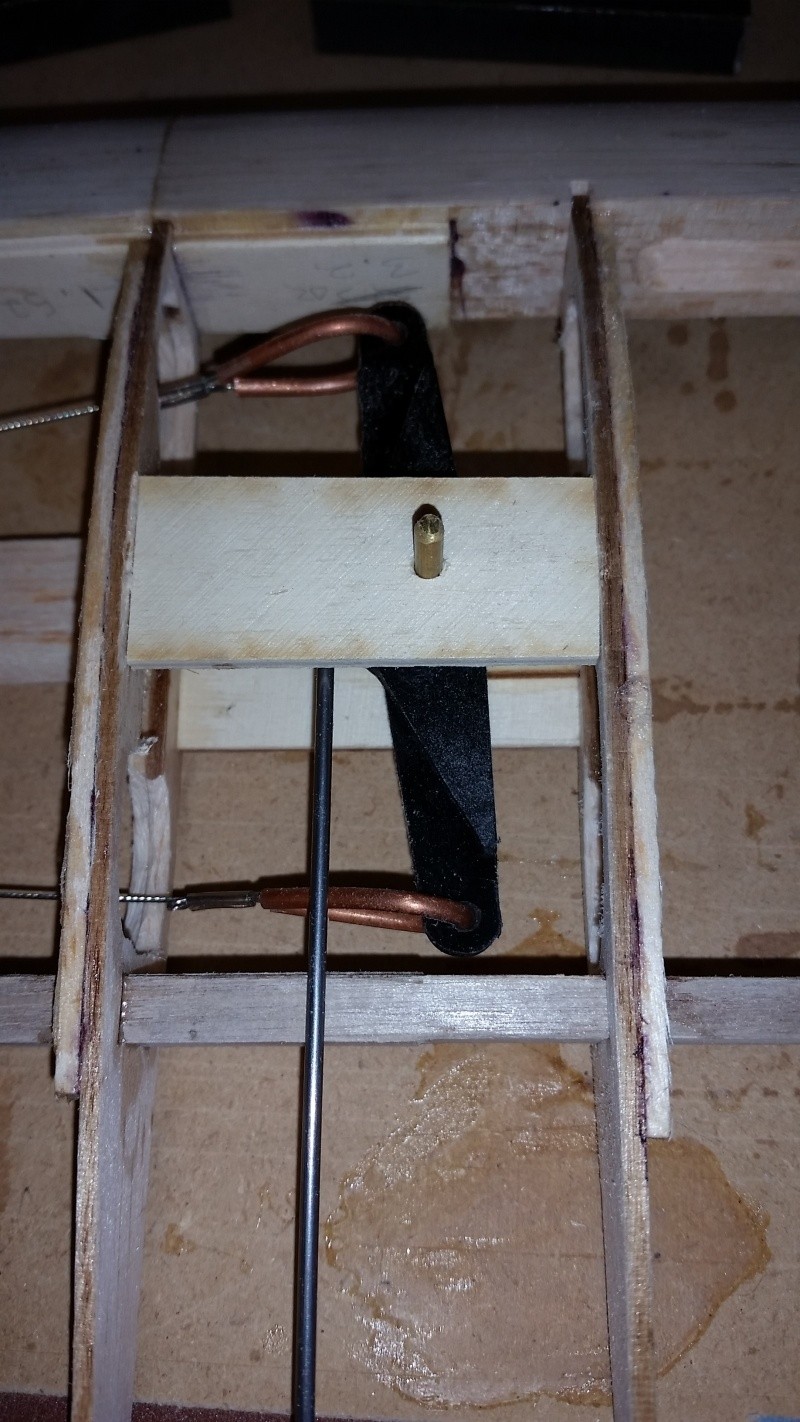
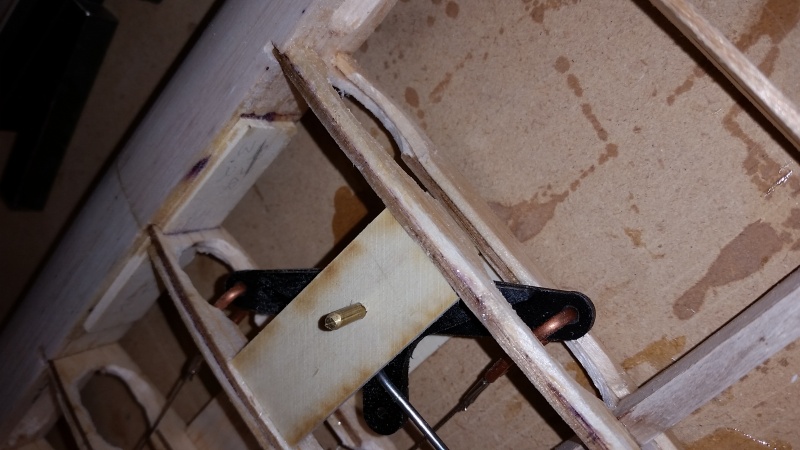
after centering top to bottom and fore/aft glued in--- and the pin/post 1/8th cut off to be under the wing sheeting--- after a quick shot of Medium CA and accelerator...not really needed as the supports are down to the loktited wheel collars and the assy can't really slide up or down...very free moving with no hitches or binds any where in the full travel
fredvon4- Top Poster
-
Posts : 4001
Join date : 2011-08-26
Age : 68
Location : Lampasas Texas
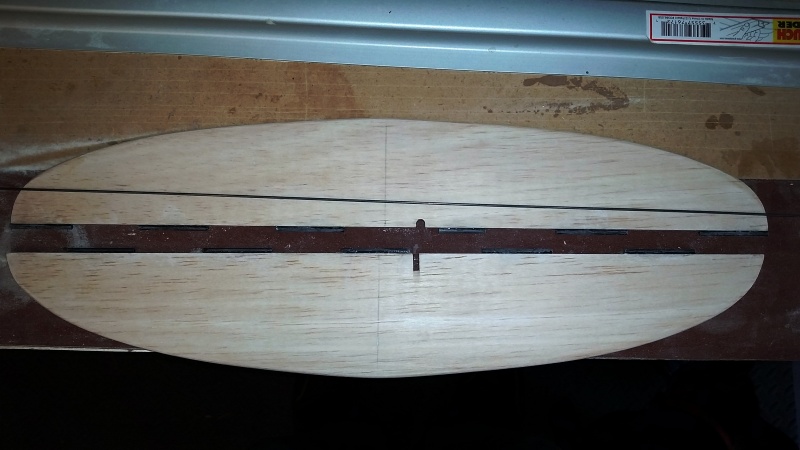
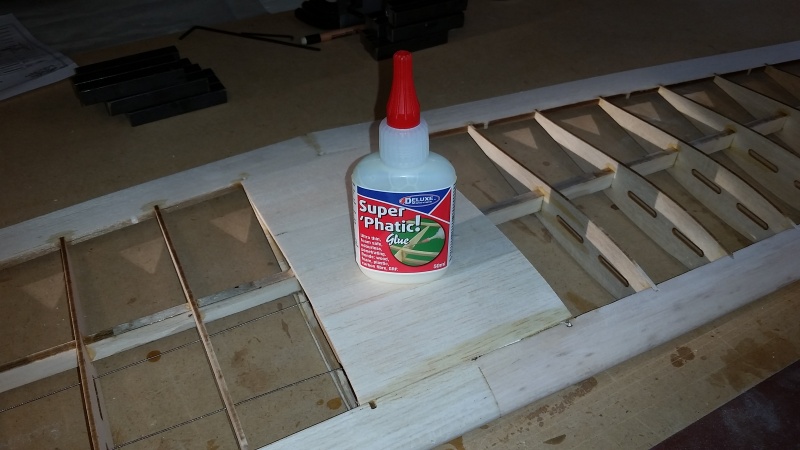
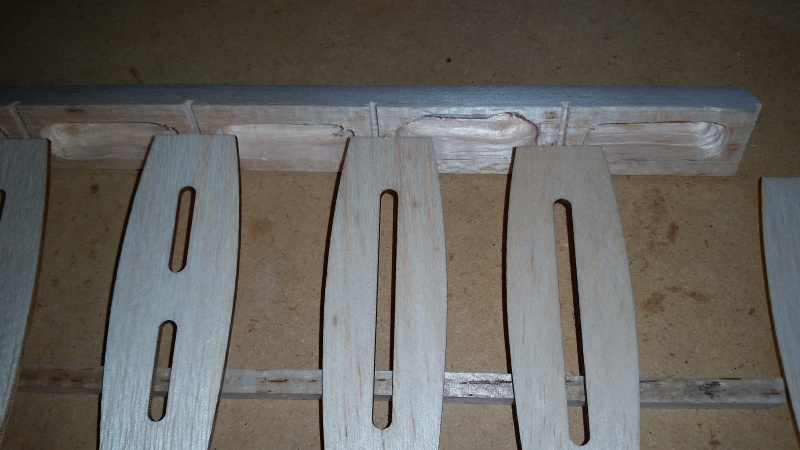
Build a flat straight wing?
![]() fredvon4 Thu Jun 16, 2016 6:39 pm
fredvon4 Thu Jun 16, 2016 6:39 pm
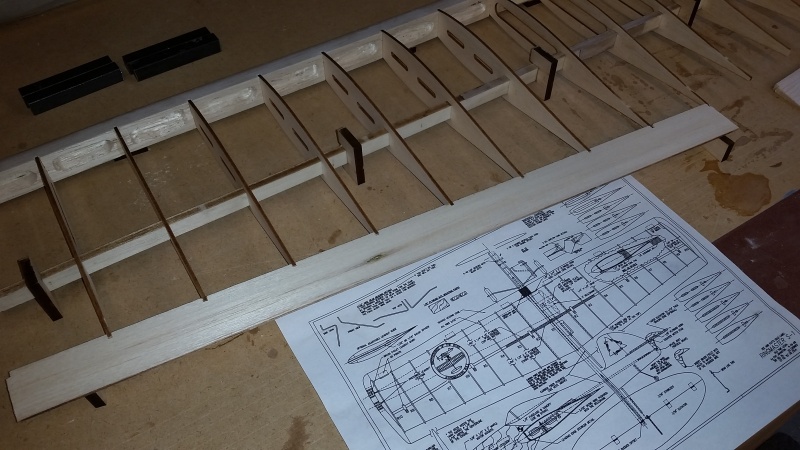

I sanded down the glue drips and re-leveled the 3/4" MDF board, then used a straight edge to align the LE jigs and tacked glued them to the flat board
This is first use of a new to me glue..SuperPhatic Deluxe products UK sold here by Horizon Hobby for $7.99 a bottle. Basically thinned down Elmer's type wood glue that wicks in, sets fast, and very good sanding quality...I like it but no instant set or kicker as with CA
Another glue I learned to love and HATE...the newer expensive Ambroid from a Canadian supplier ( I like Sig-ment better)
Hate the runny stuff
Hate the cost
Love the smell
Ken Cook taught me a trick this stuff is perfect for...pre glue the center ribs, place center sheeting in place, take off and let dry some...the shrinkage pre forms the sheet, re-glue and set in place, pin or weight and your done
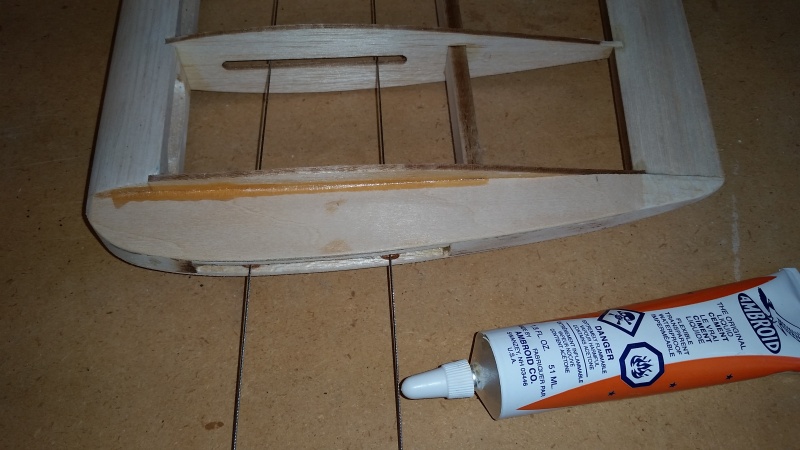
Pat also recommends hogging out the LE shallow in the center and deeper as you move outboard to reduce weight but not compromise the structure
fredvon4- Top Poster
-
Posts : 4001
Join date : 2011-08-26
Age : 68
Location : Lampasas Texas
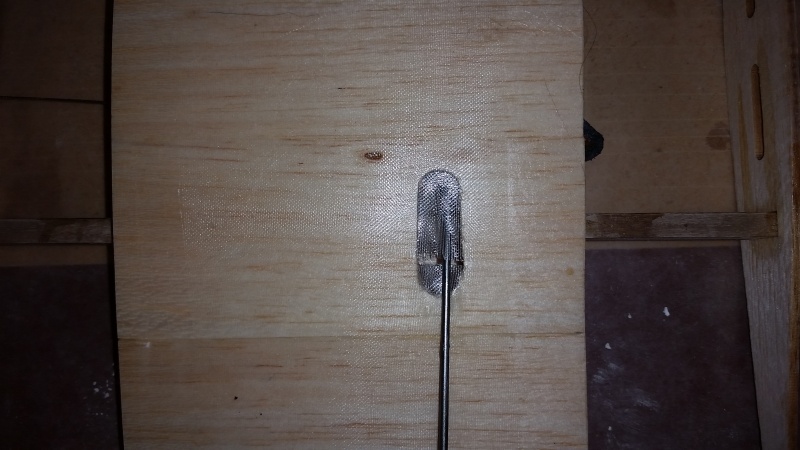
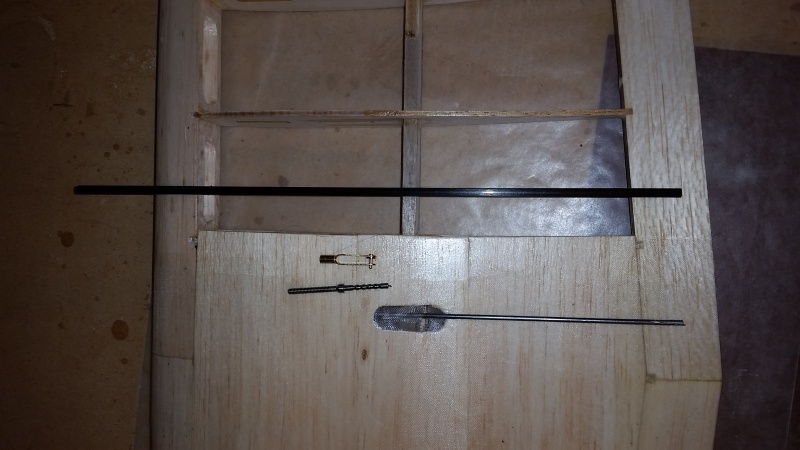
Strong wing and no flex push rod
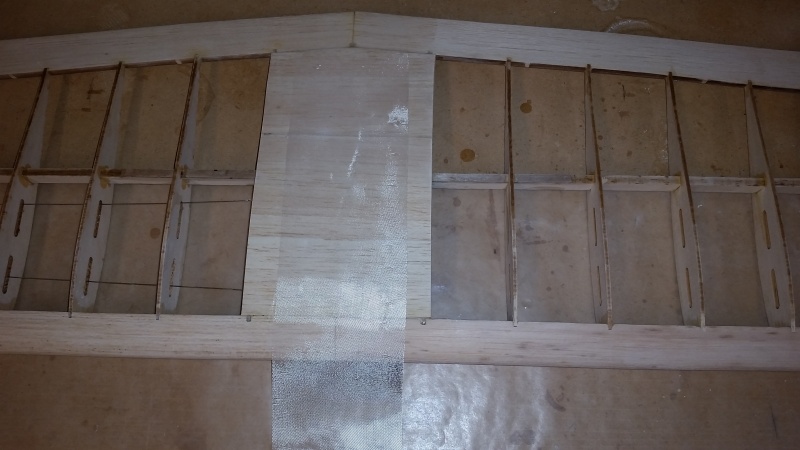
![]() fredvon4 Tue Jun 21, 2016 3:26 pm
fredvon4 Tue Jun 21, 2016 3:26 pm
In this case the center spar has 1/64th box top and bottom making the balsa spar strong in the center but the LE and TE joint need reinforcing....I use Sig light Glass Fiber cloth and dope in this area. I used to lay it on with Zpoxy finishing resin but it is a terrible mess and much harder to sand. No doubt the Zpoxy is stronger but I don't think my dope and ZS method is too weak and much easier for me to apply
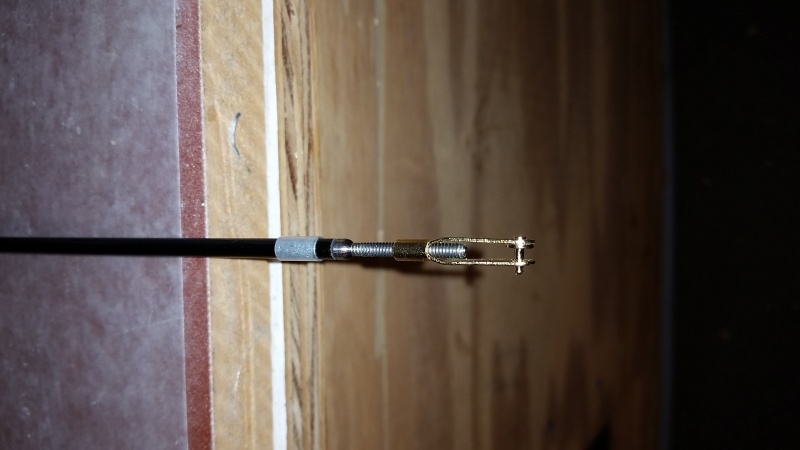
My Bell crank to elevator horn is always done with 6 components these days:
BC to CF tube is a short section of 3/32 Music wire with Z bend at BC
CF Tube is from ACP and 0.156 OD
one Titanium 5/32 x 4-40 adapter in the CF tube elev control horn end
and one DuBro 4-40 metal locking clevis
Both outer portion ends of the CF tube get a sleeve of aluminum or brass tube to prevent fraying of the tube.
Looks better than on the combat ships where we usually just wrap with thread (any kind) and thick CA
All of this is J&B epoxy in place
fredvon4- Top Poster
-
Posts : 4001
Join date : 2011-08-26
Age : 68
Location : Lampasas Texas
Re: Ring Master Gold KIt
![]() ian1954 Tue Jun 21, 2016 5:04 pm
ian1954 Tue Jun 21, 2016 5:04 pm
What is the material surrounding the push rod as it exits the hole?
ian1954- Diamond Member
- Posts : 2688
Join date : 2011-11-16
Age : 69
Location : England
Re: Ring Master Gold KIt
![]() getback Wed Jun 22, 2016 12:30 am
getback Wed Jun 22, 2016 12:30 am
( Sig light Glass Fiber cloth and dope in this area ) That's looking really strong Fred , I like your 6 component push rod set up . EriC
In this case the center spar has 1/64th box top and bottom making the balsa spar strong in the center but the LE and TE joint need reinforcing....I use Sig light Glass Fiber cloth and dope in this area. I used to lay it on with Zpoxy finishing resin but it is a terrible mess and much harder to sand. No doubt the Zpoxy is stronger but I don't think my dope and ZS method is too weak and much easier for me to apply
getback- Top Poster
-
Posts : 10116
Join date : 2013-01-18
Age : 66
Location : julian , NC
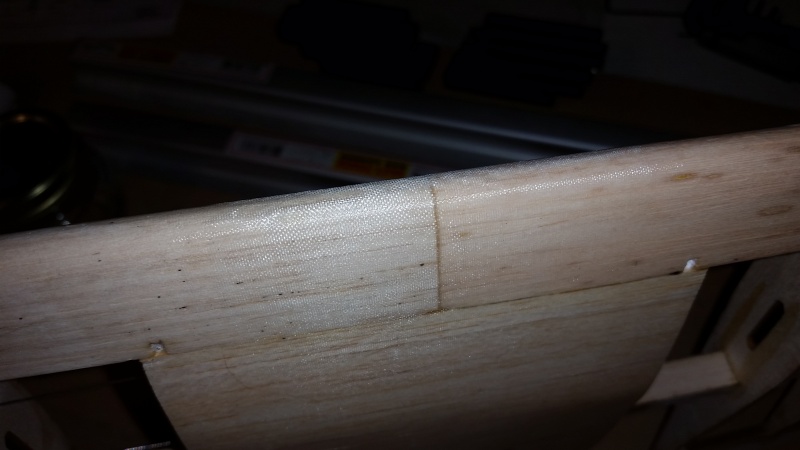
Center section cloth strengthining
![]() fredvon4 Wed Jun 22, 2016 8:54 am
fredvon4 Wed Jun 22, 2016 8:54 am
The SIGGF003 is .75 oz per Sq Yard
the SIGGF007 is .56 Oz per Sq Yard
in this case I used the .75 stuff and instead of epoxy resin, the proper fill and glue, I just used thinned dope initially then a few coats of Zink Sterate loaded thinned Dope to fill in the weave
The center section will also have overlapping 8MM Blue dyed Dharma Silk doped on and filled. Eventually the very center 3/4" to 1" will have epoxy and SuperFil fillets attaching the wing into the Fuselage saddle cut out.
I don't fly real hard Tight corners creating a lot of G force that might fold a wing, so I am confident that MY use of Dope for the FG and not Epoxy resin will be strong enough...if others fly real hard I do recommend the Zpoxy finishing resin or similar for attaching the FG to BARE sanded balsa
Later once wing is installed I will cut loose the area of FG that covers the push rod exit hole and install a Balsa shaped cover to keep fuel and oil out
fredvon4- Top Poster
-
Posts : 4001
Join date : 2011-08-26
Age : 68
Location : Lampasas Texas
Re: Ring Master Gold KIt
![]() ian1954 Wed Jun 22, 2016 9:04 am
ian1954 Wed Jun 22, 2016 9:04 am
Didn't think it was the top covering waiting to be trimmed.
ian1954- Diamond Member
- Posts : 2688
Join date : 2011-11-16
Age : 69
Location : England
Re: Ring Master Gold KIt
![]() fredvon4 Wed Jun 22, 2016 3:18 pm
fredvon4 Wed Jun 22, 2016 3:18 pm
The slit I put in the Glass Fiber and will also put in the silk, does not create any noticeable drag on the control so I may not cut back /away much of the GF, if any, after I sand off the little bit of sloppy dope on the Push rod
Still waiting on the engine to arrive before finishing the Fuselage front end drill and bearer mounting...then placement of the doubblers... some filler, sanding and smoothing, hard points for the Aluminum Landing gear and mock up... then off to get a shot or two of Napa sourced Dupli Color 540 primer and more sanding before color coats.... not decide yet on White dope or Rattle can white... the rattle can stuff is fairly fuel proof...the dope method needs more weight from a few light clear coat layers
Blue silk wings... thinking of tinting the dope with some blue for this wing
Red Dope ruder and tail
White Fuselage
Sliver Canopy
Perhaps one 3 or 4 inch stripe of black and white checkers on outboard wing... I have the monocoat checker trim sheet but not keen on how to get it on top of the silk and dope and not look funky
Certainly a BOTR and RM decal
fredvon4- Top Poster
-
Posts : 4001
Join date : 2011-08-26
Age : 68
Location : Lampasas Texas
Re: Ring Master Gold KIt
![]() fredvon4 Thu Aug 11, 2016 4:04 pm
fredvon4 Thu Aug 11, 2016 4:04 pm
Weather is prime
Family vacation
Grand children now here
Helping my son build a very large shop in town at his place
Actually my wife and I have been flying my other RMs a bit in the early AM and she is starting to pester me about silking the wing for this plane
Progress soon...I hope...it the WX will just drop some below 103F
fredvon4- Top Poster
-
Posts : 4001
Join date : 2011-08-26
Age : 68
Location : Lampasas Texas
Re: Ring Master Gold KIt
![]() Cribbs74 Thu Aug 11, 2016 10:51 pm
Cribbs74 Thu Aug 11, 2016 10:51 pm
Ron

Cribbs74- Moderator
-
Posts : 11895
Join date : 2011-10-24
Age : 50
Location : Tuttle, OK
» Pat Johnston Ring Master 526 for a Horrizon Evo .36
» Friend happydad, this is for you.
» Scientific Stunt Master........What was he thinking?
» Master Airscrew and their new slimmer faster props