

 Rules
Rules
by getback Today at 6:46 am
» Cox Ryan ST 2.0
by rsv1cox Today at 6:38 am
» COX Postage Stamp engine -Babe Bee & Horseshoe Backplate adapters
by GallopingGhostler Today at 6:33 am
» Jim Walkers FireBee - This is going to be fun
by rsv1cox Yesterday at 3:45 pm
» Hawk had breakfast and then took a bath
by GallopingGhostler Yesterday at 2:34 pm
» Prop Rod - resto to a runner
by rsv1cox Yesterday at 12:41 pm
» Jim Walker Firebaby
by rsv1cox Yesterday at 12:24 pm
» Internet buy
by Ken Cook Yesterday at 9:15 am
» Artwork for Otto Kuhni
by GallopingGhostler Yesterday at 8:26 am
» Sherline lathe wont run
by getback Yesterday at 7:15 am
» Roddie's water-cooling bottle for bench-running
by roddie Tue May 14, 2024 7:38 pm
» Feed Station Zebra.. Spring 2022
by roddie Tue May 14, 2024 5:59 pm


Redneck workshop organizational methods
Page 1 of 2 • 1, 2 ![]()

Redneck workshop organizational methods
![]() RknRusty Tue Aug 30, 2016 11:21 pm
RknRusty Tue Aug 30, 2016 11:21 pm
In my shop, I've bought and scavenged Rubbermaid drawer cases for roughly categorized parts and building supplies. These accompany the worst looking patchwork of mostly cardboard boxes and cans, you name it and I've I've punched holes in it to stick stuff. That stuff being screwdrivers, pliers, scissors, hemostats, and lots of other sharp pointy things. A spongy styrofoam block glued to the table is where I jam my Exacto knives, and is actually the most sensible contraption I've got. It lasts a year between replacements
Now I'm ready for a makeover. Now and then I shake my head and ask, "What would Tom Morris do." Anyone ever seen his shop. It's cleaner than my kitchen and better organized. I'm tired of mine and need a major redo.
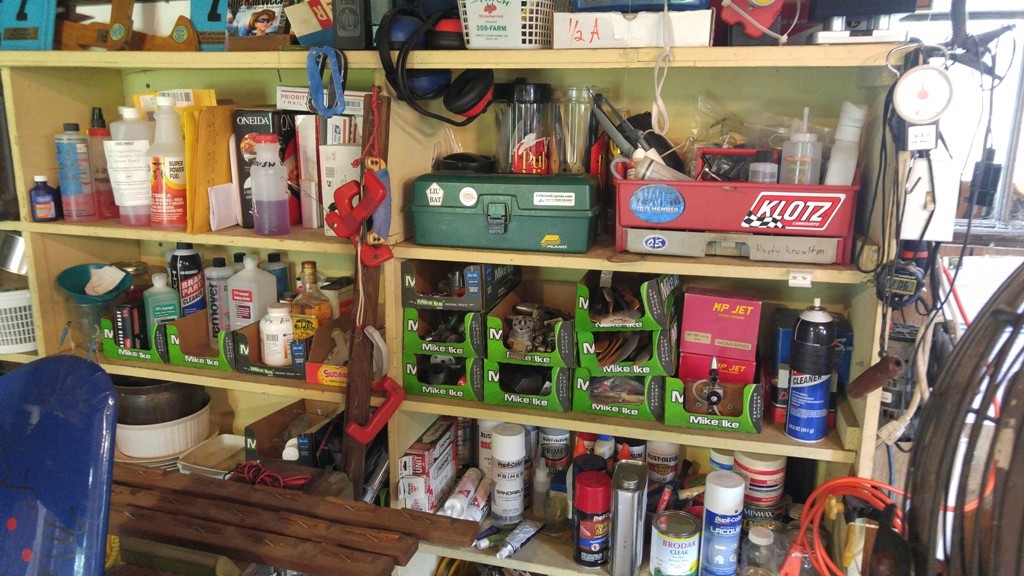
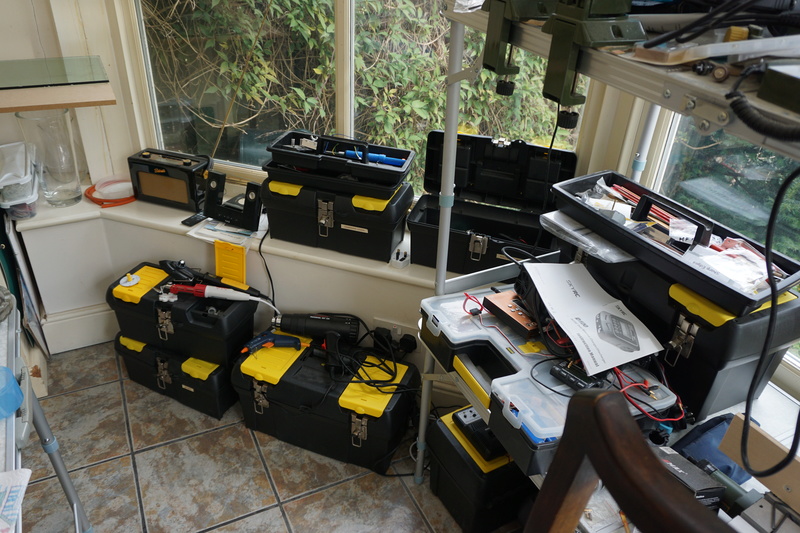
The following is what it looked like today after I finished working on the Nobler, with all the tools back in their place.
First, there's the basic 8x4 table, built in 1980 for drag racing work. There are power tools mounted around one side and on the back corners, which can't be seen. I'd like to have those tools on roller tables, so I can take sawing and sanding outside when possible. That would free up a lot of table-top space too.
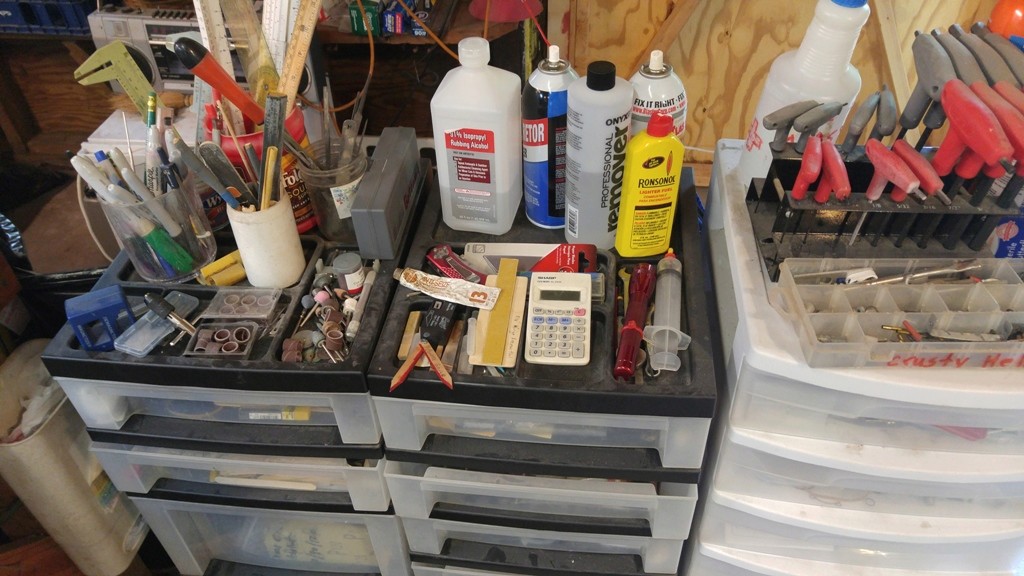
I keep the table top equipped with a plastic olive assortment tray from Whole Foods, that serves as my small scrambled hardware holder. I do not sort screws and nuts, etc that I toss into it, I'm not that anal. The aluminum grease catchers from the WalMart grill section are my project trays, $.88 for 3, and I have assorted sizes, and the bits for particular projects can be kept separate. And there is always one with a stack of torn paper towels that I soak with alcohol or acetone when I'm epoxy gluing or painting. The Mike & Ike boxes in the back serve similar roles for each project's bigger parts and building materials. These, I actually like, and you'll see why in my next pic. The front of my table, not shown has a row of nails holding rulers, squares saws, dremel, etc.

Mike & Ike shelf organizers! Engines, tanks, frequently used props, and whatever else on the shelves needs organizing. This is a work in progress, so I gotta keep eating Mike & Ikes Lol. That bottom shelf is outta control with paint, glue, spackle, ARP cards, and finishing supplies, so that is the next to be outfitted with the green boxes. And it's obvious that anywhere there's a nail, something hangs on it.
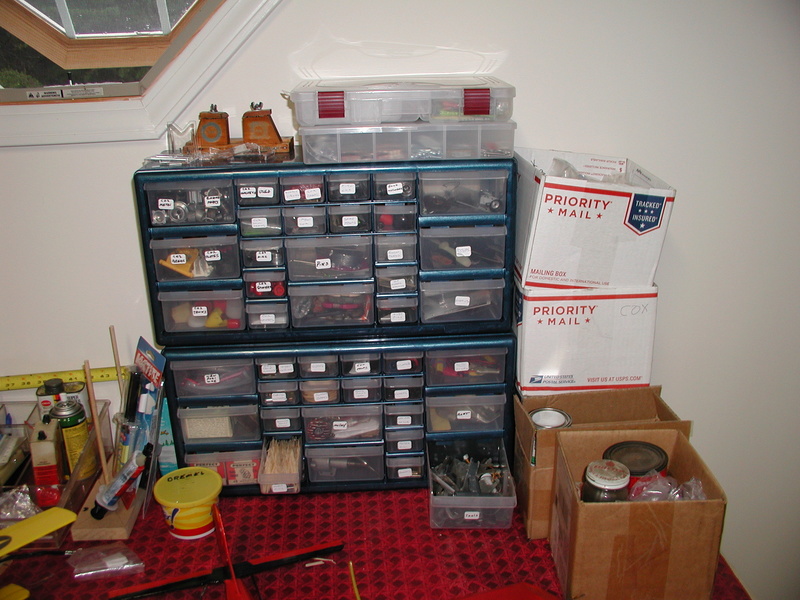
These drawers are for building supplies that I reach for most often, as well as engine parts, and control line needs, like couplers, wire, sandpaper, bellcranks and countless other paraphernalia like curves and compasses, containers of sawdust and baking soda, bla, babla bablah.
On top are home made tools like wedges, slot maker, control surface angle, sanding sticks and files, writing tools, blades, measuring tools, Dremel tools................................................. and so on.. so far so good, eh. But wait...
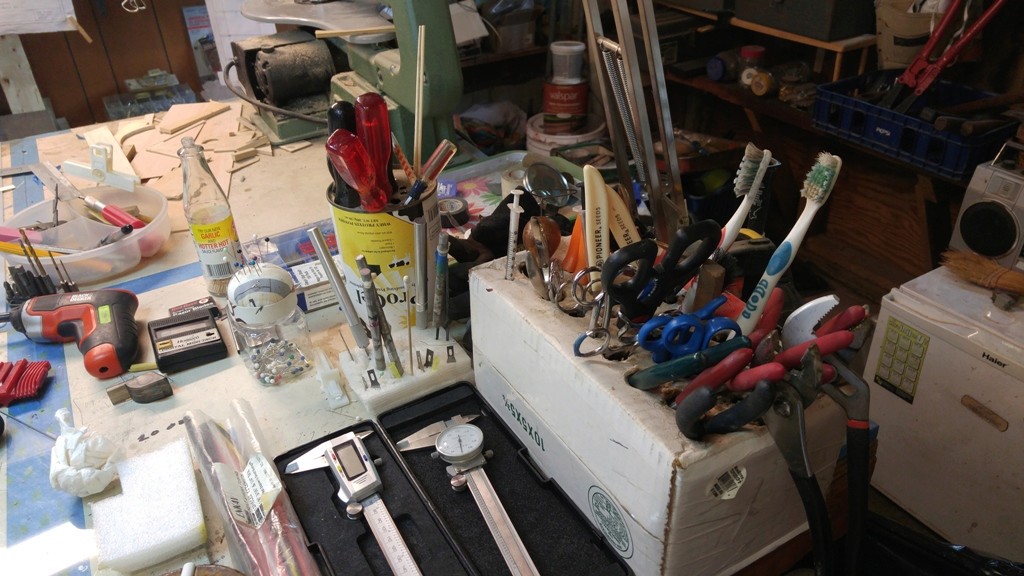
Here is my Exacto holder and the various things I mentioned having punched holes in, and this is the top thing that needs to be more professional. I need to make something that has holes for fitting everything without it all leaning one way or another... or falling through. It just looks like crap. I'd love some examples of compact tool organizers
Anyway, the reason I have this on my mind is that after an intense 6-month build, my shop is a wreck and needs o be refit to better accommodate several smaller projects at once. Like the Nobler, Micro Ring, Sterling P-51, and I hate to say it, but the trio of Stuntman23s. And the Piuma hanging the back room in need of some fixing and a lot of refinishing. Any thoughts on how I might attack this mess would be appreciated.
Thanks,
Rusty
_________________
...and never Ever think about how good you are at something...
while you're doing it!
My Hot Rock & Blues Playlist

RknRusty- Rest In Peace

- Posts : 10869
Join date : 2011-08-10
Age : 68
Location : South Carolina, USA
Re: Redneck workshop organizational methods
![]() JMynes Wed Aug 31, 2016 6:19 am
JMynes Wed Aug 31, 2016 6:19 am
I want my wife to see your workshop so she'll stop telling me how cluttered mine is.
Rusty, you have too much stuff, and coming from me, that's saying something.
I saw at least three vernier calipers. I only have one because I can only use one at any given moment.
Start by deciding what you can do without, what you have duplicates ( a better term might be redundancy ) of, and what you haven't used in the last 18 months. Put it in a pile and give it away, eBay it, or trash it.
You CAN get by with less.
A wise man once said, "A workbench is where you pile parts and tools so that you can build your wing on the folding card table". I have found this to be true, and just this week I cleared the workbench to start building a Skyray 35. Much of the 'stuff' I cleared was trash, and went in the bag. Other 'stuff' got stacked on the folding table. I WILL build on the bench I put up for this purpose, and I WILL triumph over the 'stuff' that migrates onto the bench while I sleep.
It's hard to get rid of 'stuff', and as soon as you do, you will need that item you just got rid of. But there will be many cubic feet of items that you won't miss.
A quick edit to add two words that might help you:
Peg Board

JMynes- Moderate Poster

- Posts : 25
Join date : 2016-07-02
Location : Mt Dora, FL
Re: Redneck workshop organizational methods
![]() Oldenginerod Wed Aug 31, 2016 6:56 am
Oldenginerod Wed Aug 31, 2016 6:56 am

Oldenginerod- Top Poster

- Posts : 3975
Join date : 2012-06-15
Age : 61
Location : Drouin, Victoria
Re: Redneck workshop organizational methods
![]() KariFS Wed Aug 31, 2016 7:36 am
KariFS Wed Aug 31, 2016 7:36 am

Lots of stuff, yes, and to a casual observer it may not look organized but if you can find your tools and things easily, it is organized, period. Each hobby, model planes in particular, require a lot of different tools and other paraphernalia (spelling?), and if a shop is a multi-purpose one, as most are, it is even more difficult to make it look uncluttered. It may look cluttered but it is not necessarily so.
I personally don't use old cardboard boxes any more at the shop. I used to have a lot of shoeboxes (us married guys get them a lot) with descriptions of contents written on them. But they tend to deteriorate, just like plastic margarine boxes and such. And it drives me nuts when a box falls apart and all the contents scatter over, between and under the crap on the floor. So I have "invested" to plastic bins. At my previous shop I had all the tools hung on the walls on tool boards, and had an open toolbox (and sometimes a bucket) to carry the necessary tools to wherever I was working. That was a pretty good system for home improvement projects, car repairs etc. The new shop is still a work in progress and my tools are in boxes, either in the house or in the shop, very frustrating

At some point I realized I need to either get a separate storage building or start getting rid of stuff. I chose the latter and over the past 3 years I have donated, sold or trashed a lot of stuff. Why? to make room for model airplanes of course
And now I can park my little Honda in the middle of the shop floor and actually walk around it, and also do service work on it indoors. Model plane stuff is still done on the dining table 

KariFS- Diamond Member

- Posts : 2004
Join date : 2014-10-10
Age : 52
Re: Redneck workshop organizational methods
![]() Marleysky Wed Aug 31, 2016 10:13 am
Marleysky Wed Aug 31, 2016 10:13 am
I DO like kariFS and JMynes suggestions like dumping the things we haven't used in 12 - 18 months. I have put cartons of stuff on a shelf with dates on it saying if not "used by date" ....toss it out, and have reluctantly done so.
ps: my work area will now have an aluminum tray with stacked paper towels soaked in acetone or alochol for cleaning. Thanks for the tip!
Last edited by Marleysky on Wed Aug 31, 2016 10:21 am; edited 1 time in total (Reason for editing : Great idea.)

Marleysky- Top Poster

Posts : 3618
Join date : 2014-09-28
Age : 71
Location : Grand Rapids, MI
Re: Redneck workshop organizational methods
![]() RknRusty Wed Aug 31, 2016 10:39 am
RknRusty Wed Aug 31, 2016 10:39 am
At least I got a good laugh so far. I'll get back this evening and resist y'all's logical suggestions to jettison some of my stuff.Rusty
_________________
...and never Ever think about how good you are at something...
while you're doing it!
My Hot Rock & Blues Playlist
RknRusty- Rest In Peace
- Posts : 10869
Join date : 2011-08-10
Age : 68
Location : South Carolina, USA
Re: Redneck workshop organizational methods
![]() pkrankow Wed Aug 31, 2016 3:21 pm
pkrankow Wed Aug 31, 2016 3:21 pm
My desk is a mess, my basement is a mess. My garage must have a parking spot before winter per my wife... We are looking into having an outbuilding built but a roof comes first and that won't happen before winter. (ice damming sucks) We opted to replace the broken heat pump this year.
Phil

pkrankow- Top Poster
- Posts : 3025
Join date : 2012-10-02
Location : Ohio
Re: Redneck workshop organizational methods
![]() RknRusty Wed Aug 31, 2016 9:15 pm
RknRusty Wed Aug 31, 2016 9:15 pm
Jim's right though, I do have duplicates. The story of the vernier calipers is, I love my old dial caliper. But one recent day shopping in Aldi, I found a $10 dollar electronic caliper which gave me metric measurements. I'm beginning to trust it, so I'll probably keep both, as the old dial is well made and won't quit working on a cold wet day. I found the gray plastic one last week, cleaning out my Mother-in-law's recently vacated house, and I grabbed it so I can re-learn how to read an old fashioned type. I will probably give it to my son. My screwdrivers are a mixed mess of mostly junk, other than the #0 and #1 Kobalts I bought for my flightbox, and a hardened tip pair #2 Philips and slot drivers. I have no JIS since I blew the tip off of my long #2, and that's probably going to be on my letter to Santa. The drawers with top trays and my cardboard holders are all within easy reach from the stool I sit on, and I like to have that assortment handy without having to walk away from my work.
So My re-organization goal is to sort the jars on top of the drawers, containing files, writing implements, architectural t-squares(where the gray caliper is), etc., dispose of what I don't need, and find a neater way of reaching it with ease from my work station. And most importantly to do the same thing with the old cardboard holders for my every day/week tools.
I like the top trays for all the small stuff I want quickly and frequently, like my solvents, calc. and flashlight, taps, blades, pin vice, small wooden tools, and some dremel tools. But the bulk of the Dremel junk can go in a box, inside a drawer. And the junk in the jars can accompany a new home with the junk in the hole-punch holders, also to be thinned out.
Now then, a pegboard... possibly. Thanks for the suggestion. As I write this, an idea hit me. If I had something like one of the spinning sunglasses displays, Or the old wire spinning comic book racks, placed in the corner between the drawers and table, next to my stool. I could think of some method of holding things. Like in Tokyo or London, when you can't expand, go vertical.
Okay, we delved in a little deeper. I'll think on it for a while.
Rusty
_________________
...and never Ever think about how good you are at something...
while you're doing it!
My Hot Rock & Blues Playlist
RknRusty- Rest In Peace
- Posts : 10869
Join date : 2011-08-10
Age : 68
Location : South Carolina, USA
Re: Redneck workshop organizational methods
![]() Marleysky Wed Aug 31, 2016 9:50 pm
Marleysky Wed Aug 31, 2016 9:50 pm
pkrankow wrote:I feel like a tool collector sometimes. I at least fixed one today.
My desk is a mess, my basement is a mess. My garage must have a parking spot before winter per my wife... We are looking into having an outbuilding built.
Phil
Phil - congrats on fixing the grinder! Good luck on getting a parking spot, she didn't say if it was for you or for her? IF I get a spot cleared out by winter, it'll be for the snowplow!
I'm also a "mess" I call it controlled chaos, I know where everything is.....except the item I'm looking for.

Marleysky- Top Poster
-
Posts : 3618
Join date : 2014-09-28
Age : 71
Location : Grand Rapids, MI
Re: Redneck workshop organizational methods
![]() roddie Wed Aug 31, 2016 10:12 pm
roddie Wed Aug 31, 2016 10:12 pm
Get yourself a folding table with a separate solid top for use as a portable workbench. Set it up when you're ready to work on something.. do your work.. and if possible; fold it back up and store it against a wall when your done. Nothing needs to stay on a bench indefinitely. It will be a bench that's ready for spontaneous builds.. or emergency repairs. Build or invest in a roll-around tool-caddy.. and keep your most commonly-used tools on/in it. Keep the tools off the work-table.. unless their being used. This will maximize the work-area and help keep the work from being damaged by a stray tool. The wheeled tool caddy will go anywhere you need it to go.. from bench to bench.. outside.. Maybe make a couple; with standard model-tooling in one.. and gen. purpose tooling in the other. You'll know which one to check, for the tool that you need. Specialty-tools can be organized on the pegboards within your sight. You'll only need them for special applications.
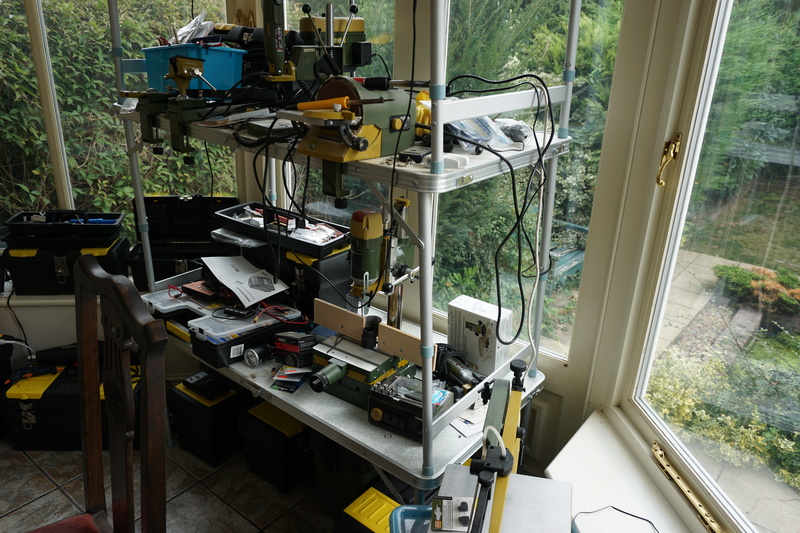
We all need a "master-bench".. This can run out of room quickly; naturally being a "catch-all". Try to keep it clear of anything that doesn't need to be there. Some "permanently-mounted" tools would include a bench-vise and grinder. Any other bench-top power tools would depend on how often you use them. A drill-press would be used fairly often.. whereas a scroll-saw might not. Store the scroll-saw up on a shelf until you need to use it. A table-saw is a common DIY tool that many of us have. These typically take-up a LOT of floor-space in a workshop.. but you only need it when your actually using it. Many small jobs can be done with a small "bench-top" table-saw that can be stored-away when not in use.
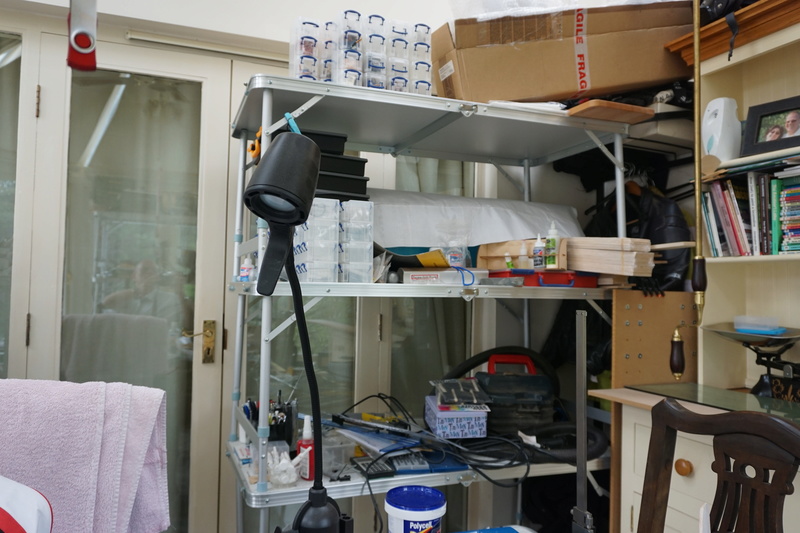
Don't forget to invest in some good portable magnified lighting fixtures. Being able to see what you're working on really helps to get a quality job done.
Hope that this has been of some help buddy. You can NEVER be too organized in a workshop.

roddie- Top Poster
- Posts : 8316
Join date : 2013-07-17
Age : 64
Location : N. Smithfield, Rhode Island -

Re: Redneck workshop organizational methods
![]() rsv1cox Thu Sep 01, 2016 7:21 am
rsv1cox Thu Sep 01, 2016 7:21 am
I love these...
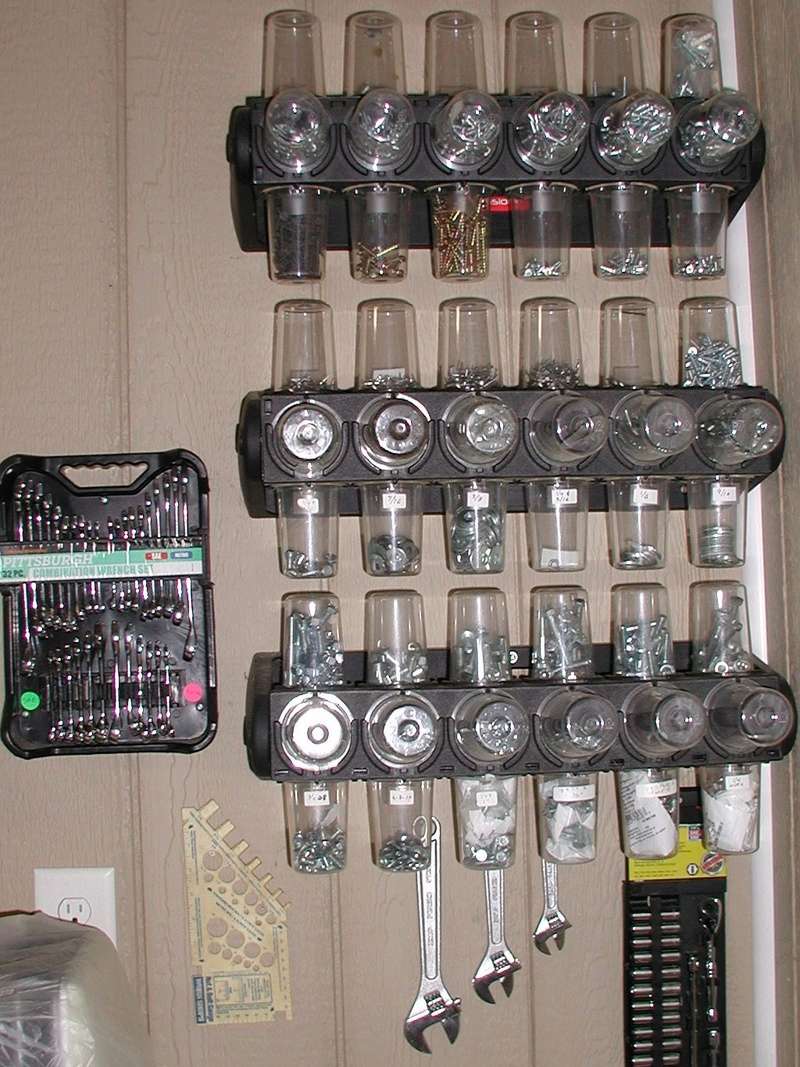
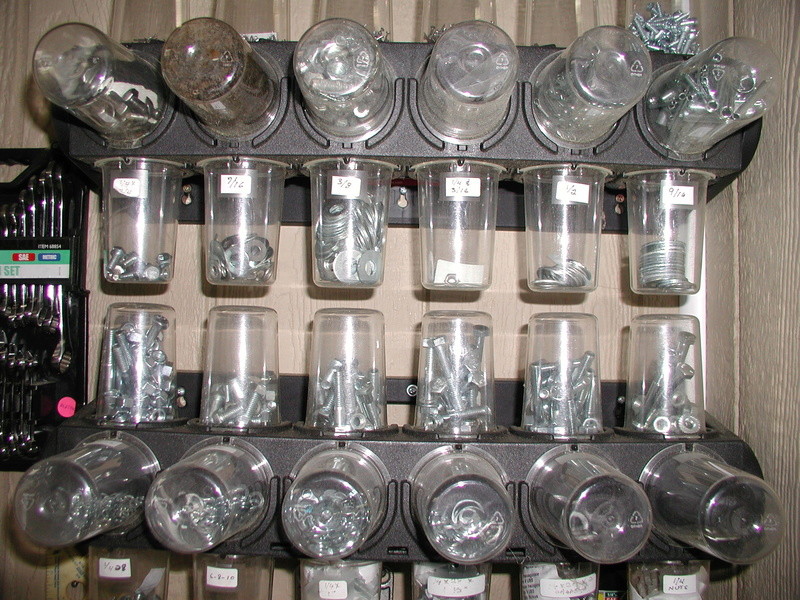
Rotary, positive stop, cups removable to work area, and see through, they are a marvel. Costco had them on sale awhile back for 6 $ apiece. Presently set up for common items but easily adaptable to clevises, control horns, glow plugs, and the like. I just wish they still sold them.
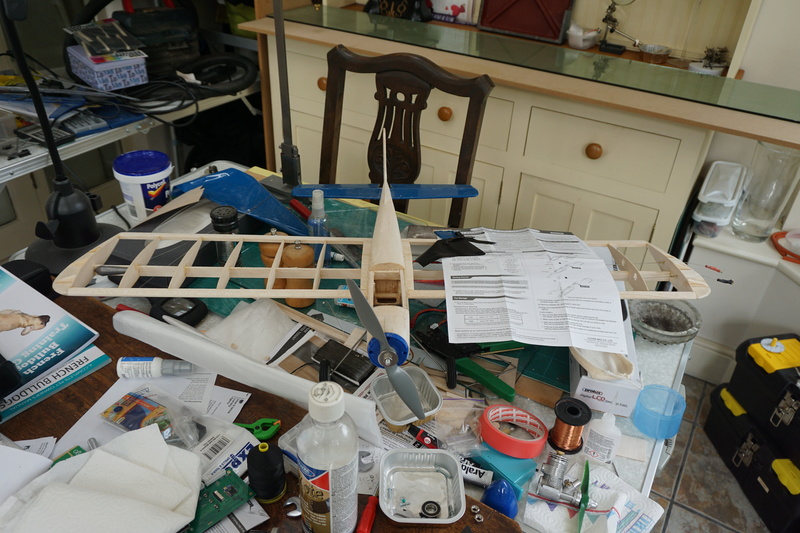
The previous owner left this old computer desk in the garage. I took it apart cleaned it up and hauled it up to the loft. Makes a great small model constructing desk with a pull out for tools and a level table-top on which I place a flat 1'X4'X1" sheet of cellulose insulation for a pin-down.
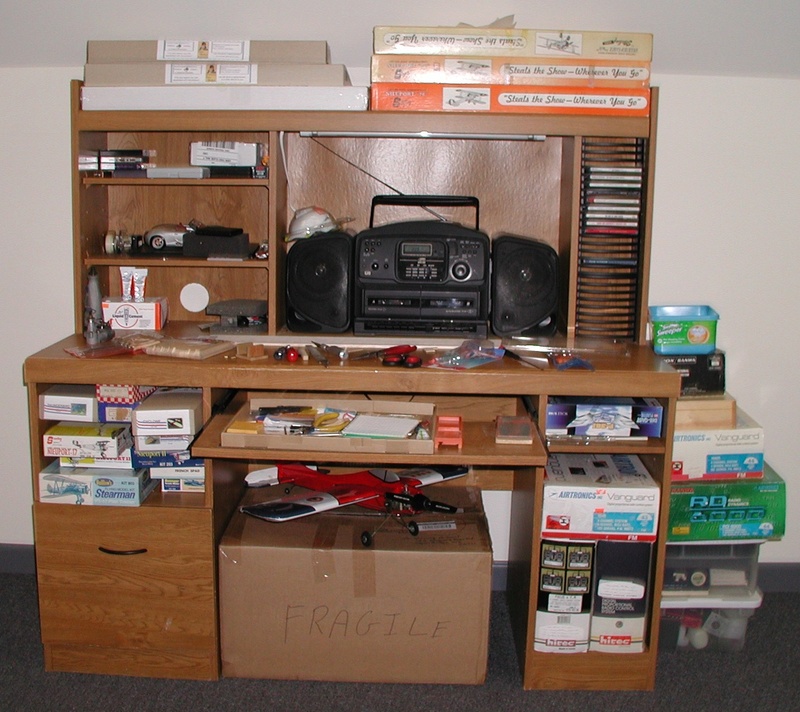
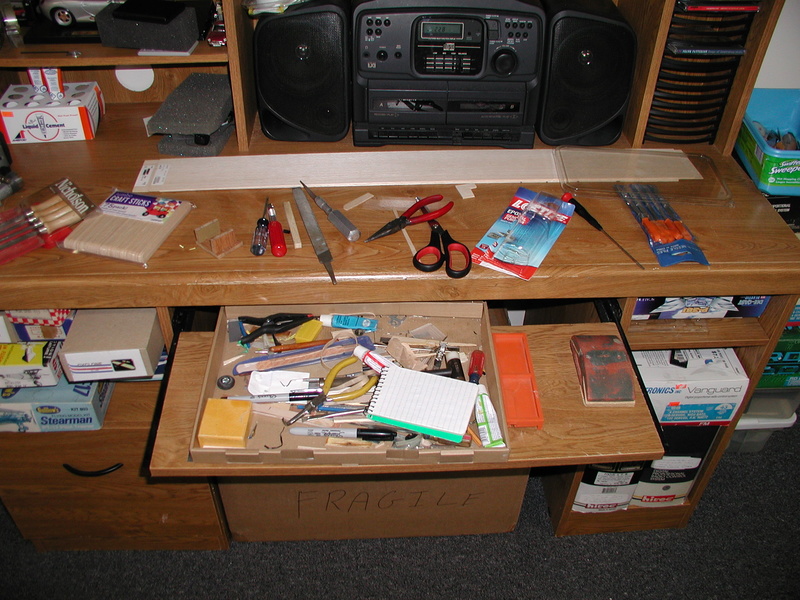
Bob

rsv1cox- Top Poster
-

Posts : 10645
Join date : 2014-08-18
Location : West Virginia
Re: Redneck workshop organizational methods
![]() getback Thu Sep 01, 2016 8:10 am
getback Thu Sep 01, 2016 8:10 am
I did manage to clean a work table off outside my shop /building /storage area , that took an hour deciding what to keep and what to put wherever I thought it should go ? am sure you will get it figured out though because you cant have too many tools it is hard on one . (Wonder what ever happened to Ian's updated shop ?) Eric 
getback- Top Poster
-
Posts : 10159
Join date : 2013-01-18
Age : 66
Location : julian , NC
Re: Redneck workshop organizational methods
![]() Kim Thu Sep 01, 2016 12:00 pm
Kim Thu Sep 01, 2016 12:00 pm
I have resigned myself to the reality that my shop, with VERY brief, occasional intermissions, will ALWAYS look like it tumbled down a hill and happened to land upright.
I'd always joked that, following an organizational overhaul, I can't find the tools I need for two or three weeks following...which just HAPPENS to coincide with it's returning appearance of a tornado-ravaged hobby shop.

Kim- Top Poster
-
Posts : 8536
Join date : 2011-09-06
Location : South East Missouri
Re: Redneck workshop organizational methods
![]() RknRusty Thu Sep 01, 2016 8:30 pm
RknRusty Thu Sep 01, 2016 8:30 pm
I did find some large Chicago Cutlery knife blocks that I may be able to drill out for holding tools, and set them on top of my drawer stacks.
Today is the first time the Twister and the Cavalier have flown in the wind. I'll file a short flight report later. The Apache returned for a few passes to see if we were flying, but at the time I was installing a bigger fuel tank while we waited out the sun, hoping for a nice late day of relaxing flights. And hoping for some extra laps after the pattern. 13 laps. That'll do.
Rusty
_________________
...and never Ever think about how good you are at something...
while you're doing it!
My Hot Rock & Blues Playlist
RknRusty- Rest In Peace
- Posts : 10869
Join date : 2011-08-10
Age : 68
Location : South Carolina, USA
My thoughts on pegboard
![]() JMynes Fri Sep 02, 2016 6:17 am
JMynes Fri Sep 02, 2016 6:17 am
Rusty, in your case I would recommend you build robust doors to close off the shelves in your picture. I say robust, because the face of the doors would be pegboard, and might be expected to bear a bit of a load.
I can already hear your objection to this idea. "But I use 'stuff' off those shelves all the time!"
So, reorganize the shelves to store 'stuff' you rarely need. Then put the 'stuff' you need on the pegboard. Keep a couple of portable project boxes nearby to comfort you while you make the adjustment.
In a year open the pegboard doors and look at the 'stuff' you haven't used since you reorganized, and imagine the potential extra space, if only you could just... Well, you know the rest.
JMynes- Moderate Poster
- Posts : 25
Join date : 2016-07-02
Location : Mt Dora, FL
Re: Redneck workshop organizational methods
![]() rsv1cox Fri Sep 02, 2016 6:26 am
rsv1cox Fri Sep 02, 2016 6:26 am
RknRusty wrote:Funny how different people have different needs for getting work done. I absolutely must have everything in its place. Others can have an accurate mental inventory no matter where everything is. Today was a flying day, so I've put no more thought into my shop, except spending the morning prepping for a flooded floor coming tomorrow.
I did find some large Chicago Cutlery knife blocks that I may be able to drill out for holding tools, and set them on top of my drawer stacks.
Today is the first time the Twister and the Cavalier have flown in the wind. I'll file a short flight report later. The Apache returned for a few passes to see if we were flying, but at the time I was installing a bigger fuel tank while we waited out the sun, hoping for a nice late day of relaxing flights. And hoping for some extra laps after the pattern. 13 laps. That'll do.
Rusty
The thing that caught my eye Rusty was your sets of T handled wrenches, probably torx and hex metric and SAE. I get by with a multitude of L shaped wrenches but long for a nice set of T handles. However the L wrenchs are a must for removing stuck head machine screws using the short ends.
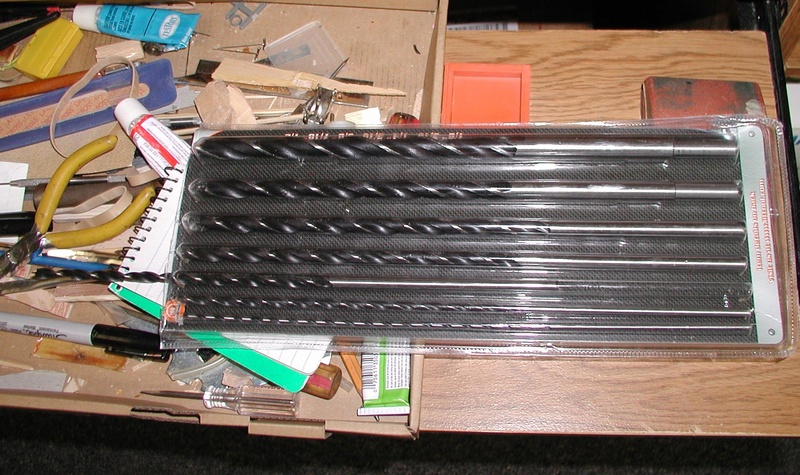
I just added a set of long shanked drill bits. A purchase made necessary by my F4U build. I have to drill a hole through several bulkheads to get to the throttle servo and nothing I have reach that far. I finally scratched that off my "have to have" tool list after many requirements for them went unfulfilled.
rsv1cox- Top Poster
-
Posts : 10645
Join date : 2014-08-18
Location : West Virginia
Re: Redneck workshop organizational methods
![]() roddie Fri Sep 02, 2016 7:34 am
roddie Fri Sep 02, 2016 7:34 am
roddie- Top Poster
- Posts : 8316
Join date : 2013-07-17
Age : 64
Location : N. Smithfield, Rhode Island -
Re: Redneck workshop organizational methods
![]() pkrankow Fri Sep 02, 2016 8:36 am
pkrankow Fri Sep 02, 2016 8:36 am
roddie wrote:Here's an idea that I've wanted to try for a LONG time.. using 2' x 4' peg-panels. Make-up some 2' x 4' frames from 1/2" hardwood square-stock. Face both sides with the peg-panels.. and they'll be less than 2" thick.. if you install "J" hooks for all your peg-items. Most bagged/carded items will fit "J"-hooks.. without protruding out much further than the hook itself. You'll have a double-sided panel.. and could mount 2 or 3 of them in a corner.. using hinged angle-brackets with screw-eyes/hooks to remove the panels if desired. Like pages of a book. Much better use of a corner-space than corner-shelves would be. Or.. cut a piece of plywood 24" wide, to fit between two ceiling joists out of the way near a corner... and install screw-eyes to hang the panels one in front of the other.. 3 or 4 inches apart. You could alternately mount "rails" made from 1/2" EMT conduit.. and hang the panels from them using screw-hooks.. to allow sliding the panels back and forth to gain access to the one you want.
2x4 is thicker than needed. You only need a real inch between the backs of the pegboards. The sliding idea is pretty good. You could instead use door hinges.
Phil
pkrankow- Top Poster
- Posts : 3025
Join date : 2012-10-02
Location : Ohio
Re: Redneck workshop organizational methods
![]() fredvon4 Fri Sep 02, 2016 11:37 am
fredvon4 Fri Sep 02, 2016 11:37 am
So I have tons of "how I did it" pics but can't share right now
My Best idea is relatively cheap...if you use hard drive free magnets----- but e-bay and Amazon have hundreds of sources for small magnets for not much $ per 20~50 of the strong buggers
epoxy them every where you can reach and the tool doesn't hide something else.......I was sanding the backs for the thickened epoxy, but this step is not all that necessary if they are just acetone or brake cleaner dipped first...thickened (micro-balloons or similar) to keep from sliding down as it cures
I have a gazillion scissors, hex keys, screwdrivers, tweezers, hemostats, knives, scalpels, exact-o, and a lot more small tools stuck where I work...then when project done, put back in the area of all the same/similar tools
I have a clamp area out of my way but for a project grab the needed ones and instead of ON the work area they get lightly clamped to the front or side of the table....requires a lip
I also have some cup hooks strategically set under these "lips" are so I can hang any one of my three Dremel tools near the work area and NOT cluttering the work top
I highly recommend one or more sets of Tom Morris (stunt hanger Hobby) building weights--- basically small Iron square stock cut 1/2" x 1/2" x 3"...36 Pieces for $19....
Also....Do Not throw out the 7Amp hr Lead acid gel cell UPS batteries...nice clean, mostly flat, weights...
Weight lifting weights are expensive...BUT the 2.5 LB round flat arm curl ones( hole in center) are frequently on sale for $.99 at Academy...Big WINK
Speaking of UPS replacement batteries...most come with a factory 7Amp hr bat...the 9Amp hr version is same size and many times cheaper than the 7Amp hr version...a little more " power off" run time...WINK!

fredvon4- Top Poster
-
Posts : 4002
Join date : 2011-08-26
Age : 68
Location : Lampasas Texas
Re: Redneck workshop organizational methods
![]() RknRusty Fri Sep 02, 2016 4:45 pm
RknRusty Fri Sep 02, 2016 4:45 pm
Jim, I instantly liked the idea of doors on the shelf faces with pegboard on the outside. I'll comment on the other good stuff too, but we're in the eye of the beast and the power keeps flicking the computer off.
Bob, the T-handle hex drivers all have a stubby tool on one end of the handles too. They are too soft, Horror Freight stuff. But that's what a bench grinder is for. My 4-40 is the shortest one in the set Lol. And I do have a set of long drill bits like that.
Rusty\
_________________
...and never Ever think about how good you are at something...
while you're doing it!
My Hot Rock & Blues Playlist
RknRusty- Rest In Peace
- Posts : 10869
Join date : 2011-08-10
Age : 68
Location : South Carolina, USA
grid-system organization
![]() roddie Fri Sep 02, 2016 6:31 pm
roddie Fri Sep 02, 2016 6:31 pm
Make a "26-page" (A-Z) 3-ring binder/register.. and list your items "alphabetically" in the register; with their corresponding grid-location. This is much easier and faster than figuring out category's. If you change a location.. or do a "re-org.".. simply white-out the old location and write-in the new one.
This may seem a bit excessive..
P.S. "Phil", my 2-sided peg-panel concept uses a 1/2" sq. hardwood perimeter-frame; sandwiched-between the 2' x 4' peg-panels. This leaves just enough clearance to insert peg-hooks either side. Screw-eyes installed on one side-edge (top/bottom) could hang on "L-hooks" mounted on the wall.. which acts as a hinge for the screw-eyes. A row of hooks spaced about 6" apart accommodates several 2-sided panels that "swing" left/right like pages of a book; providing that only the shallow-type "J" peg-hooks are used for mounting the items. Imagine the amount of peg-items you can store with 16 sq. ft. per ea. 2-sided panel! Mount the panels above a nice tall "chest of drawers" and you have maximized storage that only takes up about 6 sq. feet of floor-space! As a plus.. the peg-panels easily lift-off their L-hook hinge-pins for quick removal.
roddie- Top Poster
- Posts : 8316
Join date : 2013-07-17
Age : 64
Location : N. Smithfield, Rhode Island -
roddie- Top Poster
- Posts : 8316
Join date : 2013-07-17
Age : 64
Location : N. Smithfield, Rhode Island -
Re: Redneck workshop organizational methods
![]() RknRusty Fri Sep 02, 2016 9:57 pm
RknRusty Fri Sep 02, 2016 9:57 pm
Kewl. Good link, thanks.
Last I checked the shop didn't flood. It wasn't as hard of a rain as I expected. We got 5", but that was over a period of 18 hours.

_________________
...and never Ever think about how good you are at something...
while you're doing it!
My Hot Rock & Blues Playlist
RknRusty- Rest In Peace
- Posts : 10869
Join date : 2011-08-10
Age : 68
Location : South Carolina, USA
Re: Redneck workshop organizational methods
![]() ian1954 Sat Sep 03, 2016 11:10 am
ian1954 Sat Sep 03, 2016 11:10 am
synonyms: put in order, order, arrange, sort, sort out, assemble, marshal, put straight, group, dispose, classify, collocate, categorize, catalogue, codify, tabulate, compile, systematise, systemise, regulate, regiment, standardize, structure, shape, mould, lick/knock into shape, pigeonhole
I am totally organised with everything scattered around me but always to hand. Out of sight is out of mind!


ian1954- Diamond Member
- Posts : 2688
Join date : 2011-11-16
Age : 69
Location : England
Re: Redneck workshop organizational methods
![]() Ken Cook Sat Sep 03, 2016 2:52 pm
Ken Cook Sat Sep 03, 2016 2:52 pm
We just left the Jersey shore today at 1:30 pm. The water was up to the dune grass which I have never been there to witness. There was no beach. Waves were just gaining in height and I wouldn't be surprised if the water doesn't hit the boardwalk by this evening. I generally stay 1 block from the beach. Hurricane Sandy put a hurtin on this area a few years back and the condos in which I stay were water logged with 5' of water. I was surprised at the amount of people on the boards this morning at 6 am. By noon there was really a amazing amount of people. Most of these people would typically be on the beaches. All of the beaches were closed although some surfers tried to get into the water but were quickly deterred by police. It was very difficult to walk into the wind as your face was just sand blasted. We still enjoyed some good rounds of miniature golf and good food. I hope this storm isn't as bad as predicted and veers off course. Ken

Ken Cook- Top Poster
- Posts : 5485
Join date : 2012-03-27
Location : pennsylvania
Page 1 of 2 • 1, 2 ![]()
» Workshop safety
» New Improved Rusty Workshop!
» workshop shared-space
» David Allan Coe's prison workshop model plane auction ending soon