

 Rules
Rules
by Onelife Today at 8:12 pm
» Jim Walkers FireBee - This is going to be fun
by roddie Today at 6:51 pm
» *Cox Engine of The Month* Submit your pictures! -May 2024-
by Admin Today at 6:46 pm
» Post your Older ignition books
by lla Today at 6:34 pm
» S1 Ringmaster
by Onelife Today at 8:40 am
» Speed plane - Crispy but not too crispy
by rsv1cox Today at 7:54 am
» O&R 23 & Brown Jr
by getback Today at 7:47 am
» Introducing our Cox .049 TD Engines
by MauricioB Today at 2:31 am
» Jim Walker Firebaby
by rdw777 Yesterday at 4:16 pm
» Hemostat clamp/smooth-jaws
by roddie Yesterday at 3:48 pm
» Black Widow Run time
by Ken Cook Yesterday at 3:44 pm
» 1:64 scale Diecast (Hot Wheels)
by roddie Yesterday at 3:33 pm


Keil Kraft Phantom Scratch build from start to flying.
Page 1 of 5 • 1, 2, 3, 4, 5 ![]()

Keil Kraft Phantom Scratch build from start to flying.
![]() Woody Sat May 14, 2022 8:00 pm
Woody Sat May 14, 2022 8:00 pm
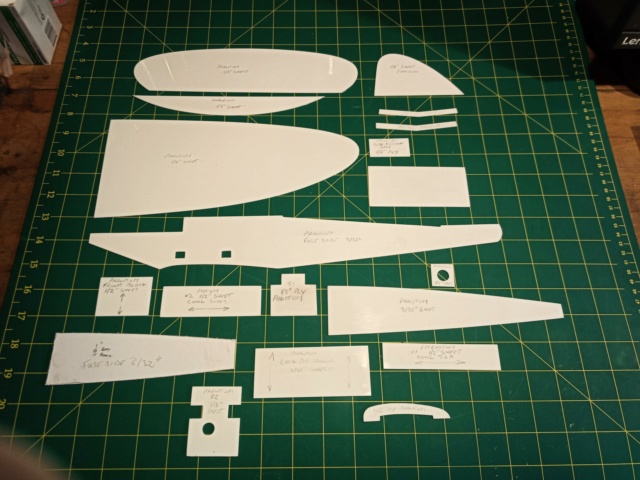
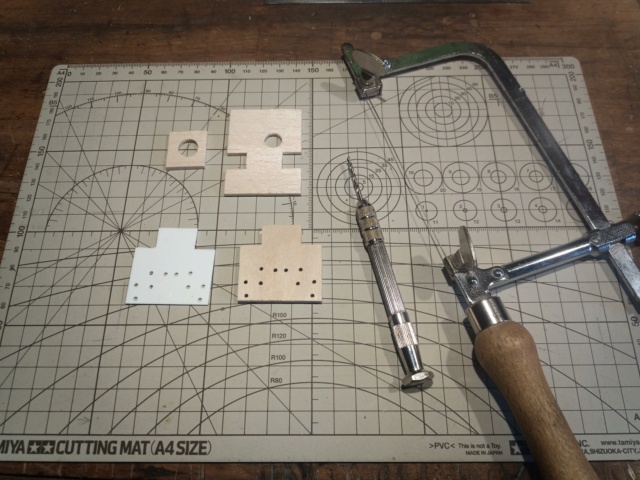
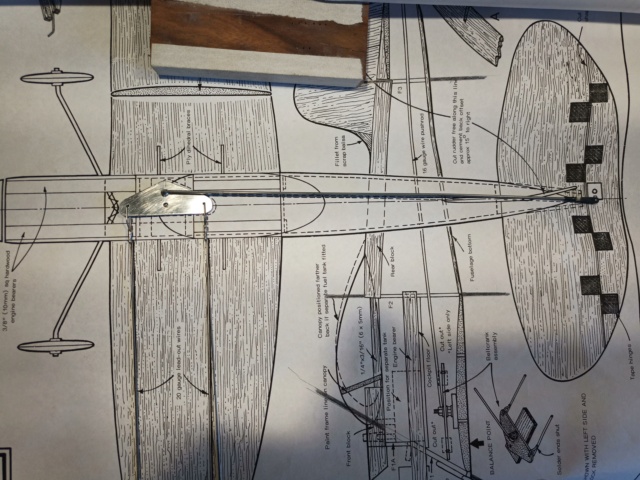
The plans are available from Outer Zone together with a parts sheet that someone thoughtfully traced around all the parts.
I prefer to make Templates for every part as then I can quickly build a fleet of them.
The templates are made from 1mm thick ABS plastic cut out with a hack saw blade coz it goes round corners.
The pieces were then sanded with a flat wooden block with 150 grit paper glued flat to the block with a Paper Glue Stick.
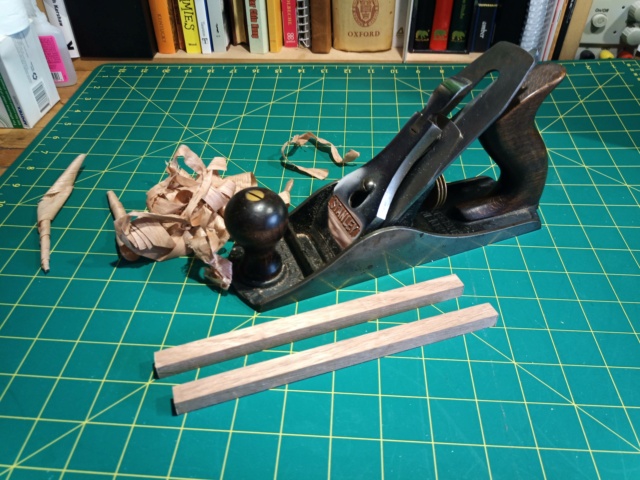
The Engine bearers are made from hardwood. In this case Tasmanian Oak which is a bit like maple.
They are sawn and hand planed to 10mm square.
The Templates have pieces of sand paper glued to the back so as firmly hold the wood whilst cutting out the parts.


Woody- Gold Member

- Posts : 133
Join date : 2022-04-20
Re: Keil Kraft Phantom Scratch build from start to flying.
![]() 944_Jim Sat May 14, 2022 8:07 pm
944_Jim Sat May 14, 2022 8:07 pm
_________________
Never enough time to build them all...always enough time to smash them all!
944_Jim- Diamond Member


Posts : 1954
Join date : 2017-02-08
Age : 59
Location : NE MS
Re: Keil Kraft Phantom Scratch build from start to flying.
![]() Woody Sat May 14, 2022 10:33 pm
Woody Sat May 14, 2022 10:33 pm
I will try not to fluff it then Jim.944_Jim wrote:Subscribed! And intrigued...
You provided me with the info I needed earlier as it is this model that will take the Cox Medallion 09.
For other readers, Yes I am fitting a Cox Medallion 09 to this build so I have had to narrow the F1 and F2 formers so that the engine bearers measure 0.0800" .
Firstly I narrowed the engine bearer slots to this measurement on the templates.
Then I narrowed the templates a smidgen on both sides of F1 and F2 with the flat sanding block.
When I then cut the formers and glue them to the fuselage, the Cox Medallion 09 will fit exactly.
It probably would have fitted any way but I am a fuss pot.
Big Thanks To Jim and Ken sending the info over from USA to Australia in record time.
What a forum!!!
Woody
Woody- Gold Member
- Posts : 133
Join date : 2022-04-20
Re: Keil Kraft Phantom Scratch build from start to flying.
![]() Woody Sun May 15, 2022 3:36 am
Woody Sun May 15, 2022 3:36 am
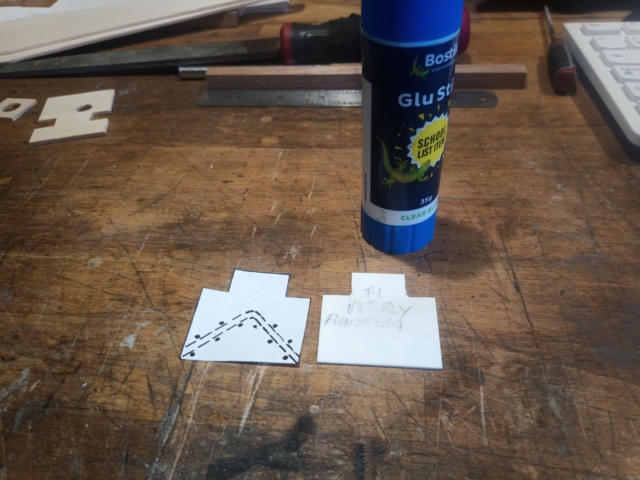
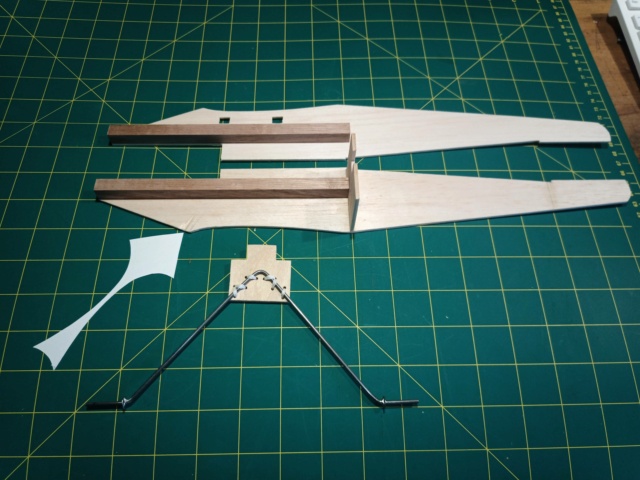
This was glued to the plastic template and the holes drilled with a 2mm drill.
The undercarriage former was cut out of 3mm birch ply using the template for the lines and the holes.
Formers 2 and 3 cut from 2.5mm balsa grain cross wise not perpendicular.
Sides were out of 2.5mm balsa cut out using the template.
The plan was then laid on the table and the three former lines continued with a pencil and steel rule about 75mm top and bottom so that when the right side is laid in position on the plan, the lines can be drawn onto the balsa side.
Now I know where my formers go.
Next is to glue the bearers on to the sides.
I used what we call a rubbed joint to do this.
It is used in musical instrument making and the surfaces must be dead flat.
The PVA glue is applied to one surface and then the bearer is rubbed up and down on the fuse side till it won't move any more. This squeezes out the glue and it is wiped off with a damp rag.
Preferably a blue one!
Former F2 was also glued and pinned in place to make sure the bearer lines up nicely.
The same with the other side checking that the bearer fits nicely into F2.
Woody- Gold Member
- Posts : 133
Join date : 2022-04-20

Woody- Gold Member
- Posts : 133
Join date : 2022-04-20
Re: Keil Kraft Phantom Scratch build from start to flying.
![]() getback Sun May 15, 2022 5:53 am
getback Sun May 15, 2022 5:53 am


getback- Top Poster

-
Posts : 10127
Join date : 2013-01-18
Age : 66
Location : julian , NC
Re: Keil Kraft Phantom Scratch build from start to flying.
![]() rsv1cox Sun May 15, 2022 6:39 am
rsv1cox Sun May 15, 2022 6:39 am
WOODY!!!!!!!!!!!

Pretty precise! Great attention to detail. Eager to see the final product.
I have that exact same Stanley plane, goes back many, many years.
Bob

rsv1cox- Top Poster
-
Posts : 10575
Join date : 2014-08-18
Location : West Virginia
Re: Keil Kraft Phantom Scratch build from start to flying.
![]() 944_Jim Sun May 15, 2022 8:30 am
944_Jim Sun May 15, 2022 8:30 am
You are lieing to us. I see no balsa dust on that particularly clean work surface!

I believe we have another master craftsman in our midst. Attention to detail is being displayed before our eyes. Judging by the method of construction, I can already see that this will be a beautiful plane.
What will the finish be? Will you use a commercial tank, or home-built?
Go Woody, Go Woody!
Last edited by 944_Jim on Sun May 15, 2022 8:22 pm; edited 1 time in total
_________________
Never enough time to build them all...always enough time to smash them all!
944_Jim- Diamond Member
-
Posts : 1954
Join date : 2017-02-08
Age : 59
Location : NE MS
Re: Keil Kraft Phantom Scratch build from start to flying.
![]() rdw777 Sun May 15, 2022 5:20 pm
rdw777 Sun May 15, 2022 5:20 pm
Robert

rdw777- Diamond Member
-
Posts : 1290
Join date : 2021-03-11
Location : West Texas
Re: Keil Kraft Phantom Scratch build from start to flying.
![]() Woody Sun May 15, 2022 6:16 pm
Woody Sun May 15, 2022 6:16 pm
I don't know about where the master craftsman is?.....I find the best way of learning to build an aeroplane is to teach someone else to do it.
Yes I am very attached to my Stanley No 4 plane and nobody else is allowed to even touch it...same goes for my chisels..they are a big NO NO!
Ref Dust and shavings. Yes I am a lying Ape.
I am normally quite messy but I see all these you tubes of people who make stuff without shavings, dust, mess and swearing!!so I thought I would make the extra effort to be posh.
The Rubbed joint is used for example, by luthiers who want to join two halves of a violin, guitar etc back or front.
The two halves are planed dead straight on a shooting board so they both come out at 90.
They are then held to the light to check for gaps.
Then the glue is applied..in the case of violins...hot animal glue. If its too cold it wont hold. If its too thick it wont stick. All this rubbish was drummed into me.
The two halves are then literally rubbed together until most of the glue oozes out and then wiped off with a damp cloth...preferably a blue one!!!.
I hope this explains it better.
There is no reason to suppose it would not work on a model aeroplane so I did it.
Who dares wins.
Anyway enough of that.
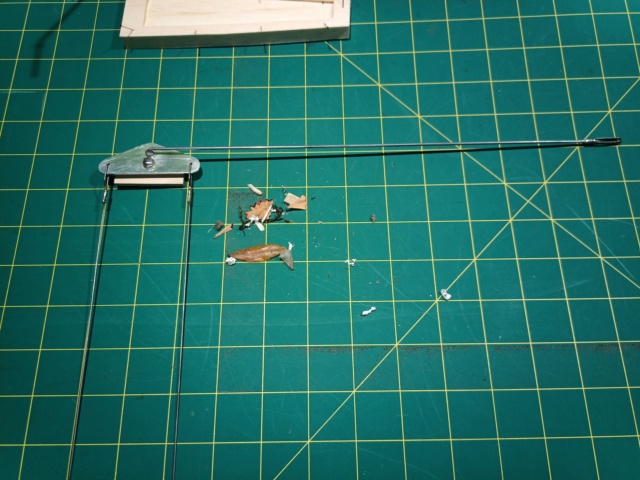
The undercarriage wire drawing was literally that. Someone drew around the prebent wire in the kit so it came out massively thick.
I found a spare bit of piano wire which measured 0.093" or 2.35mm so that will do.
Just a gripe about wire......
Why have we not globally agreed to go WIRE METRIC?
Then it will be a simple case of 2.5mm wire.
We have SWG, AWG, ...I cannot remember them all.....crazy.
The wire was bent to shape as per plan but we have to be a bit careful here.
After bending to shape and then put at the angle it sits in the model, the toes point rearwards so it is a case of putting it back in the vise and bending the toes so that when the whole is placed at the angle in the model, the toes point out nicely..Phew.. If you understood all that you are a genius.
I made up a little jig as pictured to hold the wheel stops upright whilst soldering.
Two slips of balsa each with a slit knifed in to hold the washers and then all stuck down with Blue tak which is white over here!!!
Then soldered using lead/tin multi core solder and Bakers acid flux and an 80 watt large iron.
The undercarriage was sewn on with thick linen thread and then epoxied onto the former.
Epoxy was also applied to

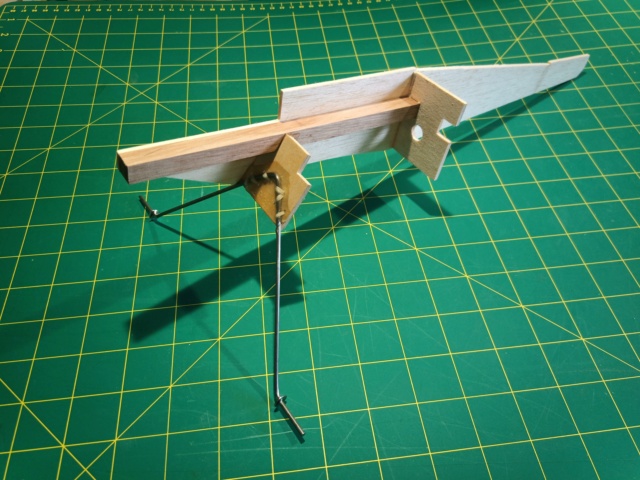
one side of the former and glued to the right fuse side.
Over here we have an epoxy called Araldite which is marketed by Selleys. This epoxy is dear but heck its good stuff.
You have one minute until it starts to set.
This was perfect as it allowed me to make minute adjustments whilst holding it to the desired angle and pencil lines in the fuse side.
Woody- Gold Member
- Posts : 133
Join date : 2022-04-20
Re: Keil Kraft Phantom Scratch build from start to flying.
![]() Woody Sun May 15, 2022 6:21 pm
Woody Sun May 15, 2022 6:21 pm
Woody- Gold Member
- Posts : 133
Join date : 2022-04-20
Re: Keil Kraft Phantom Scratch build from start to flying.
![]() Kim Sun May 15, 2022 7:29 pm
Kim Sun May 15, 2022 7:29 pm
Woody wrote:The white arrow in the picture points to a recess filed with a rat tail so that the undercarriage wire will fit nicely.
Great Build Thread Pete!!!!

Kim- Top Poster
-
Posts : 8532
Join date : 2011-09-06
Location : South East Missouri
Re: Keil Kraft Phantom Scratch build from start to flying.
![]() Woody Mon May 16, 2022 5:38 am
Woody Mon May 16, 2022 5:38 am
Glad you like it Kim.Kim wrote:Woody wrote:The white arrow in the picture points to a recess filed with a rat tail so that the undercarriage wire will fit nicely.
Great Build Thread Pete!!!!
Woody- Gold Member
- Posts : 133
Join date : 2022-04-20
Re: Keil Kraft Phantom Scratch build from start to flying.
![]() Woody Mon May 16, 2022 6:00 am
Woody Mon May 16, 2022 6:00 am
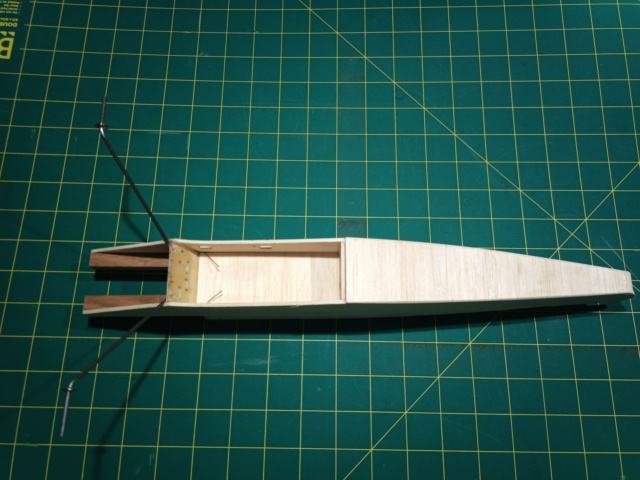
The rods are shaped and soldered at the ends using fuse wire to bind them.
The top nut is soldered to stop it vibrating loose.
I used a rc type clevis pin at the control horn end.
There is now some debris nearby to prove It was hand made! and people like to see a mess.
The other side is now epoxied into place, the bottom , cockpit plate and former 1A are also glued on using PVA.
F 1A should have fitted inside between the sides but there was an unwelcome gap there where I must have lined up the undercarriage former wrongly. So much for marking out the former lines.
Cannot figure that one out but I am happy and will not loose sleep over it.
I have prepared the fuse rear top block.
I dont have any 1/2" stock but I do have 9.5mm and 3mm which makes 1/2". We
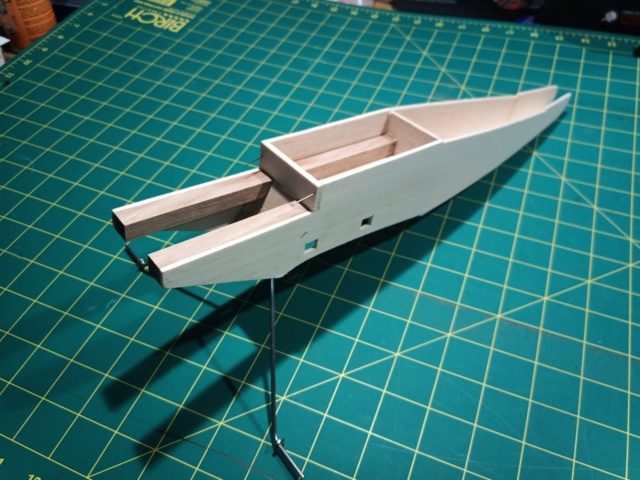
have to improvise
I used this to my advantage by cutting a large hole in the 3mm sheet to save weight.
Woody- Gold Member
- Posts : 133
Join date : 2022-04-20
Woody- Gold Member
- Posts : 133
Join date : 2022-04-20

Woody- Gold Member
- Posts : 133
Join date : 2022-04-20
Re: Keil Kraft Phantom Scratch build from start to flying.
![]() 944_Jim Mon May 16, 2022 9:05 am
944_Jim Mon May 16, 2022 9:05 am
I bet he whittled a piece of a tree limb just to throw us off.
I dare not show the train wreck my hobby closet is. It is embarrassing at best.
I'm loving this build, Woody. Your avatar name is appropriate Given what we get to witness here.
Considering the wingspan/area, was this model originally designed for this size engine? Or are you going for the old adage "there is no misplacement for displacement?"
Woody wrote:
There is now some debris nearby to prove It was hand made! and people like to see a mess.
Last edited by 944_Jim on Mon May 16, 2022 4:18 pm; edited 1 time in total
_________________
Never enough time to build them all...always enough time to smash them all!
944_Jim- Diamond Member
-
Posts : 1954
Join date : 2017-02-08
Age : 59
Location : NE MS
Re: Keil Kraft Phantom Scratch build from start to flying.
![]() cstatman Mon May 16, 2022 10:25 am
cstatman Mon May 16, 2022 10:25 am
Please keep posting. this is lovely.
cstatman- Platinum Member

-
Posts : 536
Join date : 2021-02-17
Age : 59
Location : San Jose, CA
Re: Keil Kraft Phantom Scratch build from start to flying.
![]() rdw777 Mon May 16, 2022 10:59 am
rdw777 Mon May 16, 2022 10:59 am
rdw777- Diamond Member
-
Posts : 1290
Join date : 2021-03-11
Location : West Texas
Re: Keil Kraft Phantom Scratch build from start to flying.
![]() Woody Mon May 16, 2022 4:31 pm
Woody Mon May 16, 2022 4:31 pm
I chose Cox medallion 09 because Keil Kraft writes that the model can take a 1.5cc engine.
The plans seem to represent a DC Sabre 1.5cc.
Will this then fly with an .049?
I hope I have not goofed.
What sort of lines should I use to fly it? ( I mean metal, nylon, gauge ?) please?
Woody- Gold Member
- Posts : 133
Join date : 2022-04-20
Re: Keil Kraft Phantom Scratch build from start to flying.
![]() Oldenginerod Mon May 16, 2022 4:38 pm
Oldenginerod Mon May 16, 2022 4:38 pm
Woody wrote:Thanks for all the welcome comments.
I chose Cox medallion 09 because Keil Kraft writes that the model can take a 1.5cc engine.
The plans seem to represent a DC Sabre 1.5cc.
Will this then fly with an .049?
I hope I have not goofed.
What sort of lines should I use to fly it? ( I mean metal, nylon, gauge ?) please?
The plane has a smaller cousin called the Phantom Mite. It would be more suited to an .049.

Oldenginerod- Top Poster
- Posts : 3970
Join date : 2012-06-15
Age : 61
Location : Drouin, Victoria
Re: Keil Kraft Phantom Scratch build from start to flying.
![]() Woody Mon May 16, 2022 7:30 pm
Woody Mon May 16, 2022 7:30 pm
Oldenginerod wrote:Woody wrote:Thanks for all the welcome comments.
I chose Cox medallion 09 because Keil Kraft writes that the model can take a 1.5cc engine.
The plans seem to represent a DC Sabre 1.5cc.
Will this then fly with an .049?
I hope I have not goofed.
What sort of lines should I use to fly it? ( I mean metal, nylon, gauge ?) please?
The plane has a smaller cousin called the Phantom Mite. It would be more suited to an .049.
Which would be more suited to an .049?
Woody- Gold Member
- Posts : 133
Join date : 2022-04-20
Re: Keil Kraft Phantom Scratch build from start to flying.
![]() Oldenginerod Mon May 16, 2022 9:21 pm
Oldenginerod Mon May 16, 2022 9:21 pm
Woody wrote:Oldenginerod wrote:Woody wrote:Thanks for all the welcome comments.
I chose Cox medallion 09 because Keil Kraft writes that the model can take a 1.5cc engine.
The plans seem to represent a DC Sabre 1.5cc.
Will this then fly with an .049?
I hope I have not goofed.
What sort of lines should I use to fly it? ( I mean metal, nylon, gauge ?) please?
The plane has a smaller cousin called the Phantom Mite. It would be more suited to an .049.
Which would be more suited to an .049?
Just suggesting that the Phantom Mite would do better on an .049 than the Phantom you're building.
Oldenginerod- Top Poster
- Posts : 3970
Join date : 2012-06-15
Age : 61
Location : Drouin, Victoria
Re: Keil Kraft Phantom Scratch build from start to flying.
![]() 944_Jim Mon May 16, 2022 9:59 pm
944_Jim Mon May 16, 2022 9:59 pm
You are on target. Keep in mind 0.08 cc is .049 cubic inch displacement (cid). Then 1.0 cc is .061 cid. So that makes 1.5 cc about 0.09 cid.
Wait until you finish the model, and check weight to determine lines. I did an eBay buy on my first reel of SpiderWire for my 1/2A trainers, but I really liked the 0.008" 7-strand wire. Then I tried some locally purchased synthetic braid with a higher Control Line referral and really liked it too! I say all that to say there is nothing wrong with the right synthetic...except for learning knots. The flip side is having to terninate stainless lines.
There is nothing in the plans regarding line length? Hmmm. Maybe someone on StuntHanger can help out with this. I'll try to remember to ask, or Ken may know a good reference over there. PS...I know I've been kind of tongue-in-cheek, but I'm really digging this build! No harm intended.
_________________
Never enough time to build them all...always enough time to smash them all!
944_Jim- Diamond Member
-
Posts : 1954
Join date : 2017-02-08
Age : 59
Location : NE MS
Re: Keil Kraft Phantom Scratch build from start to flying.
![]() Woody Mon May 16, 2022 10:15 pm
Woody Mon May 16, 2022 10:15 pm
It says in the destructions lines from 25 to 35ft depending on engine!944_Jim wrote:Woody,
You are on target. Keep in mind 0.08 cc is .049 cubic inch displacement (cid). Then 1.0 cc is .061 cid. So that makes 1.5 cc about 0.09 cid.
Wait until you finish the model, and check weight to determine lines. I did an eBay buy on my first reel of SpiderWire for my 1/2A trainers, but I really liked the 0.008" 7-strand wire. Then I tried some locally purchased synthetic braid with a higher Control Line referral and really liked it too! I say all that to say there is nothing wrong with the right synthetic...except for learning knots. The flip side is having to terninate stainless lines.
There is nothing in the plans regarding line length? Hmmm. Maybe someone on StuntHanger can help out with this. I'll try to remember to ask, or Ken may know a good reference over there. PS...I know I've been kind of tongue-in-cheek, but I'm really digging this build! No harm intended.
MMMhhhh! so I want to go for 35ft so I don't get giddy.
It says three strand wire or fishing line ( no breaking strain ) so not very informative for someone building a trainer.
I can learn knots but as you say...stainless wire ?.....people have used it so there must be an orthodox method of joining it.
Thank you so much for your help.
really appreciated.
Woody.
Woody- Gold Member
- Posts : 133
Join date : 2022-04-20
Page 1 of 5 • 1, 2, 3, 4, 5 ![]()
» Keil Kraft Hurricane
» Scratch build BRM - a first
» (Another) Keil Kraft Hurricane Rebuild
» La Stick Scratch Build for Cox Pee Wee .020