

 Rules
Rules
by DanMc Today at 7:25 pm
» "Red Neck" .049 elec. starter
by 944_Jim Today at 7:04 pm
» Cox AT-6 Texan repaint.....Pretty nice
by 944_Jim Today at 4:31 pm
» Prayers for my Wife Please
by balogh Today at 4:08 pm
» Jim Walkers FireBee - This is going to be fun
by rdw777 Today at 3:58 pm
» Hawk had breakfast and then took a bath
by rdw777 Today at 3:46 pm
» Roddie's water-cooling bottle for bench-running
by roddie Today at 3:07 pm
» Removing old decals
by latole Today at 3:06 pm
» Prop Rod - resto to a runner
by rsv1cox Today at 2:29 pm
» Cox Ryan ST 2.0
by 944_Jim Today at 11:52 am
» Blue backplate postage stamp engine
by getback Today at 6:46 am
» COX Postage Stamp engine -Babe Bee & Horseshoe Backplate adapters
by GallopingGhostler Today at 6:33 am


Keil Kraft Phantom Scratch build from start to flying.
Page 2 of 5 •  1, 2, 3, 4, 5
 ![]()
Re: Keil Kraft Phantom Scratch build from start to flying.
![]() 944_Jim Mon May 16, 2022 10:39 pm
944_Jim Mon May 16, 2022 10:39 pm
_________________
Never enough time to build them all...always enough time to smash them all!
944_Jim- Diamond Member


Posts : 1964
Join date : 2017-02-08
Age : 59
Location : NE MS
Re: Keil Kraft Phantom Scratch build from start to flying.
![]() Woody Tue May 17, 2022 4:09 am
Woody Tue May 17, 2022 4:09 am
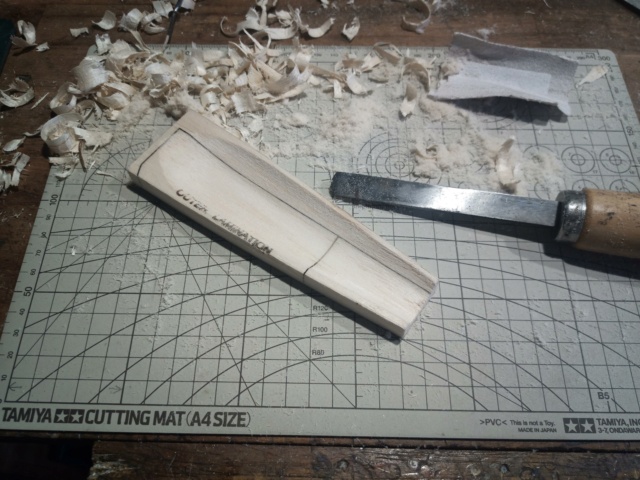
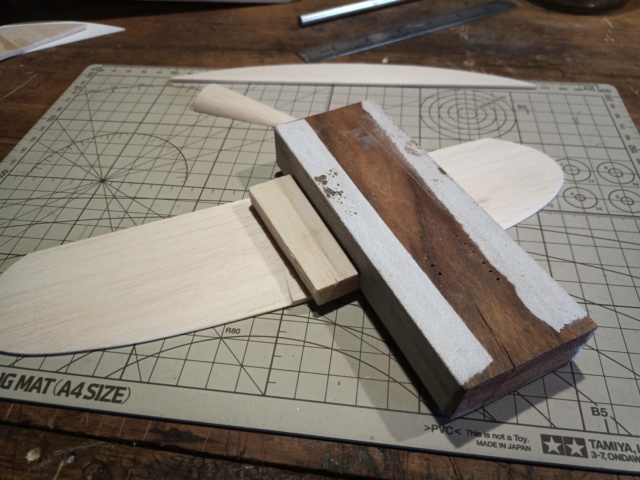
I did not like the look of my existing top block so managed to find some 1/2" stock from the scrap department.
They were part of a kit that mostly went in the bin due to bad balsa choice. They were laser cut and you can see the cutting marks. I am not worried about that as they will be filled in and not be seen ( Hopefully).
I decided to save weight by scooping out most of the balsa from the fuse top block and just for Jim, left all the mess as he loves it!
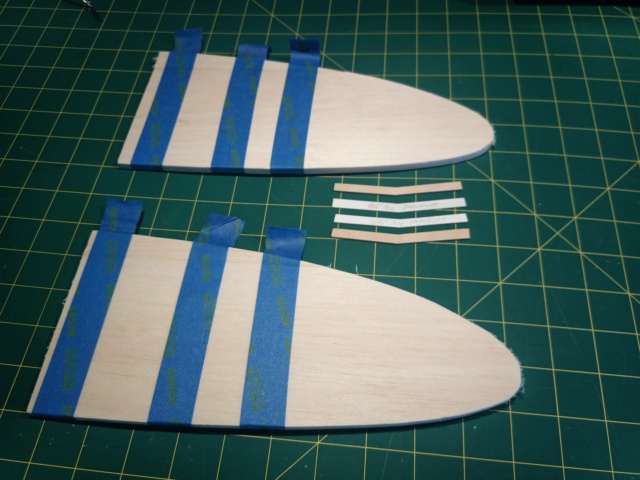
The wings from 6.5mm sheet were cut with a hack saw blade and then disc sanded. The disc sander makes short work of lots and makes it seem as if I know what I am doing.
Each wing was made from two parts glued together and taped to hold.
The Tape has tabs at the ends in order not to dig finger nails into the delicate balsa on removal. The glue up was done over a new foam type mouse pad and sheet of A4 paper to stop the mouse pad becoming a part of the wing!
The Dihedral braces from 1/16" Birch Ply were cut with a hack saw blade and finished with a sanding block.
Hacksaw blades available from WWW. Bodge it

and Scarper Barbarian Blades.com!!

Woody- Gold Member

- Posts : 133
Join date : 2022-04-20
Woody- Gold Member
- Posts : 133
Join date : 2022-04-20
Re: Keil Kraft Phantom Scratch build from start to flying.
![]() Woody Tue May 17, 2022 5:18 am
Woody Tue May 17, 2022 5:18 am
Slots for the Dihedral braces were then cut with a .......( You guessed right!) but this time TWO hacksaw blades taped together to make sure.
This provides a nice generous fit and just about holds the wings together if you don't breathe.
A chamfer is then sanded with the flat sanding block to match the braces angle. Very much an eye thing.
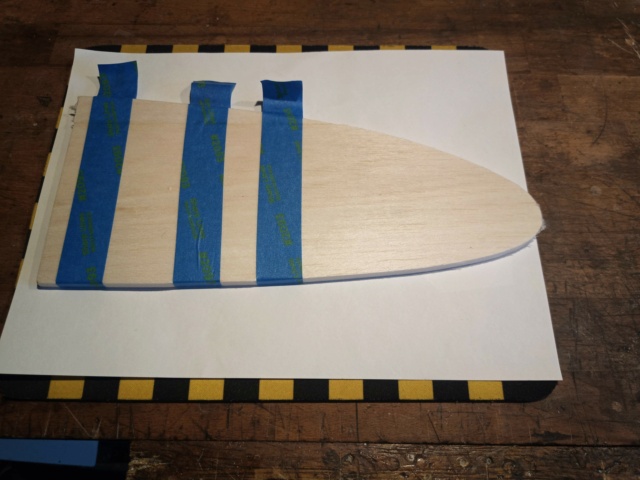
They were then glued up with Gorilla PVA applying glue generously to all parts.
The glue, being water based expanded the braces and the balsa slots so that they became a nice tight fit which is what we are after.
The whole was then wiped down back and front with a damp rag ( always a blue one) and pinned at the roots of the wing.
I blew very hard and more on it and its all good now to set for the night.
So am I so Good night!.


Woody
Woody- Gold Member
- Posts : 133
Join date : 2022-04-20

Woody- Gold Member
- Posts : 133
Join date : 2022-04-20
Re: Keil Kraft Phantom Scratch build from start to flying.
![]() Woody Wed May 18, 2022 5:24 am
Woody Wed May 18, 2022 5:24 am
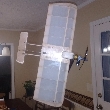
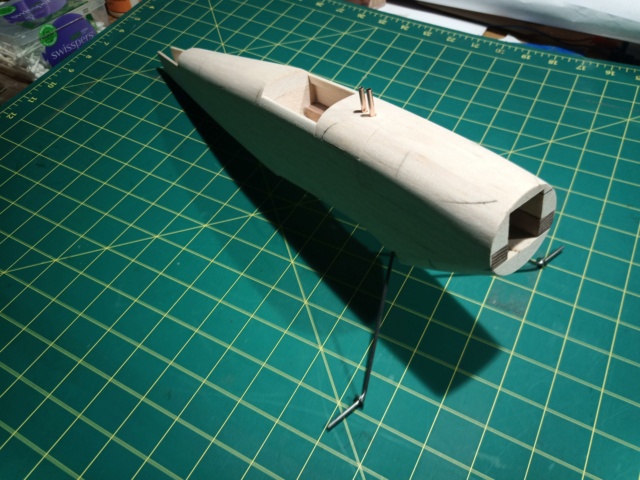
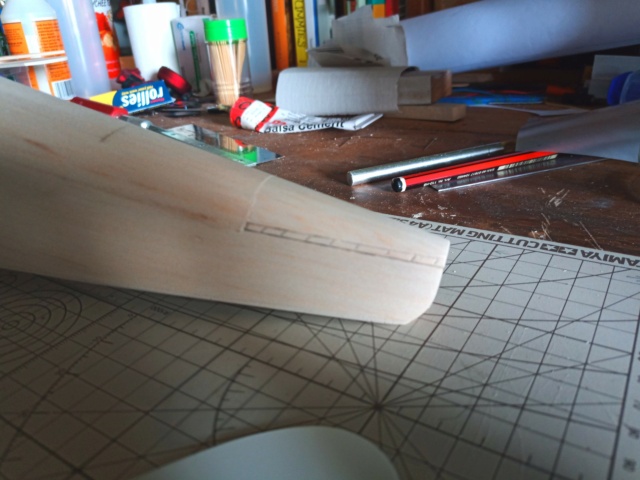
Starting to look like a Phantom hopefully.

Woody- Gold Member
- Posts : 133
Join date : 2022-04-20
Woody- Gold Member
- Posts : 133
Join date : 2022-04-20
Re: Keil Kraft Phantom Scratch build from start to flying.
![]() getback Wed May 18, 2022 7:07 am
getback Wed May 18, 2022 7:07 am


getback- Top Poster

-
Posts : 10159
Join date : 2013-01-18
Age : 66
Location : julian , NC
Re: Keil Kraft Phantom Scratch build from start to flying.
![]() duaneh Wed May 18, 2022 8:21 am
duaneh Wed May 18, 2022 8:21 am
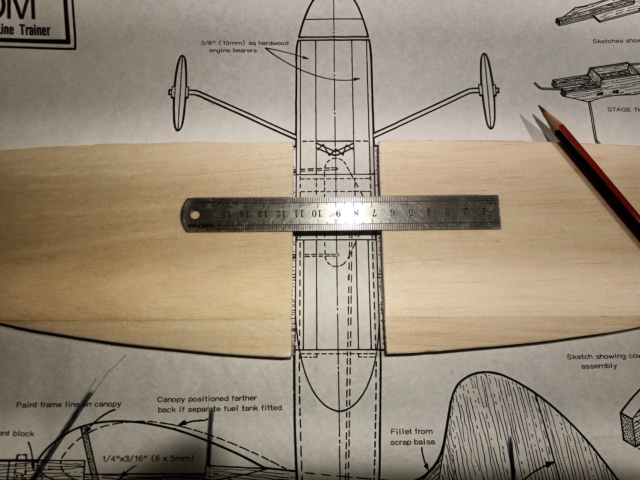
I noticed that one of the commenters on Outerzone recommended moving the bellcrank mount from the wing to the fuselage, complete with a picture and description. I would consider doing that.
duaneh- Gold Member
- Posts : 201
Join date : 2019-04-06
Re: Keil Kraft Phantom Scratch build from start to flying.
![]() 944_Jim Wed May 18, 2022 8:44 am
944_Jim Wed May 18, 2022 8:44 am
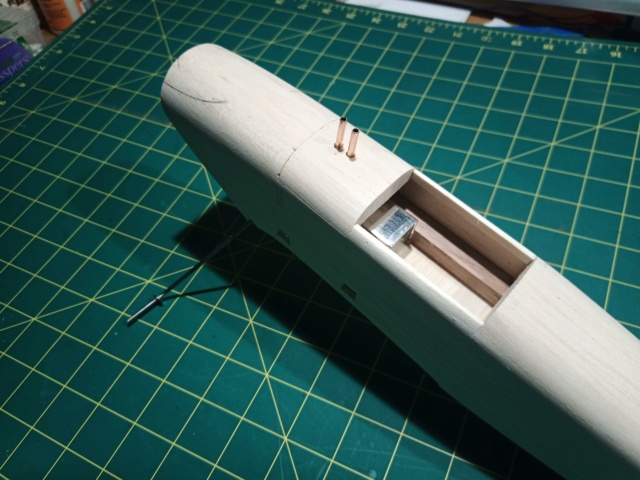
I'm guessing the BC is going inside based on the two square holes above the wing root.
Woody,
If I'm right, why square holes? I'm only thinking of concentrated stresses in their corners.
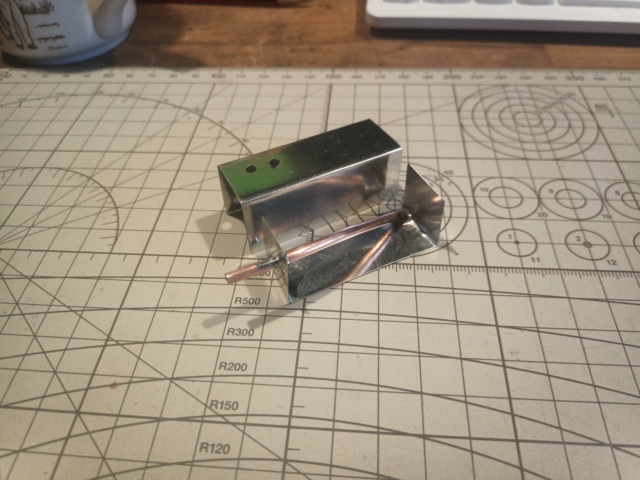
I can't believe that tank! And no flanges? I'm going to assume (uh, oh) that your seams are perfect. Bravo on a very talented tank-build. How much volume? I can get a static run of my bench-mounted Medallion .09 if you could use the fuel consumption for flight times estimates.
_________________
Never enough time to build them all...always enough time to smash them all!
944_Jim- Diamond Member
-
Posts : 1964
Join date : 2017-02-08
Age : 59
Location : NE MS
Re: Keil Kraft Phantom Scratch build from start to flying.
![]() GallopingGhostler Wed May 18, 2022 10:44 am
GallopingGhostler Wed May 18, 2022 10:44 am
Regarding the square leadout holes in the fuselage, may not be a problem IMO. These tended to be overbuilt. Even Cox used square holes for their RTF's. AFAIK, wasn't this Keil Kraft used for a team racer?
Anyway, I see a thing of beauty coming to shape.


GallopingGhostler- Top Poster
-
Posts : 5346
Join date : 2013-07-13
Age : 70
Location : Clovis NM or NFL KC Chiefs
Re: Keil Kraft Phantom Scratch build from start to flying.
![]() Woody Wed May 18, 2022 4:48 pm
Woody Wed May 18, 2022 4:48 pm
Okay...the bellcrank assy which caused me a lot of thought as to how exactly it will fit in.
I built it exactly to plan ..that is....it is mounted on a 3mm thick plywood plate and not on the wing.
It cost me three nights of wondering how to get the complete assy in the fuse but I have already done a practice run but with the top rear fuse block removed.
I will show three pics of getting it in when its ready for it.
I wanted to build the assy complete so that I could get to every thing and solder the nuts to the bolts so they do not vibrate off. The lead out ends look beautiful on the plan but you try bending the not so bendable wire they make today to a neat diamond shape like that!
The tank does have seams but they are all underneath. To get the filler and vent tubes reasonably accurate, the tank was put in place and then I drilled the holes through the top block first with a round rat tail file till it met the tank to mark the dots for drilling. ( Electric drills always choose where THEY think the hole should be and specially with Balsa ) Top block and tank removed. Tank top removed and then carefully drilled with fingers crossed that it would not buckle when the drill exits.
I do not know the exact oz size of it. I made it to the size on the plan which is 1 3/4" long with 3/4" sq ends.
Reference getting the engine in with the blocks covering the bearers.....ALL shaped blocks are removable and were only tacked in place for shaping and sanding.
My engine has not arrived yet so there is little more I can do to the front.
Why square holes ?..... That is how they are on the plan and I know no different but I get your point about stresses and oval holes could be better.
I have not built many control liners so its quite a test for me.
I would really like a set of old 2" black rubber wheels for it or even the plastic ones so if any one has a set for sale I will be interested.
Otherwise I will have to make them. I am just figuring out how.
I do have a lathe but want to fight shy of it as that would not help a novice having a go at making a simple aeroplane !
I remember looking at lovely models and articles about how they were built and thought to myself..." Yes yes yes..Thats what I want to build. I got thoroughly depressed later discovering that a lathe was needed and went away muttering ..mutter mutter BLAST BLOW and....other things like Clever Dick! I was just jealous.
So if I have to make them I will make them novice friendly.
And yes, A novice can learn to solder. It really is not that difficult. You just need three hands!!!!
Finally, what is lurking around in my mind is how the heck to make the canopy. I have not quite visualised this yet but I will get there.
I think this could be a War time build so far as everything is built from what I have got and what I can get.
As you know...these modern days...we don't just get the things we could buy 40 odd years ago coz no one makes them.
All great fun and a challenge.
Have a good good day all.
Woody
Woody- Gold Member
- Posts : 133
Join date : 2022-04-20
Re: Keil Kraft Phantom Scratch build from start to flying.
![]() Woody Wed May 18, 2022 5:09 pm
Woody Wed May 18, 2022 5:09 pm
Crickey Jim that would be useful but when it comes to stuff like that then Woody"s brain turns to wood.944_Jim wrote:Duane,
I'm guessing the BC is going inside based on the two square holes above the wing root.
Woody,
If I'm right, why square holes? I'm only thinking of concentrated stresses in their corners.
I can't believe that tank! And no flanges? I'm going to assume (uh, oh) that your seams are perfect. Bravo on a very talented tank-build. How much volume? I can get a static run of my bench-mounted Medallion .09 if you could use the fuel consumption for flight times estimates.
I cannot do maths in any way so Thats rocket science to me.
I can tell you that the tank is 1 3/4" long and has 3/4" sq ends.
Volume..Don't know.
Capacity don't know.
Run time..don't know.
If they had have told me when I was a kid WHY we have to learn maths ( To make model plane fuel tanks and working out how much fuel you need before falling over after rotating at mach3 with a control liner) I would have understood.
And if X equals 2 and Y equals 4......My little woody mind though that either X does equal 2 and Y does equal 4 or not!!!
Then when they came up with Pie R Squared with that funny sign ...That sent my brain into total lockdown as I just did not understand what the heck he was talking about and thought it was a joke. So I laughed and was sent to the headmaster and received four strokes of the cane.
I am still not sure about Pies 60 years later!
Woody
Woody- Gold Member
- Posts : 133
Join date : 2022-04-20
Re: Keil Kraft Phantom Scratch build from start to flying.
![]() 944_Jim Wed May 18, 2022 5:38 pm
944_Jim Wed May 18, 2022 5:38 pm
I like to think I "over-engineer" things. In truth, I know I just tend to build heavy. Most of the homebuilt tanks I've seen have very narrow overlapping flanges (think Roddie "speed tanks"). But a lot of homebuilt tanks from overseas show just butt-seams with no overlapping flanges. For me, this is an observation that implies I may be building my own tanks heavy...just like everything else I build. I need to go measure my Mosquito tanks...but I seem to think I had 1/8" overlapping joints. Both tanks survived the last crash...one of the engines didn't. I would rather have the engine, if not the whole plane.
I've been asked to proxy fly a Keil Kraft Radian...that plane is a work of art I've had the privilege of holding. And it has been a lesson in "build light, fly right, land right." The Radian floats to the ground once the power shuts off. It will glide for quite a bit, versus some of the rocks I've had "the joy" of "landing." In comparison, I am learning that I shouldn't "build strong to survive landing wrong."
So this is the year I learn to minimize my "construction efforts" on each plane. I'm taking notes...lots of notes.
_________________
Never enough time to build them all...always enough time to smash them all!
944_Jim- Diamond Member
-
Posts : 1964
Join date : 2017-02-08
Age : 59
Location : NE MS
Re: Keil Kraft Phantom Scratch build from start to flying.
![]() 944_Jim Wed May 18, 2022 6:02 pm
944_Jim Wed May 18, 2022 6:02 pm
I'll try to get some run time on mine...but it will be just bench time. So it won't be quite the same as unloaded in the air.
_________________
Never enough time to build them all...always enough time to smash them all!
944_Jim- Diamond Member
-
Posts : 1964
Join date : 2017-02-08
Age : 59
Location : NE MS
Re: Keil Kraft Phantom Scratch build from start to flying.
![]() Woody Wed May 18, 2022 7:20 pm
Woody Wed May 18, 2022 7:20 pm
Hey Jim thanks for the maths!...I was hoping for a 15cc as I read somewhere, someone made a 15cc tank so that was lucky.944_Jim wrote:1.75"x.75"x.75"= about 1 cubic inch...or just under 16 cc's.
I'll try to get some run time on mine...but it will be just bench time. So it won't be quite the same as unloaded in the air.
Thanks mate!
Yes, I learnt from an early age to build em light and they float.
The only reason I see in maths is...If you build it like a barn house door strong as heck then thats exactly how they hit the ground...with a very heavy thud and descending like a barn house door.
Built light they are like babies and bounce.
I learnt that with indoor flying whereas my Hangar rat flew round in circles, hit several walls, bounced off and kept on flying.
A Hangar Rat is a tank compared to what some of these guys get up to . They take it megga seriously.
BTW my tanks are only .008" thick to keep em light and easy to bend.
Yes I love the KK Radian and will build one but I love the KK Demon more. I think it is so pretty and boyish.
Woody- Gold Member
- Posts : 133
Join date : 2022-04-20
Re: Keil Kraft Phantom Scratch build from start to flying.
![]() Woody Wed May 18, 2022 7:34 pm
Woody Wed May 18, 2022 7:34 pm
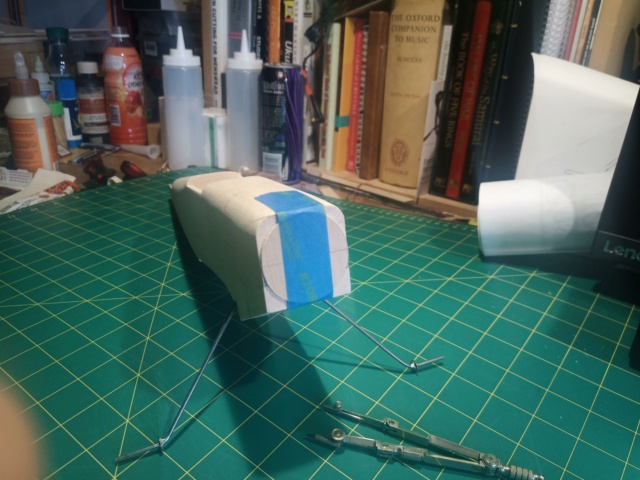
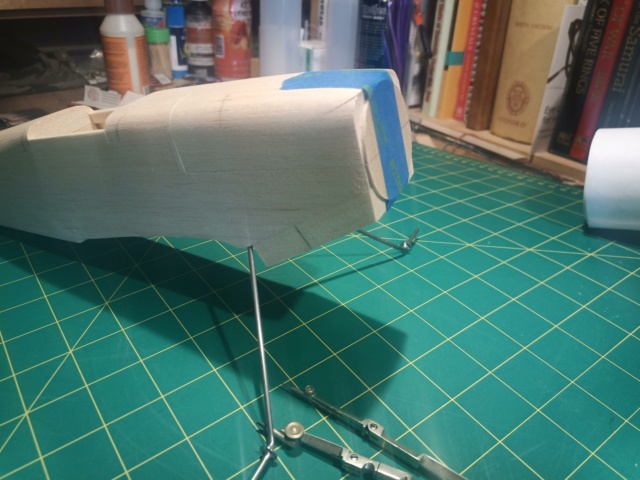
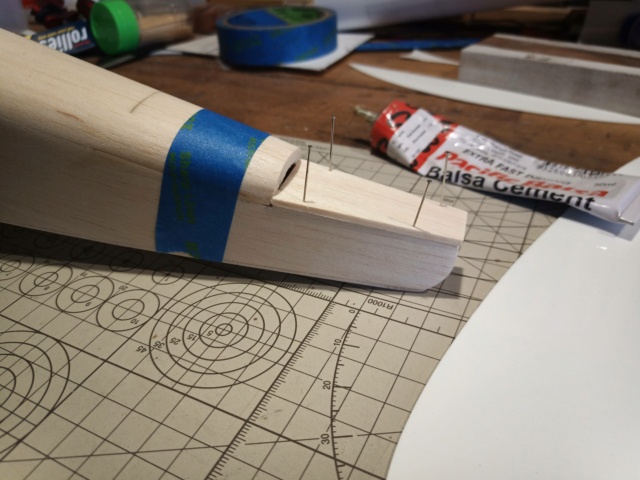
For example..... a quite complicated shape and we get two words with an arrow pointing to it..SCRAP BALSA!!!
Does not say how to fashion the scrap balsa without sanding away things like the tail plane in the process.
So The way I get around this is as follows.
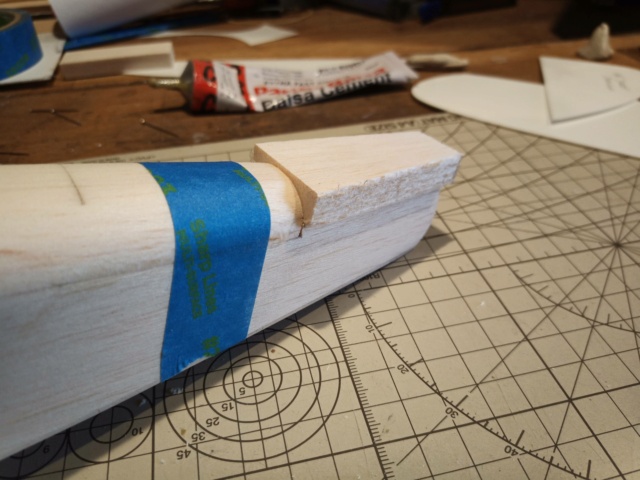
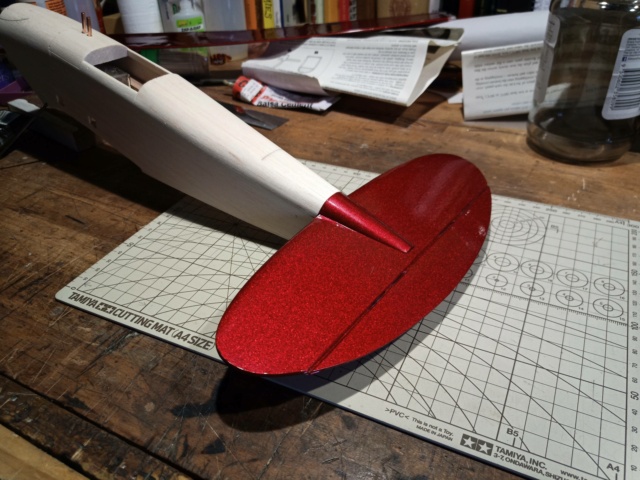
With the Phantom rear end, I have cut out a " pretend " tail from 2.5mm balsa, the exact thickness of the tail.
and stuck it to the fuse as in the picture. I levelled off the sides first to ensure the stab sits straight.
It is only tacked on with balsa cement.
Then a block of balsa roughly to profile was tacked to that.
When set, the whole was sanded down to the fuse profile giving a nice continuation instead of an after thought like in the instructions.
The sanded block will then be removed and added to the tail plane ( Stab).
Woody- Gold Member
- Posts : 133
Join date : 2022-04-20

Woody- Gold Member
- Posts : 133
Join date : 2022-04-20
Re: Keil Kraft Phantom Scratch build from start to flying.
![]() 944_Jim Wed May 18, 2022 8:21 pm
944_Jim Wed May 18, 2022 8:21 pm
I've been meaning to ask...you referenced "always a blue cloth." What's with a blue cloth?
What will you use for sealing the balsa? What fuel-proofing?
_________________
Never enough time to build them all...always enough time to smash them all!
944_Jim- Diamond Member
-
Posts : 1964
Join date : 2017-02-08
Age : 59
Location : NE MS
Re: Keil Kraft Phantom Scratch build from start to flying.
![]() Woody Thu May 19, 2022 2:28 am
Woody Thu May 19, 2022 2:28 am
Awh Jim I am retired with nothing to do, no wife any more to nag so making models is my saviour.944_Jim wrote:I can't believe the pace you are keeping! I've got three mid-build languishing for a few years. Oh, the shame of it!
I've been meaning to ask...you referenced "always a blue cloth." What's with a blue cloth?
What will you use for sealing the balsa? What fuel-proofing?
I was waiting for someone to pick up on the blue rag...its just my nonsense humour.
I have to have a laugh to myself to remain mad as a hatter.
Pay no attention. Go ahead and use red or yellow but when it irritates and you and remember Woody and go and buy blue rags........then my friend you are in the same club!!!
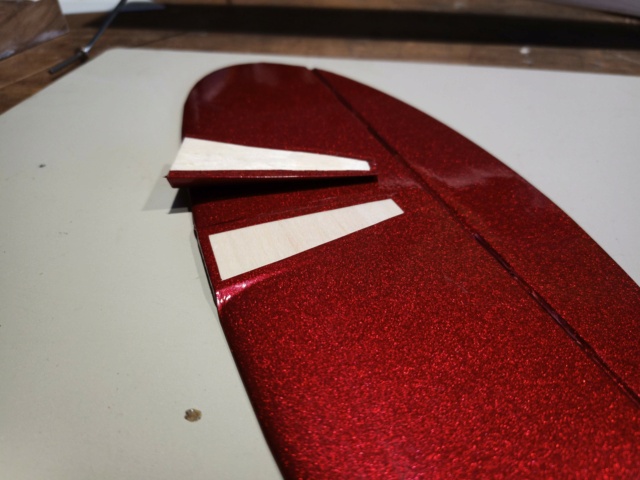
I have decided to cover it with Solarfilm as I bought a bunch of it the other day that the model shop were selling off cheap. ( old stock decades that they forgot they had )
The fuse inside will be dope and tissued and then varnished.
Things will slow up I promise as I have to wait for it to dry hard.
Woody- Gold Member
- Posts : 133
Join date : 2022-04-20
Re: Keil Kraft Phantom Scratch build from start to flying.
![]() Woody Thu May 19, 2022 2:37 am
Woody Thu May 19, 2022 2:37 am
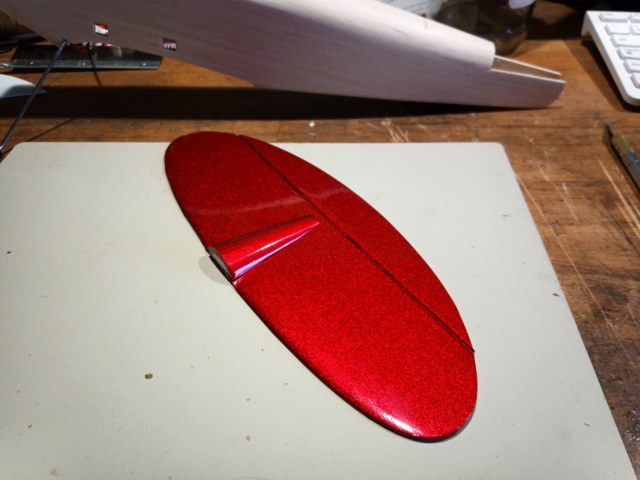
The stab, elevator and rear block are covered in Solarfilm and this acts as the hinge as well.

Woody- Gold Member
- Posts : 133
Join date : 2022-04-20
Woody- Gold Member
- Posts : 133
Join date : 2022-04-20
Re: Keil Kraft Phantom Scratch build from start to flying.
![]() rsv1cox Thu May 19, 2022 6:06 am
rsv1cox Thu May 19, 2022 6:06 am
Blue rag? I thought it a microfiber dust appliance. Mine's yellow, sometimes caught in my pictures here.

rsv1cox- Top Poster
-
Posts : 10648
Join date : 2014-08-18
Location : West Virginia
Re: Keil Kraft Phantom Scratch build from start to flying.
![]() getback Thu May 19, 2022 7:09 am
getback Thu May 19, 2022 7:09 am
Enjoying the build and thanks for answering questions  That's some sparkly solarfilm there
getback- Top Poster
-
Posts : 10159
Join date : 2013-01-18
Age : 66
Location : julian , NC
Re: Keil Kraft Phantom Scratch build from start to flying.
![]() Oldenginerod Thu May 19, 2022 7:10 am
Oldenginerod Thu May 19, 2022 7:10 am
https://www.youtube.com/watch?v=u6gPm_Mx1y8

Oldenginerod- Top Poster
- Posts : 3975
Join date : 2012-06-15
Age : 61
Location : Drouin, Victoria
Page 2 of 5 • 1, 2, 3, 4, 5 ![]()
» Keil Kraft Hurricane
» Scratch build BRM - a first
» (Another) Keil Kraft Hurricane Rebuild
» La Stick Scratch Build for Cox Pee Wee .020