

 Rules
Rules
by rdw777 Today at 9:17 am
» Revivng Some Childhood Classics
by getback Today at 8:21 am
» Roddie-Rigger.. a 2005 original design
by getback Today at 6:31 am
» A prototype Cox Reed-valve marine engine
by roddie Yesterday at 10:50 pm
» My Cox .049 Marine inboard engine
by F4D Phantom II Yesterday at 9:33 pm
» **VOTE-ON-THE-NEXT-COX-ENGINE-OF-THE-MONTH** (May 2024)
by Kim Yesterday at 8:53 pm
» Help Pee Wee tank cap .020
by MauricioB Yesterday at 8:45 pm
» Jim Walkers FireBee - This is going to be fun
by rsv1cox Yesterday at 7:29 am
» Post your Older books
by rsv1cox Mon May 06, 2024 7:51 pm
» EXTREMELY RARE COX THIMBLE DROME PROTOTYPE "BLACK WIDOW" GAS MODEL AIRPLANE
by rsv1cox Mon May 06, 2024 6:58 pm
» I brake for Turtles....
by rsv1cox Mon May 06, 2024 6:38 pm
» Ball - Socket Joints
by Ken Cook Mon May 06, 2024 3:06 pm


Help fixing model with very wrong CG

 Help fixing model with very wrong CG
![]() Yabby Wed Oct 26, 2022 3:13 am
Yabby Wed Oct 26, 2022 3:13 am
 I even built a brand new Surestart to go on this model for him, so as that it starts easy and runs solidly. Unlike me, I have even painted it to a reasonable standard ( well for me anyway :-) ) and sanded it properly etc. So as that it would be a nice little half-a model for him.
 The problem is I didnt read the plans properly!!!! and didnt think through the plans and the engine I was going to use. I needed to have cut back the node as I have mounted a Surestart on the nose, not a side mount engine on bearers that is recessed back into the nose. The end result is that the CG is about 3/4 of an inch foward of the wing leading edge and I would prefer it not to make like a Stuka when the engine stops as it can be quite demoralising for someone learning to fly, to put in a good flight and when the engine cuts it dives straight into the ground and breaks!
I could cut the nose, remount the engine................ Nope, we fly in 36 hours and I promised him this plane. So I figure I need to mod the CG. Im assuming CG of 20% of root chord from leading edge. Quite a bit of weight will be needed. The part I am unsure about is I could put all of the required weight at the very back of the fuse, but Im wondering if that will result in a pendulum/fulcrum type flying effect. Would it be better to spread weight along the fuse evenly distributed? spreading the weight evenly distributed will end up I expect in a higher total weight for the plane but I thought it might be better for flying balance than the lower weight option with all of it at the back of the fuse. If the plane needs more power due to the incresed weight I can quickly and easily nose mount a TD 049 onto the plane out at the field.
Apart from the obvious of Yabby your a clown! read the plans properly and consider your engine type etc. before you start cutting and building!

 And besides a cut and shut job on the fuse nose. What do people think is the best way to rectify as best can be now the CG? spread weight evenly along the fuse or a single weight right at the tail end of the fuse?
thanks!

Yabby

Yabby- Platinum Member


Posts : 702
Join date : 2021-06-08
Location : Yorke Peninsula South Australia
single weight
![]() cmulder Wed Oct 26, 2022 5:06 am
cmulder Wed Oct 26, 2022 5:06 am
That way you add the least weigh to the model.
For example instead of that tail skid mount a tail wheel as far back as looks apropiate.

cmulder- Gold Member

- Posts : 279
Join date : 2022-02-10
Re: Help fixing model with very wrong CG
![]() Yabby Wed Oct 26, 2022 5:48 am
Yabby Wed Oct 26, 2022 5:48 am
 I dont have wheels on the model, but I will mount the weight right at the back and I will setup the weight on a small piece of ply or balsa that i can fix to the rear of the fuse temporarily, that way its easy to mod and or move. yep, that will keep the total weight down and it also means I can keep the nice new Surestart I built for it up on the nose.
 thanks for providing your thoughts. appreciated.

Yabby
Yabby- Platinum Member
-
Posts : 702
Join date : 2021-06-08
Location : Yorke Peninsula South Australia
Re: Help fixing model with very wrong CG
![]() Yabby Wed Oct 26, 2022 6:38 am
Yabby Wed Oct 26, 2022 6:38 am
Its a definite cut and shut the front of the fuse properly job needed. Well that is certainly a very good lesson learned. and thankfully on a cheap, easy and quick model to build. I definately will check out plans etc. properly in future before I start building.
Fortunately I have four new planes ready to fly so my Lad can fly one or two of them this time and if he sticks them into the ground so be it. gotta learn somehow
Yabby
Yabby- Platinum Member
-
Posts : 702
Join date : 2021-06-08
Location : Yorke Peninsula South Australia
Re: Help fixing model with very wrong CG
![]() getback Wed Oct 26, 2022 7:00 am
getback Wed Oct 26, 2022 7:00 am

getback- Top Poster

-
Posts : 10141
Join date : 2013-01-18
Age : 66
Location : julian , NC
Re: Help fixing model with very wrong CG
![]() Yabby Wed Oct 26, 2022 7:11 am
Yabby Wed Oct 26, 2022 7:11 am
Yabby
Yabby- Platinum Member
-
Posts : 702
Join date : 2021-06-08
Location : Yorke Peninsula South Australia
Re: Help fixing model with very wrong CG
![]() balogh Wed Oct 26, 2022 10:49 am
balogh Wed Oct 26, 2022 10:49 am
Another remedy may be to move the bell-crank shaft a bit to the fore?...I would think the nose-heavy C/L plane tends to bow around the centerline of control wires (as long as the wires are kept spanned by the centrifugal force), which is in the plane of the bell-crank shaft...with the shaft brought towards the front, the rear of the plane will have a larger moment around the centerline of the wires., and help balance the nose-heavy plane?..
balogh- Top Poster
-
Posts : 4751
Join date : 2011-11-06
Age : 65
Location : Budapest Hungary
Re: Help fixing model with very wrong CG
![]() Yabby Wed Oct 26, 2022 11:48 am
Yabby Wed Oct 26, 2022 11:48 am
Both good ideas. I have moved the tank back a bit, and the new Surestart sucks really well so I could move it all the way back onto the wing. The control lines had been in my mind but the technicalities of their positioning is a bit of a mystery to me in respect to their changing the planes balance etc. I am certainly able to move the bellcrank foward and it may be a good experiment for me in learning a bit about the planes tail moment rotating around the bellcrank wires. thank you!  I think I might also put a TD 049 radial mount on the nose as they are shorter than the Surestart and much lighter which will also help. I can leave the tank right back still as ( to most peoples disgust) I run my TD 049 engines from muffler pressure and get awesome consistant results and no problems with sucking and needing really short fuel lines etc.
 I think with pragmatic application of the various offered solutions I may well be able to get the plane to fly as I had hoped without a ton of weight on the back of the fuse.
 And If I put a radial mount TD 049 on the front I dont have to run the engine flat knacker, I can back it off a bit and it may end up being a nice little plane for my lad yet. Or at the worst I will have learnt a lot and be able to quickly build another one correctly for the following weekend.
 Thank You.
Yabby
Yabby- Platinum Member
-
Posts : 702
Join date : 2021-06-08
Location : Yorke Peninsula South Australia
Re: Help fixing model with very wrong CG
![]() 944_Jim Wed Oct 26, 2022 12:33 pm
944_Jim Wed Oct 26, 2022 12:33 pm
Moving lead-outs won't change CG, but it will affect how the plane flies with respect to that CG/lead-out guide relationship.
There is a good article on Flying-Lines.org. I'll try to remember to post the link a little later today.
Last edited by 944_Jim on Wed Oct 26, 2022 8:50 pm; edited 1 time in total
_________________
Never enough time to build them all...always enough time to smash them all!
944_Jim- Diamond Member

-
Posts : 1955
Join date : 2017-02-08
Age : 59
Location : NE MS
Lug Nuts?
![]() Marleysky Wed Oct 26, 2022 6:33 pm
Marleysky Wed Oct 26, 2022 6:33 pm

Marleysky- Top Poster
-
Posts : 3618
Join date : 2014-09-28
Age : 71
Location : Grand Rapids, MI
thats nuts ;)
![]() cmulder Wed Oct 26, 2022 7:19 pm
cmulder Wed Oct 26, 2022 7:19 pm
cmulder- Gold Member
- Posts : 279
Join date : 2022-02-10
Re: Help fixing model with very wrong CG
![]() 944_Jim Wed Oct 26, 2022 10:07 pm
944_Jim Wed Oct 26, 2022 10:07 pm
http://flyinglines.org/pw.trimflow1.html
Look for lead-outs just below 1/2 way down. The whole series of articles is worth reading. Whatever you don't understand now won't hurt to learn over time. I'm not a particularly good flier yet, but I'm better now than when I first started in 2016!
Edit: Look here too...also 1/2 way down:
http://flyinglines.org/orin.trustnothing.html
_________________
Never enough time to build them all...always enough time to smash them all!
944_Jim- Diamond Member
-
Posts : 1955
Join date : 2017-02-08
Age : 59
Location : NE MS
Re: Help fixing model with very wrong CG
![]() Yabby Thu Oct 27, 2022 3:37 am
Yabby Thu Oct 27, 2022 3:37 am
I dont think the little jigger I built could get in the air with them. I agree with you cmulder about planks being slightly nose heavy peferably. I never used to worry much but then I saw the video Kim posted a while ago of a big otto, and a profile baby ringmaster with plank wing and I saw how well it flew and the glide when the engine stopped and thought maybe I should look into CG and wing area etc. a bit more!
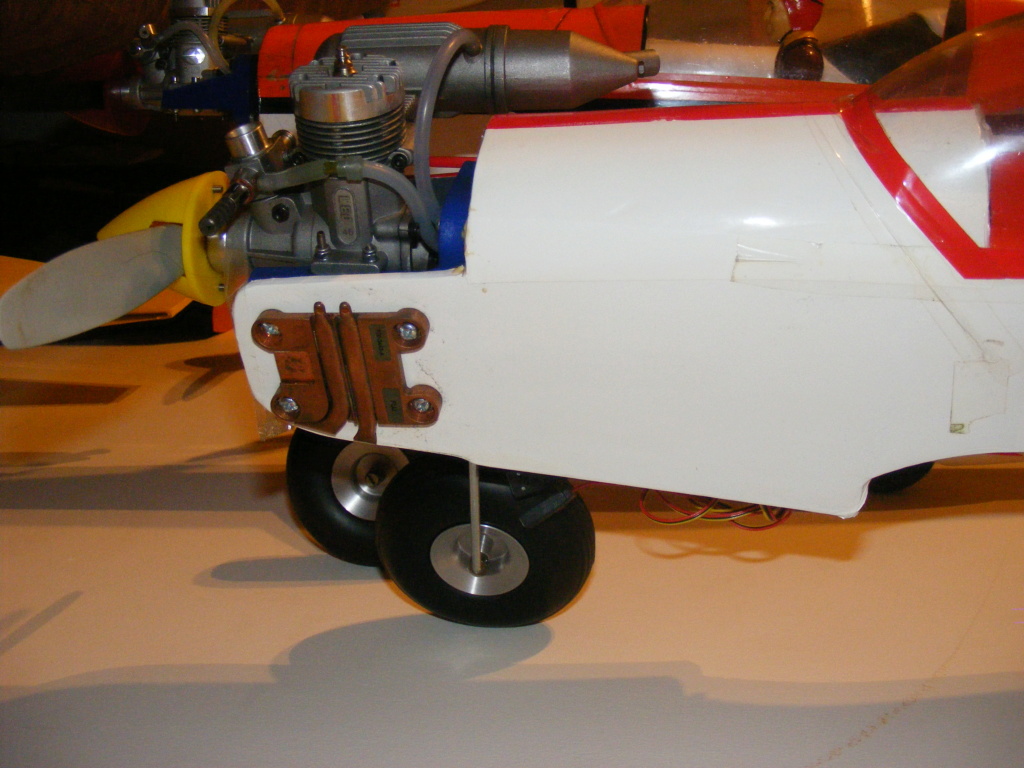
The photo of the plane nose you have posted certainly looks setup to take a very nose heavy landing if needed. Thanks heaps 944_Jim for the information you posted and the links to excellent explanations of these things.
Yabby
Yabby- Platinum Member
-
Posts : 702
Join date : 2021-06-08
Location : Yorke Peninsula South Australia
Re: Help fixing model with very wrong CG
![]() 944_Jim Thu Oct 27, 2022 11:31 pm
944_Jim Thu Oct 27, 2022 11:31 pm
cmulder wrote:I prefer staying cool though (and like my planks nose-heavy
Laptop CPU Heat Sink? It took me a minute to recognize it...and the pun.
_________________
Never enough time to build them all...always enough time to smash them all!
944_Jim- Diamond Member
-
Posts : 1955
Join date : 2017-02-08
Age : 59
Location : NE MS
yup
![]() cmulder Fri Oct 28, 2022 5:56 am
cmulder Fri Oct 28, 2022 5:56 am
cmulder wrote:I prefer staying cool though (and like my planks nose-heavy
Laptop CPU Heat Sink? It took me a minute to recognize it...and the pun.[/quote
They have this nice mounting surface and holes to bolt them down with.
The whole model is a collection of cheap or recycled things.
The original owner gave it to me after it crashed on its first flight.
Typical case of tail heavy resulting in a stall/spin just after take off.
The wing torn out of the fuse ripping it open from the front to past the rear wing mount.
Wing itself had no damage.
Over 2 years off ocasional work puzled the fuse back togeather and then used those those broken parts as template to splice in new balsa.
Installed the sullifan nylon pushrods that i prefer over metal wires with supports in between.
The left side is covered with the film sold by hobbying for about 15 euro for 5 meter at the time.
Inside is varnished with polyurethane to fuel proof it in case of a leaking tank and avoid oil damage in general.
This has already saved the model when it landed in a lake after when the engine quit and i misjudged the aproach.
First flights where with a .40 la but that was underpowered and then hobbyking sold this leo brand .46 engine cheap so got one of those.
Cg and engine trustline are set so the model does not pull left/right up/down depending on engine power (unlike the boeing 767 max 8....)
Landings are simple just aim at the runway and pull engine to idle.
The plane will just glide in hands off and only takes a little flare at the end or it will bounce.
btw it is a seagull 40 low wing sports model and they make a fun sunday flying style plane.
The orange model besides it is also a rebuild crashed model from the same previous owner. Also tail heavy at the first flight and the firewall broke out.
cmulder- Gold Member
- Posts : 279
Join date : 2022-02-10
Re: Help fixing model with very wrong CG
![]() Ken Cook Sat Oct 29, 2022 7:12 am
Ken Cook Sat Oct 29, 2022 7:12 am
Leadout position is critical but having the plane even hang where it's turned into the circle is not unthinkable. SPEED SPEED SPEED. Speed is what offers line tension. If your one that believes in rudder offset, engine offset and sweeping the leadouts toward the trailing edge to offer line tension then this post isn't for you. Your only creating drag, your making the plane fly sideways so to speak and your bleeding off SPEED. Line tension down low is not exactly a favorable spot, you want the line tension when your up high. Have any of you ever noticed why the line tension up top gets loose? I'll tell you why SPEED !!!!
This is why you want a happy balance, you want the plane to have moderate line tension down low and more up top but at the same token, you can't over control the plane. If your one that flies and then with a flick of the wrist pops full elevator, did you ever see what happens? The plane flops around and practically falls out of the air. Why? SPEED!!!!!
You have to use both a combination of wrist and full arm motions to allow the plane to progress through the maneuvers. You should look like your performing a ballet vs swatting flies.
The design of the plane is critical, I will tell you first hand that most people love the warbirds. I like them too but they fly like a brick and these planes don't scale down properly to work for control line. The wingspans are too narrow, the stabs are too small. When designed for good flying characteristics, they're way out of proportion and look strange. The Cox Messerschmitt is a great example. By design this is a fairly good design, by material selection it's horrid. The plane is way overweight due to the plastic and heavier foam. However, the wingspan and chord is correct and should be used as a guideline.
In order to determine what really is happening with your plane, you have to trim the plane so that it's flying to the best of it's ability and make one change at a time. Obviously if the plane is trying to fly into the ground, you need to determine the cause. Are the controls sticking or sluggish which is offering down elevator which in turn is causing you to offer up elevator constantly? Are there any binds in the system? This can cause the plane to fly up and down in a roller coaster motion which can also be interpreted as a tail heavy condition.
When your flying your plane and your in the center of the circle, it's difficult to spot inaccuracies of your plane's movements. One should look at the lines and think of them as completely straight when sighted down them. We all know that a slight bow takes place when flying but with the assumption that they're straight, the plane is a extension of the lines. Your plane should be inline with your lines in both axes. The planes wheels can be used as a tool here. Sight the inboard wheel and you shouldn't be able to see the outboard. If your seeing the outboard wheel behind your inboard wheel, you then know your plane is flying yawed outboard. This is creating a lot of drag and the plane isn't flying tangent to the circle.
If your plane under power is flying true to form, your outboard wingtip should be out straight and not high or low but inline with your flying lines. This is critical because most planes either have a warp built in or has just twisted that way over time. This is going to cause major problems in terms of drag and also getting very loose on the lines. Flying upright and having a outboard wingtip high is going to cause the plane to fly across the circle and loss of control when the trigger is pulled into a upward maneuver. It will do the opposite and go into the ground if one manages to get it inverted. Therefore fix your warps. Learn to sight your plane from the rear and eyeball the high point of the airfoil holding the plane level and sighting the trailing edges. This can determine which wing panel needs a twist. A heatgun and some help rotating in the opposing direction can fix this. Turn the plane around and do the same from the front. Then sight from the side to determine if the leading and trailing edges are straight. Sometimes certain twists can cancel each other out which isn't always good but the plane is still flyable.
If the plane is currently flyable, I wouldn't make any major CG changes until you can determine if other factors are at fault. You can use modeling clay and squeeze it onto the plane to make CG changes at the field. Pinching off what you need or don't need until you can make it perform. Later one, remove it, weigh it and make up some lead and glue it in. I use golfers lead ribbon which I cut off with scissors and bend it around.
Slab winged planes rarely have much of a glide pattern so I wouldn't be looking for that when the power cuts. You mentioned Kim's Big Otto and Ringmaster. These two examples are old timey planes which while they're glide patterns seem unrealistic to you, they're actually fair compared to more maneuverable examples. The Baby Flite Streak for example can be lightly whipped and will stay gliding until I stop turning. Watching the plane after the power cuts can also be a good trim tool, does the outboard tip drop? Does the tail drop or vice versa? This is where you can make better decisions on where weight is needed or not needed.
Last edited by Ken Cook on Sat Oct 29, 2022 8:50 am; edited 1 time in total

Ken Cook- Top Poster
- Posts : 5476
Join date : 2012-03-27
Location : pennsylvania
Re: Help fixing model with very wrong CG
![]() Ken Cook Sat Oct 29, 2022 8:33 am
Ken Cook Sat Oct 29, 2022 8:33 am
You work from there by either moving the pushrod up closer to your elevator center line one hole at a time. Obviously a single horned control horn doesn't benefit here and truthfully I would discard it. Most single holed control horns are too small which offer too much elevator throw and speeds up the elevator. If this doesn't offer full satisfaction, lower the rod into the furthest hole on the horn and move the pushrod on the bellcrank out one hole away from the centerline of pivot. Of course this is not possible on some 1/2A's but using the innermost hole is generally realistic. Some of the heavy built models I see need more control.
In general, most older design 1/2A planes are nose heavy. Obviously scratch building brings it's own set of mysteries. I will use the Sig Skyray as a example though. This is one example that I've found is a bit on the tail heavy side. What I've discovered with this plane is that it's surprisingly maneuverable. In fact, it sold me almost 40 years ago when I started building them regularly. It has a fairly wide chord, decent wingspan but it's nose is very close coupled to the wing. The fuse is fairly long and it does indeed create more weight aft of the engine which in turn is responsible for it's turning ability. But, for most early 1/2A flyers, it's a handful because unlike other commercially available slabs of the period, the Skyray actually flies and it will fly for the inexperienced like a roller coaster. The control horn is too small as I mentioned above and the fact that it's designed slightly tail heavy accounts for it's ability. The inexperienced is lucky to make it to the 3rd flight before planting the nose into the ground breaking it. While this is upsetting, after about 3-4 of these gravity surges the plane due to repairs brings the CG forward making it manageable.
Now even a tail heavy model can be flown if controls are properly setup. Slowing the controls down helps and limiting the throw also helps. Therefore the phrase " A tail heavy plane only flies once" doesn't necessarily apply here if the controls are trimmed accordingly. The problem is that one doesn't know this until they fly the plane which is why I suggest setting up the controls in the most limited way possible.
In reading, I saw mention of moving the fuel tank. Your fuel tank should be ONLY in one spot. The tank needs to be as close to the rear of the engine as physically possible. It's outboard placement should also be limited to being moved too far outboard. Moving the tank to adjust CG is somewhat pointless because the further you move the tank back, the engine has to work that much harder to draw fuel and the TD needs all the help it can get.
I see that Yabby uses muffler pressure, I personally wouldn't as I found it's not needed and it also makes the engine run richer which I don't prefer. If the tank is properly placed and constructed, the engine will run correctly. However, if that's what offers the best results, I'd stick with it.
It's also very difficult to make determinations via the internet. I have no knowledge of the plane, it's weight, it's construction etc. I use the above methods myself and one thing which I personally found extremely difficult to do is to do ONE THING AT A TIME. Doing several things makes it hard to determine the root cause or how to return it to it's prior flying ability .
Ken Cook- Top Poster
- Posts : 5476
Join date : 2012-03-27
Location : pennsylvania
tip weight?
![]() cmulder Sat Oct 29, 2022 2:17 pm
cmulder Sat Oct 29, 2022 2:17 pm
cmulder- Gold Member
- Posts : 279
Join date : 2022-02-10
Re: Help fixing model with very wrong CG
![]() Yabby Sat Oct 29, 2022 4:58 pm
Yabby Sat Oct 29, 2022 4:58 pm
 Thanks for so much effort and detail into what are really the basis of setting up a plane. the two posts are extremely helpful to me in that they have in some case confirmed I was on the corect track and in other cases explained in a manner applicable to a weekend 'sport' flyer ways to go about setting up a 'sport' style plane to fly and enjoy flying it. I dont fly scale as that is not my thing, I think I am probably what is called a 'Sport Flyer', I like to basically fly free form and just enjoy flying and learning new things and practicing them but I dont get upset if my wingovers come inside or I pull them out too early before the ground. I notice these things and say to myself I should try and get better control, maybe smoother on the controls, etc. but it doesnt ruin my day as I have no intention of ever competing. As it is, I actually enjoy setting stuff up and getting it right, I used to love setting my race bikes up or speedway car after a major change or repair or something as simple as we decided to try air caps on the forks, and that meant lots of testing, one thing at time, sometimes backwards with one, then foward with another,....., till we arrived at the correct setting. After a lot of experience I could often make a number of adjustments to a rough sane starting position, but when it wasnt coming right, it was back to baseline and one thing at a time. I expect with my planes, of which I am now building some more reputable, not necessarily perfect, but reasonable flying planes, that I will have a better chance at learning and applying what you have explained above, as at least the plane is somewhere half in the reasonable envelope, as opposed to the Jiggers I design and build myself, which also rely very heavily on speed. I have started increasing the wing area of them and extending the tail and they are starting to behave better.
The explanation of managing the correct or good wingtip setting for sport/no stunt flying is very helpful and I think it mixes well with the issue of rudder and engine offset producing yaw. Makes good sense. The jigger is basically on the end of a set of lines, if it tries to fly fast and straight it should produce tension on the lines, so engine offset and rudder offsett, and I expect raked back leadouts will all produce yaw, which will reduce speed and line tension. I have tended to offset my engines quite a bit with straight rudder and leadouts to try and get line tension mixed with small plane and a TD 049. Im going to make an engine mount I can adjust a bit. But I will start setting my planes up neutral as the base point and then test to see where I need to go. The clay and golfers lead are both great suggestions. Wingtip weight has been a pain to me over some years and I have gone from heaps too much where the plane would fly with the outer wing going up and down quite visibly in the wind as it was too heavy and then I came back too far and the wing would lift and plane start to roll turn in. I understand now a way to go about correcting this. And also what I am looking for in setting it up
I had a bad day with a couple of TDs the other day, so Im giving them a rest for a while. I have many new parts at home and I will build up several Surestart based crankcase engines with a killer bee crank and thrust washer, small thrust plate, TD Cylinder, start with a standard Cox plug and then use a Kamtechnik head, with the grey reed backplate and I like the black helicopter mount. Ive built these before and the power whilst not that of a TD is still very good and the engines are very easy and reliable in doing what they do. I seem to find with my TDs I have exceptionally great days with them and then exceptionally bad days.
So I want to take the engine out of the setup equation and use an engine i know I can get to perform the same time after time and start easily which is also needed to setup/trim a sport style plane. I will return to my TDs at a later date when I feel I have learnt better how to set my planes up in the first place. I didnt start rate motorbikes on Grand Prix bikes, I started on production bikes, learnt the craft of setting up and riding a race bike in a race, then I got a GP bike. I think using the engine I described as opposed to a TD at the moment is the right step and will help.Interestingly the other day, I flew my lads scorpion for two flights in atrocious conditions and I was actually very pleased with it and I hadnt done anything about the CG problem. The TDs were giving me hassles, so I decided to fly the scorpion and see how it went. It had a surestart on the nose, and I left my 42 foot lines out and used, which I shouldnt have, but the plane actually flew quite well all things considered. The wind was so bad, as the plane came into the wind, several times I thought it was going to stall and come down. I just tried to keep it level and not smash it up given the conditions! As it came around from going into the wind to the wind pushing it toward me it was coming in around five feet and at first I was running around all over the place to keep tension, then I decided it seemed to fly level anyway, so I kept the controls neutral and it did come in about five feet, but stayed level and then flew back out again quite nicely. None of my home designed planes would have been able to do that. I think that probably shows the difference in a plane that is at least somewhere in the frame as a weekend sport plane as opposed to my designs. I have several builds on the go now, being a baby ringmaster (plank style and also a built up wing), a half-a plank style Nobler, another Scorpion, a plane from outerzone called Flip, and another similar one that escapes me right now.
thanks for the effort to explain in simple terms. I also have a better grasp of the CG effect from your explanations and of how it impacts flight characteristics. I think with these cheap, easy to build planes, and some reliable engines I will get the planes flying better and have maybe more enjoyment and less frustration. The setup one thing at a time/ 1 change at a time is defintely the way. You have also helped me with the what and why, which is important to trying to setup and look for the changes. I expect the planes will be as with my motorsport experience in that many seemingly very small changes add up to a package that works very well. Its not often that one change on its own solves everything and sometimes changing one thing needs a small change on another etc. I think armed with the knowledge you have passed on, and some reasonable known planes and some nice new surestarts, with sensible line lengths Im in with a really good chance of getting the improvements and enjoyment Im seeking.
Thanks again for the time and effort to help me. Ive had some tell me if I flew big planes all the problems would go, but I dont fully agree with that. I can fly, my reflexes are good, I will crash planes learning, and I dont want to crash big expensive planes, and I just have a thing that I love half-A planes, and I have known deep down that I dont understand how to set them up! If I cant setup a half A plane I wont be able to setup a big plane either! and vice a versa. So Im happy with my half - A planes.Yabby
Yabby- Platinum Member
-
Posts : 702
Join date : 2021-06-08
Location : Yorke Peninsula South Australia
Re: Help fixing model with very wrong CG
![]() Ken Cook Sat Oct 29, 2022 5:46 pm
Ken Cook Sat Oct 29, 2022 5:46 pm
Ken Cook- Top Poster
- Posts : 5476
Join date : 2012-03-27
Location : pennsylvania
Re: Help fixing model with very wrong CG
![]() Yabby Sun Oct 30, 2022 5:38 am
Yabby Sun Oct 30, 2022 5:38 am
greatly appreciative
Yabby
Yabby- Platinum Member
-
Posts : 702
Join date : 2021-06-08
Location : Yorke Peninsula South Australia
Re: Help fixing model with very wrong CG
![]() Ken Cook Sun Oct 30, 2022 7:17 am
Ken Cook Sun Oct 30, 2022 7:17 am
Many times when I have new planes, I tape coins to them during their maiden flights. I've even trimmed elevators down removing quite a bit of material to improve balance. If you can balance the plane by trying to avoid using mounds of lead, it usually is beneficial on 1/2A's. Shortening noses, light wheels, etc.
Ken Cook- Top Poster
- Posts : 5476
Join date : 2012-03-27
Location : pennsylvania
Re: Help fixing model with very wrong CG
![]() Yabby Sun Oct 30, 2022 8:03 am
Yabby Sun Oct 30, 2022 8:03 am
i will definately go down in line length using reedies.
My dad was around motorbike racing a lot as a young man and helped in the pits. when i started racing he was very very not pleased but decided seeing as i couldnt drill a straight hole he better build my bikes and be my race engineer to try and make that part safe! Were it not for my dad i would have been no good at it. fact. full stop. both sports require a top pitman. they see things the competitor misses. and its a great way for both to have a good time together doing stuff they love. my dad is 90 now and i treasure memories of times we spent prepping, building, qualufying, racing, testing together. great times!! I bet your son wouldnt be quite as good if you werent pitting for him. people often greatly underate the value of a good pittman.
I used to fly dominator and liquidator wings scratch built with my enya 15 in them. they were a blast to fly. one is almost ready to go. yay. but ive got a half A learning bug now. lol. and im not a good combat pilot. i fly like a motorcycle boy racer rides in the hills on the weekend. lol. looks flash, but when the crunch comes........... they are rubbish. thats my combat level. lol. but i have fun. and at times my lad joins me which i love.
Yabby
Yabby- Platinum Member
-
Posts : 702
Join date : 2021-06-08
Location : Yorke Peninsula South Australia
» Fixing the Shoestring
» Micro 12VDC Generator with a Cox .049 Sure Start Diesel Engine
» PeeWee .020 bent cylinder
» Fixing my handle, maybe this'll give you a good Yuk...