

 Rules
Rules
Log in
Search
Latest topics
» Roddie's water-cooling bottle for bench-runningby roddie Today at 8:59 pm
» Baja Bug / Dune Buggy Recoil Starter
by vambrosini Today at 8:57 pm
» Wanted: Pull Starter reapir kit for a Cox Dune Buggy.
by vambrosini Today at 8:55 pm
» cox dune buggy/ baja bug
by vambrosini Today at 8:49 pm
» Jim Walkers FireBee - This is going to be fun
by 944_Jim Today at 7:46 pm
» Joe Wagners Sioux
by GallopingGhostler Today at 7:37 pm
» Jim Walker Firebaby
by rsv1cox Today at 10:29 am
» B-25 Mitchell
by rdw777 Today at 9:49 am
» Artwork for Otto Kuhni
by rsv1cox Today at 9:39 am
» Cox water wizard
by Wiggy Today at 6:32 am
» My Cox .049 Marine inboard engine
by 1/2A Nut Yesterday at 9:52 pm
» Roddie's water-cooled bench-run vid
by roddie Yesterday at 8:55 pm


CEF Traveling Engine


Win This Engine!

Live on Patrol


Plier Mark Repair Attempt
Page 1 of 1

Plier Mark Repair Attempt
![]() rdw777 Tue Jan 31, 2023 7:05 pm
rdw777 Tue Jan 31, 2023 7:05 pm
Got most of the marks out on this bay special .020 by filling flats on the top fin to accept the Cox wrench…. Thanks for the how to on this Andras!!!
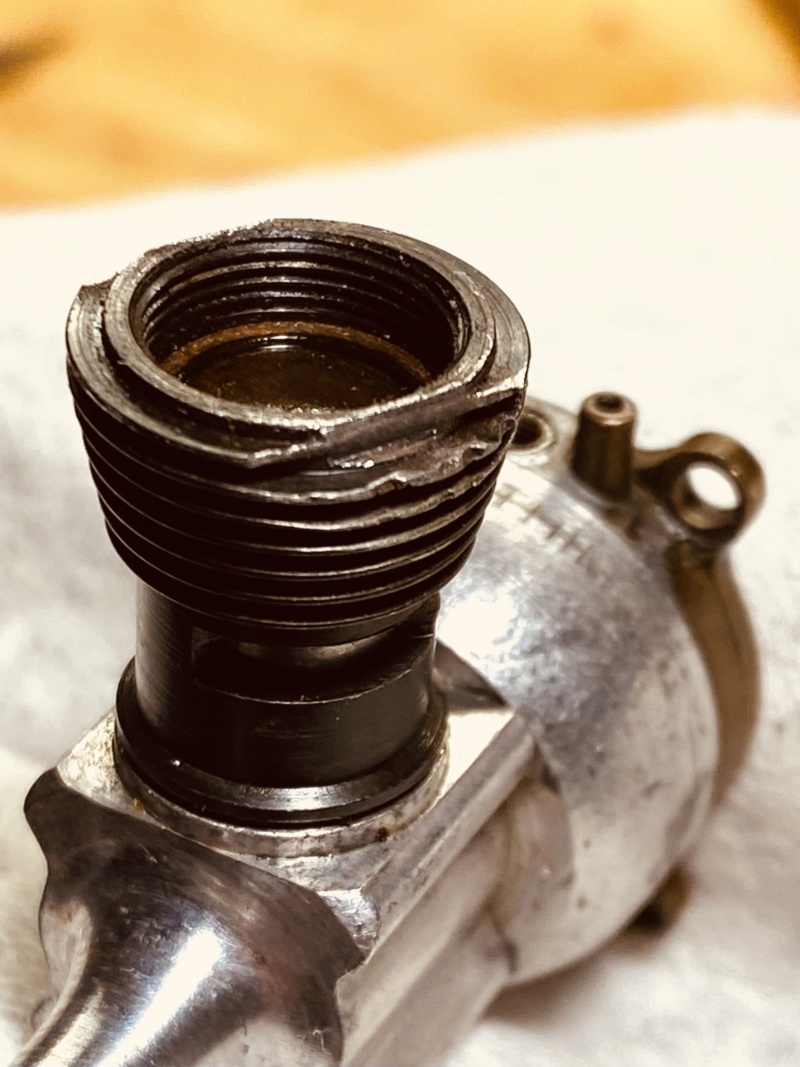
I’ve read the metal the cylinders has lead as part of the alloy so I thought I’d give it a shot….I filled the marks in fins 2 and 3 with 60/40
rosin core solder then filed back to shape….
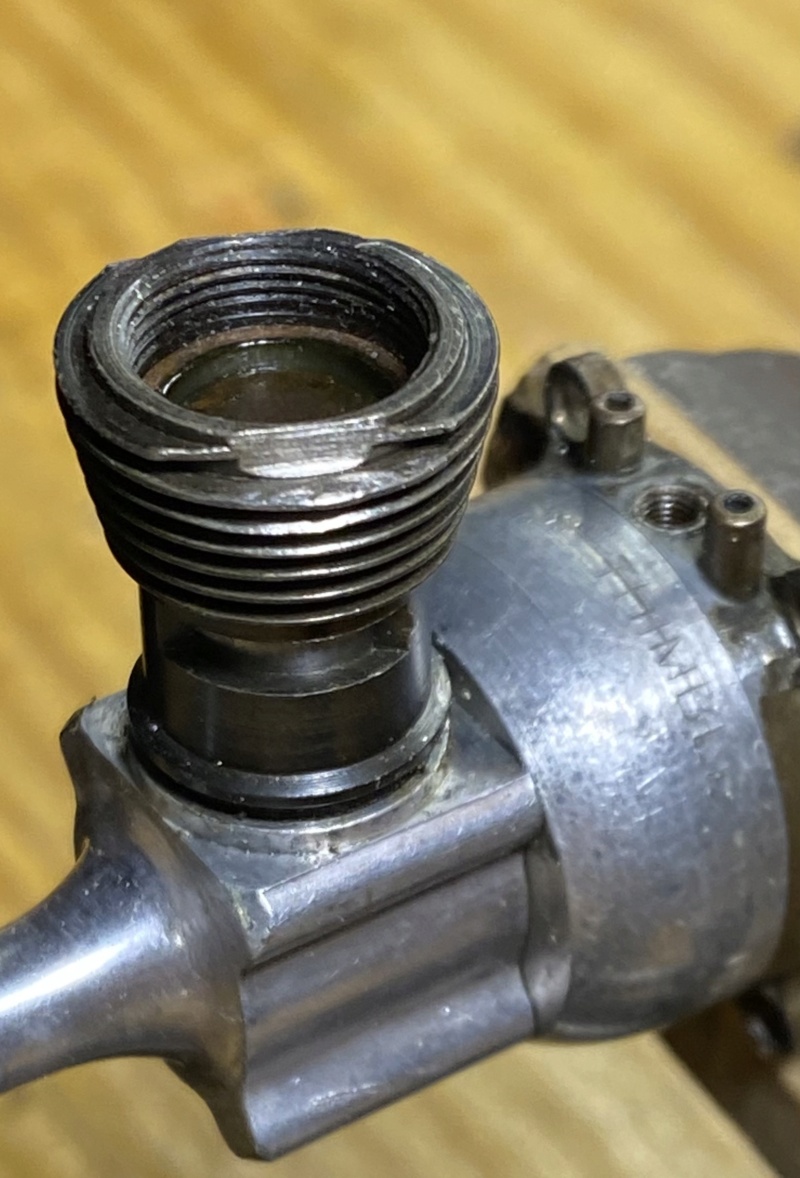
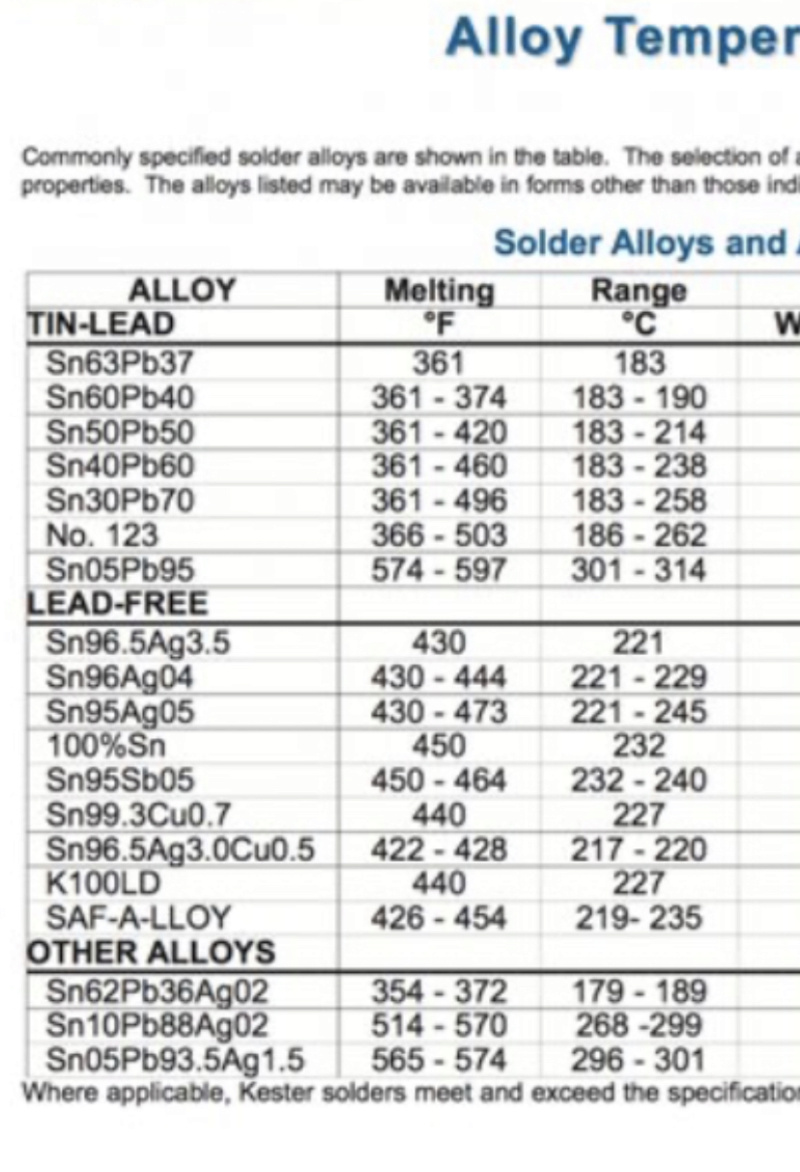
Any thoughts from anyone if the solder will stay or not? The acid test of course will just be to run it but it’s going to be to cold the next several days….Maybe there’s a better solder if anyone has done anything similar?…. I made sure to get the iron on and off quickly to not heat damage the cylinder…Here’s a temp chart for reference….
I’ve read the metal the cylinders has lead as part of the alloy so I thought I’d give it a shot….I filled the marks in fins 2 and 3 with 60/40
rosin core solder then filed back to shape….
Any thoughts from anyone if the solder will stay or not? The acid test of course will just be to run it but it’s going to be to cold the next several days….Maybe there’s a better solder if anyone has done anything similar?…. I made sure to get the iron on and off quickly to not heat damage the cylinder…Here’s a temp chart for reference….

rdw777- Diamond Member


Posts : 1332
Join date : 2021-03-11
Location : West Texas
Re: Plier Mark Repair Attempt
![]() balogh Wed Feb 01, 2023 12:35 am
balogh Wed Feb 01, 2023 12:35 am
Hey Robert, congrats to your results in filing the flats on the cylinder top fin, looks really great.
As to the reconstruction of fins to remove plier marks, your soldering material touch-up has really made wonders, the marks disappeared.
I read somewhere that the surface temperature of a running, hot COX engine is in the range of 140...150 Celsius, this will most likely be endured by the soldering material you have added. Whether it will stick, wlll be seen during your bench run test. Did you try if gun blue fluid will blacken the soldered parts too?
Soldering has always been a challenge for me, even though I could do very well with some home-made battery packs soldered from 4pcs of 1/3 or 2/3 NiMh AAA size batteries, this is still on my bucket list.
For repairing not too deep plier marks I resort to fine sand paper: I fix a strip of it on the exacto knife blade, pry this combo between the fins, and file the fin top and bottom flat surface until it becomes even. Then I wind a strip of sanding paper around the damaged fins and rotate the cylinder until the depth of the marks is minimized or disappeared. (I simply grab the cylinder with my thumb and index fingers surrounding it to ensure full circumferential contact between sanding paper and fins, to prevent ovality or similar damage inflicted with the raw, sanding cosmetics.) The cylinder material is really soft, sanding paper will do it on shallow marks.
Then I add a touch of gun blue fluid to restore the black color of the cylinder. This restored black color will help optically hide the remaining minor marks that sanding could not heal.
balogh- Top Poster

-
Posts : 4753
Join date : 2011-11-06
Age : 65
Location : Budapest Hungary
Re: Plier Mark Repair Attempt
![]() rdw777 Wed Feb 01, 2023 11:08 am
rdw777 Wed Feb 01, 2023 11:08 am
Thanks Andras again for the inspiration to add the flats!…. And the reply on the operating temps, I new someone here should have an idea…. I know it will depend on ambient temps as well but will test it out next chance I get…. If it holds up I have some ideas for a throttle, Exhaust type, but would require some soldering…
I did a lot of industrial brazing and soldering early in my career so I understand the concept well….Also built a lot of electronic kits ….In the 90’s when micro RC became a thing I learned to solder really tiny parts like surface mount components…. That will test patience for sure….
I filed and sanded as much possible on the damaged fins before I thought it was getting too aggressive…. I used needle files and broken pieces of Dremel cut off wheels, They fit between the fins nicely…. Sandpaper and a fine brass bristle brush as well…I’m guessing the gun bluing will work but will run it a few times before to be sure the solder will stay….
rdw777- Diamond Member
-
Posts : 1332
Join date : 2021-03-11
Location : West Texas
Re: Plier Mark Repair Attempt
![]() rdw777 Wed Feb 01, 2023 11:27 am
rdw777 Wed Feb 01, 2023 11:27 am
Here’s the iron I used, A Weller 25 W…. But it runs hot….. A 40 W would probably be better for this kind of job…. I made a different tip for it with #12 solid copper wire…. Coiled around the barrel and the existing tip then the tip is filed to a sharp point….
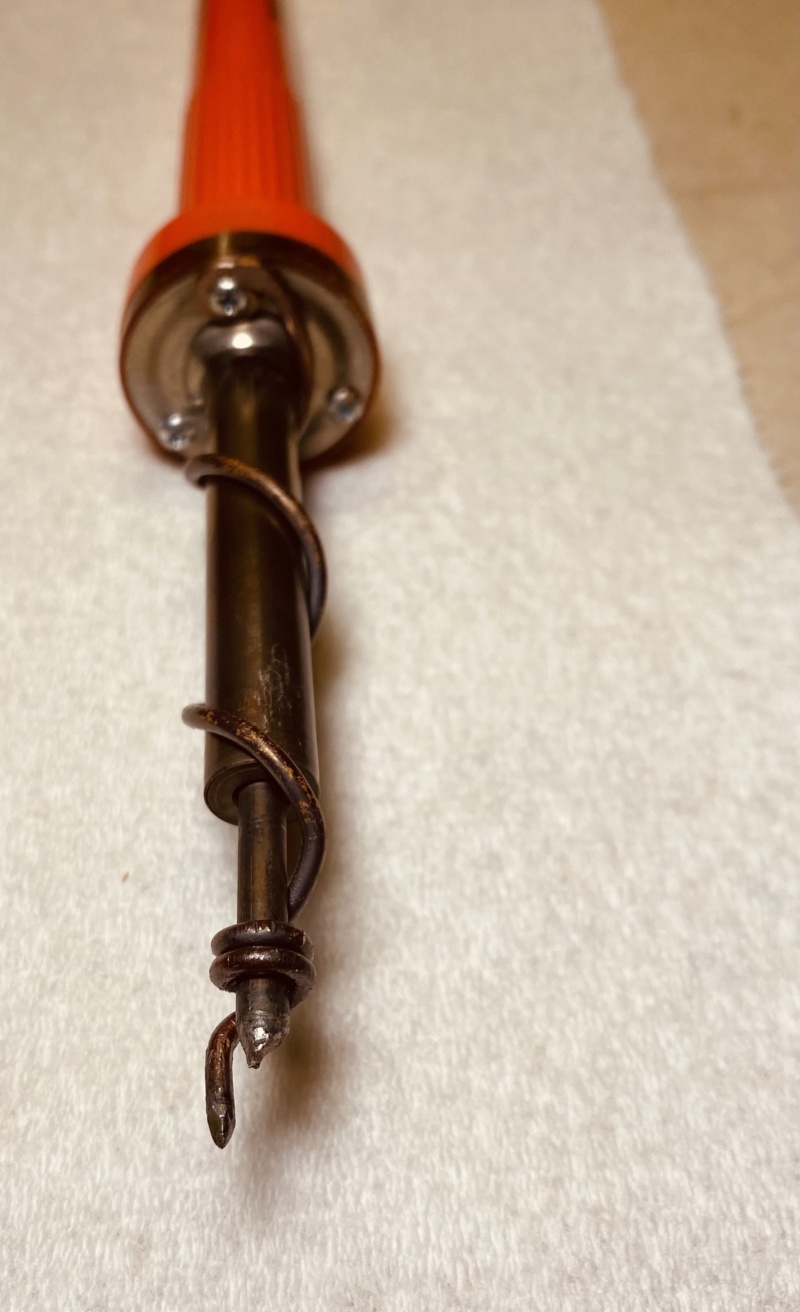
I used plumbing solder paste, The kind for copper pipes….. Just a tiny dot applied with a toothpick only applied exactly where the solder should be….Then just a tiny bit of solder on the tip applied a little at a time…. Minimizes run out and clean up this way…. Needs a good clean up with alcohol afterwards to get any flux that was left off….
I used plumbing solder paste, The kind for copper pipes….. Just a tiny dot applied with a toothpick only applied exactly where the solder should be….Then just a tiny bit of solder on the tip applied a little at a time…. Minimizes run out and clean up this way…. Needs a good clean up with alcohol afterwards to get any flux that was left off….
rdw777- Diamond Member
-
Posts : 1332
Join date : 2021-03-11
Location : West Texas
Re: Plier Mark Repair Attempt
![]() Yabby Wed Feb 01, 2023 3:16 pm
Yabby Wed Feb 01, 2023 3:16 pm
great job of renovating the engine Robert!  The solder idea is a great idea and it is also soft enough to file into shape etc. I like the tip you made for your soldering iron.
I think many will be interested in the methods yourself and Andras have used to recondition the outside of the engines. Both methods came together to produce a great result. I think Bob @rsv1cox will be interested as he so loves reconditioning planes and engines. Its just that he is up to his eyeballs in a Mazda RX7 currently.

GaryB
'Yabby'
The solder idea is a great idea and it is also soft enough to file into shape etc. I like the tip you made for your soldering iron.I think many will be interested in the methods yourself and Andras have used to recondition the outside of the engines. Both methods came together to produce a great result. I think Bob @rsv1cox will be interested as he so loves reconditioning planes and engines. Its just that he is up to his eyeballs in a Mazda RX7 currently.
GaryB
'Yabby'

Yabby- Platinum Member

-
Posts : 702
Join date : 2021-06-08
Location : Yorke Peninsula South Australia
Re: Plier Mark Repair Attempt
![]() rsv1cox Wed Feb 01, 2023 3:43 pm
rsv1cox Wed Feb 01, 2023 3:43 pm
Yabby wrote:great job of renovating the engine Robert!
I think many will be interested in the methods yourself and Andras have used to recondition the outside of the engines. Both methods came together to produce a great result. I think Bob @rsv1cox will be interested as he so loves reconditioning planes and engines. Its just that he is up to his eyeballs in a Mazda RX7 currently.
GaryB
'Yabby'
Yeah, but I haven't forgotten my roots, I still read this stuff.
I have done a lot of cylinders, remember - I always tried to find and buy the worst looking engines out there.
I have posted a lot of pictures here about my method so I won't reinvent and picture the wheel again. But for lite marks I just left the glow head on, chucked it up in my drill press and lightly held a fine file to the cylinder then finished with 400 grit wet/dry paper and did the fins with an equalizing jewelers file then blackened with Oxpho gun blue. Cylinder will never miss it. But I have seen some intentionally remove large amounts of cylinder metal.
Works great for lite marks, but Robert's were quite deep. Might try the solder method next time. But I don't think gun blue will touch it.
BTW, the fun is not in the results, it's in the journey.

rsv1cox- Top Poster
-
Posts : 10633
Join date : 2014-08-18
Location : West Virginia
Re: Plier Mark Repair Attempt
![]() GallopingGhostler Wed Feb 01, 2023 5:27 pm
GallopingGhostler Wed Feb 01, 2023 5:27 pm
Some years back, I welded a broken steel saddle bag hangar with a light lowest temperature brazing rod and my Weller MAP Gas outfit. This was for my 1987 Suzuki Savage. For some odd reason, the 3/8" chromed steel rod framework broke near its mount bracket. Was good for a number of years before I got rid of the motorcycle.
That outfit could only do the lowest temperature brazing rods at this 4,300 ft. elevation.
Wonder if something a little harder like these low temp. brazing rods might repair the sheared fins. However, it might affect the tempering of the cylinder as well, may be even warp it with that much heat.
Perhaps touching it with a TIG or MIG arc weld, then carefully file the weld smooth and even?
I think Bob's idea of just cleaning up with a file, and reblue the exposed metal edges might be the most practical in the long run. Make it a regular runner, and save the prettier stuff for shelfware proud to show stuff.

GallopingGhostler- Top Poster
-
Posts : 5336
Join date : 2013-07-13
Age : 70
Location : Clovis NM or NFL KC Chiefs
Re: Plier Mark Repair Attempt
![]() rsv1cox Wed Feb 01, 2023 6:37 pm
rsv1cox Wed Feb 01, 2023 6:37 pm
The jewelers file in the fins while spinning works really well removing the lateral rough edges and restoring the original Cox look. Use a light touch. You can continue with a folded sheet of 400 grit paper inside the fins again while spinning to really smooth them out.
A nicely beveled screwdriver inserted at a 90 degree angle straightens most bent fins.
A nicely beveled screwdriver inserted at a 90 degree angle straightens most bent fins.
rsv1cox- Top Poster
-
Posts : 10633
Join date : 2014-08-18
Location : West Virginia
Re: Plier Mark Repair Attempt
![]() sosam117 Wed Feb 01, 2023 6:48 pm
sosam117 Wed Feb 01, 2023 6:48 pm
You could also try using silver solder. It has a higher melting point?
I use silver solder on my landing gear for a better hold than the acid solder. (60/40)
Just an idea?
It also files just as easy as the 60/40 solder.
I use silver solder on my landing gear for a better hold than the acid solder. (60/40)
Just an idea?
It also files just as easy as the 60/40 solder.
sosam117- Diamond Member
- Posts : 1292
Join date : 2016-03-23
Location : Suburb of Chicago, Illinois
Re: Plier Mark Repair Attempt
![]() GallopingGhostler Wed Feb 01, 2023 8:00 pm
GallopingGhostler Wed Feb 01, 2023 8:00 pm
I suppose one could try silver solder.  Relooking Robert's engine photo and damage, it seems only superficial.
  If engine is to be flown, I think Bob's idea of simply dressing the damaged fins to remove the burrs, clean up the uneveness then reblue, would for the long run be a lasting solution.
  If it is to be a static display, then the other methods that improves looks would probably be satisfactory.
But, that is just my opinion.
If engine is to be flown, I think Bob's idea of simply dressing the damaged fins to remove the burrs, clean up the uneveness then reblue, would for the long run be a lasting solution. But, that is just my opinion.
GallopingGhostler- Top Poster
-
Posts : 5336
Join date : 2013-07-13
Age : 70
Location : Clovis NM or NFL KC Chiefs
Re: Plier Mark Repair Attempt
![]() rdw777 Thu Feb 02, 2023 7:25 am
rdw777 Thu Feb 02, 2023 7:25 am
Thank you Gentlemen, I appreciate your thoughts!!
Yes Yabby, I think I have some of Bob’s “Make a silk purse from a sow’s ear” in me …. Actually very satisfying to restore/rebuild things like these….
Sosam, When you use silver alloy solder on your landing gear do you use torch or iron?…. What percent silver? I really need to stick with the iron to keep it controllable ….
George, Yes brazing with silver alloys would certainly resist high temps better, I’m going to see what the plumbing shop might have and possibilities of working it with an iron…
Thanks Bob, Details noted…. Spinning it certainly makes sense…. I sanded a soft dowel to a taper to friction fit in the cylinder just to hold it while working on it…. I could also use it to turn it as well …. I bet you’re right about the bluing not sticking to the lead/tin…The bluing probably reacts with the iron in the cylinder alloy….
You are spot on about enjoying the journey…. I love working thru problems like this, If it works, great!! If it doesn’t we’ll try something else or chalk it up to learning!!!
Yes Yabby, I think I have some of Bob’s “Make a silk purse from a sow’s ear” in me
…. Actually very satisfying to restore/rebuild things like these….Sosam, When you use silver alloy solder on your landing gear do you use torch or iron?…. What percent silver? I really need to stick with the iron to keep it controllable ….
George, Yes brazing with silver alloys would certainly resist high temps better, I’m going to see what the plumbing shop might have and possibilities of working it with an iron…
Thanks Bob, Details noted…. Spinning it certainly makes sense…. I sanded a soft dowel to a taper to friction fit in the cylinder just to hold it while working on it…. I could also use it to turn it as well …. I bet you’re right about the bluing not sticking to the lead/tin…The bluing probably reacts with the iron in the cylinder alloy….
You are spot on about enjoying the journey…. I love working thru problems like this, If it works, great!! If it doesn’t we’ll try something else or chalk it up to learning!!!
rdw777- Diamond Member
-
Posts : 1332
Join date : 2021-03-11
Location : West Texas
Re: Plier Mark Repair Attempt
![]() sosam117 Thu Feb 02, 2023 11:34 am
sosam117 Thu Feb 02, 2023 11:34 am
rdw777 wrote:Thank you Gentlemen, I appreciate your thoughts!!
Sosam, When you use silver alloy solder on your landing gear do you use torch or iron?…. What percent silver? I really need to stick with the iron to keep it controllable ….
You are spot on about enjoying the journey…. I love working thru problems like this, If it works, great!! If it doesn’t we’ll try something else or chalk it up to learning!!!
I have used those small hobby sized butane torchs with the silver solder along with a regular iron (about 175 watts).
The silver solder I use is, Stay-Brite -- it has about 45% silver in it.
Here is the exact product that I use:
Click on the words below to go to the website to view.
Stay-Brite Silver Solder Kit
You can use either the little butane torch (I like to use it to heat up the larger part to solder)
Then use the large soldering iron to apply the silver solder on the part.
I do the same on the landing gear.
Pre-Heat up the gear then a drop of flux on the wire then use the iron to melt the solder onto and around the landing gear wire.
sosam117- Diamond Member
- Posts : 1292
Join date : 2016-03-23
Location : Suburb of Chicago, Illinois
Re: Plier Mark Repair Attempt
![]() rdw777 Thu Feb 02, 2023 2:21 pm
rdw777 Thu Feb 02, 2023 2:21 pm
Thanks for sharing the material you use and the soldering tips sosam …..Yes familiar with that product, We used it to braze steel nipples to copper pipes…..5, 10, and 15% Sil-Fos was for copper to copper only….. I checked for it at the plumbing shop here but they do not stock it…. I may order some
rdw777- Diamond Member
-
Posts : 1332
Join date : 2021-03-11
Location : West Texas
» Another attempt to avoid work.
» Micro 12VDC Generator with a Cox .049 Sure Start Diesel Engine
» My First Balloon Tank Attempt
» Cox Sopwith Camel almost ready
» Fall SMALL -- Oct. 11-14, 2018 (Thr-Sun)--Mayflower, Arkansas
» Micro 12VDC Generator with a Cox .049 Sure Start Diesel Engine
» My First Balloon Tank Attempt
» Cox Sopwith Camel almost ready
» Fall SMALL -- Oct. 11-14, 2018 (Thr-Sun)--Mayflower, Arkansas
Page 1 of 1
Permissions in this forum:
You cannot reply to topics in this forum