

 Rules
Rules
by getback Today at 5:44 am
» Fox .35 Modifications
by Ken Cook Today at 3:16 am
» Three -- sold out (making two more) Cox .010 Carburetors with wrench
by 1/2A Nut Today at 12:08 am
» Happy Anzac Day!
by Boats13 Yesterday at 11:03 pm
» Project Cox .049 r/c & Citabrian Champion
by MauricioB Yesterday at 4:08 pm
» Revivng Some Childhood Classics
by rsv1cox Yesterday at 7:17 am
» Introducing our Cox .049 TD Engines
by getback Yesterday at 6:20 am
» Roddie's flat-bottomed boat..
by Levent Suberk Yesterday at 12:23 am
» Cox powered jet-pump for model Sprint Boat
by roddie Thu Apr 25, 2024 10:25 pm
» Micro Draco Gets to Fly on a Beautiful Morning.
by rdw777 Thu Apr 25, 2024 8:15 pm
» Jim Walker Firebaby
by rdw777 Thu Apr 25, 2024 8:06 pm
» Hydro-bat by Vic Smeed: engine probs
by GallopingGhostler Thu Apr 25, 2024 5:12 pm


Rebuilding a Black Widow, mouse racer style.
Page 2 of 4 •  1, 2, 3, 4
 ![]()
Re: Rebuilding a Black Widow, mouse racer style.
![]() Cribbs74 Sun Mar 04, 2012 8:19 am
Cribbs74 Sun Mar 04, 2012 8:19 am
When you first fired it off you were able to shut it down by plugging the vents. Once warm you lost that ability......
A crack may be expanding when warm. Just a thought. Are the case,tank and backplate common to the engine before the mods? You were saying that was a problem before you rebuilt it.

Cribbs74- Moderator


Posts : 11895
Join date : 2011-10-24
Age : 50
Location : Tuttle, OK
Re: Rebuilding a Black Widow, mouse racer style.
![]() PV Pilot Sun Mar 04, 2012 10:00 am
PV Pilot Sun Mar 04, 2012 10:00 am

PV Pilot- High Tech Balsa Basher

- Posts : 1854
Join date : 2011-08-11
Age : 57
Location : The ragged end of the Universe.
Re: Rebuilding a Black Widow, mouse racer style.
![]() RknRusty Sun Mar 04, 2012 11:03 am
RknRusty Sun Mar 04, 2012 11:03 am
If so, I have some OEM ones. At least it ran cool. I could hold my finger against the crankcase and it was not too hot. It's really windy, so if I don't fly today, I'll crack it open and fix it. I think I have a good running engine here, just the usual glitch. The way it cranked the first time I thought I had it right.PV Pilot wrote:Maybe your cut silicone seal for the venturi gasket bit back.
_________________
...and never Ever think about how good you are at something...
while you're doing it!
My Hot Rock & Blues Playlist

RknRusty- Rest In Peace

- Posts : 10869
Join date : 2011-08-10
Age : 68
Location : South Carolina, USA
Re: Rebuilding a Black Widow, mouse racer style.
![]() Paulgibeault Sun Mar 04, 2012 12:31 pm
Paulgibeault Sun Mar 04, 2012 12:31 pm
I just returned from a beach holiday & noticed your thread topic. It's excellent!
What you're doing is what I've actually always wanted to do. I've always though that a few short video clips of various phases of my Cox engine building/assembly would be a real help. But I'm not as far advanced as you are in that regard, so keep up the good work!
The whole Cox 049 RELIABILITY thing is based on sealing up leaks everywhere. I'm not sure if you sealed up the screw holes in the backplate (after the engines's all together) but if not, you should. Certainly when the engine doesn't needle properly you've got a problem that has to be fixed. Sadly, I've no way of trouble-shooting over the internet! The time-consuming way is to swap out parts & isolate the offending leaker. OR, use your intellect & attempt to FIX the offending leaker. Both ways work...
I'm not a great intellect/designer, but I do try to OBSERVE what's going on a lot.
One thing I observed was your comment that Sig 35% worked well on your TD but not with your reed motors. Something's wrong here. Induction style has nothing to do with how an engine responds to fuel type. You may note that Sig 35% was the selected fuel for the 2010 049 Tach Off & it ran well in all those entries... If I could, I'd like to take my Sig fuel over to your place & run your engine to see for myself. If only! So somethings's amiss there, but I'm not sure what exactly. You did however mention the condition of the plug. Now that's a clue. Not sure what the 'white haze' you describe is. I do know ANY "frosting" of the Cox element is not good & often is a sign of micro metal coming off somewhere. The real question then is WHERE?
It is possible your cleaning is not thorough enough, although that's a stretch. (i.e. not 100% of the grinding or polishing compound was removed...) Or, it's something else seen with a 10X magnifying glass. Or, none of the above. Very tough to diagnose over the internet!
You mention sanding the c/case to match the transfer ports. 25 yrs ago, I thought that was a great idea that made sense too. I did however OBSERVE that no Cox 1/2 speed flyer did that. They always positioned their exhaust ports sideways. So I deduced, they would do it differently if they though it was better, but they don't. I've OBSERVED on my best running mouse engines that the ideal port situation is neither front nor sideways, but at a 45 degree angle. I can't tell you why, but I know what I see...THIS is what makes these discussions interesting!
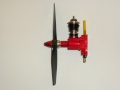
For bench running it's not critical, but for flying the fuel pick-up MUST be at the absolute most outboard corner of the tank. Your photo shows it's close but for me, it wouldn't be close enough. Your position (in the air) won't use all the fuel in the tank.
Mounting the engine cyl sideways has the benefit of more tip weight & more streamlining. About all I can say is do it carefully (whatever that means). I have seen some perfectly normal engines run very strangely when their owners moved the cylinders & tank around. It can work JUST FINE, I've seen that too, but one must be careful to OBSERVE, when these changes make things worse. One reknowned modeller claims his engine runs better (in the air) with the cylinder on the inboard side. Perhaps.
In any event, my method of operation is to start from square one & go from there. If a change is better, good. If not go back a step & confirm the observation. Speaking of which, I winch when knowing you're not using a Tach. Man, you gotta get one of those! I've got a spare for $30 delivered if you can't get one locally. Enough of my ramblings for now. Keep up the informative work.
Cheers, Paul
I did not know Paul G. was a member of CEF before I started this, but whaddya know, he's here. Now I better make it good. Paul, if you read this, I hope you approve. Or if you need to add some criticism, I'll welcome that too.

Paulgibeault- Gold Member

- Posts : 259
Join date : 2011-09-24
Location : Leduc, Alberta Canada
Re: Rebuilding a Black Widow, mouse racer style.
![]() RknRusty Sun Mar 04, 2012 1:43 pm
RknRusty Sun Mar 04, 2012 1:43 pm
I wish I had read this earlier or I would have positioned the pickup tube higher. There is a little shelf at exactly the right place to prop the tube in a metal plate, but not on the plastic one.
When I run an engine all week on my Glowplugboy fuel, the glowplugs are fine. In fact since I was a kid I've only had 2 plugs fail until lately. And if after all that time on GPB fuel I can run a single tank of SIG through it and the engine will no longer crank. The ohm meter reads normal conductivity but it will not light. Something may be depositing on it that's more conductive than the platinum, shunting the current(in theory, unlikely. Platinum is very conductive), or shorting it to ground(more likely). A coating of fine steel or aluminum would surely do that too. But this is a problem across all of my reedies. I am ridiculously meticulous. I fiddled with those engine parts all week, and each time I re-bagged them, I cleaned them with alcohol or acetone. I inspect everything under my magnifying lamp before moving on to the next. I've been wondering if it's the batch of fuel. I have never bought SIG before I got this bottle of 35%. I have a bottle of SIG 25% also, but I'm too forgetful to keep straight if it's one or both of them. I Googled "SIG fuel foul plug" and came up with nothing. Maybe the TDs burn it off, I haven't a clue.
I did plug the backplate screw holes with black Permatex on the metal backplate. I didn't want to skip any steps that I didn't have to. Today I didn't seal them, but I will. Like I said, it's a little slow starving it when I pinch the vents, however it is consistent. After I open it up to move the pickup tube as you suggest, I will plug them then. If any more problems arise, I will also seal the crankcase with the same stuff. I have had two BWs I had to do that with and they became my fastest consistent runners. In fact this crankcase was from one of them. I figured the screws and shallow threads were the real problem, so I spent a lot of time with this engine getting that right. I expect my 2-56 bottoming tap will be in the mail tomorrow. I'll get it perfect. After learning your methods, now I can rebuild a dependable Bee much more quickly than the week of evenings I spent on this one.
If I was actually trying to build a mouse racer, I would have put a KB crank in it, and I would have tested it with a sub 5" prop. But its purpose is only to be a sporting workhorse for my fun and entertainment. Do you think I would see much difference if I had used a KB crankshaft?
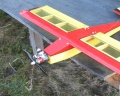
After I move the tube and plug the screw holes I think this one will be ready to go back on the Li'l Satan.
Thanks for all the information, I'll be reporting my results.
Rusty
_________________
...and never Ever think about how good you are at something...
while you're doing it!
My Hot Rock & Blues Playlist
RknRusty- Rest In Peace
- Posts : 10869
Join date : 2011-08-10
Age : 68
Location : South Carolina, USA
Re: Rebuilding a Black Widow, mouse racer style.
![]() Paulgibeault Sun Mar 04, 2012 5:04 pm
Paulgibeault Sun Mar 04, 2012 5:04 pm
Yes indeed, you may be coming to the right conclusion for the wrong reason. Certainly, if you OBSERVE a fuel doesn't run well, then by rights stop using it. I have no doubt that your particular container of Sig fuel is no good. Rare, but I have certainly seen & heard incidents of bad fuel from major fuel manufacturers...
Buying another new sealed quart would make for a good comparison. What's not answered is exactly what contaminant in your Sig fuel is causing the problem....that I don't know.
Concerning Killer Bee crankshafts. I'm not fastidious enough to say "the K/B crank gives 'X' more rpm than a standard crank under all conditions". One of the regular AMA mouse race winners never used anything but a standard crank. Personally, I've been able to go very fast with many standard cranks. When run really fast though, I broke them fairly regularly. I broke the original K/B cranks even faster until I started using a full length prop stud. The difference being in how precision a given crank was made. It was thought that in the earlier days of Cox (when people still cared) the general quality of parts was higher. Same holds true with the K/B cranks. Some run quite well & others are out of tolerance & vibrate or run poorly. Bottom line, for most sport flying you won't see much of a difference...
Looking forward to hearing more results & best of luck in your quest for high speed reliability.
Cheers, Paul
Paulgibeault- Gold Member
- Posts : 259
Join date : 2011-09-24
Location : Leduc, Alberta Canada
Re: Rebuilding a Black Widow, mouse racer style.
![]() Godsey3.0 Sun Mar 04, 2012 5:35 pm
Godsey3.0 Sun Mar 04, 2012 5:35 pm
Godsey3.0- Platinum Member

- Posts : 970
Join date : 2011-09-21
Age : 28
Location : Metamora, Indiana
Re: Rebuilding a Black Widow, mouse racer style.
![]() microflitedude Sun Mar 04, 2012 5:42 pm
microflitedude Sun Mar 04, 2012 5:42 pm
Godsey3.0 wrote:Are the KB Cranks lighter?
Yes. The web is trimmed down and the crankpin is hollow.

microflitedude- Top Poster

- Posts : 3417
Join date : 2011-08-17
Age : 26
Location : Columbia, SC -

Re: Rebuilding a Black Widow, mouse racer style.
![]() RknRusty Sun Mar 04, 2012 6:53 pm
RknRusty Sun Mar 04, 2012 6:53 pm
Your KB in the Tach Race would have undoubtedly spun faster if the prop screw hole hadn't been drilled crooked. You got burned by that piece of equipment.microflitedude wrote:Godsey3.0 wrote:Are the KB Cranks lighter?
Yes. The web is trimmed down and the crankpin is hollow.
_________________
...and never Ever think about how good you are at something...
while you're doing it!
My Hot Rock & Blues Playlist
RknRusty- Rest In Peace
- Posts : 10869
Join date : 2011-08-10
Age : 68
Location : South Carolina, USA
Re: Rebuilding a Black Widow, mouse racer style.
![]() Kim Sun Mar 04, 2012 7:29 pm
Kim Sun Mar 04, 2012 7:29 pm

Kim- Top Poster
-
Posts : 8528
Join date : 2011-09-06
Location : South East Missouri
Re: Rebuilding a Black Widow, mouse racer style.
![]() RknRusty Sun Mar 04, 2012 8:30 pm
RknRusty Sun Mar 04, 2012 8:30 pm
I've heard that too much anti-foaming agent will foul plugs. I think it's some sort of silicon compound. I guess they don't count a minute amount of that in their percentages, or it's included in the oil. or they don't use anything.Paulgibeault wrote:Hi Rusty,
Buying another new sealed quart would make for a good comparison. What's not answered is exactly what contaminant in your Sig fuel is causing the problem....that I don't know.
Aw come on Kim, as you can see, I haven't overcome the engines' finnickyness. I'm just a monkey copying what Paul already figured out. He won the Bee category of the Tach race. My ear-tach says I'm not even close.Kim wrote:Man, you all are wearing out my 'cut and paste' spies !!! We're gonna have to compile all this into a book or something ! Think I'll wait 'till tomorrow when my cloudy mind can wrap around all this great stuff !
But I did like the way it cranked on the first flip. I swear I did not fake that.
It was howling windy cold weather again today, so the Bean stayed in the hangar. It's new engine and fuel system is still untested.
_________________
...and never Ever think about how good you are at something...
while you're doing it!
My Hot Rock & Blues Playlist
RknRusty- Rest In Peace
- Posts : 10869
Join date : 2011-08-10
Age : 68
Location : South Carolina, USA
Re: Rebuilding a Black Widow, mouse racer style.
![]() PV Pilot Mon Mar 05, 2012 5:55 am
PV Pilot Mon Mar 05, 2012 5:55 am
PV Pilot- High Tech Balsa Basher
- Posts : 1854
Join date : 2011-08-11
Age : 57
Location : The ragged end of the Universe.
Re: Rebuilding a Black Widow, mouse racer style.
![]() RknRusty Mon Mar 05, 2012 10:37 am
RknRusty Mon Mar 05, 2012 10:37 am
That could be a problem. I keep the fuel in the house in the Summer, but it stays out in the drafty shop in the winter. I should keep it more stable. I'll add a cooler to my field gear too. Thanks for the tip.PV Pilot wrote:I had some glow plugs with the "white haze" on the coil a few years back. Come to find out from a experienced racer it was from moisture absorbed into the fuel. Once I bought a fresh jug it went away. Every since then I have taken the fuel out of the clear jugs and put them into white opaque O'Donnell jugs. You get a greenhouse effect with the clear jugs if they are left in the sunlight or a warm environment. You can actually see water droplets form on the inside of the clear jugs. They always get put into a Igloo man purse/lunch cooler when going to the field on a sunny hot day.
I got my bottoming tap today. I'll thread those crankcase holes as deep as they'll go and use new screws. I'm ready to get this engine back on the plane.
_________________
...and never Ever think about how good you are at something...
while you're doing it!
My Hot Rock & Blues Playlist
RknRusty- Rest In Peace
- Posts : 10869
Join date : 2011-08-10
Age : 68
Location : South Carolina, USA
The project continues
![]() RknRusty Mon Mar 05, 2012 9:23 pm
RknRusty Mon Mar 05, 2012 9:23 pm
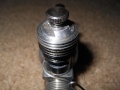
Back apart and de-oiled, I cleaned all the old threadlocker gunk out of the Crankcase screw holes. The tap I'm referring to is a 2-56 tap I bought to extend the threads deeper into the existing holes. Prior to this, the screws would only go in between 4 and 6 turns. Here it is in hole number 1:

I used Marvel Mystery Oil. A little thick, maybe but probably good for aluminum. I worked the tap slowly and was able to extend the threads, so now I have between 9 and 10 turns on all of them. This is good because they aren't the tightest fitting screws in the first place. Here's my little reference again with the updated screw turns for each hole:

From 4.5 to 9.25, from 5 to 10, etc.
I would bet bottoming out the screws, or insufficient threading is probably what has caused every crankcase pressure leak I've ever had. I have high hopes this will increase dependability a lot.
I also went back to the aluminum pickup tube. I thought the plastic one was going to work, but when I repositioned it, it was too loose on the nipple. My aluminum tube(thanks to Microflitedude for the al) is a bit ugly, but it's clean and open and sits firmly in place with some fairly thick walled silicon tubing. I'll skip the twist tie this go-round.

I have some new screws for the crankcase and I'll check the length when I fit everything up tomorrow. And it should be ready for Mouse racer rebuild V2.0. As usual, I will make a video for your viewing pleasure.
Rusty
_________________
...and never Ever think about how good you are at something...
while you're doing it!
My Hot Rock & Blues Playlist
RknRusty- Rest In Peace
- Posts : 10869
Join date : 2011-08-10
Age : 68
Location : South Carolina, USA
Re: Rebuilding a Black Widow, mouse racer style.
![]() RknRusty Tue Mar 06, 2012 9:47 pm
RknRusty Tue Mar 06, 2012 9:47 pm
I only fiddled with glowplugs and filtered and spiked some fuel with oil today. It's too freakin cold in the shop tonight. I expect to have it running again tomorrow night. I have to solder up 4 new starter batteries too. I've been using the starter a lot lately, I drained a 4 pack of Energizers in about 3 weeks. And only flew once... badly.
_________________
...and never Ever think about how good you are at something...
while you're doing it!
My Hot Rock & Blues Playlist
RknRusty- Rest In Peace
- Posts : 10869
Join date : 2011-08-10
Age : 68
Location : South Carolina, USA
Re: Rebuilding a Black Widow, mouse racer style.
![]() fit90 Wed Mar 07, 2012 7:36 am
fit90 Wed Mar 07, 2012 7:36 am
There's no such thing as a bad flight. Some flights are just better than others.
Bob
fit90- Diamond Member
- Posts : 1336
Join date : 2011-08-11
Location : Naples, Florida
Re: Rebuilding a Black Widow, mouse racer style.
![]() RknRusty Wed Mar 07, 2012 10:46 am
RknRusty Wed Mar 07, 2012 10:46 am
You're very right, Bob. I did not break anything. Your old Tee Dee was involved until the bladder popped in mid loop.fit90 wrote:Rusty,
There's no such thing as a bad flight. Some flights are just better than others.
Bob
_________________
...and never Ever think about how good you are at something...
while you're doing it!
My Hot Rock & Blues Playlist
RknRusty- Rest In Peace
- Posts : 10869
Join date : 2011-08-10
Age : 68
Location : South Carolina, USA
Re: Rebuilding a black widow- Mouse Racer Style
![]() proctor Wed Mar 07, 2012 12:25 pm
proctor Wed Mar 07, 2012 12:25 pm
the syringes we use can lead to minute traces of rubber in the fuel
which shows up as grey speckles on the plug element. Syringes with
nylon plunger would of course obviate this. Nonsense? Maybe.
But a great thread anyway, learning loads.
Now where did I put that 2. 56 tap?
john

proctor- Gold Member
- Posts : 199
Join date : 2012-01-31
Location : Scottish Highlands
Re: Rebuilding a Black Widow, mouse racer style.
![]() John Goddard Wed Mar 07, 2012 12:48 pm
John Goddard Wed Mar 07, 2012 12:48 pm
proctor wrote:Probably nonsense but I read somewhere that the rubber plungers on
the syringes we use can lead to minute traces of rubber in the fuel
which shows up as grey speckles on the plug element. Syringes with
nylon plunger would of course obviate this. Nonsense? Maybe.
But a great thread anyway, learning loads.
Now where did I put that 2. 56 tap?
john
Dunno John
But if you can turn out some 2-56X1.25 bolts I'm your first customer...

John Goddard- Diamond Member
- Posts : 2447
Join date : 2011-11-24
Age : 59
Location : Leyton North East London
Re: Rebuilding a Black Widow, mouse racer style.
![]() Surfer_kris Wed Mar 07, 2012 1:23 pm
Surfer_kris Wed Mar 07, 2012 1:23 pm
proctor wrote:Probably nonsense but I read somewhere that the rubber plungers on
the syringes we use can lead to minute traces of rubber in the fuel
which shows up as grey speckles on the plug element. Syringes with
nylon plunger would of course obviate this.
Yes, rubber is not good for the glow plug. You should use dedicated glow-fuel syringes or plastic only syringes.
Surfer_kris- Diamond Member
- Posts : 1905
Join date : 2010-11-20
Location : Sweden
Re: Rebuilding a Black Widow, mouse racer style.
![]() RknRusty Wed Mar 07, 2012 3:08 pm
RknRusty Wed Mar 07, 2012 3:08 pm
_________________
...and never Ever think about how good you are at something...
while you're doing it!
My Hot Rock & Blues Playlist
RknRusty- Rest In Peace
- Posts : 10869
Join date : 2011-08-10
Age : 68
Location : South Carolina, USA
Re: Rebuilding a Black Widow, mouse racer style.
![]() microflitedude Wed Mar 07, 2012 3:23 pm
microflitedude Wed Mar 07, 2012 3:23 pm
microflitedude- Top Poster
- Posts : 3417
Join date : 2011-08-17
Age : 26
Location : Columbia, SC -
Re: Rebuilding a Black Widow, mouse racer style.
![]() Cribbs74 Wed Mar 07, 2012 3:45 pm
Cribbs74 Wed Mar 07, 2012 3:45 pm
microflitedude wrote:My favorite syringes have rubber stoppers....
I wouldn't toss em yet Matt, this would be a long term type thing. If you haven't had a problem already you are probably fine.
Cribbs74- Moderator
-
Posts : 11895
Join date : 2011-10-24
Age : 50
Location : Tuttle, OK
Re: Rebuilding a Black Widow, mouse racer style.
![]() RknRusty Wed Mar 07, 2012 4:55 pm
RknRusty Wed Mar 07, 2012 4:55 pm
_________________
...and never Ever think about how good you are at something...
while you're doing it!
My Hot Rock & Blues Playlist
RknRusty- Rest In Peace
- Posts : 10869
Join date : 2011-08-10
Age : 68
Location : South Carolina, USA
Re: Rebuilding a Black Widow, mouse racer style.
![]() RknRusty Thu Mar 08, 2012 8:53 am
RknRusty Thu Mar 08, 2012 8:53 am
I'm going to mount it and crank it again today.
_________________
...and never Ever think about how good you are at something...
while you're doing it!
My Hot Rock & Blues Playlist
RknRusty- Rest In Peace
- Posts : 10869
Join date : 2011-08-10
Age : 68
Location : South Carolina, USA
Page 2 of 4 • 1, 2, 3, 4 ![]()
» First Black Widow
» Built up my First Mouse Racer Engine!
» Free to good home - Mouse racer plan - ALL GONE!!
» Black Widow RPM