

 Rules
Rules
Log in
Search
Latest topics
» Jim Walkers FireBee - This is going to be funby cstatman Today at 6:58 pm
» Prop Rod - resto to a runner
by cstatman Today at 6:56 pm
» Hawk had breakfast and then took a bath
by rdw777 Today at 5:38 pm
» Jim Walker Firebaby
by rdw777 Today at 4:58 pm
» WenMac 049 - Glow Plug & Head Gasket replacements?
by rdw777 Today at 4:32 pm
» A choke-tube with velocity-stack configured Bee
by GallopingGhostler Today at 3:31 pm
» Nostalgia alert, my 1959 Corvette revisited
by rsv1cox Today at 2:25 pm
» Prayers for my Wife Please
by akjgardner Today at 10:28 am
» Cox prop rod
by Wiggy Yesterday at 4:30 pm
» "Red Neck" .049 elec. starter
by getback Yesterday at 7:19 am
» Cox prop rod
by Wiggy Yesterday at 5:35 am
» Looking For Comet Tri-Pacer
by latole Yesterday at 3:45 am


CEF Traveling Engine


Win This Engine!

Live on Patrol


1/2-A flat-wing adj. lead-out guide
Page 1 of 1

1/2-A flat-wing adj. lead-out guide
![]() roddie Thu Sep 05, 2013 6:33 pm
roddie Thu Sep 05, 2013 6:33 pm
I made these years ago using thin sheet-stock of either; brass, formica or thin polycarbonate, 1 Popsicle stick, 1/8" sq. spruce/basswood strip-stock and short (1/4"L.) #2 screws and a very sm. slotted screwdriver.
Cut a strip of the sheet-stock with scissors; about 5/16"w. and a little shorter than your wing-tip's chord. Draw a line across the length of the strip... about 3/16" in from one edge.
Leaving 1/2" on ea. side; use a Dremel tool/cut-off wheel to cut "slots" every 1/4" along the strip; 3/16" deep (the drawn line) until it resembles a "rake" or "comb"... Drill the screw-holes (3/32" drill; which is the approx. sz. for #2 wood/mach. screws) in each end; about 1/4" in... "on center". This we will call the "guide-strip"
Cut the 1/8" sq. spruce/basswood "stick"... to approx. the same length as the slotted guide-strip. We'll call this the "bridge"
You will see; that when placing on a flat surface with the "bridge" up against the "slotted guide strip" (strip standing on it's edge- slots facing down) that it forms a series of positions for your lead-outs. The "bridge" has 2 functions; keeps lead-outs off the wing and close's the vertical gap in the slots.
Cut the Popsicle stick into 2 short equal lengths; depending on your wing's thickness at the tip, and drill your #2 screw's "pilot" hole (5/64" drill for "either" a wood screw or a mach. screw) in ea. one. These are the "mounts" for the slotted guide-strip, and will be glued into the wing.
Once mounted; the slotted guide-strip should stand on edge (slots "down" if on top of the wing... slots "up" if on bottom of the wing) Glue the 1/8" square-stock bridge "up against" the slotted guide-strip.
"Adjustments" involve; simply removing "one" of the mounting screws... and loosening the other to "swing the guide open" (exposing the slots). Reposition the lead-out(s) and "close"/re-mount the guide.
You "could" use heavier mat'l. for the guide-strip if you're flying "combat" perhaps... but it's really not necessary; as there are minimal forces at work "vertically" on the lead-outs, compared to the forces on the "bellcrank/mount".
Photos below; show a "bottom-mount" on my little combat ship.

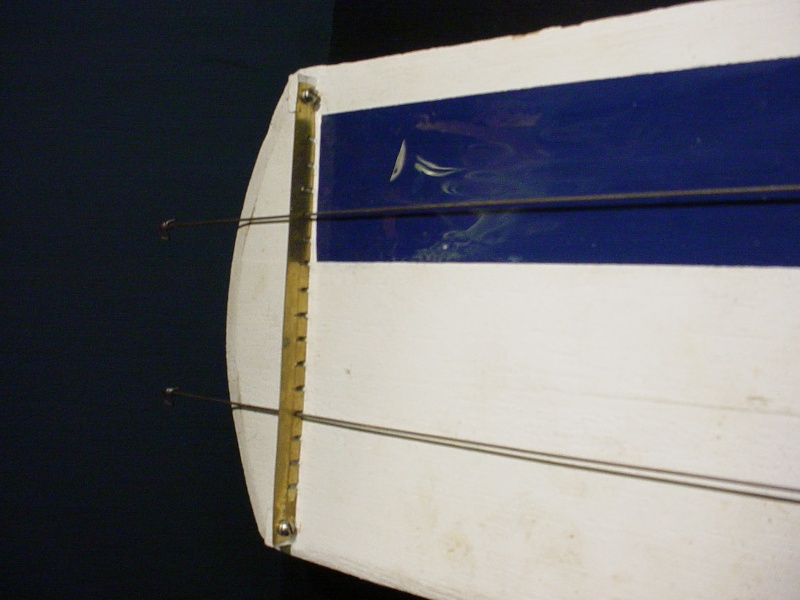
Note; you could use this design on a built-up wing as well... by first; cutting your guide to match the model's airfoil at the wingtip. The "bridge" will conform to the camber if you CA glue it.
Cut a strip of the sheet-stock with scissors; about 5/16"w. and a little shorter than your wing-tip's chord. Draw a line across the length of the strip... about 3/16" in from one edge.
Leaving 1/2" on ea. side; use a Dremel tool/cut-off wheel to cut "slots" every 1/4" along the strip; 3/16" deep (the drawn line) until it resembles a "rake" or "comb"... Drill the screw-holes (3/32" drill; which is the approx. sz. for #2 wood/mach. screws) in each end; about 1/4" in... "on center". This we will call the "guide-strip"
Cut the 1/8" sq. spruce/basswood "stick"... to approx. the same length as the slotted guide-strip. We'll call this the "bridge"
You will see; that when placing on a flat surface with the "bridge" up against the "slotted guide strip" (strip standing on it's edge- slots facing down) that it forms a series of positions for your lead-outs. The "bridge" has 2 functions; keeps lead-outs off the wing and close's the vertical gap in the slots.
Cut the Popsicle stick into 2 short equal lengths; depending on your wing's thickness at the tip, and drill your #2 screw's "pilot" hole (5/64" drill for "either" a wood screw or a mach. screw) in ea. one. These are the "mounts" for the slotted guide-strip, and will be glued into the wing.
Once mounted; the slotted guide-strip should stand on edge (slots "down" if on top of the wing... slots "up" if on bottom of the wing) Glue the 1/8" square-stock bridge "up against" the slotted guide-strip.
"Adjustments" involve; simply removing "one" of the mounting screws... and loosening the other to "swing the guide open" (exposing the slots). Reposition the lead-out(s) and "close"/re-mount the guide.
You "could" use heavier mat'l. for the guide-strip if you're flying "combat" perhaps... but it's really not necessary; as there are minimal forces at work "vertically" on the lead-outs, compared to the forces on the "bellcrank/mount".
Photos below; show a "bottom-mount" on my little combat ship.
Note; you could use this design on a built-up wing as well... by first; cutting your guide to match the model's airfoil at the wingtip. The "bridge" will conform to the camber if you CA glue it.

roddie- Top Poster

- Posts : 8322
Join date : 2013-07-17
Age : 64
Location : N. Smithfield, Rhode Island -

» flat framed construction
» Ring Master Gold KIt
» *SOLD* Walt Musciano Scientific "Red Tiger P-40" kit
» P-38 Lightning-Roddie style..
» Lead Out Wire
» Ring Master Gold KIt
» *SOLD* Walt Musciano Scientific "Red Tiger P-40" kit
» P-38 Lightning-Roddie style..
» Lead Out Wire
Page 1 of 1
Permissions in this forum:
You cannot reply to topics in this forum