

 Rules
Rules
Log in
Search
Latest topics
» Here we go again... another Lawn-Boyby rsv1cox Today at 6:40 pm
» My Cox .049 Marine inboard engine
by roddie Today at 2:48 pm
» Help Pee Wee tank cap .020
by rdw777 Today at 12:38 pm
» **VOTE-ON-THE-NEXT-COX-ENGINE-OF-THE-MONTH** (May 2024)
by Admin Today at 10:31 am
» Revivng Some Childhood Classics
by GTO455 Today at 8:11 am
» Jim Walkers FireBee - This is going to be fun
by rsv1cox Today at 7:29 am
» Post your Older books
by rsv1cox Yesterday at 7:51 pm
» EXTREMELY RARE COX THIMBLE DROME PROTOTYPE "BLACK WIDOW" GAS MODEL AIRPLANE
by rsv1cox Yesterday at 6:58 pm
» I brake for Turtles....
by rsv1cox Yesterday at 6:38 pm
» Ball - Socket Joints
by Ken Cook Yesterday at 3:06 pm
» A little nostalgia…
by MauricioB Yesterday at 2:32 pm
» A new useful transport vehicle
by davidll1984 Yesterday at 10:32 am
Cox Engine of The Month


CEF Traveling Engine


Win This Engine!

Live on Patrol


Another C.T. engine rebuild completed -- this time a Cox Tee Dee .049
Page 1 of 1

Another C.T. engine rebuild completed -- this time a Cox Tee Dee .049
![]() sosam117 Mon Apr 01, 2024 4:52 pm
sosam117 Mon Apr 01, 2024 4:52 pm
This Cox Tee Dee was in fair shape, compared to the .051 engines (especially the KK .051!)
Below is the before and after picture:

As on the KK engine, the prop driver was stripped and could be pulled of by my fingers.
So, that needed replacing ----- also need to order a thrust washer as it was missing.

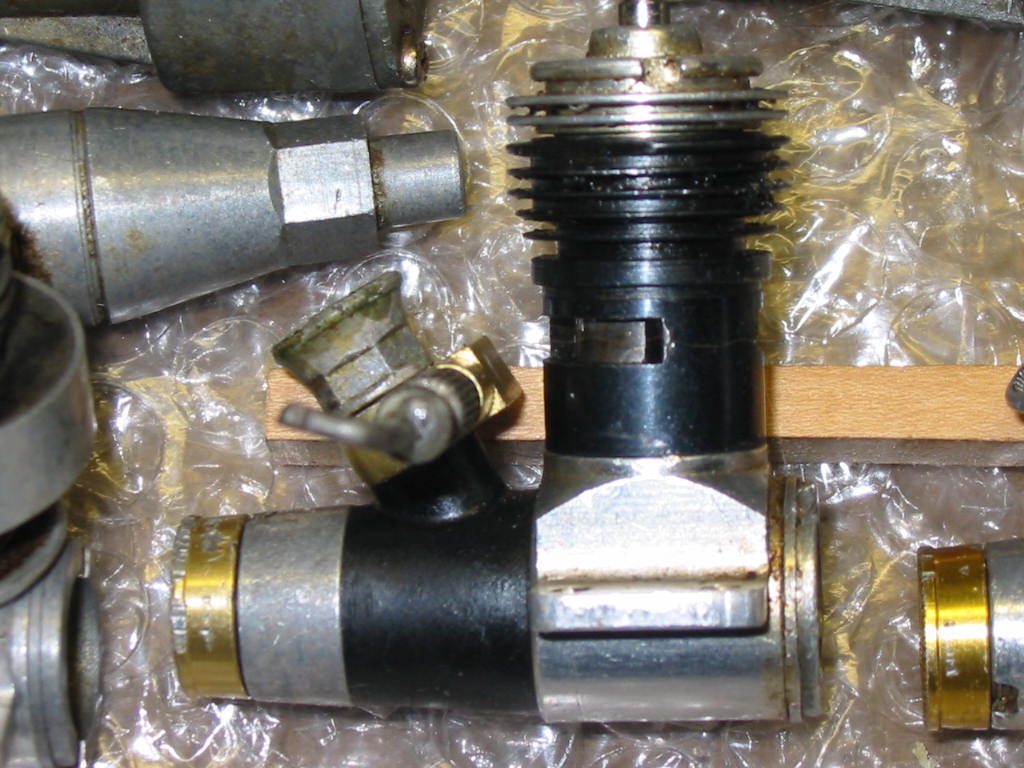
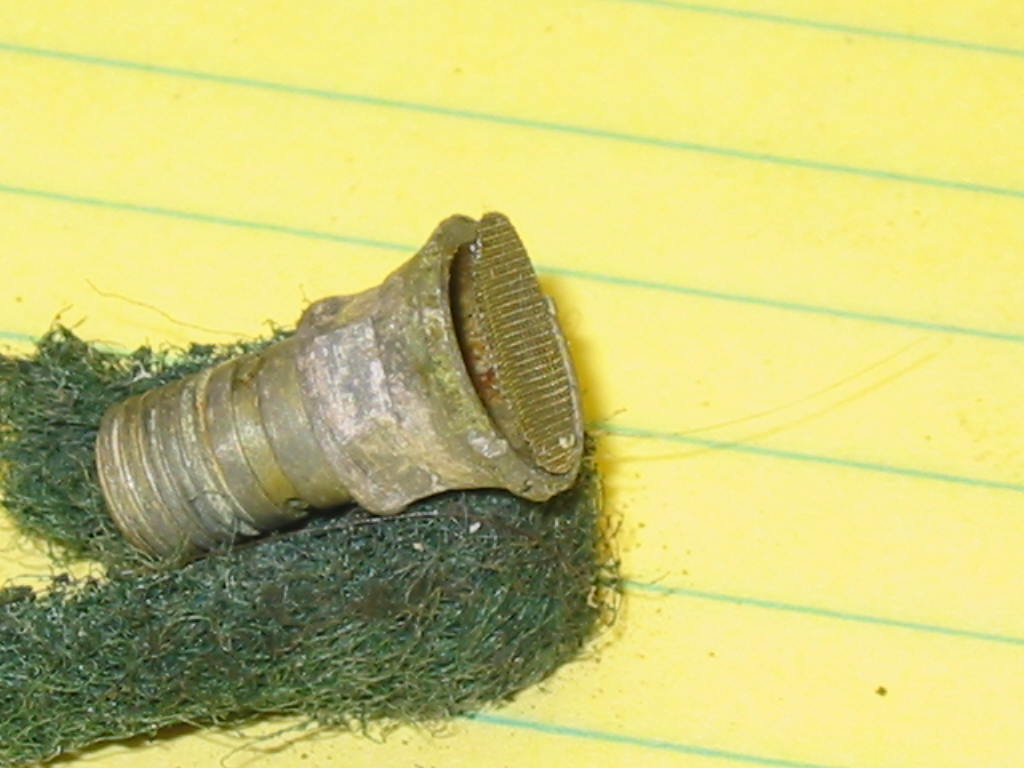
Unscrewed the venturi and this needed to be replaced as it was severely corroded.

Removed the venturi body nut and the "black" venturi body.
Order a replacement as the original venturi body was cracked in 3 different places.

The piston was stuck --- not much of a problem with some oil and heat it freed up easily.
Backplate unscrewed with no problem and also unscrewed the cylinder head and sleeve.
Then removed the piston/con rod from the crank.
Placed everything into the sonic tank for a cleaning. (20 minutes)
The engine cleaned up well --- the sonic tank got the "gunk" off.
The bluing on the sleeve looked o.k.
I took the aluminum parts to the buffer and touched them up a little.
Reworked the needle valve by removing the lead solder and "silver" soldered the needle valve extension as the silver solder is stronger than the lead solder. (and it was loose anyway)

I had this Kustom Kraftsmanship Throttle ring and decided to give it to C.T. for this .049.
I have it on my other Tee Dee .049 and works out well.
One thing that I have noticed from the KK throttle ring over other throttle rings is that 1/2 way on either side of the exhaust ports in the ring there is a "hole" exactly in the middle of them.
Interesting thing is when the ring is wide open the hole is shut off.
But at a little past 1/2 throttle the hole is uncovered to the one exhaust ports.
I have some Cox throttle rings and some Ace R/C rings and they don't have this little hole?
Photo below of the KK throttle ring.

Anyway,
After the light buffing on the aluminum parts, I placed the parts back into the sonic tank for the final cleaning before assembly.
Reassembly went on without a problem.
I reset the piston socket, installed the "new" venturi body and tightened up the venturi nut, pressed the prop driver on (and installed the thrust washer).
Installed the piston onto the crankshaft and screwed on the backplate.
Checked the deck height and used one of the four shims that Burnie/Matt sells but had to sand it down a little to .009" (0.23mm)
to get the setting just right.
Tightened down the cylinder and installed and tightened the glow head.
Installed the new venturi and the old needle valve, also added a small piece of surgical tubing on the needle valve (for a seal).
Added the new spinner, the starter spring and a socket head 5-40 bolt.
Now she looks like brand new again!
Hope you like the KK throttle valve on it as now you'll have another engine with throttle control C.T.
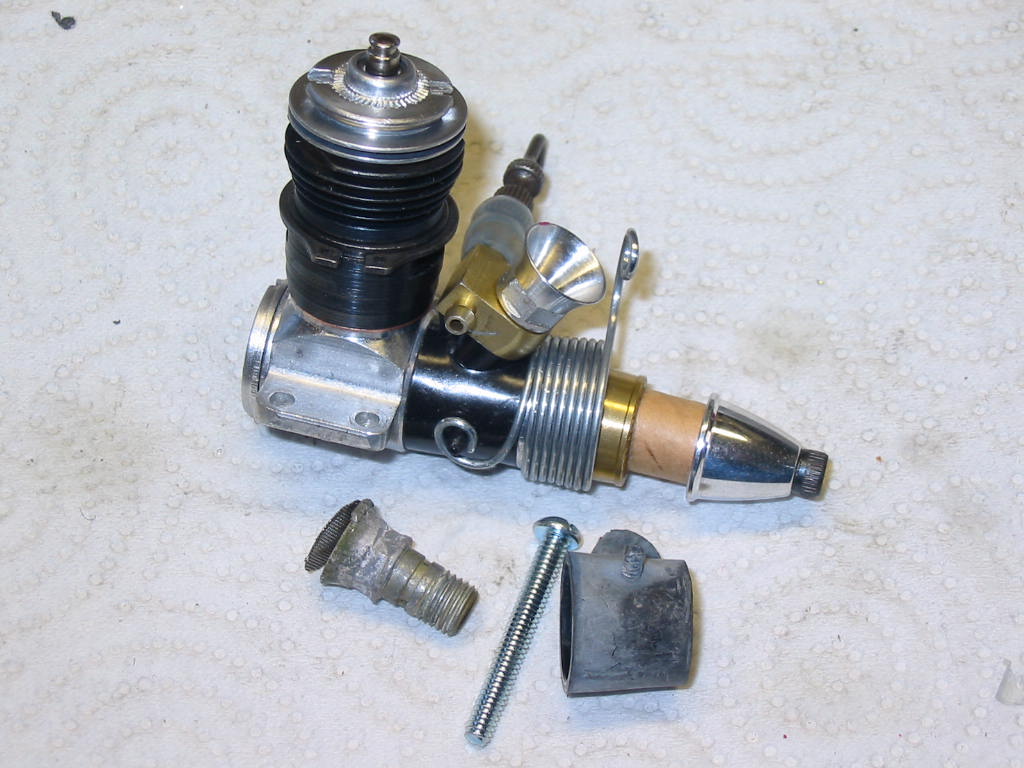

Below is the before and after picture:
As on the KK engine, the prop driver was stripped and could be pulled of by my fingers.
So, that needed replacing ----- also need to order a thrust washer as it was missing.
Unscrewed the venturi and this needed to be replaced as it was severely corroded.
Removed the venturi body nut and the "black" venturi body.
Order a replacement as the original venturi body was cracked in 3 different places.
The piston was stuck --- not much of a problem with some oil and heat it freed up easily.
Backplate unscrewed with no problem and also unscrewed the cylinder head and sleeve.
Then removed the piston/con rod from the crank.
Placed everything into the sonic tank for a cleaning. (20 minutes)
The engine cleaned up well --- the sonic tank got the "gunk" off.
The bluing on the sleeve looked o.k.
I took the aluminum parts to the buffer and touched them up a little.
Reworked the needle valve by removing the lead solder and "silver" soldered the needle valve extension as the silver solder is stronger than the lead solder. (and it was loose anyway)
I had this Kustom Kraftsmanship Throttle ring and decided to give it to C.T. for this .049.
I have it on my other Tee Dee .049 and works out well.
One thing that I have noticed from the KK throttle ring over other throttle rings is that 1/2 way on either side of the exhaust ports in the ring there is a "hole" exactly in the middle of them.
Interesting thing is when the ring is wide open the hole is shut off.
But at a little past 1/2 throttle the hole is uncovered to the one exhaust ports.
I have some Cox throttle rings and some Ace R/C rings and they don't have this little hole?
Photo below of the KK throttle ring.
Anyway,
After the light buffing on the aluminum parts, I placed the parts back into the sonic tank for the final cleaning before assembly.
Reassembly went on without a problem.
I reset the piston socket, installed the "new" venturi body and tightened up the venturi nut, pressed the prop driver on (and installed the thrust washer).
Installed the piston onto the crankshaft and screwed on the backplate.
Checked the deck height and used one of the four shims that Burnie/Matt sells but had to sand it down a little to .009" (0.23mm)
to get the setting just right.
Tightened down the cylinder and installed and tightened the glow head.
Installed the new venturi and the old needle valve, also added a small piece of surgical tubing on the needle valve (for a seal).
Added the new spinner, the starter spring and a socket head 5-40 bolt.
Now she looks like brand new again!
Hope you like the KK throttle valve on it as now you'll have another engine with throttle control C.T.
sosam117- Diamond Member

- Posts : 1292
Join date : 2016-03-23
Location : Suburb of Chicago, Illinois
Wooohooo!
![]() Boats13 Mon Apr 01, 2024 7:29 pm
Boats13 Mon Apr 01, 2024 7:29 pm
I can't wait! As always, thanks, Mike! This will be a blast!
CT
CT

Boats13- Silver Member

-
Posts : 92
Join date : 2018-01-28
Location : Kemah
Re: Another C.T. engine rebuild completed -- this time a Cox Tee Dee .049
![]() davidll1984 Mon Apr 01, 2024 9:19 pm
davidll1984 Mon Apr 01, 2024 9:19 pm
It's beautiful work, I've never seen this model of restriction ring wit Mabe idling hole ? At least that's what it looks like! CT I think you're going to have good engine well tuned for new projects 


davidll1984- Diamond Member
- Posts : 2293
Join date : 2020-02-12
Age : 39
Location : shawinigan
Re: Another C.T. engine rebuild completed -- this time a Cox Tee Dee .049
![]() Boats13 Mon Apr 01, 2024 10:40 pm
Boats13 Mon Apr 01, 2024 10:40 pm
davidll1984 wrote:It's beautiful work, I've never seen this model of restriction ring wit Mabe idling hole ? At least that's what it looks like! CT I think you're going to have good engine well tuned for new projects
Yes, sir, I believe so!
David
Boats13- Silver Member
-
Posts : 92
Join date : 2018-01-28
Location : Kemah
Sponsored content
» Tee Dee Engine rebuild
» Engine rebuild help please
» Nice -- New -- In Good Shape Tether Car with a "New" in the box Enya .10 engine for it! **** NOW COMPLETED ***
» Coper Reed valve melted too mutch détergent in fuel mixture
» Engine run time?
» Engine rebuild help please
» Nice -- New -- In Good Shape Tether Car with a "New" in the box Enya .10 engine for it! **** NOW COMPLETED ***
» Coper Reed valve melted too mutch détergent in fuel mixture
» Engine run time?
Page 1 of 1
Permissions in this forum:
You cannot reply to topics in this forum