

 Rules
Rules
by rsv1cox Today at 10:12 am
» Jim Walkers FireBee - This is going to be fun
by rdw777 Today at 8:20 am
» **VOTE-ON-THE-NEXT-COX-ENGINE-OF-THE-MONTH** (May 2024)
by rdw777 Today at 8:06 am
» A prototype Cox Reed-valve marine engine
by F4D Phantom II Yesterday at 7:00 pm
» World's largest weathervane
by Cox International Yesterday at 5:51 pm
» Here we go again... another Lawn-Boy
by rsv1cox Yesterday at 6:50 am
» Norvel Needle Needed
by Greenman38633 Yesterday at 4:02 am
» My Cox .049 Marine inboard engine
by 1/2A Nut Wed May 08, 2024 11:41 pm
» Roddie-Rigger.. a 2005 original design
by roddie Wed May 08, 2024 7:04 pm
» music vids.. some of your favorites
by HalfaDave Wed May 08, 2024 6:55 pm
» Help Pee Wee tank cap .020
by rdw777 Wed May 08, 2024 1:30 pm
» Revivng Some Childhood Classics
by getback Wed May 08, 2024 8:21 am


Ringmaster Jr Kit S5
Page 4 of 4 •  1, 2, 3, 4
Re: Ringmaster Jr Kit S5
![]() NEW222 Sat Apr 27, 2019 2:58 pm
NEW222 Sat Apr 27, 2019 2:58 pm

NEW222- Top Poster

- Posts : 3892
Join date : 2011-08-13
Age : 45
Location : oakbank, mb
Re: Ringmaster Jr Kit S5
![]() Ken Cook Sat Apr 27, 2019 5:07 pm
Ken Cook Sat Apr 27, 2019 5:07 pm

Ken Cook- Top Poster
- Posts : 5478
Join date : 2012-03-27
Location : pennsylvania
Re: Ringmaster Jr Kit S5
![]() NEW222 Sat Apr 27, 2019 5:22 pm
NEW222 Sat Apr 27, 2019 5:22 pm
NEW222- Top Poster
- Posts : 3892
Join date : 2011-08-13
Age : 45
Location : oakbank, mb
Re: Ringmaster Jr Kit S5
![]() getback Sun Apr 28, 2019 8:56 am
getback Sun Apr 28, 2019 8:56 am

getback- Top Poster


Posts : 10146
Join date : 2013-01-18
Age : 66
Location : julian , NC
Re: Ringmaster Jr Kit S5
![]() Ken Cook Sun Apr 28, 2019 10:27 am
Ken Cook Sun Apr 28, 2019 10:27 am
Ken Cook- Top Poster
- Posts : 5478
Join date : 2012-03-27
Location : pennsylvania
Re: Ringmaster Jr Kit S5
![]() Ken Cook Sun Apr 28, 2019 10:28 am
Ken Cook Sun Apr 28, 2019 10:28 am
Ken Cook- Top Poster
- Posts : 5478
Join date : 2012-03-27
Location : pennsylvania
Re: Ringmaster Jr Kit S5
![]() NEW222 Wed May 01, 2019 8:20 pm
NEW222 Wed May 01, 2019 8:20 pm
NEW222- Top Poster
- Posts : 3892
Join date : 2011-08-13
Age : 45
Location : oakbank, mb
Re: Ringmaster Jr Kit S5
![]() getback Thu May 02, 2019 9:40 am
getback Thu May 02, 2019 9:40 am
 I will keep that in mind Ken , before i covered the wing it wasn't binding ?? O well have to get it off the wall and see if i can clean up the problem.
getback- Top Poster
-
Posts : 10146
Join date : 2013-01-18
Age : 66
Location : julian , NC
Re: Ringmaster Jr Kit S5
![]() roddie Thu May 02, 2019 6:49 pm
roddie Thu May 02, 2019 6:49 pm
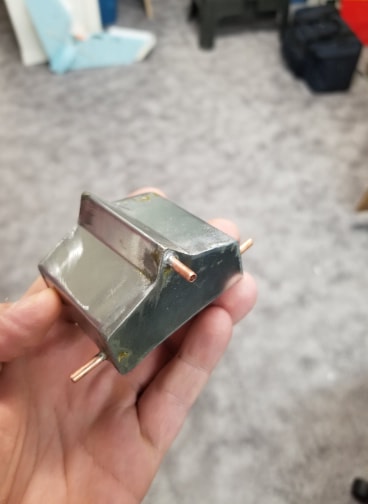
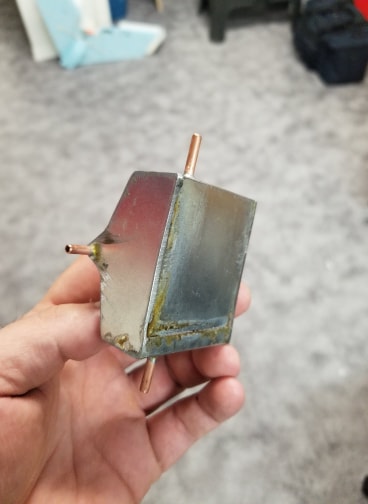
Acetone or lacquer-thinner should be used to flush-out the tank. I would leak-test the tank in in a clear glass jar or bowl, filled with enough water to cover the tank. Cap the vents and pressurize the feed-tube using some tight-fitting fuel-line.. and either a empty fuel-bulb or syringe. Look for bubbles.. and if you see any; note the location and re-solder the leaking joint. Repeat the leak-test until the tank holds pressure without any signs of bubbles. Just curious.. what the tanks' capacity is... in ounces/cc's? By the looks.. I would guess it's around 2oz.. ? Did you size it for the Fox .15X engine to be able to fly the pattern?

roddie- Top Poster
- Posts : 8301
Join date : 2013-07-17
Age : 64
Location : N. Smithfield, Rhode Island -

Re: Ringmaster Jr Kit S5
![]() NEW222 Thu May 02, 2019 8:58 pm
NEW222 Thu May 02, 2019 8:58 pm
NEW222- Top Poster
- Posts : 3892
Join date : 2011-08-13
Age : 45
Location : oakbank, mb
Re: Ringmaster Jr Kit S5
![]() NEW222 Fri May 03, 2019 6:55 pm
NEW222 Fri May 03, 2019 6:55 pm
NEW222- Top Poster
- Posts : 3892
Join date : 2011-08-13
Age : 45
Location : oakbank, mb
Re: Ringmaster Jr Kit S5
![]() roddie Sat May 04, 2019 9:54 am
roddie Sat May 04, 2019 9:54 am
roddie- Top Poster
- Posts : 8301
Join date : 2013-07-17
Age : 64
Location : N. Smithfield, Rhode Island -
Re: Ringmaster Jr Kit S5
![]() NEW222 Sat May 04, 2019 10:26 am
NEW222 Sat May 04, 2019 10:26 am
roddie wrote:Congratulations on passing the leak-test.. and on the 1st try! That's significant. How do you plan to attach the tank to the model?
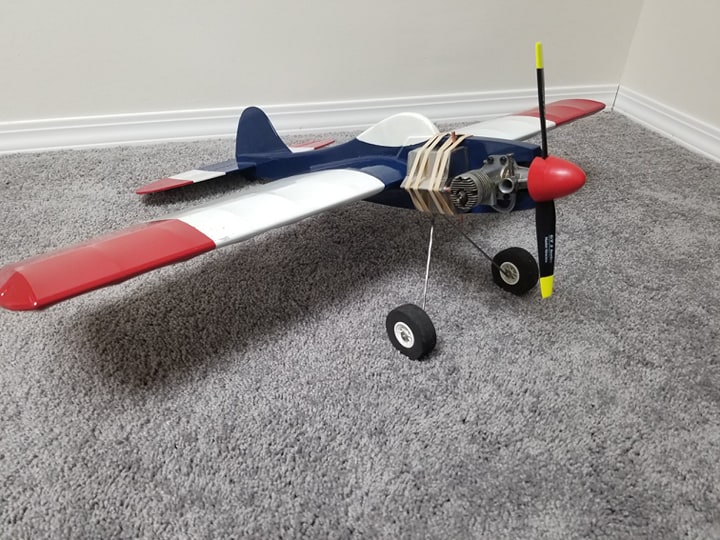
Thanks roddie. Now, that is the question I am trying to figure out right now. I know of a few methods to mount it, but I am seriously and really considering trying to mount is using velcro. It will allow adjustment, as well as give a slight cushion so as not to hopefully bubble. Either way, I did still plan on wrapping a couple rubber bands around the tank and fuselage as added security. I will get into mounting the tank in a little bit as I gotta run out for a bit right now. And I will post a picture when I get it done.
NEW222- Top Poster
- Posts : 3892
Join date : 2011-08-13
Age : 45
Location : oakbank, mb
Re: Ringmaster Jr Kit S5
![]() roddie Sat May 04, 2019 1:50 pm
roddie Sat May 04, 2019 1:50 pm
NEW222 wrote:roddie wrote:Congratulations on passing the leak-test.. and on the 1st try! That's significant. How do you plan to attach the tank to the model?
Thanks roddie. Now, that is the question I am trying to figure out right now. I know of a few methods to mount it, but I am seriously and really considering trying to mount is using velcro. It will allow adjustment, as well as give a slight cushion so as not to hopefully bubble. Either way, I did still plan on wrapping a couple rubber bands around the tank and fuselage as added security. I will get into mounting the tank in a little bit as I gotta run out for a bit right now. And I will post a picture when I get it done.
Yes.. I like the hook and loop (Velcro) approach for the padding.. and adjustability. Regarding securing the tank with rubber bands, you could easily install x4 small 3mm dia. hardwood dowels "horizontally" on the inboard side of the nose (opposite the tanks' footprint..) as posts for the rubber-bands to wrap around. It's a simple and lightweight way to do it. It makes raising/lowering the tank to find the sweet-spot.. an easier task. Once you've flown enough flights to know the best position.. you can then go for a more sturdy/permanent mount. I'm not an advocate of "gluing" a tank in place. That's a bit too permanent.. and a slightly out-of-balance prop (due to a prop-change) could cause that profile-nose to vibrate like a diving-board.. creating bubbles in the fuel. You don't need those problems.
roddie- Top Poster
- Posts : 8301
Join date : 2013-07-17
Age : 64
Location : N. Smithfield, Rhode Island -
Re: Ringmaster Jr Kit S5
![]() Ken Cook Sun May 05, 2019 8:45 am
Ken Cook Sun May 05, 2019 8:45 am
Ken Cook- Top Poster
- Posts : 5478
Join date : 2012-03-27
Location : pennsylvania
Re: Ringmaster Jr Kit S5
![]() NEW222 Sun May 05, 2019 11:49 am
NEW222 Sun May 05, 2019 11:49 am
NEW222- Top Poster
- Posts : 3892
Join date : 2011-08-13
Age : 45
Location : oakbank, mb
Re: Ringmaster Jr Kit S5
![]() NEW222 Mon May 06, 2019 8:59 pm
NEW222 Mon May 06, 2019 8:59 pm

NEW222- Top Poster
- Posts : 3892
Join date : 2011-08-13
Age : 45
Location : oakbank, mb
Re: Ringmaster Jr Kit S5
![]() getback Tue May 07, 2019 9:46 am
getback Tue May 07, 2019 9:46 am


getback- Top Poster
-
Posts : 10146
Join date : 2013-01-18
Age : 66
Location : julian , NC
Re: Ringmaster Jr Kit S5
![]() akjgardner Tue May 07, 2019 12:45 pm
akjgardner Tue May 07, 2019 12:45 pm

akjgardner- Diamond Member

-
Posts : 1474
Join date : 2014-12-28
Age : 64
Location : Greensberg Indiana
Re: Ringmaster Jr Kit S5
![]() Ken Cook Tue May 07, 2019 6:56 pm
Ken Cook Tue May 07, 2019 6:56 pm
Ken Cook- Top Poster
- Posts : 5478
Join date : 2012-03-27
Location : pennsylvania
Re: Ringmaster Jr Kit S5
![]() NEW222 Tue May 07, 2019 8:24 pm
NEW222 Tue May 07, 2019 8:24 pm
NEW222- Top Poster
- Posts : 3892
Join date : 2011-08-13
Age : 45
Location : oakbank, mb
Re: Ringmaster Jr Kit S5
![]() oldguy Wed May 08, 2019 3:27 pm
oldguy Wed May 08, 2019 3:27 pm


oldguy- Gold Member

- Posts : 368
Join date : 2015-12-10
Age : 70
Location : Idaho
Re: Ringmaster Jr Kit S5
![]() Mike1484 Wed May 08, 2019 7:10 pm
Mike1484 Wed May 08, 2019 7:10 pm
Mike1484

Mike1484- Gold Member
- Posts : 296
Join date : 2011-10-28
Age : 75
Location : Northern Ohio
Re: Ringmaster Jr Kit S5
![]() NEW222 Wed May 08, 2019 7:27 pm
NEW222 Wed May 08, 2019 7:27 pm
NEW222- Top Poster
- Posts : 3892
Join date : 2011-08-13
Age : 45
Location : oakbank, mb
Page 4 of 4 • 1, 2, 3, 4