

 Rules
Rules
by rsv1cox Today at 6:43 am
» Project Cox .049 r/c & Citabrian Champion
by rsv1cox Today at 6:27 am
» Roddie-Rigger.. a 2005 original design
by rsv1cox Today at 6:23 am
» Three (only one left) Cox .020 silencers for sale.
by GallopingGhostler Today at 5:12 am
» *Cox Engine of The Month* Submit your pictures! -May 2024-
by Admin Today at 2:38 am
» Fox .35 Modifications
by GallopingGhostler Today at 12:20 am
» Jim Walkers FireBee - This is going to be fun
by roddie Yesterday at 6:51 pm
» Post your Older ignition books
by lla Yesterday at 6:34 pm
» S1 Ringmaster
by Onelife Yesterday at 8:40 am
» O&R 23 & Brown Jr
by getback Yesterday at 7:47 am
» Introducing our Cox .049 TD Engines
by MauricioB Yesterday at 2:31 am
» Jim Walker Firebaby
by rdw777 Tue Apr 30, 2024 4:16 pm


Broken nose, all fixed... Final Installment(s)
Page 3 of 5 •  1, 2, 3, 4, 5
 ![]()
Re: Broken nose, all fixed... Final Installment(s)
![]() getback Fri Sep 11, 2015 2:06 pm
getback Fri Sep 11, 2015 2:06 pm

getback- Top Poster


Posts : 10127
Join date : 2013-01-18
Age : 66
Location : julian , NC
Re: Broken nose, all fixed... Final Installment(s)
![]() RknRusty Fri Sep 11, 2015 3:26 pm
RknRusty Fri Sep 11, 2015 3:26 pm
Rusty
_________________
...and never Ever think about how good you are at something...
while you're doing it!
My Hot Rock & Blues Playlist

RknRusty- Rest In Peace

- Posts : 10869
Join date : 2011-08-10
Age : 68
Location : South Carolina, USA
Re: Broken nose, all fixed... Final Installment(s)
![]() batjac Fri Sep 11, 2015 3:38 pm
batjac Fri Sep 11, 2015 3:38 pm
"Sorry Rusty, I got nothing."
The Unhelpful Mark
batjac- Diamond Member

-
Posts : 2336
Join date : 2013-05-22
Age : 61
Location : Broken Arrow, OK, USA
Re: Broken nose, all fixed... Final Installment(s)
![]() RknRusty Fri Sep 11, 2015 5:26 pm
RknRusty Fri Sep 11, 2015 5:26 pm
That's okay, Mark. Just knowing you're watching helps. I love an audience, Lol.batjac wrote:Mark your calendars, Folks. This may be the only time you hear this from me...
"Sorry Rusty, I got nothing."
The Unhelpful Mark
Rusty
_________________
...and never Ever think about how good you are at something...
while you're doing it!
My Hot Rock & Blues Playlist
RknRusty- Rest In Peace
- Posts : 10869
Join date : 2011-08-10
Age : 68
Location : South Carolina, USA
Re: Broken nose, all fixed... Final Installment(s)
![]() Ken Cook Fri Sep 11, 2015 5:35 pm
Ken Cook Fri Sep 11, 2015 5:35 pm

Ken Cook- Top Poster
- Posts : 5461
Join date : 2012-03-27
Location : pennsylvania
Re: Broken nose, all fixed... Final Installment(s)
![]() roddie Fri Sep 11, 2015 6:32 pm
roddie Fri Sep 11, 2015 6:32 pm
RknRusty wrote:Roddie, your first idea is a good one, Lol. If... the plane wasn't on its last crash, I would put a 1/2oz smaller BH-560 tank in it and get a smaller venturi and go through the engine trimming routine. But this combo is already tuned, and the plane has one wheel in the slag heap, so, you get my drift. I also have no idea if I'll fly it better than the Nobler by Sunday, Oct. 25 at 9:45am. However my fabulous friend Ken is offering to bail me out, so I'm going to take advantage of his generosity... again.
As for your second idea, a Roddimus Prime Classic for sure. But, nnnnnI think I'll just go wit wut I got. Dude, I'd brainstorm with you any time, just don't expect me to keep up.
Rusty
Ha Ha! Yes.. I often think way too far outside the box with crazy s#*t... but that's my job here..

roddie- Top Poster
- Posts : 8282
Join date : 2013-07-17
Age : 64
Location : N. Smithfield, Rhode Island -

Re: Broken nose, all fixed... Final Installment(s)
![]() Ken Cook Fri Sep 11, 2015 6:52 pm
Ken Cook Fri Sep 11, 2015 6:52 pm
Here's Dennis's Oriental I mentioned. I may just fly this in Huntersville. I haven't flown it with this engine in it yet. I personally and still may, move the tank forward and shorten the pickup line as short as possible. I don't like the long pickup line, but I flew it with other engines in it and it worked fine. This Oriental has had about 6 different powerplants.

The one pic is blurry but you get the idea. Put a jump up in the uniflow tubing or a loop in it to prevent siphoning.
Ken Cook- Top Poster
- Posts : 5461
Join date : 2012-03-27
Location : pennsylvania
Re: Broken nose, all fixed... Final Installment(s)
![]() RknRusty Fri Sep 11, 2015 7:49 pm
RknRusty Fri Sep 11, 2015 7:49 pm
I'll start putting the Monokote on it while I wait on the US Post Office.
Boy, I feel better now. PM on the way.
Rusty
_________________
...and never Ever think about how good you are at something...
while you're doing it!
My Hot Rock & Blues Playlist
RknRusty- Rest In Peace
- Posts : 10869
Join date : 2011-08-10
Age : 68
Location : South Carolina, USA
Re: Broken nose, all fixed... Final Installment(s)
![]() pkrankow Fri Sep 11, 2015 8:00 pm
pkrankow Fri Sep 11, 2015 8:00 pm
Phil

pkrankow- Top Poster
- Posts : 3025
Join date : 2012-10-02
Location : Ohio
Re: Broken nose, all fixed... Final Installment(s)
![]() RknRusty Fri Sep 11, 2015 8:05 pm
RknRusty Fri Sep 11, 2015 8:05 pm
Hey, there's an idea. I'd have to do 4 laps between stunts to give the judges time to score me. And last Christmas, Ken set me up with a bladder kit for the Shoestring's Thunder Tiger, I could blaze the circle with that too, Lol.pkrankow wrote:You could always fly one of your bladder fed 1/2a Flite Streaks as a 3rd plan. They can do the pattern, they can carry enough fuel, all you need is a wheel for take off and landing.
Phil
Rusty
_________________
...and never Ever think about how good you are at something...
while you're doing it!
My Hot Rock & Blues Playlist
RknRusty- Rest In Peace
- Posts : 10869
Join date : 2011-08-10
Age : 68
Location : South Carolina, USA
Re: Broken nose, all fixed... Final Installment(s)
![]() Ken Cook Sat Sep 12, 2015 6:39 am
Ken Cook Sat Sep 12, 2015 6:39 am
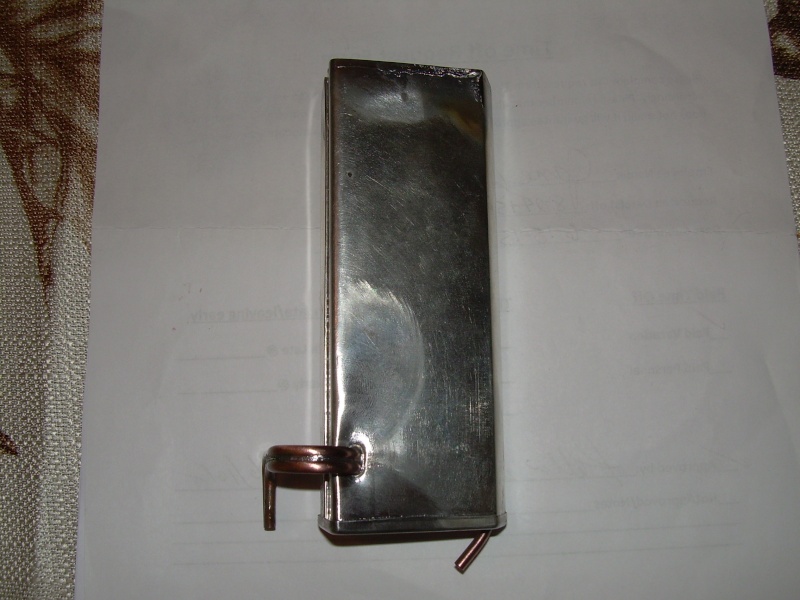
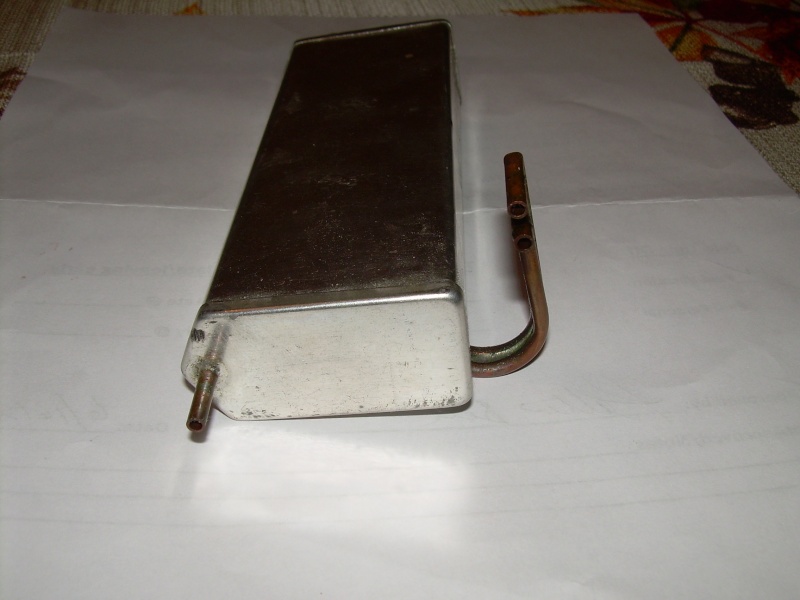
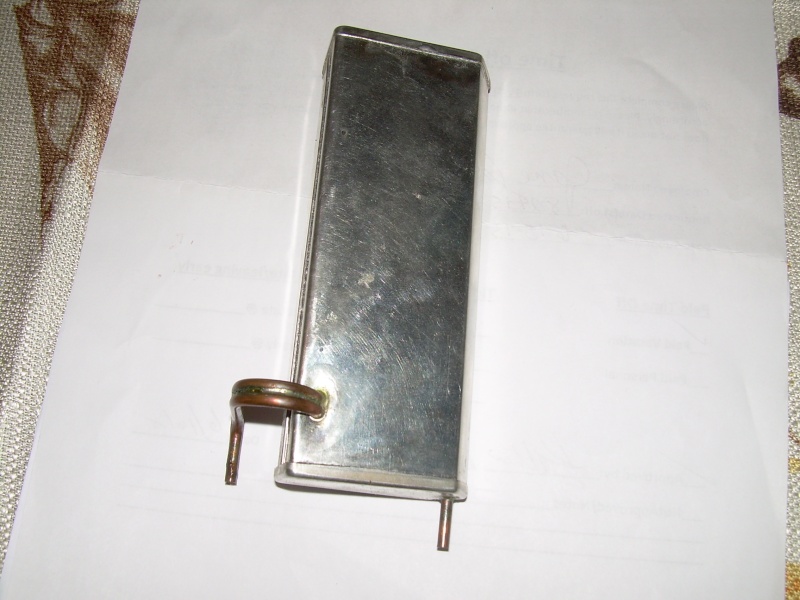
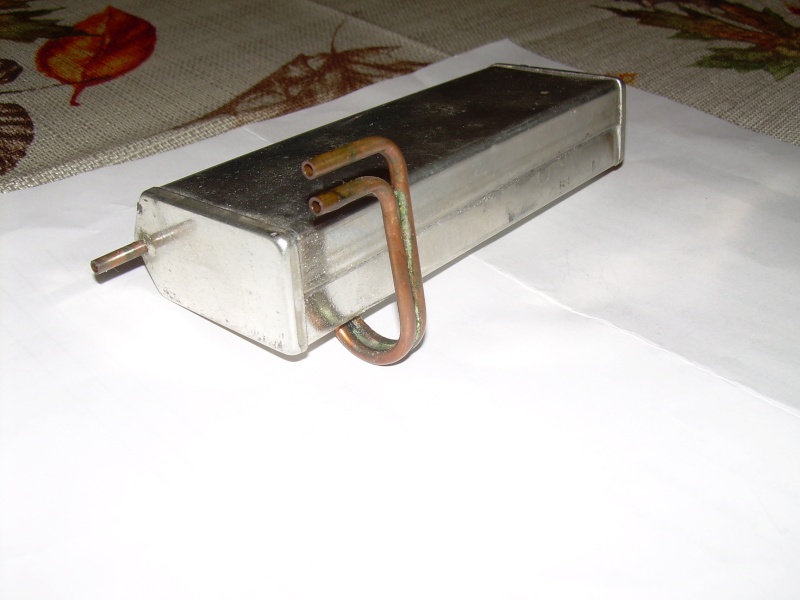
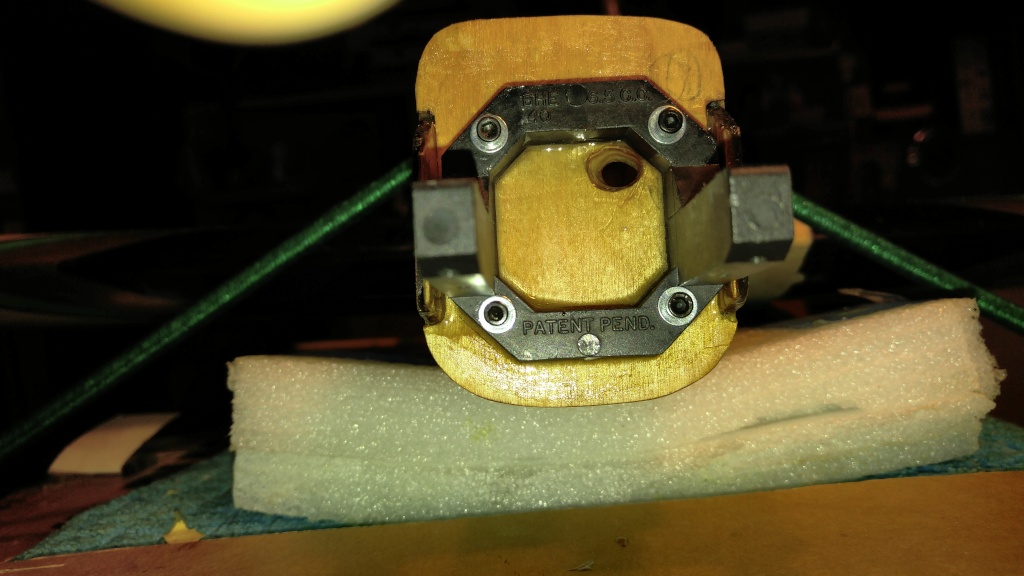
The burnishing you see on the tank is from a wire wheel. These tanks and many of the new ones you receive are coated in clear lacquer. The only reasoning for this is rust prevention and to make anyone who solders it extremely hot headed. This is a real pain to get off. Once heated it will contaminate the solder joint usually resulting in a leak. It's more troublesome to remove it then it is to fix the tank itself. When wire wheeling it, it moves around rather than come off. I re solder every joint on the tank. In addition, I cut back the clear coat much further than the joint to prevent any contamination when resoldering. It's as if it just melts and I feel my description of burnishing better describes what happens to it when it is wire wheeled. Rusty, I will get this out to you ASAP when I get it boxed up. Just some FYI the exiting pickup is dead soft now so if more of a bend is requires it could be done with little finger pressure. Ken
Ken Cook- Top Poster
- Posts : 5461
Join date : 2012-03-27
Location : pennsylvania
Re: Broken nose, all fixed... Final Installment(s)
![]() RknRusty Sat Sep 12, 2015 10:21 am
RknRusty Sat Sep 12, 2015 10:21 am
Thanks very much for your help. I'll be Monokoting and finishing all the other details.
Rusty
_________________
...and never Ever think about how good you are at something...
while you're doing it!
My Hot Rock & Blues Playlist
RknRusty- Rest In Peace
- Posts : 10869
Join date : 2011-08-10
Age : 68
Location : South Carolina, USA
Re: Broken nose, all fixed... Final Installment(s)
![]() TDbandit Sat Sep 12, 2015 11:38 am
TDbandit Sat Sep 12, 2015 11:38 am
It's good to see that it's coming back together man looks great! I wish I could help ya too it's just metal hard tanks are not my forte at least not yet anyway. I can set one up but taking one apart I haven't done yet. That is coming though since I have a brand new Brodak 4 oz that failed the pressure test and has slag rattling around inside so it's got to come apart. It's for my twister which I will be starting on soon after I get my dad's ringmaster done. (Bandit)RknRusty wrote:That looks great, Ke. When I took the back off of mine, the vent is a big 8th inch from the top too, so I woun't even notice a difference.
Thanks very much for your help. I'll be Monokoting and finishing all the other details.
Rusty

TDbandit- Platinum Member

- Posts : 897
Join date : 2014-12-01
Age : 52
Location : Riverdale Georgia
Re: Broken nose, all fixed... Final Installment(s)
![]() roddie Sat Sep 12, 2015 1:12 pm
roddie Sat Sep 12, 2015 1:12 pm
TDbandit wrote:It's good to see that it's coming back together man looks great! I wish I could help ya too it's just metal hard tanks are not my forte at least not yet anyway. I can set one up but taking one apart I haven't done yet. That is coming though since I have a brand new Brodak 4 oz that failed the pressure test and has slag rattling around inside so it's got to come apart. It's for my twister which I will be starting on soon after I get my dad's ringmaster done. (Bandit)RknRusty wrote:That looks great, Ke. When I took the back off of mine, the vent is a big 8th inch from the top too, so I woun't even notice a difference.
Thanks very much for your help. I'll be Monokoting and finishing all the other details.
Rusty
Yea.. it takes patience to solder. Preparation is everything. One thing I learned (through my limited experience) is to make sure that any holding-fixtures/clamps/wedges etc.. won't "sink" heat away from the work. I learned this when trying to tack the feed and uni-flow tubes to the inside lower-rear corner of my 1st tiny speed tank. I had tried to use an alligator-clip to hold the tubes in position.. bad idea. I thought something was wrong with my iron. The paste-flux was sizzling and flowing.. but the solder wasn't melting. A small wooden wedge/plug to hold the tubes in position, made a night and day difference. I was only using a small (sub 30W) pencil iron.. but it worked fine once I figured that out. I since made a little wooden jig/clamp.. but haven't tried it yet.

roddie- Top Poster
- Posts : 8282
Join date : 2013-07-17
Age : 64
Location : N. Smithfield, Rhode Island -
Re: Broken nose, all fixed... Final Installment(s)
![]() Ken Cook Sun Sep 13, 2015 6:16 am
Ken Cook Sun Sep 13, 2015 6:16 am
Ken Cook- Top Poster
- Posts : 5461
Join date : 2012-03-27
Location : pennsylvania
Re: Broken nose, all fixed... Final Installment(s)
![]() RknRusty Sun Sep 13, 2015 7:31 am
RknRusty Sun Sep 13, 2015 7:31 am
I'm going out this morning to try and correct the handle monkey motion I saw in my "Inside the Circle" video from last Sunday. Flight report to follow.
Gotta go pack, stayed in the shop way too late last night... this morning.
Rusty
Last edited by RknRusty on Thu Sep 17, 2015 9:52 pm; edited 1 time in total
_________________
...and never Ever think about how good you are at something...
while you're doing it!
My Hot Rock & Blues Playlist
RknRusty- Rest In Peace
- Posts : 10869
Join date : 2011-08-10
Age : 68
Location : South Carolina, USA
Busted nose, New tank... perfectomundo!... and a side of flying
![]() RknRusty Thu Sep 17, 2015 9:45 pm
RknRusty Thu Sep 17, 2015 9:45 pm
And there will be room to add some hardwood triangle stock, bracing against vibration. Considering the engine is only secondarily connected to the beams now, I think that's a good idea.
Today was a great day for flying, steady, though firm breeze, partly cloudy and mid 80s. Rich and Bob came up from the Low Country, Wayne and me from the Midlands all converged on the Fort this morning. They play with carefree abandon while all that's on my mind is Huntersville. I brought them a gallon bag of boiled peanuts to keep them from talking so much, Lol.
I've been practicing landings and staying on the bottom 5' limit for level flight and maneuver bottoms. I have finally started consistently rolling out one touch landings. All I had to do is... nothing, basically. Just let the damn plane land itself, with only corrections for up and down wind. I made a couple of nice ones with the Nobler. Boy, 5' is low though. I learned today, in trying to make perfect bottoms, that when you dive straight at the ground, like in an outside square, you better start pulling out early because an 8mph wind accelerates the plane so much it takes more room than I had previously(in my high-bottom flying) noticed. I uh... er.. learned the hard way. On the aforementioned outside square. I cracked a beam. It looked like nothing was wrong, but I took the cowl off and checked. Yep, I have busted more wood. I suppose that's what happens when an Intermediate pilot is pushing himself hard. I hope so. Sounds good anyway.
In any case, that means the Oriental is my only full grown stunter now. I have another Nobler ARF fuse and wing, but I am not going to fix it until this winter. I continued flying the Ukey and actually flew it very well. hitting good bottoms and making all one touch rollouts after landing. I'll get back in the shop next week.
Rusty
_________________
...and never Ever think about how good you are at something...
while you're doing it!
My Hot Rock & Blues Playlist
RknRusty- Rest In Peace
- Posts : 10869
Join date : 2011-08-10
Age : 68
Location : South Carolina, USA
Re: Broken nose, all fixed... Final Installment(s)
![]() Ken Cook Fri Sep 18, 2015 4:10 am
Ken Cook Fri Sep 18, 2015 4:10 am
Ken Cook- Top Poster
- Posts : 5461
Join date : 2012-03-27
Location : pennsylvania
Re: Broken nose, all fixed... Final Installment(s)
![]() RknRusty Fri Sep 18, 2015 4:16 am
RknRusty Fri Sep 18, 2015 4:16 am
Rusty
_________________
...and never Ever think about how good you are at something...
while you're doing it!
My Hot Rock & Blues Playlist
RknRusty- Rest In Peace
- Posts : 10869
Join date : 2011-08-10
Age : 68
Location : South Carolina, USA
Re: Broken nose, all fixed... Final Installment(s)
![]() Ken Cook Sat Sep 19, 2015 5:35 am
Ken Cook Sat Sep 19, 2015 5:35 am
Ken Cook- Top Poster
- Posts : 5461
Join date : 2012-03-27
Location : pennsylvania
Re: Broken nose, all fixed... Final Installment(s)
![]() RknRusty Tue Sep 22, 2015 1:17 pm
RknRusty Tue Sep 22, 2015 1:17 pm
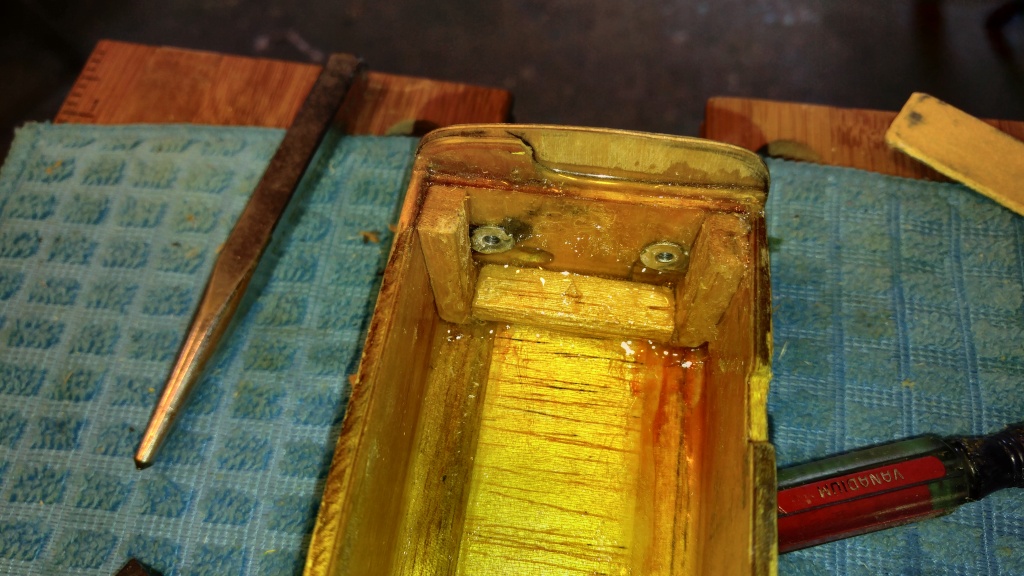
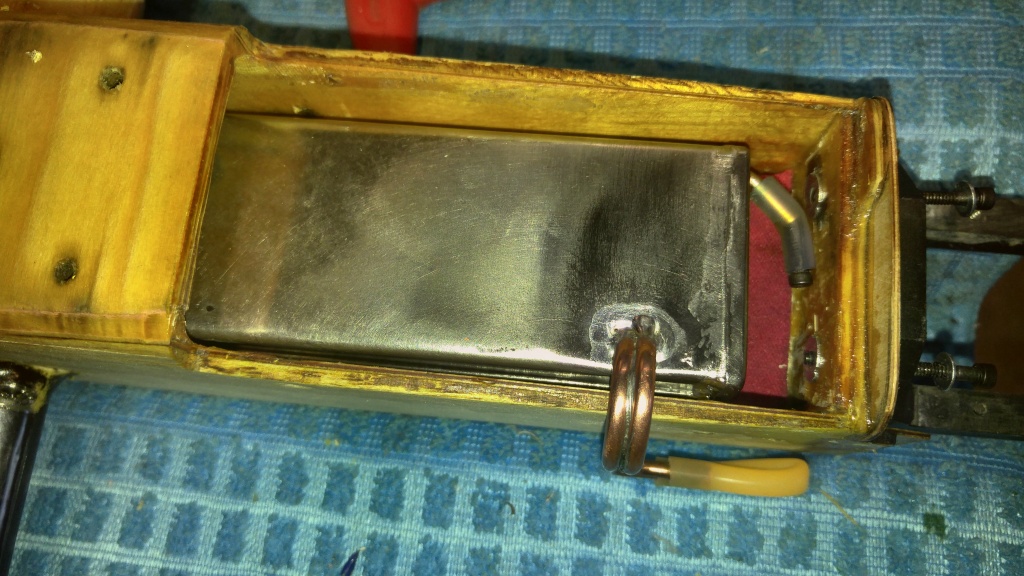
Tonight, I'll cover the front face of the firewall with epoxy and bolt the mount to it. So it'll be glued and screwed. There is room for Nylock nuts inside too. There's a little broken piece of ply you can see on the edge of the firewall. It's been missing since July, and I cut a piece of 16th ply to fill that in so I have a place for the locking dowel on the tank compartment door. I will wrap a strip of glass around the firewall joint on the outside of the fuse. I think I'm short on the medium glass, so I hope 1/2 oz. glass is strong enough.
So, after tonight, all that's left is the Monokote job. I decided against paint.
But I am considering urethane and tissue on the nose the nose just for added stiffness, and Monokote over that. I'll defer to advice on that. Question: Would it be okay to lay the tissue on with Solvent based urethane rather than Polycrylic? I have both. Or just Kote straight to the wood? I'm only talking about the front end, forward of the canopy for this step.
Rusty
P.S. Long ago, I glassed the rear belly-pan joint. That should be in the instructions, as it's a very weak point. So, there's no reason I can't do the front joint too. Inside the tank compartment is all glassed in front of that same bulkhead.
_________________
...and never Ever think about how good you are at something...
while you're doing it!
My Hot Rock & Blues Playlist
RknRusty- Rest In Peace
- Posts : 10869
Join date : 2011-08-10
Age : 68
Location : South Carolina, USA
Re: Broken nose, all fixed... Final Installment(s)
![]() RknRusty Tue Sep 22, 2015 10:49 pm
RknRusty Tue Sep 22, 2015 10:49 pm
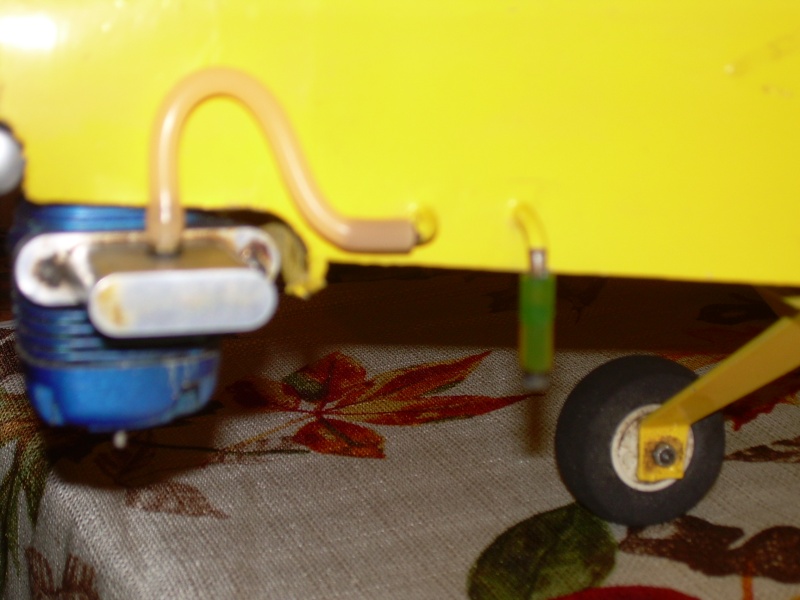
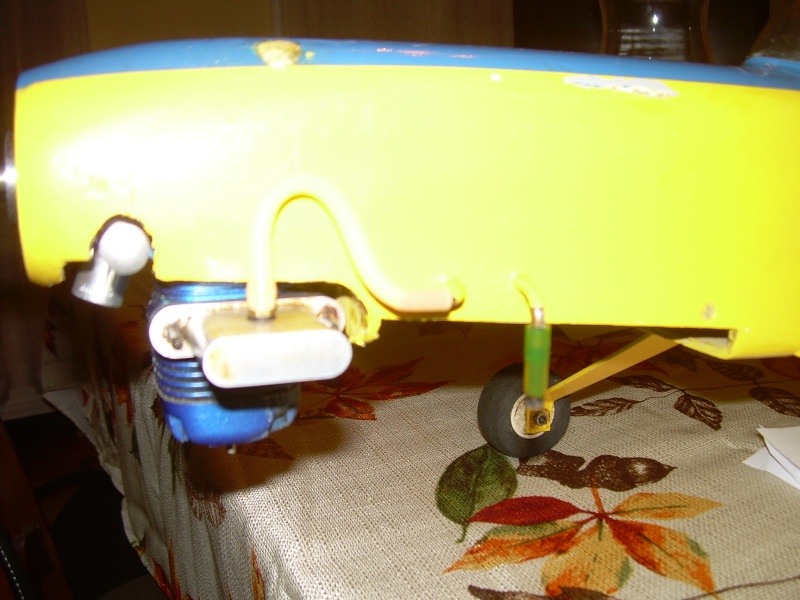
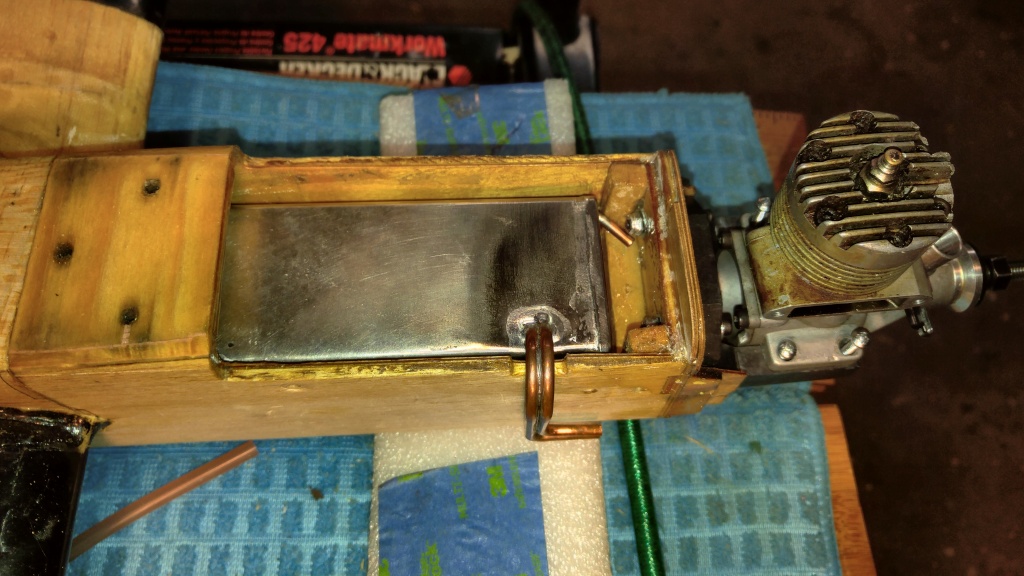
The engine is farther forward, maybe just 5/16" or so, eyeballing the ruler. I need to build an extension for the cowl to fit over. I may fly it before I get around to that. It'll probably run better without it, but I'd like for it to look good.
Not much room for padding the sides of the tank. I can't keep it from touching the sides of the compartment at two corners. I use Son of a Gun in my fuel and it works wonders to suppress foaming. Barely any outboard angle in the rear. A degree or less.
_________________
...and never Ever think about how good you are at something...
while you're doing it!
My Hot Rock & Blues Playlist
RknRusty- Rest In Peace
- Posts : 10869
Join date : 2011-08-10
Age : 68
Location : South Carolina, USA
Re: Broken nose, all fixed... Final Installment(s)
![]() TDbandit Wed Sep 23, 2015 12:07 am
TDbandit Wed Sep 23, 2015 12:07 am
Looking good man. Btw on the hold down screws for the engine I like to use socket head cap screws so I can get a better bite on the screws to make sure the engine is secured well. Looking forward to seeing it fly again!RknRusty wrote:I like it.
The engine is farther forward, maybe just 5/16" or so, eyeballing the ruler. I need to build an extension for the cowl to fit over. I may fly it before I get around to that. It'll probably run better without it, but I'd like for it to look good.
Not much room for padding the sides of the tank. I can't keep it from touching the sides of the compartment at two corners. I use Son of a Gun in my fuel and it works wonders to suppress foaming. Barely any outboard angle in the rear. A degree or less.
(Bandit)
TDbandit- Platinum Member
- Posts : 897
Join date : 2014-12-01
Age : 52
Location : Riverdale Georgia
Re: Broken nose, all fixed... Final Installment(s)
![]() Ken Cook Wed Sep 23, 2015 3:59 am
Ken Cook Wed Sep 23, 2015 3:59 am
Ken Cook- Top Poster
- Posts : 5461
Join date : 2012-03-27
Location : pennsylvania
Re: Broken nose, all fixed... Final Installment(s)
![]() RknRusty Wed Sep 23, 2015 4:09 am
RknRusty Wed Sep 23, 2015 4:09 am
I might make the extension part of the cowl out of a tin strip, and the screws will go into the existing cowl screw holes that are beside the engine compartment. I'll cover the tin strip with yellow Monokote trim.
Rusty
_________________
...and never Ever think about how good you are at something...
while you're doing it!
My Hot Rock & Blues Playlist
RknRusty- Rest In Peace
- Posts : 10869
Join date : 2011-08-10
Age : 68
Location : South Carolina, USA
Page 3 of 5 • 1, 2, 3, 4, 5 ![]()
» Cape Girardeau's Christmas Holiday Float...The Baby Snowbird's Last Installment!!!!!
» Cox Stocker 0.49 / Indy Car / Nissan GTP
» Fixed my Fox!
» surestart wont stay running!