

 Rules
Rules
by getback Today at 2:32 pm
» Roddie's flat-bottomed boat..
by OVERLORD Today at 2:20 pm
» PT-19 Mayhem at Buder Park...a Decade Ago!!!!
by Kim Today at 7:41 am
» Project Cox .049 r/c & Citabrian Champion
by getback Today at 6:46 am
» Three -- sold out (making two more) Cox .010 Carburetors with wrench
by balogh Today at 12:34 am
» Joe Wagners Sioux
by GallopingGhostler Yesterday at 9:03 pm
» Happy Anzac Day!
by GallopingGhostler Yesterday at 4:16 pm
» Jim Walkers FireBee - This is going to be fun
by rsv1cox Yesterday at 12:27 pm
» Revivng Some Childhood Classics
by getback Yesterday at 7:31 am
» Fox .35 Modifications
by Ken Cook Yesterday at 3:16 am
» Introducing our Cox .049 TD Engines
by getback Fri Apr 26, 2024 6:20 am
» Cox powered jet-pump for model Sprint Boat
by roddie Thu Apr 25, 2024 10:25 pm


Getting Ready to Attempt some Restorations - Newbie
Page 1 of 4 • 1, 2, 3, 4 ![]()

 Getting Ready to Attempt some Restorations - Newbie
![]() Bretherman Sat Jan 09, 2021 8:14 pm
Bretherman Sat Jan 09, 2021 8:14 pm
I've always wanted some of these engines ever since I was in elementary school.
Over my childhood, I've seen them at yard sales where they were too expensive for my father to buy them for me, and at a friend's house behind a glass display case where his father wouldn't let me look at them.
Now I'm nearing 30, and I've come across these three at a yard sale for $5.
Rough condition, but all the childhood excitement came rushing back, and I couldn't say no.
All three look to be different from each other.
All three are completely seized except for the one with the prop, at which the piston will move up and down only within the exhaust port area.
I was not able to locate any writing or markings on the engines. Maybe they are covered with rust.
I've spent the last few hours reading through some refurbishing posts, and I've gathered these steps:
- Crock pot and antifreeze, or Evaporust to soak the entire engine in to get rid of rust (minus plastic pieces if possible).
- Apply heat if/when needed.
- #0000 steel wool to clean piston and cylinder.
- Optional bluing liquid for parts as wanted.
- ATF for oiling.
My question is, am I on the right track here?
I was about to order a bottle of Super Blue (cheaper than the apparently preferred option -- Brownells Oxpho-Blue) and Evaporust, but wanted to post this here first for opinions.
Heck, any input on what I'm getting myself into is appreciated.
If I can get at least one of these running, I'd be ecstatic.
Pictures below (right click and open in new tab/window to view full size).
What do you think?
Image of all three:

Image of smallest(?) one:

Image of medium(?) one:

Image of largest(?) one:

Last edited by Bretherman on Sun Jan 10, 2021 6:36 pm; edited 2 times in total

Bretherman- Moderate Poster

- Posts : 23
Join date : 2021-01-09
Location : Florida
Re: Getting Ready to Attempt some Restorations - Newbie
![]() NEW222 Sat Jan 09, 2021 8:28 pm
NEW222 Sat Jan 09, 2021 8:28 pm
https://www.mh-aerotools.de/airfoils/cox_frameset.htm
Go to the left side and you can click on 'BEES' or 'PRODUCT engines'. There you will find your engines that you have when scrolling down, and a bit of info about them.
As for teh first one, may have been on a Cox airplane, or may have been bought seperately, but the second and third engines did come on Cox airplanes as the middle one still has the mount still attached. Hope this helps some. I am sure some more knowledgable members will chime in here shortly and help you out further.

NEW222- Top Poster

- Posts : 3892
Join date : 2011-08-13
Age : 45
Location : oakbank, mb
Re: Getting Ready to Attempt some Restorations - Newbie
![]() NEW222 Sat Jan 09, 2021 8:39 pm
NEW222 Sat Jan 09, 2021 8:39 pm
NEW222- Top Poster
- Posts : 3892
Join date : 2011-08-13
Age : 45
Location : oakbank, mb
Re: Getting Ready to Attempt some Restorations - Newbie
![]() Mark Boesen Sat Jan 09, 2021 10:53 pm
Mark Boesen Sat Jan 09, 2021 10:53 pm

Mark Boesen- Top Poster
- Posts : 3976
Join date : 2011-09-01
Age : 65
Location : Rockford, Il -

Re: Getting Ready to Attempt some Restorations - Newbie
![]() rsv1cox Sun Jan 10, 2021 7:42 am
rsv1cox Sun Jan 10, 2021 7:42 am
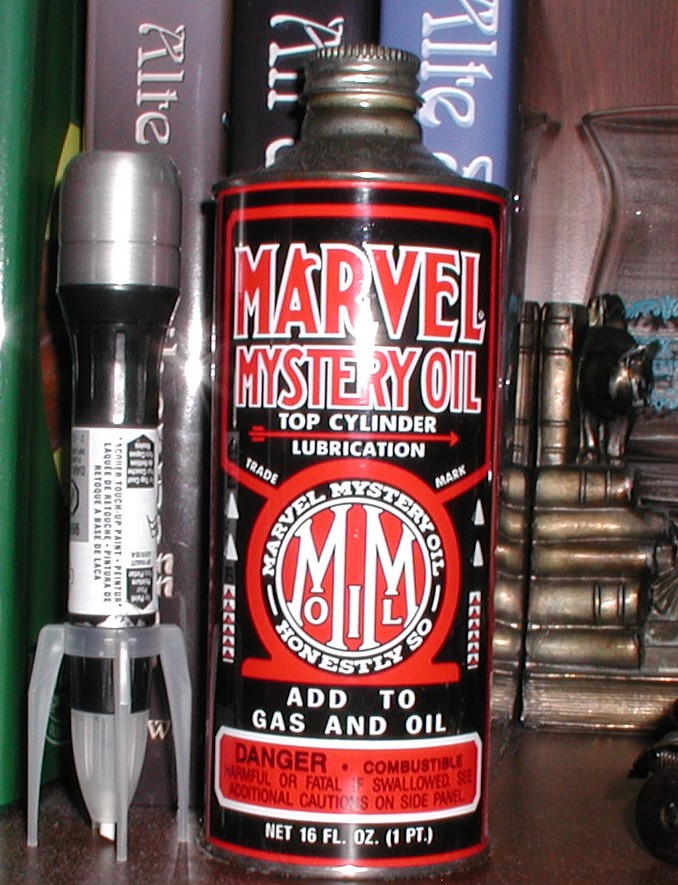
I couldn't access your pictures Bman but prepared to be ecstatic, chances are you will be able to get them all running. And yes, as Rene said, crock pot and plastic are a no, no. been there. Thanks Mark for testing that Marvel Mystery oil/crock pot theory, something I have wanted to do. I have used it in many capacities for years. Saved my last metal can when they went to plastic bottles.

rsv1cox- Top Poster


Posts : 10557
Join date : 2014-08-18
Location : West Virginia
Re: Getting Ready to Attempt some Restorations - Newbie
![]() Coxfledgling Sun Jan 10, 2021 8:10 am
Coxfledgling Sun Jan 10, 2021 8:10 am
Cox engines, cannot open the pictures on my internet phone.
You got some at last, well done, and for £5, sorry #5, 5 dollars !!
Be wary of the heads as they have a fine filament, the glow plug.
Get the Cox spanner, sorry wrench...
I would tackle each engine seperatly, so no mix up. Antifreeze for freeing up a stuck glow engine, you live and learn.
ATF absorbs/mixes with water so be carefully.
Cox or any other engine in a display cabinet, if it's really old and valuable then i suppose so.
Have fun and stay safe out there. Research more, lots of tlc and run the engines, then get a control line model, even a cheap profile one and fly the engines.
Enjoy...

Coxfledgling- Gold Member

- Posts : 374
Join date : 2021-01-10
Location : Near Caernarfon, Snowdonia, Wales, UK
Re: Getting Ready to Attempt some Restorations - Newbie
![]() Bretherman Sun Jan 10, 2021 6:51 pm
Bretherman Sun Jan 10, 2021 6:51 pm
NEW222 wrote:Firstly, welcome to the forum! Also a great story as to how you got here along the way. Now as to the engines. They all appear to be Cox .049 engines. Left one is a Cox Babe Bee / product engine, middle one is a product engine with aluminum needle valve and white horseshoe backplate. The third is a standard 'postage stamp' backplate engine. They do indeed look a little rough, but with a bit of time will clean up just nicely, and more than likely run just as well. For more information you can do some reading here about your engines.
https://www.mh-aerotools.de/airfoils/cox_frameset.htm
Go to the left side and you can click on 'BEES' or 'PRODUCT engines'. There you will find your engines that you have when scrolling down, and a bit of info about them.
As for teh first one, may have been on a Cox airplane, or may have been bought seperately, but the second and third engines did come on Cox airplanes as the middle one still has the mount still attached. Hope this helps some. I am sure some more knowledgable members will chime in here shortly and help you out further.
Wow! Thank you for the identifications and pin-point right off the bat! And the great resource nonetheless. I've already learned more about these looking through the mh-aerotools website than I thought I'd ever find out.
NEW222 wrote:As for yoru restorations. You can also use a heat gun and heat the engine up a bit and carefully see if it will turn over as well. This will make the engine disassembly go a bit better as well. But I too do use a crock pot to clean engines. Just remember this. DO NOT ever use the crock pot for normal cooking or anything for human consumption again. Secondly, use the cheap standard antifreeze undiluted. Yes, you are correct about not putting plastic parts in the antifreeze. You will want to remove the plastic backplates before putting in an antifreeze bath. The Evaporust is new to me as well, and I have just recently used it on an engine rebuild as well. Worked well. And honestly, it workd only a little bit better than plain 'white vinegar' I had found, on my particular engine anyway. As for bluing, you will want to wait for others to chime in as I have not used that on a cylinder yet myself. After teh antifreeze bath, you may be surprised as to how the cylinder looks inside. Lastly, for now, if you do decide to clean these up all together, I would personally keep teh piston/cylinder assemblies 'matched' as well. Meaning, for example, using a wire, tie them together so the original piston and cylinder stay together. Yes, they are interchangable, but best kept together.
Thank you for the insight. I've never even heard of the antifreeze method before I started looking into these engines.
I will start working on one of them and gauge how the experience goes. I'll make sure to keep the pistons and engines matched. Thank you for that!
Mark Boesen wrote:my last 'clean-up' with the crockpot, I used mystery oil instead of antifreeze, worked great, and no teardown needed.
Heck, I didn't even know this was an option, thank you!
rsv1cox wrote:A person that reads and does research. Remarkable!
I couldn't access your pictures Bman but prepared to be ecstatic, chances are you will be able to get them all running. And yes, as Rene said, crock pot and plastic are a no, no. been there. Thanks Mark for testing that Marvel Mystery oil/crock pot theory, something I have wanted to do. I have used it in many capacities for years. Saved my last metal can when they went to plastic bottles.
*Embedded Picture removed for formatting purposes - Please look at original reply*
Thank you for the kind words! I've re-embedded the pictures after using the in-forum hosting option. I hope it will work better now.
What in fact is that thing to the left of the Marvel Mystery Oil in your picture?
Coxfledgling wrote:May I ask, what is that object to the left of the mystery oil please, a flash light or something really noisey ?
Cox engines, cannot open the pictures on my internet phone.
You got some at last, well done, and for £5, sorry #5, 5 dollars !!
Be wary of the heads as they have a fine filament, the glow plug.
Get the Cox spanner, sorry wrench...
I would tackle each engine seperatly, so no mix up. Antifreeze for freeing up a stuck glow engine, you live and learn.
ATF absorbs/mixes with water so be carefully.
Cox or any other engine in a display cabinet, if it's really old and valuable then i suppose so.
Have fun and stay safe out there. Research more, lots of tlc and run the engines, then get a control line model, even a cheap profile one and fly the engines.
Enjoy...
Thank you, I've re-embedded the pictures, and I hope it works better now.
I've been looking at the Cox spanners/wrenches (
Thank you for the heads up on the glow plug. I didn't even know it was the whole top of the head until I started looking at replacement parts, wow.
Bretherman- Moderate Poster
- Posts : 23
Join date : 2021-01-09
Location : Florida
Re: Getting Ready to Attempt some Restorations - Newbie
![]() Bretherman Sun Jan 10, 2021 7:34 pm
Bretherman Sun Jan 10, 2021 7:34 pm
Got an old (rather nice) Crock-Pot at a thrift store for $4.
Unfortunately the only coolant I could find for the day was a 50/50 mix, so we will see how it fares.
Chose one of the engines to start with.
Was able to take the mounting plate off without much trouble, and tossed the engine (and screws just in case the antifreeze is able to take any corrosion off) in.
I found that the shaft has about one millimeter of play without the piston moving at all. Wondering at this point if I'll need a piston reset tool...
Will set it to low, and check on it probably tomorrow night.
Looks like there is a reed thing in there. I'm going to have to do a little more research on this. I'm reading a Mylar reed is a recommended upgrade.
Pictures below.
Engine with mounting plate off:


Crock-Pot and Antifreeze:

Antifreeze in:

Bretherman- Moderate Poster
- Posts : 23
Join date : 2021-01-09
Location : Florida
Re: Getting Ready to Attempt some Restorations - Newbie
![]() NEW222 Sun Jan 10, 2021 8:44 pm
NEW222 Sun Jan 10, 2021 8:44 pm
It would be better if you can remove the piston, cylinder, and head while cleaning just to clean it better and help the crud come out from the parts. You may need to let it soak a bit first prior to disassembling letting the heat do some magic. If you do not have the proper wrenches to remove the parts, you can use a leather strap to remove the cylinder. I just cannot find the thread at the moment, but am sure someone else will chime in here that knows where it is or may even be the one that made one.
NEW222- Top Poster
- Posts : 3892
Join date : 2011-08-13
Age : 45
Location : oakbank, mb
Re: Getting Ready to Attempt some Restorations - Newbie
![]() davidll1984 Sun Jan 10, 2021 9:23 pm
davidll1984 Sun Jan 10, 2021 9:23 pm
no steal wool after light polish wit pure polish compound wit cloth on the piston its posible To use as lapping compound wit piston inside cylinder wit laping tool can use tube as tool be gentle wit them dont force piston inside cylinder the bleach wil disolve the black color coting on the cylinder its wy use gun blue after To protection dont let it sit in the bleach for To long just 30 minute à time its mutch agressif way Not like for just stuck engine without rust antifreeze wil Not do mutch for rust
Last edited by davidll1984 on Sun Jan 10, 2021 9:48 pm; edited 2 times in total (Reason for editing : Ad info)

davidll1984- Diamond Member

- Posts : 2287
Join date : 2020-02-12
Age : 39
Location : shawinigan
Re: Getting Ready to Attempt some Restorations - Newbie
![]() 944_Jim Sun Jan 10, 2021 10:39 pm
944_Jim Sun Jan 10, 2021 10:39 pm
Run all.the way to the bottom of that page and get the link to the Way back Machine's copy of the "Care and Feeding of Cox 1/2A Engines.PDF." That document should be a great start for you.
https://web.archive.org/web/20170410030959/http://www.mccookfieldfac.com/helpful-info/cox-engines.pdf
The first two engines will readily screw to a model. The last one with the different backplate could...if you had adapters. Those adapters have been mentioned here before. There is even a DIY version for a 3d printer.
If you are planning on running at least one, you need to consider what kind of plane. There are a couple of plans for really easy, low buy-in models, such as the Man-Win (a combat trainer with adjustable right thrust for amazing line tension), a PT-19 clone, and others, made from corrugated sign plastic (no paint required). Or you can go with new reproductions of earlier 1/2A balsa and tissue kits from Brodak, Sig Mfr, and even boutique laser cutters. Tell us your interest, and we can point you there!
If you do run them, a quick way to get fuel is to go to eBay and get a quart of Glowplug Boy 1/2A fuel. Or buy a complete starter pack through vendors...again, we can point you there.
_________________
Never enough time to build them all...always enough time to smash them all!
944_Jim- Diamond Member
-
Posts : 1953
Join date : 2017-02-08
Age : 59
Location : NE MS
Re: Getting Ready to Attempt some Restorations - Newbie
![]() KariFS Mon Jan 11, 2021 12:47 am
KariFS Mon Jan 11, 2021 12:47 am
I just want to add a word or two of caution: Anti-freeze fumes can be toxic, so be sure to use the crockpot in a properly ventilated place or outside. Might also want to write a warning on the pot so that no one ever uses it for cooking food by mistake.
I have never tried the anti-freeze in a crockpot method. Mostly, I guess, because crockpots never were a ”thing” or a fad here, and they are not abundant at flea markets. Plus I rarely go to flea markets anymore. I do have a couple of stuck engines that would benefit from it. I have one of those (relatively) inexpensive Chinese ultrasonic cleaners, mine is 3 liters and with heating. I use ethanol (camping stove fluid) or full-strength windshield washer fluid, also ethanol based, not methanol
Just a thought, when cleaning Cox engines or other small things in the ultrasonic, I put the object in a small glass jar, fill the jar with ethanol and put the jar in the ultrasonic that is filled with water. Maybe this would work in a crockpot too? Just fill the pot with water and put a small jar with antifreeze (and the engine) in the pot? Could save some fluid and also make the clean-up less messy.
Anyway, great to see a new enthusiast joining the crowd, welcome

KariFS- Diamond Member
- Posts : 2002
Join date : 2014-10-10
Age : 52
Re: Getting Ready to Attempt some Restorations - Newbie
![]() rsv1cox Mon Jan 11, 2021 7:37 am
rsv1cox Mon Jan 11, 2021 7:37 am
Coxfledgling wrote:May I ask, what is that object to the left of the mystery oil please, a flash light or something really noisey ?
...
Space age touch up paint dispenser for my Nissan 350Z.
rsv1cox- Top Poster
-
Posts : 10557
Join date : 2014-08-18
Location : West Virginia
Re: Getting Ready to Attempt some Restorations - Newbie
![]() 944_Jim Mon Jan 11, 2021 10:33 am
944_Jim Mon Jan 11, 2021 10:33 am
I don't know how much you know these engines, so please bear with me through the following:
The beauty of Cox .049 engines is that they all allow for significant interchange between versions, from postage stamp backplates and forward. I don't know the really early ones (late '50's, I think) before postage stamp.
While the appropriate wrenches can be mail-ordered or eBayed easily:
If you have access to a drill, bits of the same diameter as the head, and as the cylinder, and a small hand saw, then you can make a split-hole clamp to remove both separately. A small strap wrench can be made fairly quickly if you don't have access to a drill and bits. Harbor Freight has a cheap strap wrench set (plast and rubber, bleck!), if you need a visual. My last strap wrench was a disposable one so I could break apart a Medallion .15. A hairdryer will get these engines warm enough to allow for easier disassembly.
That small backplate is known as the postage stamp. The tanked one is a 5cc Babe Bee and the one with a piece of airplane firewall is known as the horseshoe backplate engine.
I recommend saving the tanked engine for last. It has a few parts that will have to be replaced...the fuel pickup tube and venturi O-ring inside.
The horseshoe backplate engine will be easiest to mount and test.
Key note on that postage stamp one...the needle valve assembly is a finer-pitch thread than later ones, and is sought for better needling, especially on pressurized fuel systems.
Once you get your engine(s) cleaned up, benchtest them on a pine block, or a piece of plywood in a vise. I like a C-clamp and wood on a saw horse.
I like #2 wood screws, but the holes are really sized for #3 hardware. Unfortunately, #3 is hard to find. The problem with most #3 hardware (especially for the Babe Bee mounting lugs) is head diameter...not shank. The outer diameter interferes/fouls with the fillet between the flange and back plate.
In a pinch, fuel line can be vinyl IV tube, and a tank can be one of those mini shampoo bottles in hotels, or a shot-size liquor bottle. Try to stage the tank level with the intake hole in the backplate to avoid having the fuel fight gravity.
Clean all of your glowplugs in a thin solvent, and flush with any solvent that dries without residue. I like acetone for this. Ensure you do not directly touch the filament so you dont break the weld between it and the head. If the filament touches more than just the end-weld in the head, then carefully manipulate it with a straight pin. You want the electric current to flow from glowplug tip across the filament to the weld without any other contact along the way.
That.filament came in two styles...a coiled wire, and a W-shaped wire. The W is another sought-after component.
A wire stopped back about 1.5" can be wrapped around the head between two cooling fins, and a tiny alligator clip connected to the plug tip. The other ends can be taped securely to a fresh D-cell battery. Check the heads before installing. Nothing is more tedious than determining you have a bad glowplug after installing it.
Once you benchtest successfully, then it is time to determine which engine and which plane. Have you got helpers? That, or stooge launching will determine if you have landing gear.
_________________
Never enough time to build them all...always enough time to smash them all!
944_Jim- Diamond Member
-
Posts : 1953
Join date : 2017-02-08
Age : 59
Location : NE MS
Re: Getting Ready to Attempt some Restorations - Newbie
![]() rsv1cox Mon Jan 11, 2021 10:53 am
rsv1cox Mon Jan 11, 2021 10:53 am
I buy my #2's from Lowes in small packets, Brass. But I keep everything from 00's up to #6's handy too in plastic cases. I used to use draws but cases are so much easier to find what you want. The VACO tool cuts everything to length including the 2/56's but you have to dress the bitter end.
When I first started out some 70 years ago, all I ever used to attach engines to bulkheads were #2 screws. Never had an engine fall off either.
rsv1cox- Top Poster
-
Posts : 10557
Join date : 2014-08-18
Location : West Virginia
Re: Getting Ready to Attempt some Restorations - Newbie
![]() OhBee Mon Jan 11, 2021 3:23 pm
OhBee Mon Jan 11, 2021 3:23 pm

OhBee- Platinum Member

- Posts : 698
Join date : 2016-03-23
Age : 73
Location : Minnesota
Re: Getting Ready to Attempt some Restorations - Newbie
![]() Bretherman Tue Jan 12, 2021 2:40 pm
Bretherman Tue Jan 12, 2021 2:40 pm
NEW222 wrote:Well, I have personally not used antifreeze at 50/50, so I cannot comment on that or how it will do. But, as for cleaning the backplate, needle, reed, etc, you can use your nitro fuel and put some in a little container and let it sit in there. It will also clean things very well. I personally use a used or new toothbrush for cleaning my parts along the way. You can also get some other nylon bristle brushes for cleaning as well, or even paint brushes. If the paint brushes are a bit too soft, trim them shorter to make them better at removing crud. The reed you have there is actuall good providing it is not damaged. You just simply remove the circlip holding it in and carefully remove the reed. For this, you can use a pin, thumbtack, dental pick, etc. The biggest thing when re-assembling your engine will be to put the clip back in the proper direction. It is easy to see. Just place the circlip on a flat surface and when it is the correct direction, the center of it is slightly higher than that of the outside edges. You will want to remove the needle valve so you can clean the tube and make sure there is no blockages in the fuel passage. The holes are very small so may be hard to see. I use a very bright flashlight.
It would be better if you can remove the piston, cylinder, and head while cleaning just to clean it better and help the crud come out from the parts. You may need to let it soak a bit first prior to disassembling letting the heat do some magic. If you do not have the proper wrenches to remove the parts, you can use a leather strap to remove the cylinder. I just cannot find the thread at the moment, but am sure someone else will chime in here that knows where it is or may even be the one that made one.
Thank you for the advice on the reed and circlip. I was not aware there was a proper orientation!
I will try cleaning the needle valve assembly etc. with the nitro fuel -- time to get some nitro fuel...
Will this also work with rubbing alcohol by chance? I've read it can do a decent job. I'm unsure if it will be damaging for the plastics.
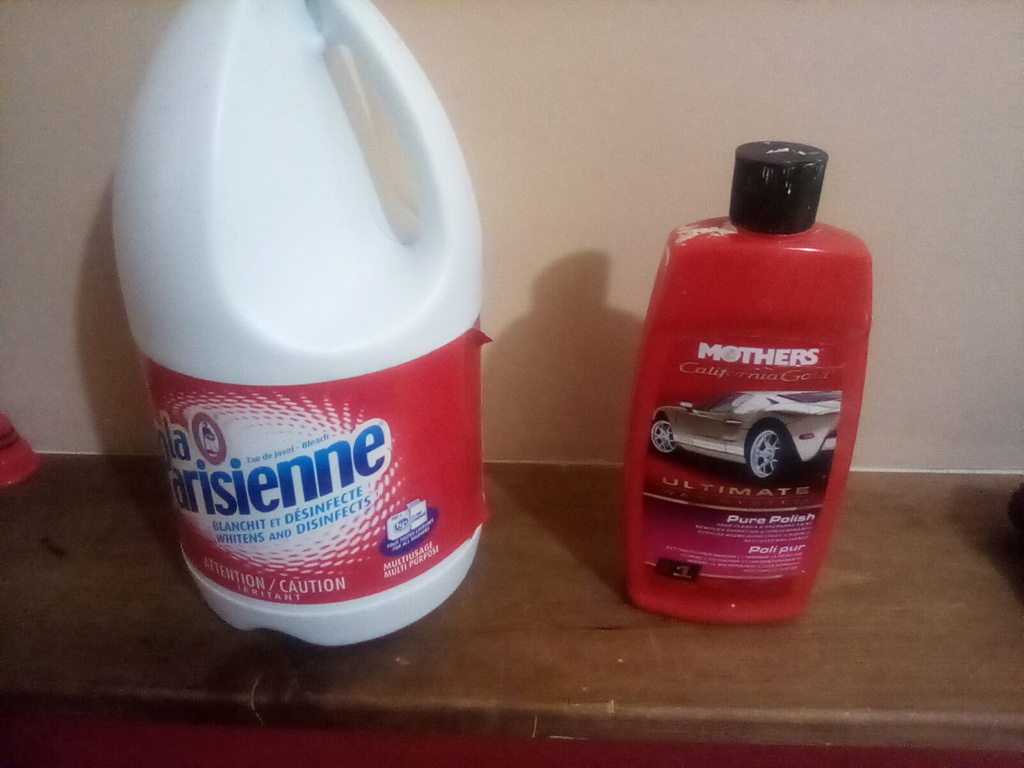
davidll1984 wrote:Y use la parisienne bleach mix wit waterTo disolve rust in the cylinder working
no steal wool after light polish wit pure polish compound wit cloth on the piston its posible To use as lapping compound wit piston inside cylinder wit laping tool can use tube as tool be gentle wit them dont force piston inside cylinder the bleach wil disolve the black color coting on the cylinder its wy use gun blue after To protection dont let it sit in the bleach for To long just 30 minute à time its mutch agressif way Not like for just stuck engine without rust antifreeze wil Not do mutch for rust
Yes, looks like the antifreeze didn't do much for rust.
Interesting concept of using polishing compound and the piston and cylinder for lapping! Sounds like it might be a better method than the #0000 steel wool.
My problem here is it looks like there is a good amount of buildup on the bottom of the piston (I suspect rust?) that prevents it from going into the cylinder at all. Worst case scenario if I can't get that buildup off, will steel wool in the end be worth it?
I was going to invest in a bottle of Evaporust, as it seems to be a friendly non-toxic rust remover.
944_Jim wrote:Go to the left edge of this website and find the "instruction sheets" just above the Cox Engine of the Month stuff.
Run all.the way to the bottom of that page and get the link to the Way back Machine's copy of the "Care and Feeding of Cox 1/2A Engines.PDF." That document should be a great start for you.
https://web.archive.org/web/20170410030959/http://www.mccookfieldfac.com/helpful-info/cox-engines.pdf
The first two engines will readily screw to a model. The last one with the different backplate could...if you had adapters. Those adapters have been mentioned here before. There is even a DIY version for a 3d printer.
If you are planning on running at least one, you need to consider what kind of plane. There are a couple of plans for really easy, low buy-in models, such as the Man-Win (a combat trainer with adjustable right thrust for amazing line tension), a PT-19 clone, and others, made from corrugated sign plastic (no paint required). Or you can go with new reproductions of earlier 1/2A balsa and tissue kits from Brodak, Sig Mfr, and even boutique laser cutters. Tell us your interest, and we can point you there!
If you do run them, a quick way to get fuel is to go to eBay and get a quart of Glowplug Boy 1/2A fuel. Or buy a complete starter pack through vendors...again, we can point you there.
Wow, another great resource, thank you!
I was actually wondering how to remove the crankshaft, and reading through this article I came across this:
After removing the backplate, cylinder, and piston from the engine, insert one of the screws into the shaft as far as it will go.
Place the crankcase rear-end down on a sheet of cardboard on a cement floor (cement for solid backing; cardboard so the crankcase won't be marred). Whup that puppy with a hammer until the shaft slides free of the drive washer. Keep that screw just for removing shafts.
I was actually wondering about the RC model planes for these engines. I know there is no throttle control, but it sounds like a very interesting idea.
Thank you for the suggestion on the fuel -- I've ordered a quart
KariFS wrote:Looking good!
I just want to add a word or two of caution: Anti-freeze fumes can be toxic, so be sure to use the crockpot in a properly ventilated place or outside. Might also want to write a warning on the pot so that no one ever uses it for cooking food by mistake.
I have never tried the anti-freeze in a crockpot method. Mostly, I guess, because crockpots never were a ”thing” or a fad here, and they are not abundant at flea markets. Plus I rarely go to flea markets anymore. I do have a couple of stuck engines that would benefit from it. I have one of those (relatively) inexpensive Chinese ultrasonic cleaners, mine is 3 liters and with heating. I use ethanol (camping stove fluid) or full-strength windshield washer fluid, also ethanol based, not methanolEthanol bath is not quite as effective as antifreeze seems to be, although I only cook mine for about half an hour, and the temperature is lower too.
Just a thought, when cleaning Cox engines or other small things in the ultrasonic, I put the object in a small glass jar, fill the jar with ethanol and put the jar in the ultrasonic that is filled with water. Maybe this would work in a crockpot too? Just fill the pot with water and put a small jar with antifreeze (and the engine) in the pot? Could save some fluid and also make the clean-up less messy.
Anyway, great to see a new enthusiast joining the crowd, welcome
Thank you for the input!
Is it me, or does the jar in a water bath sound genius. I don't see why that wouldn't work, and I can't believe I didn't think of that
944_Jim wrote:Bretherman,
I don't know how much you know these engines, so please bear with me through the following:
The beauty of Cox .049 engines is that they all allow for significant interchange between versions, from postage stamp backplates and forward. I don't know the really early ones (late '50's, I think) before postage stamp.
While the appropriate wrenches can be mail-ordered or eBayed easily:
If you have access to a drill, bits of the same diameter as the head, and as the cylinder, and a small hand saw, then you can make a split-hole clamp to remove both separately. A small strap wrench can be made fairly quickly if you don't have access to a drill and bits. Harbor Freight has a cheap strap wrench set (plast and rubber, bleck!), if you need a visual. My last strap wrench was a disposable one so I could break apart a Medallion .15. A hairdryer will get these engines warm enough to allow for easier disassembly.
That small backplate is known as the postage stamp. The tanked one is a 5cc Babe Bee and the one with a piece of airplane firewall is known as the horseshoe backplate engine.
I recommend saving the tanked engine for last. It has a few parts that will have to be replaced...the fuel pickup tube and venturi O-ring inside.
The horseshoe backplate engine will be easiest to mount and test.
Key note on that postage stamp one...the needle valve assembly is a finer-pitch thread than later ones, and is sought for better needling, especially on pressurized fuel systems.
Once you get your engine(s) cleaned up, benchtest them on a pine block, or a piece of plywood in a vise. I like a C-clamp and wood on a saw horse.
I like #2 wood screws, but the holes are really sized for #3 hardware. Unfortunately, #3 is hard to find. The problem with most #3 hardware (especially for the Babe Bee mounting lugs) is head diameter...not shank. The outer diameter interferes/fouls with the fillet between the flange and back plate.
In a pinch, fuel line can be vinyl IV tube, and a tank can be one of those mini shampoo bottles in hotels, or a shot-size liquor bottle. Try to stage the tank level with the intake hole in the backplate to avoid having the fuel fight gravity.
Clean all of your glowplugs in a thin solvent, and flush with any solvent that dries without residue. I like acetone for this. Ensure you do not directly touch the filament so you dont break the weld between it and the head. If the filament touches more than just the end-weld in the head, then carefully manipulate it with a straight pin. You want the electric current to flow from glowplug tip across the filament to the weld without any other contact along the way.
That.filament came in two styles...a coiled wire, and a W-shaped wire. The W is another sought-after component.
A wire stopped back about 1.5" can be wrapped around the head between two cooling fins, and a tiny alligator clip connected to the plug tip. The other ends can be taped securely to a fresh D-cell battery. Check the heads before installing. Nothing is more tedious than determining you have a bad glowplug after installing it.
Once you benchtest successfully, then it is time to determine which engine and which plane. Have you got helpers? That, or stooge launching will determine if you have landing gear.
I came in not knowing much of anything, but I seem to be learning at lightning speed with the help of everyone here.
I appreciate the extra knowledge and tips, thank you!
I unfortunately don't have much in the form of tools other than some pliers.
The strap wrench sounds like something I'd like to invest in.
I was going to order some new glowplugs, but I'm going to look over the original ones and check them out based on your info.
Interesting method on the D-cell battery!
rsv1cox wrote:Jim gives good advice, that's as good a run-down on Cox engines as any I have seen.
I buy my #2's from Lowes in small packets, Brass. But I keep everything from 00's up to #6's handy too in plastic cases. I used to use draws but cases are so much easier to find what you want. The VACO tool cuts everything to length including the 2/56's but you have to dress the bitter end.
When I first started out some 70 years ago, all I ever used to attach engines to bulkheads were #2 screws. Never had an engine fall off either.
I will agree with you that plastic cases are much more convenient than tiny drawers
I didn't know you could get this kind of hardware at Lowes. Noted! There's one not too far from here...
Bretherman- Moderate Poster
- Posts : 23
Join date : 2021-01-09
Location : Florida
Re: Getting Ready to Attempt some Restorations - Newbie
![]() Bretherman Tue Jan 12, 2021 3:01 pm
Bretherman Tue Jan 12, 2021 3:01 pm
Picture after taking it out:

As some members mentioned, the antifreeze didn't do much for the rust.
After spraying some WD-40, and being a little rougher on the glow plug than I probably should have been (I had initially decided to just grab new glow plugs), I was able to take it off. Looks to be the coil shape instead of the W shape.
Picture of glowplug off:

Other than about a millimeter of play on the piston connecting rod, the piston wouldn't budge.
I took a softer plastic nozzle (like the one you get on a silicone or caulking tube) and hammered it a dozen or so times, and it popped down!
The crank looks to be turning easily in its current range of motion, but I'm still leaning towards removing it to make sure it's as clean as can be.
After that, I broke out the hair dryer, as well as more WD-40.
Took quite a bit of convincing with two pliers and a bath towel, as well as multiple heatings, but I was finally able to unscrew the head.
I'm really considering a strap wrench.
Picture of heating the engine:

Picture with head and piston removed:

There is quite a lot of nasty buildup at the base of the head, as well as what seems to be rust on the head, and on the piston skirt.
I'm going to see what rubbing alcohol will do to it, as well as order some Evaporust (for possible use on this engine, as well as to try on the other engines).
I'd really like to get the piston to fit and move within the sleeve. I had initially thought about #0000 steel wool to try and clean it off, but davidll1984 mentioned an interesting-sounding lapping method with polishing compound.
My only fear is I won't be able to clean the piston without using something more abrasive.
I guess we'll see how the rubbing alcohol turns out.
Bretherman- Moderate Poster
- Posts : 23
Join date : 2021-01-09
Location : Florida
Re: Getting Ready to Attempt some Restorations - Newbie
![]() EXModelEngines Tue Jan 12, 2021 3:34 pm
EXModelEngines Tue Jan 12, 2021 3:34 pm
A little steel wool looks to be needed on the piston in spots (don't worry if there is still discoloration - just get the surface smooth and remove the heavy stuff). You may also need to do the same on the inside of the cylinder depending upon how much buildup there is.
Best of Luck!
Matt

EXModelEngines- Platinum Member

Posts : 858
Join date : 2011-06-07
Location : Central CT, USA-
Re: Getting Ready to Attempt some Restorations - Newbie
![]() rsv1cox Tue Jan 12, 2021 3:44 pm
rsv1cox Tue Jan 12, 2021 3:44 pm
But I would trade that WD40 in a heartbeat for a can of Remoil spray, or any other light oil available anywhere else on the earth including communist countries.
White vinegar will remove much of that rust.
rsv1cox- Top Poster
-
Posts : 10557
Join date : 2014-08-18
Location : West Virginia
Re: Getting Ready to Attempt some Restorations - Newbie
![]() NEW222 Tue Jan 12, 2021 4:59 pm
NEW222 Tue Jan 12, 2021 4:59 pm
NEW222- Top Poster
- Posts : 3892
Join date : 2011-08-13
Age : 45
Location : oakbank, mb
Re: Getting Ready to Attempt some Restorations - Newbie
![]() Bretherman Tue Jan 12, 2021 7:03 pm
Bretherman Tue Jan 12, 2021 7:03 pm
EXModelEngines wrote:I would definitely recommend taking apart the crankcase. From the look of the engine, it was pretty gummed up so I would be willing to bet the crank journal has a decent amount of semi-hardened gunk between the two bearing surfaces of the crankshaft.
A little steel wool looks to be needed on the piston in spots (don't worry if there is still discoloration - just get the surface smooth and remove the heavy stuff). You may also need to do the same on the inside of the cylinder depending upon how much buildup there is.
Best of Luck!
Matt
Crankshaft has been removed!
Thank you for the input on the steel wool. If it is needed, I feel a little better about using it.
rsv1cox wrote:Good job so far.
But I would trade that WD40 in a heartbeat for a can of Remoil spray, or any other light oil available anywhere else on the earth including communist countries.
White vinegar will remove much of that rust.
Hahahaha, I will grab some Remoil spray next chance I can. Is this something that would be good to use to oil the engine and store it in general?
I'm going to toss the steel parts in vinegar tonight, and let them sit for a day.
NEW222 wrote:Yes, sorry if I was not more clear while mentioning the antifreeze bath. Whether full strength, 100% or diluted as you have, it will not remove rust. That is if I had made it sound that way to you. As Bob had mentioned plain old white vinegar will probably work as well as the Evaporust. I just happend to have a small bottle on hand for many things, and do personally like it. Also to add to lapping. Another thing I have done and used in the past is to use a bit of toothpaste..... Sounds funny, but does also work if you want a really fine compound. Also, if you did not have any polishing compound, you probably have a tube of toothpaste. And if that did not work you could go out and grab some polishing compound.
Oh, no not at all, that was just mostly wishful thinking on my part
I'm trying the white distilled vinegar tonight since I have some on hand.
Interesting idea for the toothpaste! I guess I don't see why that wouldn't work. It's basically a cutting compound itself.
I have a few grades of cutting/polishing compounds on hand. If I can get the piston and sleeve pretty free of the rust/buildup with vinegar and/or steel wool, I'm going to try maybe a medium or light cut option.
Bretherman- Moderate Poster
- Posts : 23
Join date : 2021-01-09
Location : Florida
Crankshaft removed!
![]() Bretherman Tue Jan 12, 2021 7:05 pm
Bretherman Tue Jan 12, 2021 7:05 pm
Head, crankshaft, piston, and screws are going in vinegar tonight, and will sit for about a day.
Picture of parts in vinegar:

Bretherman- Moderate Poster
- Posts : 23
Join date : 2021-01-09
Location : Florida
Re: Getting Ready to Attempt some Restorations - Newbie
![]() Bretherman Tue Jan 12, 2021 7:08 pm
Bretherman Tue Jan 12, 2021 7:08 pm
I've followed the instructions of that June 1996 article linked earlier in the thread by 944_Jim (Thank you again!)
https://web.archive.org/web/20170410030959/http://www.mccookfieldfac.com/helpful-info/cox-engines.pdf
No fancy editing, I just figured I'd record myself doing this for the first time. Went smoother than expected.
Bretherman- Moderate Poster
- Posts : 23
Join date : 2021-01-09
Location : Florida
Re: Getting Ready to Attempt some Restorations - Newbie
![]() NEW222 Tue Jan 12, 2021 8:04 pm
NEW222 Tue Jan 12, 2021 8:04 pm
Just to throw another thing at you about removing the driveplate in case you did not see or read about it. Another option, of which I personally use and prefer, is to use a standard shop vice. If you do have one and want to try it, it is also simple. As you did, put the screw in like the video, open the vice up wide enough for the crankcase, put a piece of wood on the jaw where the rear of the crankcase will rest against, and slowly tighten it / close the jaws. I prefer this as it is just a nice slow steady pressure. Again, both ways work, and this is just the way I prefer to do it.
When it comes time to reassemble the engine, carefully put the driveplate against the crankshaft and you will feel it 'grab' telling you it is in the proper place to tighten it up.
NEW222- Top Poster
- Posts : 3892
Join date : 2011-08-13
Age : 45
Location : oakbank, mb
Page 1 of 4 • 1, 2, 3, 4 ![]()
» Cox restorations for the week
» My First Balloon Tank Attempt
» Another attempt to avoid work.
» Plier Mark Repair Attempt