

 Rules
Rules
by Mark Boesen Yesterday at 11:53 pm
» Roddie's water-cooling bottle for bench-running
by roddie Yesterday at 8:59 pm
» Baja Bug / Dune Buggy Recoil Starter
by vambrosini Yesterday at 8:57 pm
» Wanted: Pull Starter reapir kit for a Cox Dune Buggy.
by vambrosini Yesterday at 8:55 pm
» cox dune buggy/ baja bug
by vambrosini Yesterday at 8:49 pm
» Jim Walkers FireBee - This is going to be fun
by 944_Jim Yesterday at 7:46 pm
» Joe Wagners Sioux
by GallopingGhostler Yesterday at 7:37 pm
» Jim Walker Firebaby
by rsv1cox Yesterday at 10:29 am
» B-25 Mitchell
by rdw777 Yesterday at 9:49 am
» Cox water wizard
by Wiggy Yesterday at 6:32 am
» My Cox .049 Marine inboard engine
by 1/2A Nut Sun May 12, 2024 9:52 pm
» Roddie's water-cooled bench-run vid
by roddie Sun May 12, 2024 8:55 pm


Getting Ready to Attempt some Restorations - Newbie
Page 3 of 4 •  1, 2, 3, 4
 ![]()
 Re: Getting Ready to Attempt some Restorations - Newbie
![]() rsv1cox Fri Jan 15, 2021 8:19 am
rsv1cox Fri Jan 15, 2021 8:19 am
Much of what I learned cleaning and restoring firearms, think hundreds over a 60 year span could be applied to model engines so the learning process wasn't much of a leap.
It's not rocket science, use common sense and research this forums past posts. Chances are, your only going to do a few engines so getting it right the first time is important. There are just a few "best ways" do the one that sounds the best for you.

rsv1cox- Top Poster


Posts : 10633
Join date : 2014-08-18
Location : West Virginia
Re: Getting Ready to Attempt some Restorations - Newbie
![]() getback Fri Jan 15, 2021 9:10 am
getback Fri Jan 15, 2021 9:10 am
 We have had a few people come and go that have been contributed to and that really don't fly in my book, But i am no writer .
Last edited by getback on Fri Jan 15, 2021 9:12 am; edited 2 times in total (Reason for editing : change meaning damn no spelling ck.)

getback- Top Poster
-
Posts : 10155
Join date : 2013-01-18
Age : 66
Location : julian , NC
Re: Getting Ready to Attempt some Restorations - Newbie
![]() Bretherman Fri Jan 15, 2021 5:49 pm
Bretherman Fri Jan 15, 2021 5:49 pm
NEW222 wrote:Well, I wish I could tell you why, but vinegar and as well my Evaporust both have done that to me. Taking regular looking steel parts and making them black. You did not do anything wrong. It is just the nature of teh beast. I too would be very interested in why things do indeed turn colors. But I do know if you use a very fine steel wool or sandpaper with a drop of oil while your crank is in a drill you can get the shine back. This I have done, and also recently did this on my OS FS48 Surpass. And that engine crankshaft came out very black! Sorry, no pictures though. As for the piston, I cannot say or tell you what you may use to get it back without possibly doing any damage, so I will leave that for someone more knowledgable than I.
When you polished the crank, did you do the bearing surfaces?
I'd like to do that on this, but I'm unsure if it's as critical as the piston and sleeve surfaces.
Levent Suberk wrote:Vinegar is OK for cleaning for steel, but for only one or two hours soaking. Soaking for two days is a big no no. I think that you need a new cylinder and piston set.
Also don't soak aluminum parts in ethyl alcohol for days. Ethyl alcohol don't eat aluminum but blackens it.
Most effective way for removing rust is using kerosene and a stiff tooth brush.
I might as well have! I guess we will see.
Thank you for the tip on the aluminum!
davidll1984 wrote:Yes plastiques brush no coper just dont use gun brush it have abrasive in plastiques brush u want To use nilon only is the picturs of m'y tool To remove old varnish oil gum rust for .049 .010
Y have al size even for m'y smaler tee dee .010 up To .15 just cant Find the two other for .020 .15
Thank you, I set aside a toothbrush to use for this. I have a brass brush that I may use on the outsides... maybe...
944_Jim wrote:I say "Assemble and Run." Let the engine polish those surfaces back into operational status. Any material you take off now, will also loosen the engine up. It may actually loosen too much. If I were to clean up anything before running, it would be only the prop plate splines and crank splines.
By leaving the sacrificial surface in place and running it, the engine may actually "break in" all over again.
Unfortunately, all you are left with is to test some ideas.
I have a deal for you:
If you try it the way I suggest and the engine becomes ruined, then I'll send along another old one. But, in order to take my offer, you have to do a couple things first. Assemble the engine, oil the engine, test by hand, then run it. Last step is to document with pictures any failure that occurs.
Best case, you have a runner.
Worst case, WE ALL know not to do that anymore (and why). But if it does become worst case, you are only out the time to try it, and the time to wait on the replacement...and we all learn from it.
You know, that may not be a bad idea!
My only concern is I feel like I should at least try to polish the crankshaft bearing surfaces. What do you think?
I have no problem trying to see what comes of this. Good learning opportunity as you said.
Super generous offer, but I'd feel bad taking an engine! This one was used as a learning experience.
How about this:
I have three engines; my goal being get at least one running.
If this one fails, I'll learn for the second one.
If I make some other dumb mistake, I'll learn for the third one.
If pop culture has taught me anything, it's that third time's the charm.
Now, if that one is ruined by yet another learning opportunity, I'd be down to try and "restore" another
rsv1cox wrote:We have struggled with this issue ever since I joined the forum over six years ago. Since that time I have probably disassembled and cleaned over 200 engines everything from .020's to .60's and a couple of four strokers and related about many of them here complete with pictures. Many I bought were "the worst of the worst" so I had little to lose if I made a mistake.
Much of what I learned cleaning and restoring firearms, think hundreds over a 60 year span could be applied to model engines so the learning process wasn't much of a leap.
It's not rocket science, use common sense and research this forums past posts. Chances are, your only going to do a few engines so getting it right the first time is important. There are just a few "best ways" do the one that sounds the best for you.
Wow, that's a lot of engines!
I agree, I've already learned so much just by searching around. Awesome to see so many documented cases of rebuilding these.
getback wrote:You seem to bee really into this new to you hobby and that is a big plus in my book ! Remember to use only 90% alcohol W/less water in it will help , i have forgot to get engines out as long as a week and they still ran Just looked like DoDo LOL The .049 wrench you want is the one with a complete circle at the glow plug removing end . Like this one https://www.coxengineforum.com/t8309-wtb-older-style-wrench?highlight=cox+wrench And you can make a strap wrench https://www.coxengineforum.com/t1414-strap-wrench?highlight=cox+wrench Use the search feature at the top of the page to see all kinds of Good ideas !! OK IF YOU DO AS JIM SAYS I WILL UP THE FREEBEE TO ANOTHER ENGINE TO CLEAN AND SOME PARTS TO BOOT!!! Alright i am through shouting
Too generous! If I fail on all three, I may take you up on yours and Jim's offer

Yes, I definitely want to look into the normal Cox and/or strap wrench. The bath towel and pliers might not come equipped with the care that maybe the material properties of the head deserves.

Bretherman- Moderate Poster

- Posts : 23
Join date : 2021-01-09
Location : Florida
Re: Getting Ready to Attempt some Restorations - Newbie
![]() Bretherman Fri Jan 15, 2021 6:00 pm
Bretherman Fri Jan 15, 2021 6:00 pm
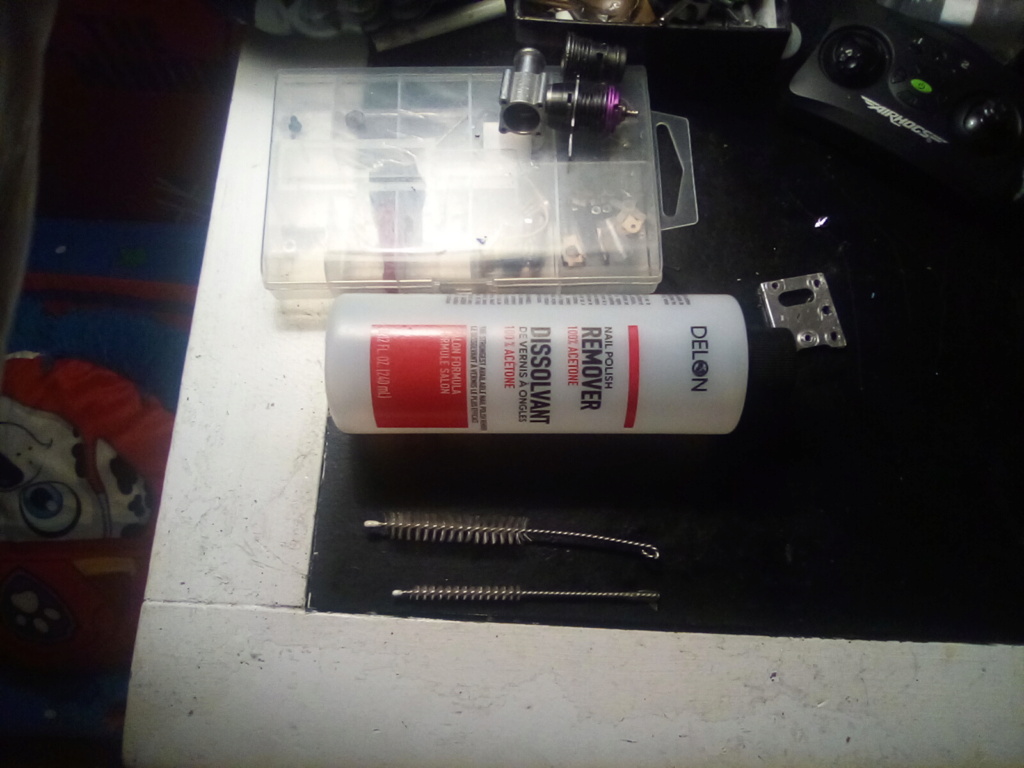
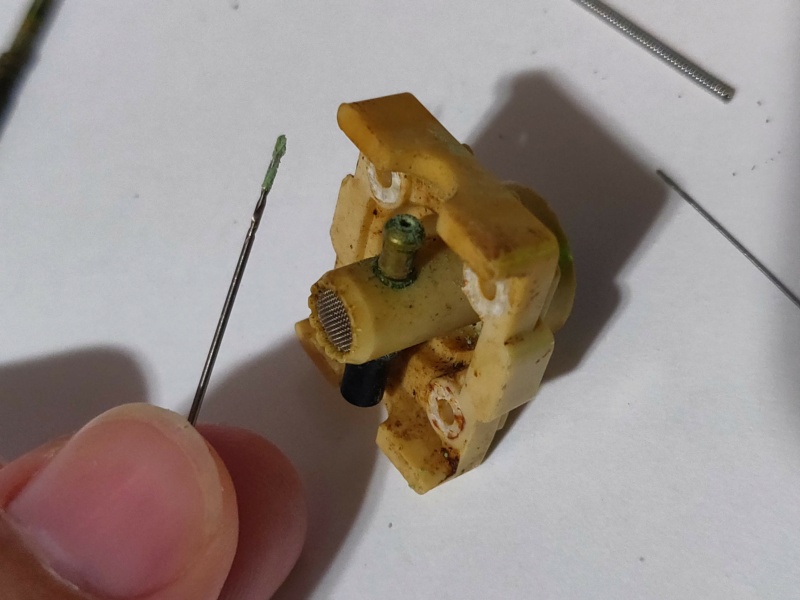
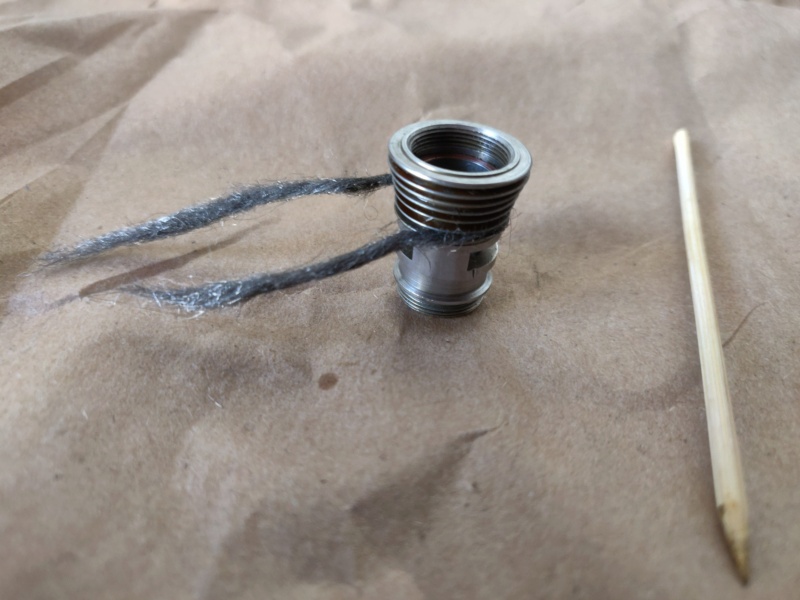
In the meantime I'm going to see if I can free up the needle valve assembly.
I'm going to soak it in 91% isopropyl alcohol (NOT FOR TWO DAYS), and check on it every now and then.
Pictures:
The circlip wasn't too hard to remove:
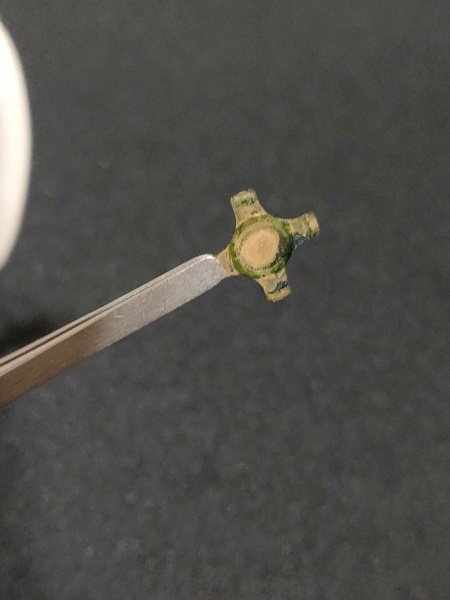
Neither was the reed (though both were understandably tacky-feeling:
Hoping this will also make the rock-solid tube easier to remove:

Bretherman- Moderate Poster
- Posts : 23
Join date : 2021-01-09
Location : Florida
Re: Getting Ready to Attempt some Restorations - Newbie
![]() NEW222 Fri Jan 15, 2021 6:44 pm
NEW222 Fri Jan 15, 2021 6:44 pm
Now with your 'star' shaped reed. Just be very careful with it as they are fragile and will damage easily. I have had to make a new reed as well before. I have used a piece of the material from the inside of a 3.5" floppy disc from a computer. Just trace teh copper one out and you are done.
And lastly as for the rock solid tube in the picture. You can just cut it off however you like from the fuel nipple. I have not ever even tried to soften one up, and do not believe I have ever seen anyone do it either. I use eithe the small nitro fuel tubing or a piece of clear PVC (I believe) as a replacement. I had bought a couple of feet of the clear tubing from a store here somewhere, but cannot remember where. Also, IV lines or such from a hospital stay work as well...... Once you start with these things, trust me, you will find things everywhere. You will just be walking along in a store and say hey, that would be good for...., ..., .... While out having meal, you will also see useful things. Papre ketchup cups for mixing glue, sorting parts, etc, Coffee stir sticks also for mixing glue and other things.

NEW222- Top Poster
- Posts : 3892
Join date : 2011-08-13
Age : 45
Location : oakbank, mb
Re: Getting Ready to Attempt some Restorations - Newbie
![]() NEW222 Fri Jan 15, 2021 6:53 pm
NEW222 Fri Jan 15, 2021 6:53 pm
Also another thing I like a syringe for is that they make priming the engine easy, as you can directly and accurately place a couple of drops of fuel by the exhaust port.
NEW222- Top Poster
- Posts : 3892
Join date : 2011-08-13
Age : 45
Location : oakbank, mb
Re: Getting Ready to Attempt some Restorations - Newbie
![]() 944_Jim Fri Jan 15, 2021 7:19 pm
944_Jim Fri Jan 15, 2021 7:19 pm
_________________
Never enough time to build them all...always enough time to smash them all!
944_Jim- Diamond Member

-
Posts : 1961
Join date : 2017-02-08
Age : 59
Location : NE MS
Re: Getting Ready to Attempt some Restorations - Newbie
![]() 944_Jim Fri Jan 15, 2021 9:55 pm
944_Jim Fri Jan 15, 2021 9:55 pm
Will you be considering trying control line? Might as well start thinking what to fly. The old Testors Ambush could be replicated in coroplast as is the ManWin. Or, if you want balsa, I can come up with a few good examples there too!
_________________
Never enough time to build them all...always enough time to smash them all!
944_Jim- Diamond Member
-
Posts : 1961
Join date : 2017-02-08
Age : 59
Location : NE MS
Re: Getting Ready to Attempt some Restorations - Newbie
![]() Bretherman Mon Jan 18, 2021 11:11 pm
Bretherman Mon Jan 18, 2021 11:11 pm
NEW222 wrote:Yes, I do 'polish' the bearing surfaces. But with the finest sandpaper I have available and it did not take much. Just a second or two in my drill, again, using a drop of oil and the sandpaper. You can even safely and probably better use steel wool or a scotch brite pad with oil as well. More of a cleaning than anythin and making it nice and shiny so it is rotating a smooth surface.
Now with your 'star' shaped reed. Just be very careful with it as they are fragile and will damage easily. I have had to make a new reed as well before. I have used a piece of the material from the inside of a 3.5" floppy disc from a computer. Just trace teh copper one out and you are done.
And lastly as for the rock solid tube in the picture. You can just cut it off however you like from the fuel nipple. I have not ever even tried to soften one up, and do not believe I have ever seen anyone do it either. I use eithe the small nitro fuel tubing or a piece of clear PVC (I believe) as a replacement. I had bought a couple of feet of the clear tubing from a store here somewhere, but cannot remember where. Also, IV lines or such from a hospital stay work as well...... Once you start with these things, trust me, you will find things everywhere. You will just be walking along in a store and say hey, that would be good for...., ..., .... While out having meal, you will also see useful things. Papre ketchup cups for mixing glue, sorting parts, etc, Coffee stir sticks also for mixing glue and other things.
NEW222 wrote:Once you get the needle removed, the biggest part to clean, and probably the hardest will be the tube where the needle screws into. It is not physically hard to do, just tedious. While a very small/thin pin will work, there are a couple of alternatives. One that I like to use is a 'torch tip cleaner'. The other that does work is to get a few 'needles' from the pharmacy. They are a push on type that I have gotten. Heck if at the pharmacy asking to buy a couple needles, should you decide to try them, also ask to buy a couple of syringes for use as well. A big 60cc one is great for fuelling your engines, and a smaller 5 or 10cc syringes are good to use as a 'fuel tank' for your engines without tanks if being run on a bench. Just hook the fuel tubing from the syringe to the bottom where you will remove the one pictured. Remove the plunger and fill with fuel. I do not reinstall the plunger.
Also another thing I like a syringe for is that they make priming the engine easy, as you can directly and accurately place a couple of drops of fuel by the exhaust port.
Yes, I was surprised at how thin and flimsy this reed felt.
Great, I think I'll try to polish the bearing surfaces of the crankshaft with some #0000 steel wool.
I did end up cutting the tube off. Alcohol did not make it any softer, but luckily it wasn't hard to remove. Just a few light swipes with an X-Acto.
You definitely have a point on finding things out in the wild that could be used for this hobby. Coffee stir sticks... genius! I would normally find myself trying to find something to mix epoxy, etc. with

Good advice on the needles. Luckily(?) a family member is a type 1 diabetic, and syringes are readily available
944_Jim wrote:Those copper/beryllium star reeds are another sought after component. Shoot me a PM with your address. I'll send floppy disk material so you can make your own. I like a razor blade for slicing the line off the spray bar. Otherwise you may tug it out of the backplate.
944_Jim wrote:Bretherman,
Will you be considering trying control line? Might as well start thinking what to fly. The old Testors Ambush could be replicated in coroplast as is the ManWin. Or, if you want balsa, I can come up with a few good examples there too!
PM is coming your way! Thank you! Sounds like that could make a good amount of these.
I was thinking of ordering some of those tune-up kits with gaskets, etc. Do you know if the simpler-shaped Mylar ones that come in them would fit in this?
As for airplanes, I'm not sure. I've always wanted a remote control one. I remember wanting to build a balsa model plane for the longest time, but I won't have the space to do anything remotely like that for probably another half year to a year.
I see there are options to 3D print some RC planes, and there are even people that have uploaded modified Cox mounts for specific planes. Considering lack of tools, this may be my easiest method to jump into it the fastest.
However I'm still checking Craigslist etc. in case I come across something
I've actually been wanting to travel to a hobby shop that's roughly an hour away that's been in business for over 55 years. Talked to the guy on the phone, and they have a lot of old Cox stuff.
I know I should wait before I get one of these running, but heck, I want to see if there are any cool plane kits there C/L or R/C.
Bretherman- Moderate Poster
- Posts : 23
Join date : 2021-01-09
Location : Florida
Re: Getting Ready to Attempt some Restorations - Newbie
![]() Bretherman Mon Jan 18, 2021 11:38 pm
Bretherman Mon Jan 18, 2021 11:38 pm
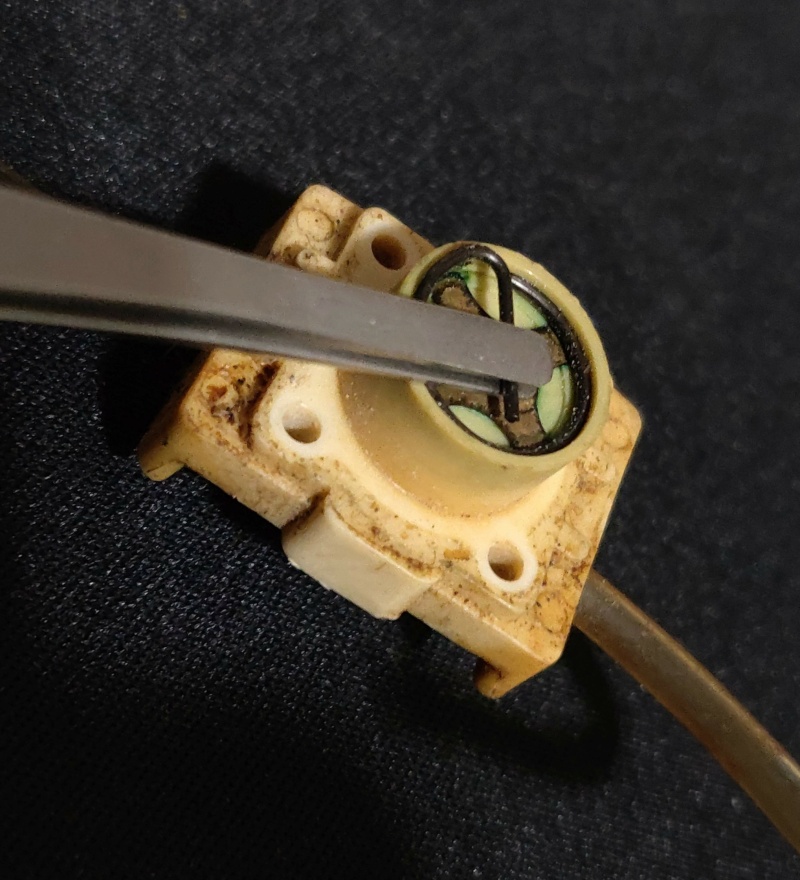
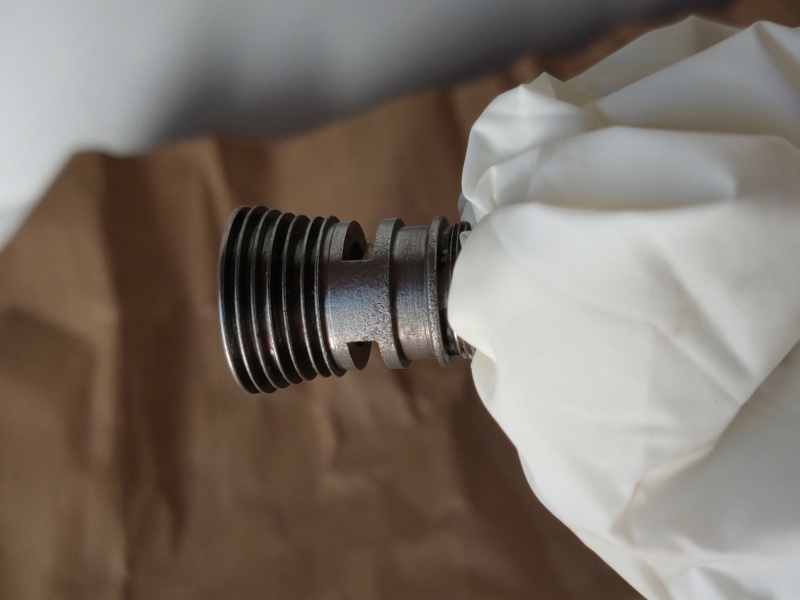
After soaking in the alcohol, I was able to get the needle valve out with my fingers by using a little rubber pad for grip.
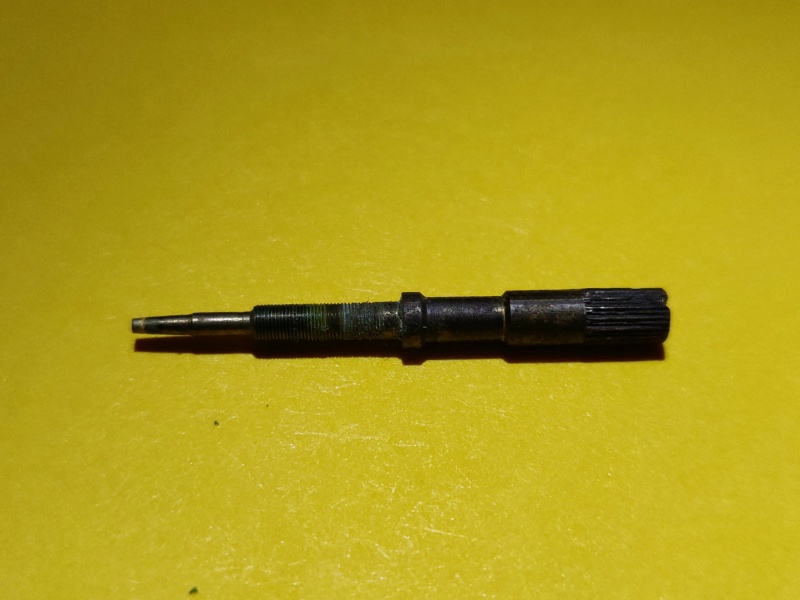
Picture of needle valve:
I used a super tiny drill bit set I had (they go well below the 1mm diameter) to kind of start working the solidified crud out.
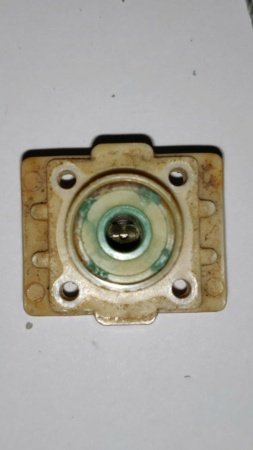
No tool used, just kind of twisted it with my fingers. This ended up doing a pretty good job. I was able to clear out both the area the needle valve goes into, as well as that little hole you can see through the opening on the side.
Picture of cleaning with the mini drill bits:
Picture of little hole from the side:
My Oxpho-Blue liquid came in, and I was super excited to use it.
I wanted to clean the cylinder up a bit, so I took the #0000 steel wool and oil to it:
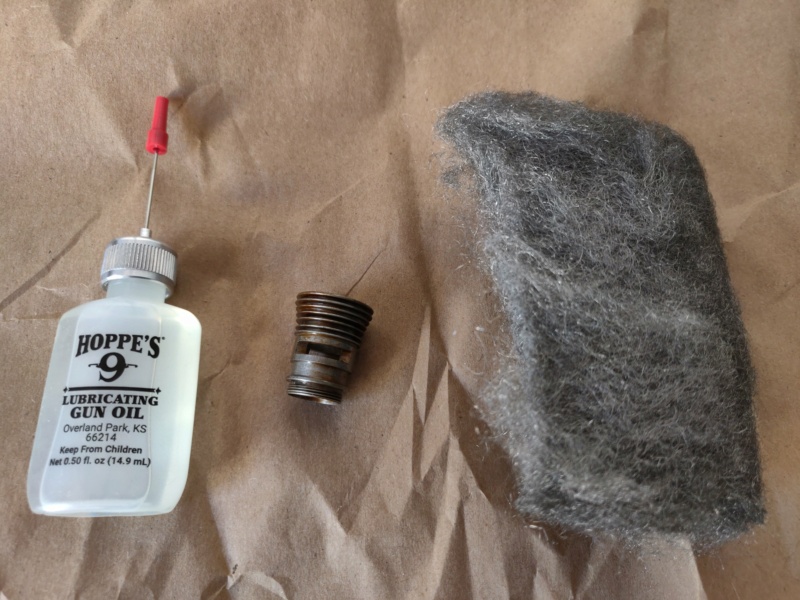
I tore off a piece that I twisted up to be able to get in between the fins:
After cleaning up, I noticed there was a bit of pitting from the rust on one area of the cylinder head:
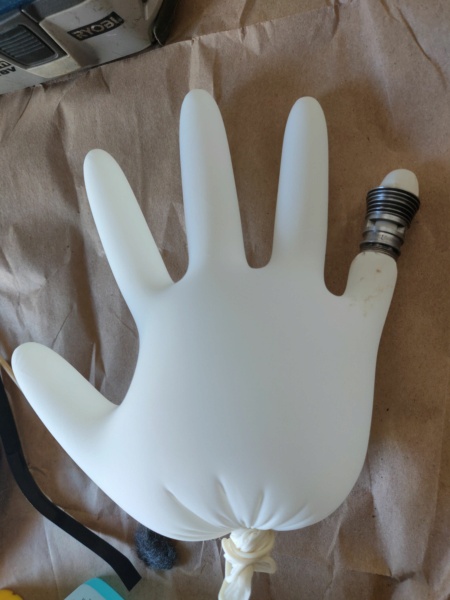
So, I took a big drill bit, and wedged a disposable glove and the cylinder on it.
This way I could sand it much easier.
600 grit was going a bit slow, so I switched to 400, and was able to get an OK amount of the pitting off.
Picture of the sanding setup:

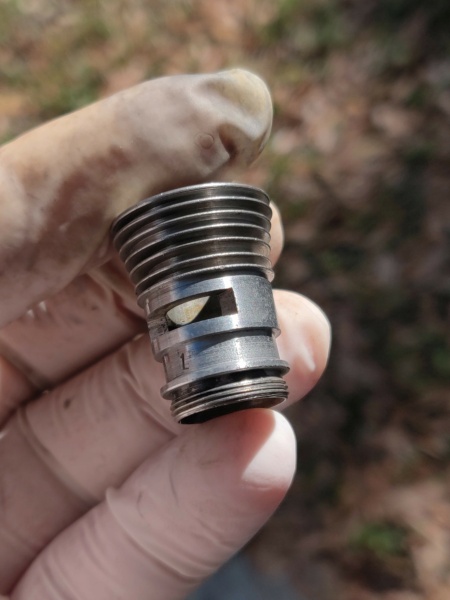
Picture of the cylinder head after sanding:
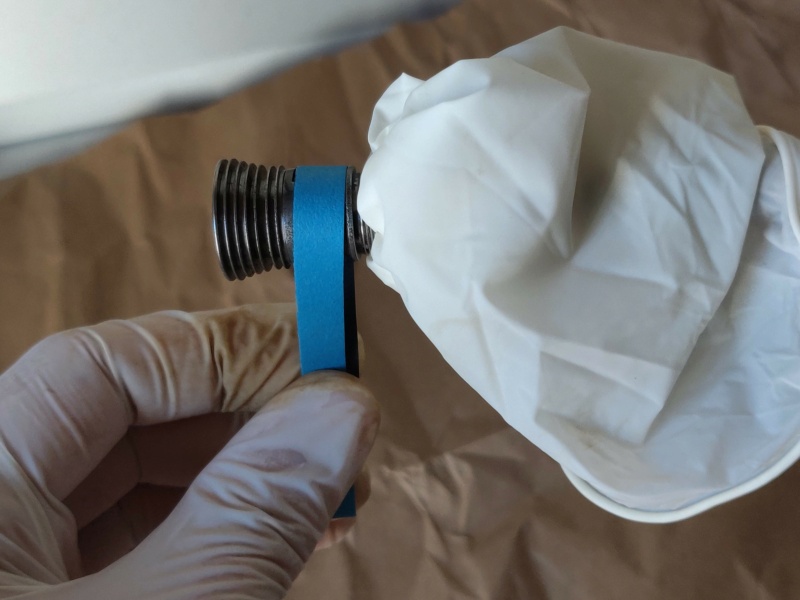
After an acetone bath and scrub, it was time to try the bluing.
I heard a balloon could be inflated in the cylinder to block the bluing liquid from getting on the inside of the cylinder walls.
So I used a disposable glove (she said yes!):
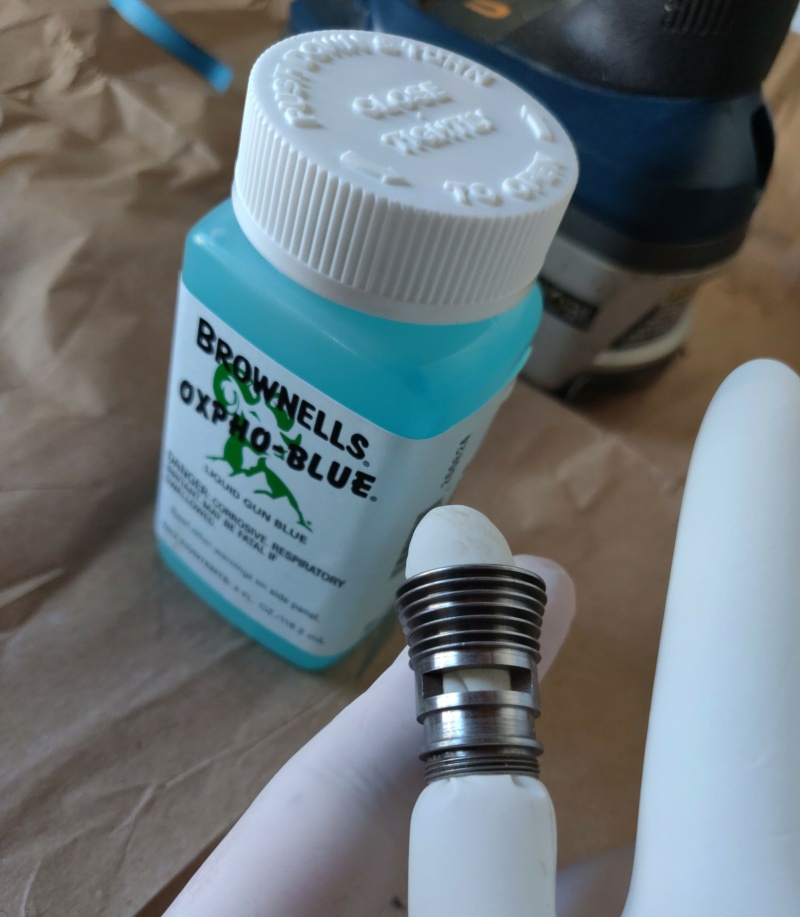
Then after one coat, a rinse with some water, then another acetone bath, I put a coat of oil on and I was done for today.
Picture of cylinder head after one bluing coat and oiling:
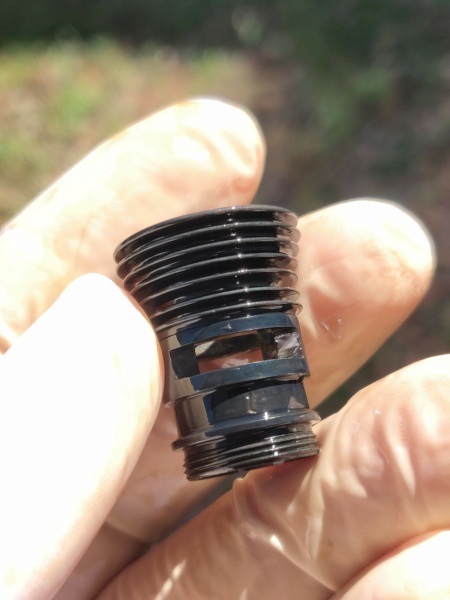
I think the glove did an alright job as far as I can see.
I couldn't really tell with my naked eye in the sunlight if any got inside or not.
I want to take some more #0000 steel wool to the outside of it while the oil is on there, and then do another coat of blue.
My fuel came in today as well!
(Thank you 944_Jim for the recommendation):

Now I think I need to order some gaskets, glow heads, etc. as well as some fuel line and whatever else I could use to try and start this.
A little more work to do, but not too far off!
Bretherman- Moderate Poster
- Posts : 23
Join date : 2021-01-09
Location : Florida
Re: Getting Ready to Attempt some Restorations - Newbie
![]() getback Tue Jan 19, 2021 9:07 am
getback Tue Jan 19, 2021 9:07 am

getback- Top Poster
-
Posts : 10155
Join date : 2013-01-18
Age : 66
Location : julian , NC
Re: Getting Ready to Attempt some Restorations - Newbie
![]() NEW222 Tue Jan 19, 2021 9:23 am
NEW222 Tue Jan 19, 2021 9:23 am
NEW222- Top Poster
- Posts : 3892
Join date : 2011-08-13
Age : 45
Location : oakbank, mb
Do this in coroplast for a 45 minute build you could throw away...
![]() 944_Jim Tue Jan 19, 2021 4:52 pm
944_Jim Tue Jan 19, 2021 4:52 pm
_________________
Never enough time to build them all...always enough time to smash them all!
944_Jim- Diamond Member
-
Posts : 1961
Join date : 2017-02-08
Age : 59
Location : NE MS
Re: Getting Ready to Attempt some Restorations - Newbie
![]() NEW222 Tue Jan 19, 2021 5:29 pm
NEW222 Tue Jan 19, 2021 5:29 pm
944_Jim wrote:If you broke it!
That looks like a nice little model actually. Might have to do some searching later.... Not like I need another, but will be nice when the hangar clears out slowly.
NEW222- Top Poster
- Posts : 3892
Join date : 2011-08-13
Age : 45
Location : oakbank, mb
Re: Getting Ready to Attempt some Restorations - Newbie
![]() OhBee Tue Jan 19, 2021 5:42 pm
OhBee Tue Jan 19, 2021 5:42 pm

OhBee- Platinum Member

- Posts : 698
Join date : 2016-03-23
Age : 73
Location : Minnesota
Re: Getting Ready to Attempt some Restorations - Newbie
![]() rsv1cox Tue Jan 19, 2021 6:28 pm
rsv1cox Tue Jan 19, 2021 6:28 pm
OhBee wrote:Bluing inside a cylinder wont hurt a thing! .....
I agree.
This issue has become a tempest in a teapot. I don't know, I have blued many, burnished the inside and noticed no, repeat no difference in compression before or after. If anything, bluing the inside of the cylinder will serve to protect it, not damage it. Think of the natural varnish that builds up there anyway.
Don't know, but I'm thinking of devising a test rig to measure compression before and after bluing the inside of a cylinder. Something a little more specific than finger feel. Think of an analog tire pressure gauge with a fitting screwed into a modified Cox head for a glow plug and calibrated to measure something in that pressure range.
In the mean time do what you will, it's not going to hurt your cylinder. Nobody blues new or cylinders in good condition anyway, just ratted out rusty old ones that have seen better days.
Got one. Perhaps a better use of that latex glove. Modified cylinder head, cut a finger off, secure it tightly around the top of the cylinder and flip. Observe results in front of a ruler.
rsv1cox- Top Poster
-
Posts : 10633
Join date : 2014-08-18
Location : West Virginia
Re: Getting Ready to Attempt some Restorations - Newbie
![]() Cribbs74 Tue Jan 19, 2021 6:57 pm
Cribbs74 Tue Jan 19, 2021 6:57 pm
That’s what I would consider an extreme case. A little time immersed is probably no big deal, my original post was just a warning not to leave it in too long.

Cribbs74- Moderator
-
Posts : 11897
Join date : 2011-10-24
Age : 50
Location : Tuttle, OK
Re: Getting Ready to Attempt some Restorations - Newbie
![]() Cribbs74 Tue Jan 19, 2021 7:08 pm
Cribbs74 Tue Jan 19, 2021 7:08 pm
Ron
Cribbs74- Moderator
-
Posts : 11897
Join date : 2011-10-24
Age : 50
Location : Tuttle, OK
Re: Getting Ready to Attempt some Restorations - Newbie
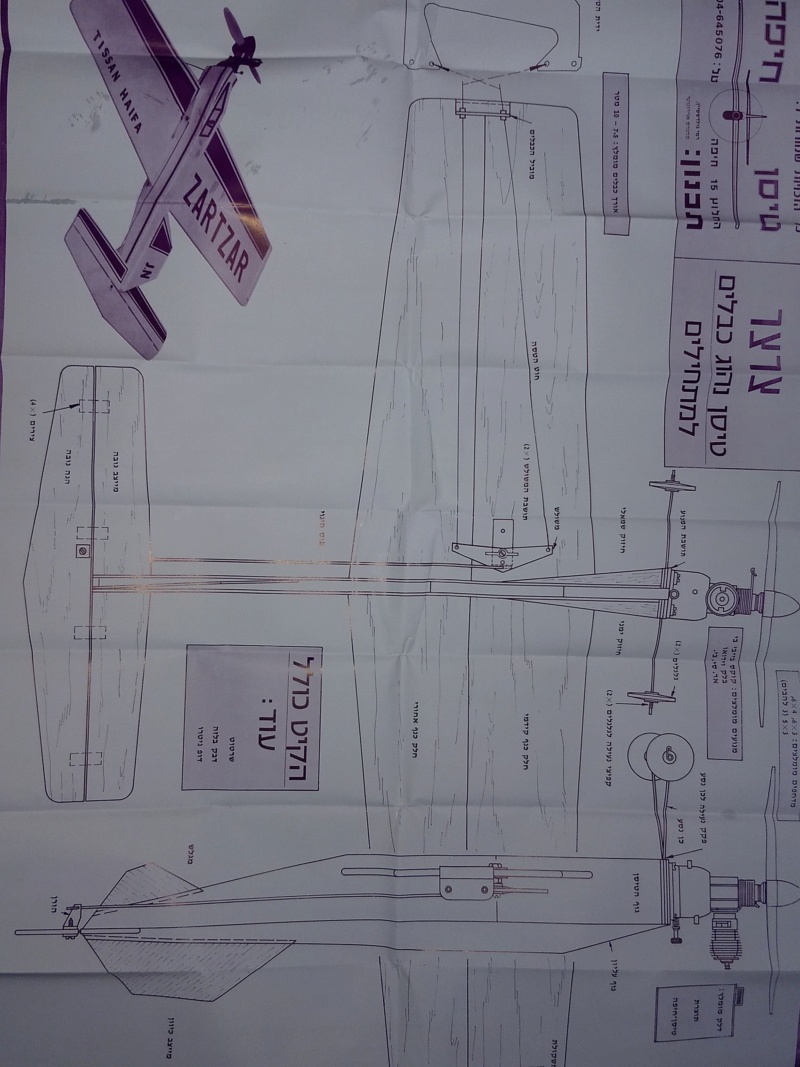
![]() 944_Jim Tue Jan 19, 2021 7:28 pm
944_Jim Tue Jan 19, 2021 7:28 pm
That's a commercial kit out of Isreal. I won't post the digitized full-size copy on any of the plans sites. Hint Hint Hint.
_________________
Never enough time to build them all...always enough time to smash them all!
944_Jim- Diamond Member
-
Posts : 1961
Join date : 2017-02-08
Age : 59
Location : NE MS
Re: Getting Ready to Attempt some Restorations - Newbie
![]() OhBee Tue Jan 19, 2021 8:26 pm
OhBee Tue Jan 19, 2021 8:26 pm
OhBee- Platinum Member
- Posts : 698
Join date : 2016-03-23
Age : 73
Location : Minnesota
Re: Getting Ready to Attempt some Restorations - Newbie
![]() Levent Suberk Tue Jan 19, 2021 11:42 pm
Levent Suberk Tue Jan 19, 2021 11:42 pm
https://www.google.com/url?sa=t&source=web&rct=j&url=https://www.brownells.com/userdocs/learn/Inst-546forWeb.pdf&ved=2ahUKEwjLoeW05anuAhUL6aQKHdwHCwQQFjAAegQIARAB&usg=AOvVaw2hA_6GltO2tXdTwjCsJ0of

Levent Suberk- Diamond Member
- Posts : 2205
Join date : 2017-12-24
Location : Türkiye
Re: Getting Ready to Attempt some Restorations - Newbie
![]() gkamysz Wed Jan 20, 2021 3:29 pm
gkamysz Wed Jan 20, 2021 3:29 pm
Cribbs74 wrote:The case is anodized and is hardened by that process.
Only colored cases are anodized. At least, I haven't seen a natural case that was anodized. The plain aluminum cases can wear quickly, which is why anodized Black Widow or Golden Bee cases were favored for Mouse.

gkamysz- Gold Member

- Posts : 380
Join date : 2018-02-22
Location : Chicagoland
Re: Getting Ready to Attempt some Restorations - Newbie
![]() Cribbs74 Wed Jan 20, 2021 4:11 pm
Cribbs74 Wed Jan 20, 2021 4:11 pm
https://www.coxengineforum.com/t6032-how-is-anodizing-done?highlight=Anodized#76913
Cribbs74- Moderator
-
Posts : 11897
Join date : 2011-10-24
Age : 50
Location : Tuttle, OK
Re: Getting Ready to Attempt some Restorations - Newbie
![]() gkamysz Wed Jan 20, 2021 4:29 pm
gkamysz Wed Jan 20, 2021 4:29 pm
Cribbs74 wrote:Umm no, colored cases are dyed and anodized. Plain cases aren’t dyed, just anodized. Other than color the anodizing process is the same.
I'm familiar with anodize. If you do a conductivity test, you'll find natural cases are conductive and colored cases are not. Natural cases also scratch much more easily compared to colored cases. I don't see any evidence natural cases are anodized. The conductivity is the most telling. I could be convinced that they were conversion coated which would also prevent corrosion, is conductive, and fast(cheap).
It took me a while to finish my post so I didn't see the post above.
gkamysz- Gold Member
- Posts : 380
Join date : 2018-02-22
Location : Chicagoland
Re: Getting Ready to Attempt some Restorations - Newbie
![]() rsv1cox Wed Jan 20, 2021 5:24 pm
rsv1cox Wed Jan 20, 2021 5:24 pm
Cribbs74 wrote:Yeah I did some research to check my memory and since I was glaringly wrong I removed the post so that info wasn’t floating around leading folks astray.
I'm going to bookmark this day Cribbs.
Bob
rsv1cox- Top Poster
-
Posts : 10633
Join date : 2014-08-18
Location : West Virginia
Page 3 of 4 • 1, 2, 3, 4 ![]()
» Cox restorations for the week
» Another attempt to avoid work.
» Micro 12VDC Generator with a Cox .049 Sure Start Diesel Engine
» Plier Mark Repair Attempt