

 Rules
Rules
by batjac Today at 3:06 am
» Three -- sold out (making two more) Cox .010 Carburetors with wrench
by balogh Today at 12:34 am
» Joe Wagners Sioux
by GallopingGhostler Yesterday at 9:03 pm
» Roddie's flat-bottomed boat..
by rsv1cox Yesterday at 6:26 pm
» Happy Anzac Day!
by GallopingGhostler Yesterday at 4:16 pm
» Jim Walkers FireBee - This is going to be fun
by rsv1cox Yesterday at 12:27 pm
» Project Cox .049 r/c & Citabrian Champion
by rdw777 Yesterday at 8:14 am
» Revivng Some Childhood Classics
by getback Yesterday at 7:31 am
» Fox .35 Modifications
by Ken Cook Yesterday at 3:16 am
» Introducing our Cox .049 TD Engines
by getback Fri Apr 26, 2024 6:20 am
» Cox powered jet-pump for model Sprint Boat
by roddie Thu Apr 25, 2024 10:25 pm
» Micro Draco Gets to Fly on a Beautiful Morning.
by rdw777 Thu Apr 25, 2024 8:15 pm


Back to the Yak - Yak-9 Build, Part II
Page 5 of 9 •  1, 2, 3, 4, 5, 6, 7, 8, 9
 ![]()
Re: Back to the Yak - Yak-9 Build, Part II
![]() JPvelo Mon Dec 30, 2013 9:04 am
JPvelo Mon Dec 30, 2013 9:04 am
Jim

JPvelo- Diamond Member

- Posts : 1972
Join date : 2011-12-02
Age : 56
Location : Colorado
Re: Back to the Yak - Yak-9 Build, Part II
![]() RknRusty Mon Dec 30, 2013 5:23 pm
RknRusty Mon Dec 30, 2013 5:23 pm
It's the super light weight stuff for patching holes in the wall or leveling where an area of paint has peeled, like when you fix water damage on the ceiling. I only use it to level dents and dings on the plane. It looks like the builder of my Shoestring used it all over to fill in the weave on whatever fabric he covered the balsa with. It weighs next to nothing. I made fillets on a model with it once and brushed it with CA and it was instantly rock hard... and no longer sandable.JPvelo wrote:Rusty, when you use spackle is it the Home Depot patch a hole in the wall stuff? Is it an overall grain filler or just for larger dents?
Jim
Rusty
_________________
...and never Ever think about how good you are at something...
while you're doing it!
My Hot Rock & Blues Playlist

RknRusty- Rest In Peace

- Posts : 10869
Join date : 2011-08-10
Age : 68
Location : South Carolina, USA
Re: Back to the Yak - Yak-9 Build, Part II
![]() RknRusty Thu Jan 02, 2014 9:05 pm
RknRusty Thu Jan 02, 2014 9:05 pm
I asked the same question at Stunthangar; whether I should use flat color(white on mine) for the under coats for greater adhesion and less weight, and also whether gloss was even necessary on the final coat for a glassy finish if it's going to be covered with clear.roddie wrote:... I was also curious about the weight of "gloss" vs. using a flat finish.. only to be top-coated by several thin coats of clear (Lustre-Kote)...
I got one reply from Doc Holiday, but it was only a vague guess. So I suppose I'll have to buy some flat paint and try both on some test pieces, top it with clear and see what it looks like. I already have white gloss paint. That will answer the appearance question, but not the weight/adhesion question.
I was going to Monokote the wing tonight but it got too late. I'll get it done this weekend.
Rusty
_________________
...and never Ever think about how good you are at something...
while you're doing it!
My Hot Rock & Blues Playlist
RknRusty- Rest In Peace
- Posts : 10869
Join date : 2011-08-10
Age : 68
Location : South Carolina, USA
Re: Back to the Yak - Yak-9 Build, Part II
![]() RknRusty Thu Jan 09, 2014 9:19 am
RknRusty Thu Jan 09, 2014 9:19 am
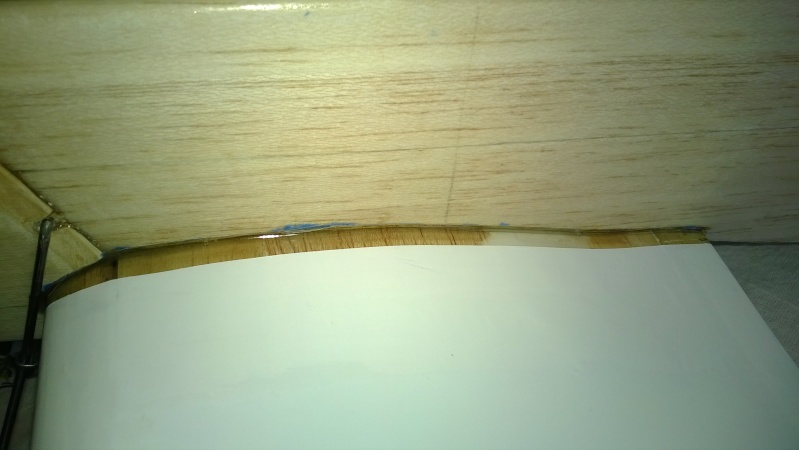
The doublers aren't covered with anything yet. It looks like like there's a sharp angle where it meets the fuse, but it's really a gradual taper. I'm going to smooth it further with some microballoons.
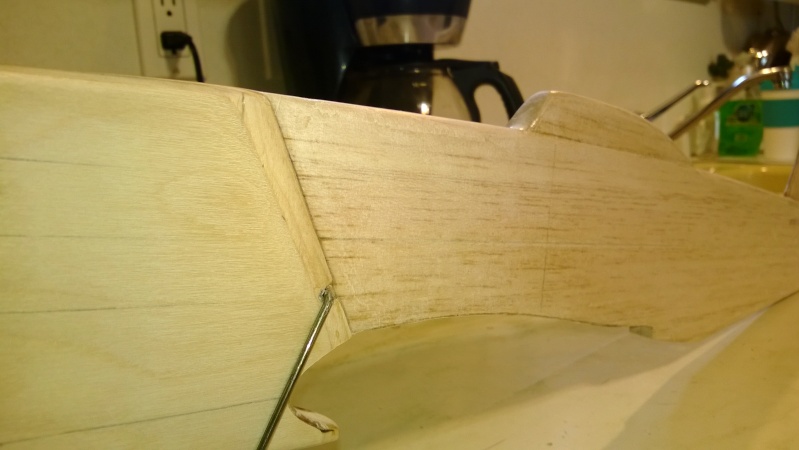
The paper still covers the stab slot which will stay until after painting. You can see some of the tissue overlap along the bottom but can't feel it.
There was a bad dent in the top right behind the doublers, but the spackle and tissue hid it nicely. And the spackling can be seen through the tissue on the front of the canopy, but it's smooth as glass.
I hope to cover the wing and glue it on today. Still haven't done anything to the tail feathers since spackling the rough edges. Later, I'll Monokote the Stab and paint the fin and rudder.
_________________
...and never Ever think about how good you are at something...
while you're doing it!
My Hot Rock & Blues Playlist
RknRusty- Rest In Peace
- Posts : 10869
Join date : 2011-08-10
Age : 68
Location : South Carolina, USA
Mark Boesen- Top Poster

- Posts : 3976
Join date : 2011-09-01
Age : 65
Location : Rockford, Il -

Re: Back to the Yak - Yak-9 Build, Part II
![]() Cribbs74 Thu Jan 09, 2014 1:05 pm
Cribbs74 Thu Jan 09, 2014 1:05 pm

Cribbs74- Moderator


Posts : 11895
Join date : 2011-10-24
Age : 50
Location : Tuttle, OK
Re: Back to the Yak - Yak-9 Build, Part II
![]() RknRusty Thu Jan 09, 2014 1:25 pm
RknRusty Thu Jan 09, 2014 1:25 pm
_________________
...and never Ever think about how good you are at something...
while you're doing it!
My Hot Rock & Blues Playlist
RknRusty- Rest In Peace
- Posts : 10869
Join date : 2011-08-10
Age : 68
Location : South Carolina, USA
Re: Back to the Yak - Yak-9 Build, Part II
![]() Cribbs74 Thu Jan 09, 2014 2:09 pm
Cribbs74 Thu Jan 09, 2014 2:09 pm
RknRusty wrote:It better be, I've been fiddling with it since June.
Well, I didn't want to say anything, but since your brought it up...

Cribbs74- Moderator
-
Posts : 11895
Join date : 2011-10-24
Age : 50
Location : Tuttle, OK
Re: Back to the Yak - Yak-9 Build, Part II
![]() RknRusty Sat Jan 11, 2014 11:06 pm
RknRusty Sat Jan 11, 2014 11:06 pm
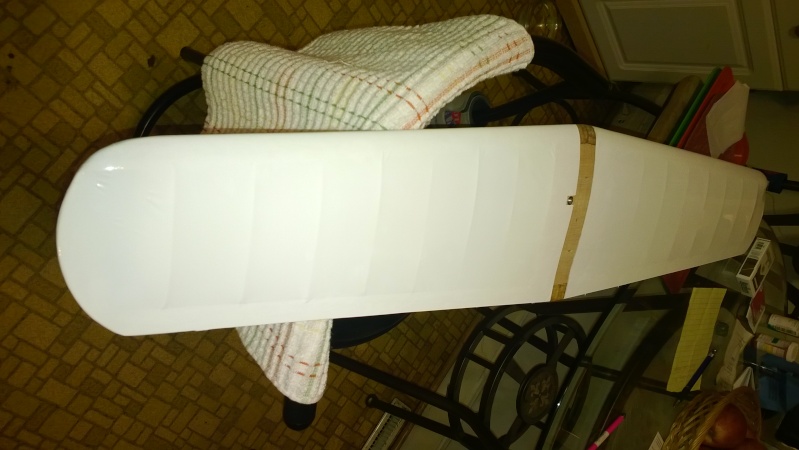
First I checked the wing for any twist. I used a method Ken taught me; took two straight edges and placed one on each end of the wing against the last rib. Look down the length of the wing and eyeball the straight edges and if they're aligned with each other the wing is straight. If they're crisscrossed the wing is twisted and it tells you which way to untwist it. There was a very slight misalignment so I twisted and held the wing and re-checked. After a couple of tries it was straight. A couple of hours later it was still straight, so I started applying the Kote. I got the bottom panels done and will do the top ones tomorrow while watching the Panthers & 49ers.
The Yak has simple curves at the tip and the film went on without much trouble. All one piece without having to cut any botches out or make separate sheets for the wingtips. I got it on really tight and it looks like I already shrunk it, but I have not because I want the whole thing covered before I tighten it up. I don't ever use a gun any more, just the iron with no sock. That's how I did the Shoestring and my last 1/2A, which believe it or not was the Refried Bean.
I'm going to add some aluminum colored strips next to the fuse on top of the center sheeting. Then the red stars.
Here's what it looks like so far.
_________________
...and never Ever think about how good you are at something...
while you're doing it!
My Hot Rock & Blues Playlist
RknRusty- Rest In Peace
- Posts : 10869
Join date : 2011-08-10
Age : 68
Location : South Carolina, USA
Re: Back to the Yak - Yak-9 Build, Part II
![]() RknRusty Wed Jan 15, 2014 11:19 pm
RknRusty Wed Jan 15, 2014 11:19 pm
Some minor twist had returned to the wing so I used a hair dryer to heat the LE center joint, which is epoxied and glassed, and gently twisted it and held it until it cooled. It came out perfect. I used the steel rods from my wing jig as straight edges to check for any criss-cross between the ends and it came out perfect and stayed straight all day.
I finished covering the wing and shrunk the film and it looks great. Since tomorrow's flying has been cancelled, I'll sand and prime the fuse and get that wing glued on. One nice thing about a low winger is it's easy to paint with the wing in place. When it finally starts to look like an airplane I'll take some pictures. That'll be pretty soon.
Rusty
_________________
...and never Ever think about how good you are at something...
while you're doing it!
My Hot Rock & Blues Playlist
RknRusty- Rest In Peace
- Posts : 10869
Join date : 2011-08-10
Age : 68
Location : South Carolina, USA
Cribbs74- Moderator
-
Posts : 11895
Join date : 2011-10-24
Age : 50
Location : Tuttle, OK
Re: Back to the Yak - Yak-9 Build, Part II
![]() RknRusty Mon Jan 20, 2014 4:14 pm
RknRusty Mon Jan 20, 2014 4:14 pm
Okay, Cribbs, hope you haven't been eating that popcorn too fast.Cribbs74 wrote:
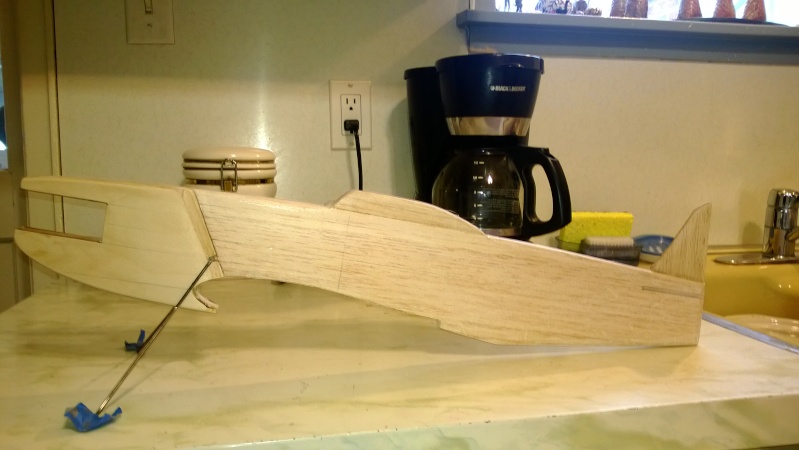
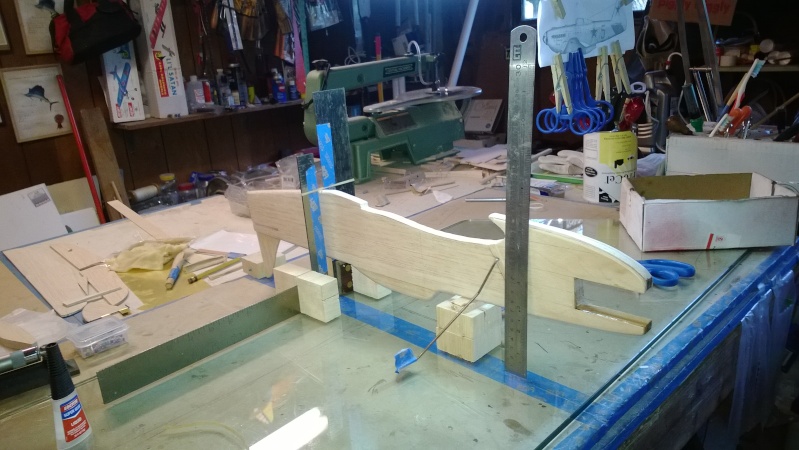
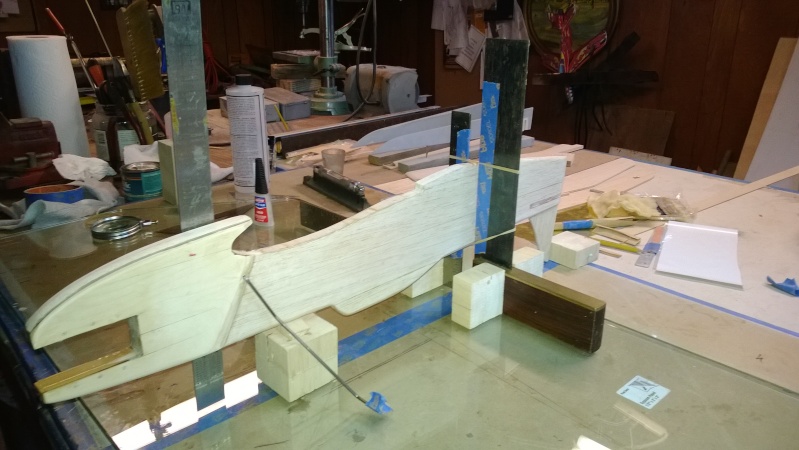
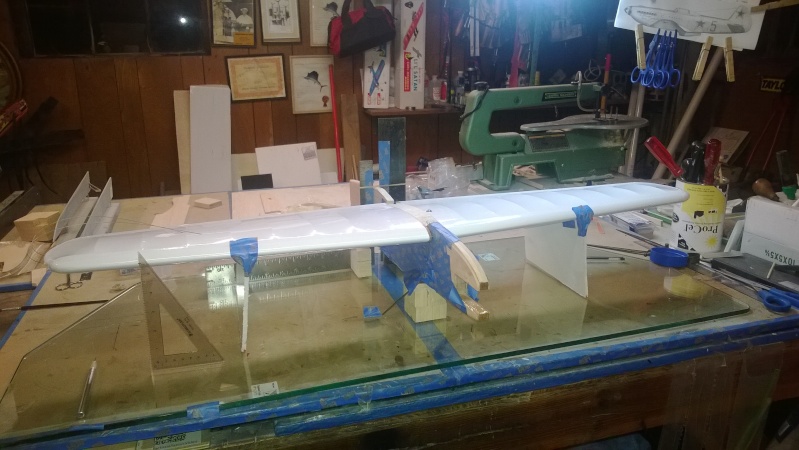
Time to glue the wing. I've been out of commission with a blown elbow since my last installment. That gave me time to think too much about jigging it up and getting the wing in perfectly straight. I came up with all kinds of fancy ideas, but when I went out to the shop, I said the hell with it and improvised. I have the fuse locked in with the lead and trailing incidence lines exactly 144mm off the glass, and all alignment blocks are superglued to the glass. After a quick break I'll lay the wing in and shim it up square and mix some 60 minute epoxy with sawdust to fill the gaps and glue that mother in place... hopefully not upside down.
I have Microballoons I bought for the filets, but I thought that wouldn't be as strong as sawdust for filling gaps in the wing seat. If anyone has an opinion on that, let me know. It'll be an hour or two before I start gluing. I can go with the balloons if y'all think it's structurally sound.
Here's my fancy fuse jig:
_________________
...and never Ever think about how good you are at something...
while you're doing it!
My Hot Rock & Blues Playlist
RknRusty- Rest In Peace
- Posts : 10869
Join date : 2011-08-10
Age : 68
Location : South Carolina, USA
Re: Back to the Yak - Yak-9 Build, Part II
![]() Cribbs74 Mon Jan 20, 2014 4:51 pm
Cribbs74 Mon Jan 20, 2014 4:51 pm
I think a lot would depend on how much gap you have to fill. If you have 80-90% wood to wood contact I wouldn't think you could go wrong either way.
Cribbs74- Moderator
-
Posts : 11895
Join date : 2011-10-24
Age : 50
Location : Tuttle, OK
Re: Back to the Yak - Yak-9 Build, Part II
![]() Ken Cook Mon Jan 20, 2014 8:51 pm
Ken Cook Mon Jan 20, 2014 8:51 pm

Ken Cook- Top Poster
- Posts : 5454
Join date : 2012-03-27
Location : pennsylvania
Re: Back to the Yak - Yak-9 Build, Part II
![]() RknRusty Mon Jan 20, 2014 10:02 pm
RknRusty Mon Jan 20, 2014 10:02 pm
I put some sharpie dots all the way around the wing's edges and checked about 10 times with a square and it's all the same height off the glass. I think I have the best wing I've ever made, mated as straight as I ever have before. This is my first full build of a big plane and I've taken "meticulous" to ridiculous lengths. No way the Skyray will take this much work. So I'm down to attaching control surfaces, tank mount, engine placement, cheek(with cool aluminum exhaust pipes), paint and... well I'm getting there.
Rusty
_________________
...and never Ever think about how good you are at something...
while you're doing it!
My Hot Rock & Blues Playlist
RknRusty- Rest In Peace
- Posts : 10869
Join date : 2011-08-10
Age : 68
Location : South Carolina, USA
Re: Back to the Yak - Yak-9 Build, Part II
![]() Cribbs74 Mon Jan 20, 2014 10:22 pm
Cribbs74 Mon Jan 20, 2014 10:22 pm
I hope it's a ton of fun. Bout time to do some break in runs on that .35
Cribbs74- Moderator
-
Posts : 11895
Join date : 2011-10-24
Age : 50
Location : Tuttle, OK
Re: Back to the Yak - Yak-9 Build, Part II
![]() RknRusty Tue Jan 21, 2014 6:48 pm
RknRusty Tue Jan 21, 2014 6:48 pm
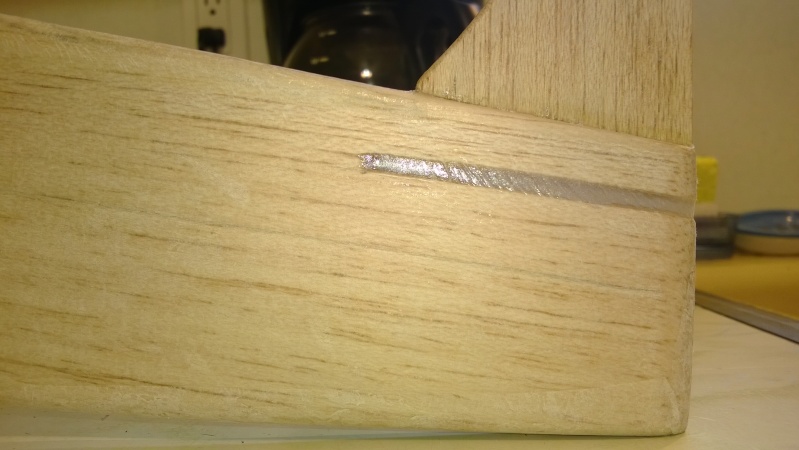
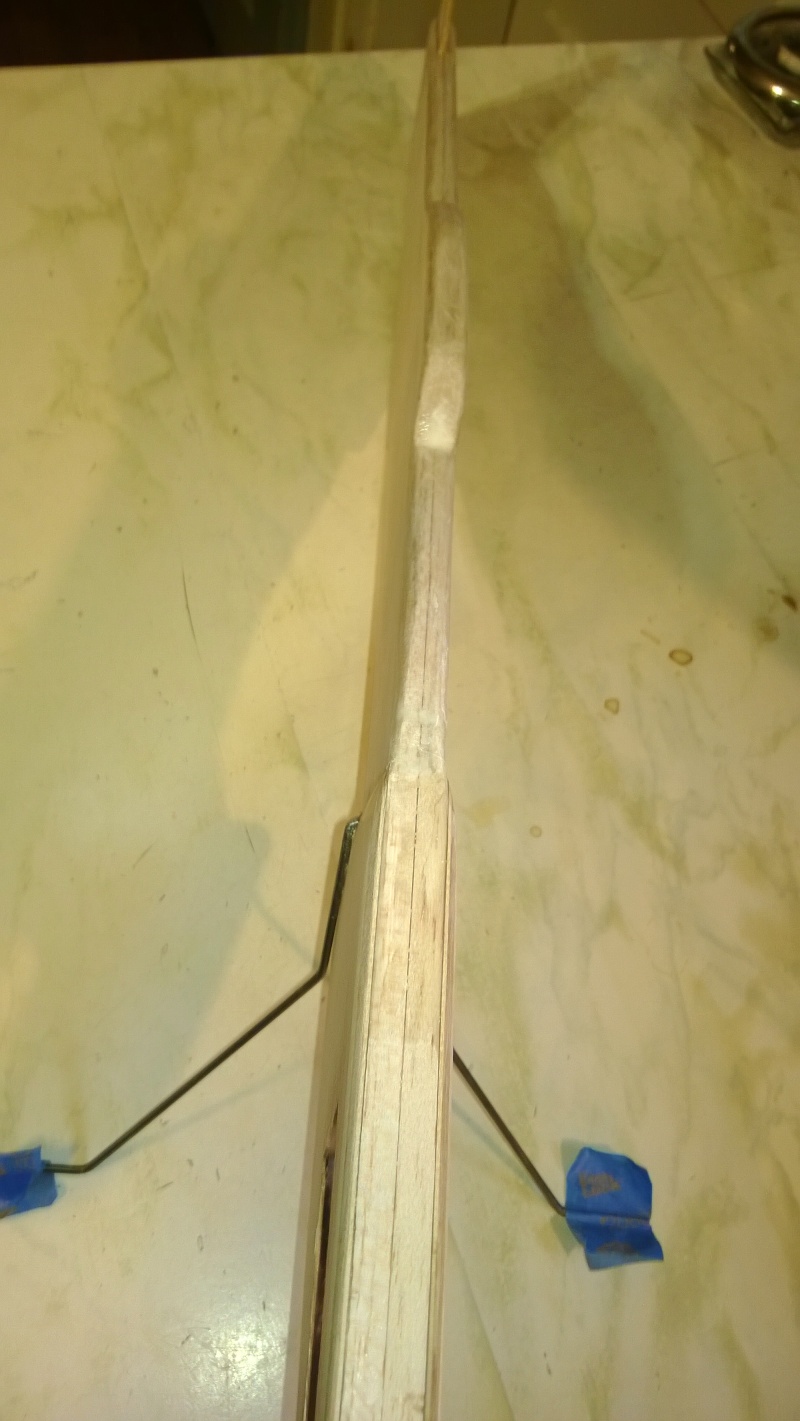
This was the only gap and this tapered shim filled it and forced the wing into alignment. I'll leave the tab in case I want to run a strip under the belly. I'll sand it off after that.
I worked on finishing the flap coupling today and it got too cold to paint. Here she is now.
_________________
...and never Ever think about how good you are at something...
while you're doing it!
My Hot Rock & Blues Playlist
RknRusty- Rest In Peace
- Posts : 10869
Join date : 2011-08-10
Age : 68
Location : South Carolina, USA
JPvelo- Diamond Member
- Posts : 1972
Join date : 2011-12-02
Age : 56
Location : Colorado
Re: Back to the Yak - Yak-9 Build, Part II
![]() Cribbs74 Tue Jan 21, 2014 8:52 pm
Cribbs74 Tue Jan 21, 2014 8:52 pm
Good idea on thin shims, it's something I may do in the future.
Ron
Cribbs74- Moderator
-
Posts : 11895
Join date : 2011-10-24
Age : 50
Location : Tuttle, OK
Re: Back to the Yak - Yak-9 Build, Part II
![]() RknRusty Thu Jan 23, 2014 3:05 pm
RknRusty Thu Jan 23, 2014 3:05 pm
Academically, I knew they would, but it was a relief to actually see it demonstrated on the table. I shaped them and squared them up from what they look like in the picture below. I capped them top and bottom today. The outboard caps extend to accept the flap horn stress. When I put the coupler wire in them to test, they have more than enough back and forth swing, and Zero up and down slop. It won't look like something Al Rabe built, but when it's painted I think it'll still look pretty professional. Tonight the white paint goes on and the ten hinges will be installed.
RknRusty wrote:

_________________
...and never Ever think about how good you are at something...
while you're doing it!
My Hot Rock & Blues Playlist
RknRusty- Rest In Peace
- Posts : 10869
Join date : 2011-08-10
Age : 68
Location : South Carolina, USA
Re: Back to the Yak - Yak-9 Build, Part II
![]() Cribbs74 Thu Jan 23, 2014 7:54 pm
Cribbs74 Thu Jan 23, 2014 7:54 pm
So my question is how is the control arm locked in place once installed? What keeps them from just falling free or pulling out?
Ron
Cribbs74- Moderator
-
Posts : 11895
Join date : 2011-10-24
Age : 50
Location : Tuttle, OK
Re: Back to the Yak - Yak-9 Build, Part II
![]() RknRusty Wed Jan 29, 2014 3:16 pm
RknRusty Wed Jan 29, 2014 3:16 pm
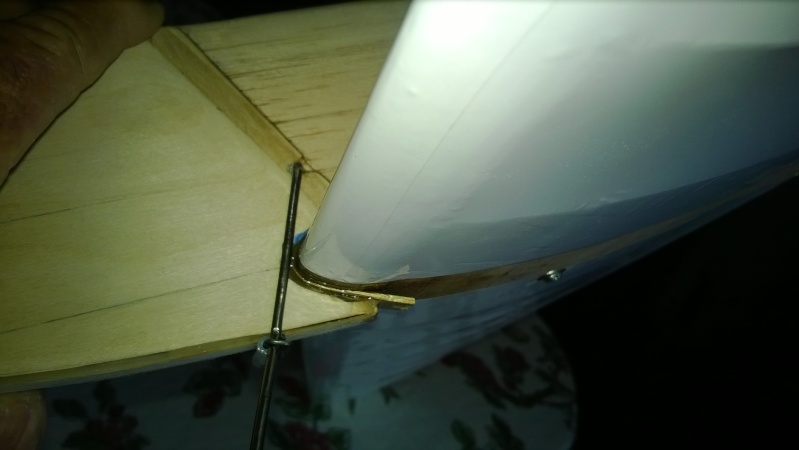
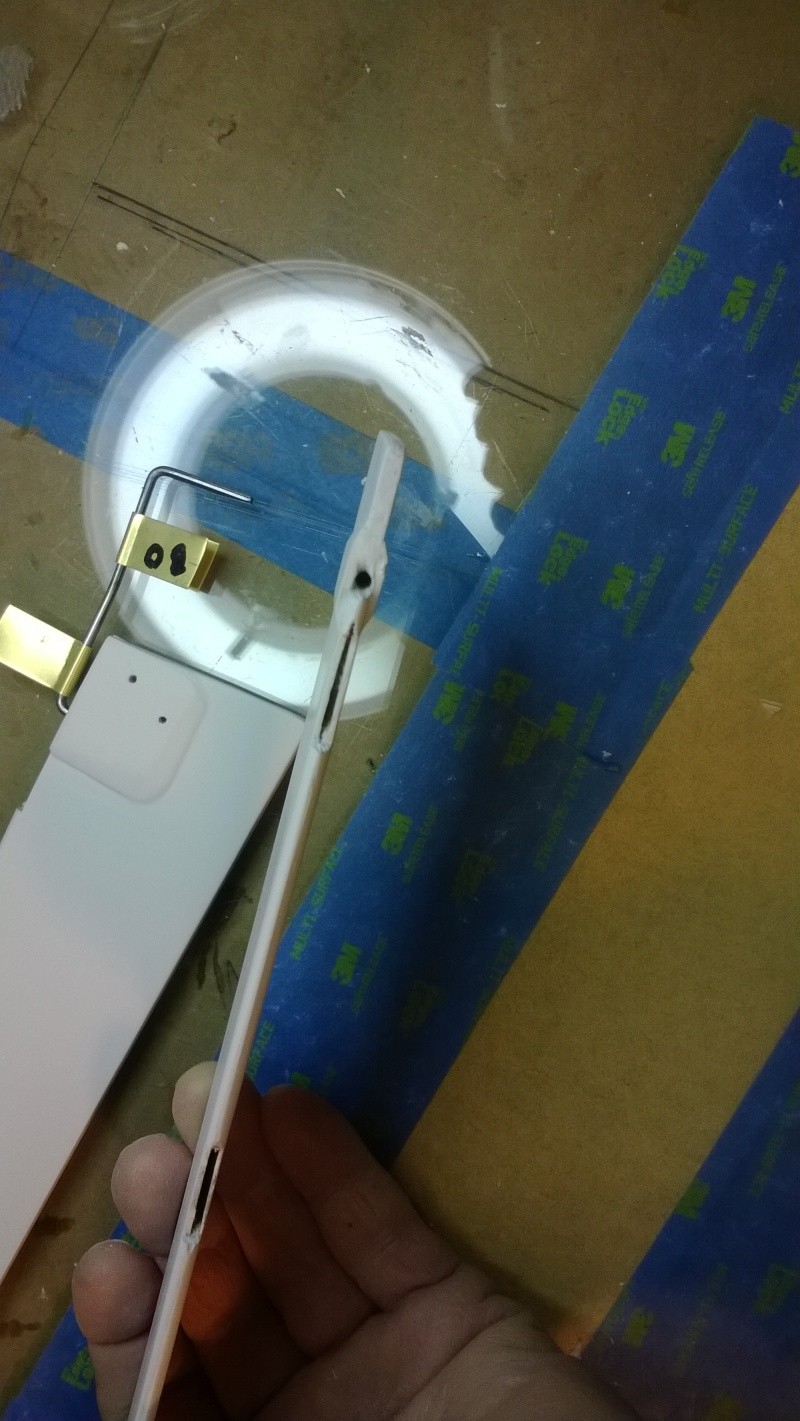
Oh, I never saw your reply, Ron. I was about to post about today's work and found it. Since the coupler wire is not glued in place, I made brass hinges that will be fixed to the trail edge of the main wing. Here's what they look like.Cribbs74 wrote:I am having a bit of trouble understanding what exactly lucky boxes are. From your picture it appears that the flap control arm cutouts are cut out a little larger which I assume is to allow movement in all directions to keep the flaps from binding.
So my question is how is the control arm locked in place once installed? What keeps them from just falling free or pulling out?
Ron
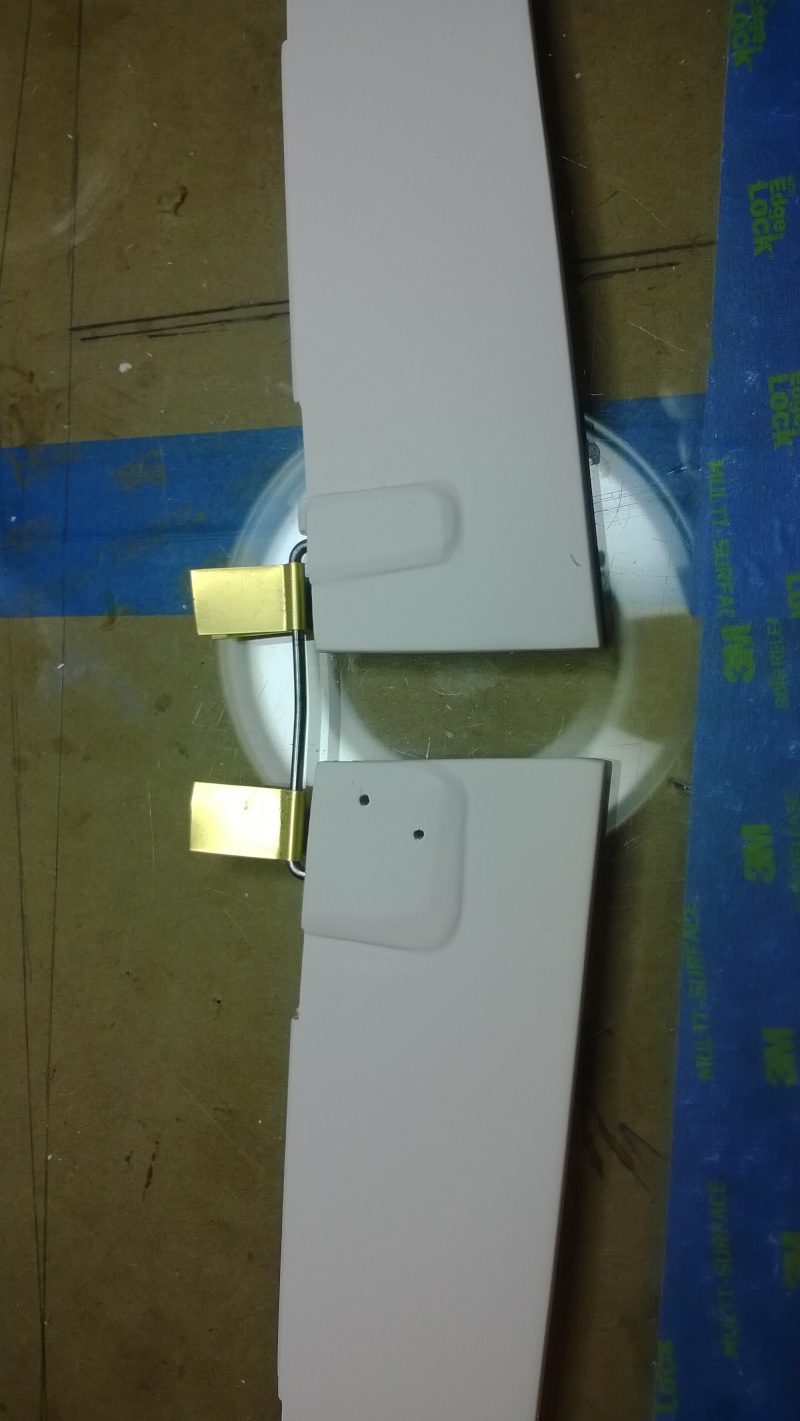
There's the hole the coupler is inserted into.
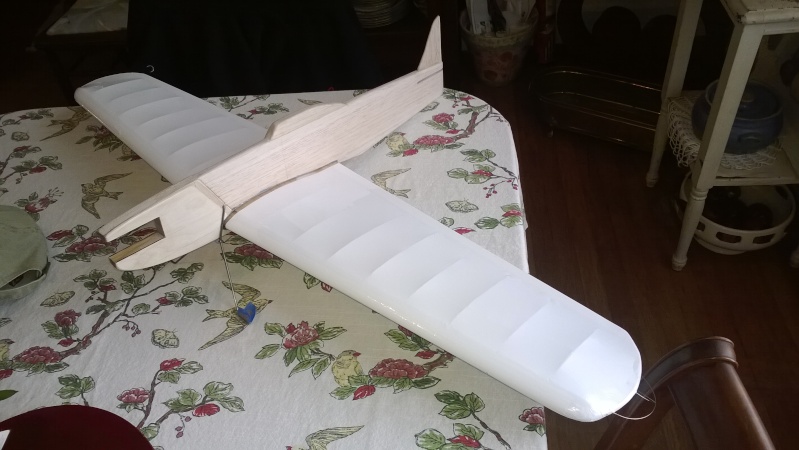
Here it is starting to look like a plane.
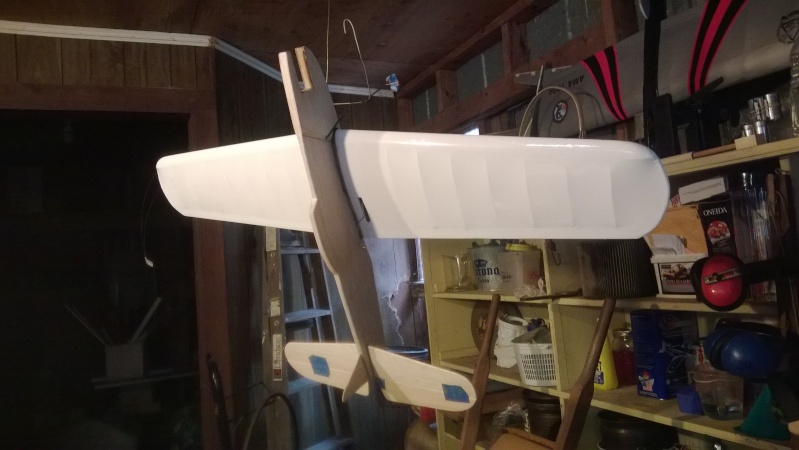
Earlier I had it with the flaps on it too, it looks good. I was getting measurements for the control horn placement. Tonight I'll make a ply reinforcement fot the elevator horn and minwax it. Fter it dries, tomorrow, another snow day for me to play, I'll Monokote the tail feathers, glue them and maybe even hook up the linkages. That's a little ambitious, but I'm on a roll now.
Rusty
_________________
...and never Ever think about how good you are at something...
while you're doing it!
My Hot Rock & Blues Playlist
RknRusty- Rest In Peace
- Posts : 10869
Join date : 2011-08-10
Age : 68
Location : South Carolina, USA
Re: Back to the Yak - Yak-9 Build, Part II
![]() Cribbs74 Wed Jan 29, 2014 5:50 pm
Cribbs74 Wed Jan 29, 2014 5:50 pm
Thanks for the explaination, I see how they function now.
Cribbs74- Moderator
-
Posts : 11895
Join date : 2011-10-24
Age : 50
Location : Tuttle, OK
Re: Back to the Yak - Yak-9 Build, Part II
![]() RknRusty Fri Feb 07, 2014 5:03 pm
RknRusty Fri Feb 07, 2014 5:03 pm
Rusty
_________________
...and never Ever think about how good you are at something...
while you're doing it!
My Hot Rock & Blues Playlist
RknRusty- Rest In Peace
- Posts : 10869
Join date : 2011-08-10
Age : 68
Location : South Carolina, USA
Re: Back to the Yak - Yak-9 Build, Part II
![]() Ken Cook Fri Feb 07, 2014 6:05 pm
Ken Cook Fri Feb 07, 2014 6:05 pm
Ken Cook- Top Poster
- Posts : 5454
Join date : 2012-03-27
Location : pennsylvania
Page 5 of 9 • 1, 2, 3, 4, 5, 6, 7, 8, 9 ![]()
» Part ID: Back Plate Extension?
» Custom 1963 Cox PT-19 and HELLO!
» Shoestring flights - I brought it home! Now, can I do it again?
» Guillows Cessna 150 build circa 1970 (Build Log)