

 Rules
Rules
by rsv1cox Today at 8:04 am
» Project Cox .049 r/c & Citabrian Champion
by getback Today at 7:46 am
» PT-19 Mayhem at Buder Park...a Decade Ago!!!!
by getback Today at 7:43 am
» Roddie's flat-bottomed boat..
by getback Today at 7:17 am
» Three -- sold out (making two more) Cox .010 Carburetors with wrench
by balogh Today at 1:34 am
» Joe Wagners Sioux
by GallopingGhostler Yesterday at 10:03 pm
» Happy Anzac Day!
by GallopingGhostler Yesterday at 5:16 pm
» Jim Walkers FireBee - This is going to be fun
by rsv1cox Yesterday at 1:27 pm
» Revivng Some Childhood Classics
by getback Yesterday at 8:31 am
» Fox .35 Modifications
by Ken Cook Yesterday at 4:16 am
» Introducing our Cox .049 TD Engines
by getback Fri Apr 26, 2024 7:20 am
» Cox powered jet-pump for model Sprint Boat
by roddie Thu Apr 25, 2024 11:25 pm


Back to the Yak - Yak-9 Build, Part II
Page 3 of 9 •  1, 2, 3, 4, 5, 6, 7, 8, 9
 ![]()
Re: Back to the Yak - Yak-9 Build, Part II
![]() RknRusty Mon Aug 05, 2013 12:09 pm
RknRusty Mon Aug 05, 2013 12:09 pm
I got my hinges and slotting kit out and made some practice cuts. Practice is a must. I also cut two new flaps. The old ones were okay, but one was a little short(my fault), so I found some balsa that seems stiff enough for the job and put my new scroll saw to work. Taped 2 feet of 220 sandpaper to my glass and honed them, then marked where the horn and control hinge will lay, and started deciding where to place the nylon hinges. I'll do some slot cutting tonight. The wing is amazingly straight as far as I can tell in every direction, so it should fly right.
The weather looks good for tomorrow morning, so I might go out and do a few practice patterns with the SS. I'll try to remember to turn the camera on this time.
Rusty
_________________
...and never Ever think about how good you are at something...
while you're doing it!
My Hot Rock & Blues Playlist

RknRusty- Rest In Peace

- Posts : 10869
Join date : 2011-08-10
Age : 68
Location : South Carolina, USA
Time for a question before I commit
![]() RknRusty Tue Aug 06, 2013 11:03 pm
RknRusty Tue Aug 06, 2013 11:03 pm
Ah crap, there's an ashtray in the picture, sorry.
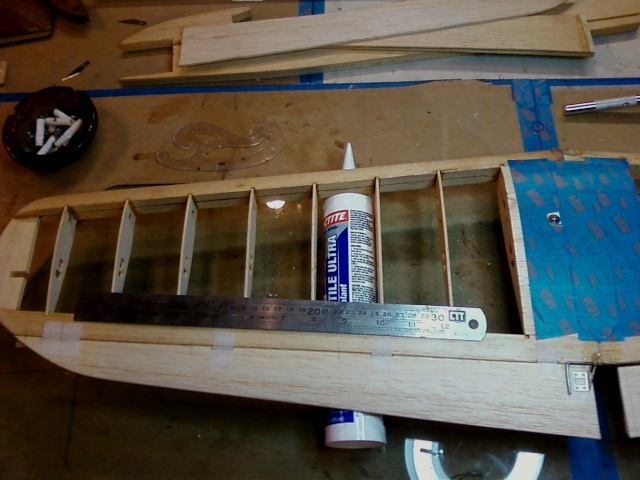
I'm going to dry fit everything to make sure it works before I put the top sheeting on and Monokote it.
All that blue tape is just to prevent scratches and dings.
EDIT: Re flying today; I pre-flighted the SS and then it clouded over and the bottom dropped out of the sky. 2" of rain today. Wayne and I are planning for a Thursday morning excursion to do some practice patterns.
_________________
...and never Ever think about how good you are at something...
while you're doing it!
My Hot Rock & Blues Playlist
RknRusty- Rest In Peace
- Posts : 10869
Join date : 2011-08-10
Age : 68
Location : South Carolina, USA
Re: Back to the Yak - Yak-9 Build, Part II
![]() Cribbs74 Tue Aug 06, 2013 11:27 pm
Cribbs74 Tue Aug 06, 2013 11:27 pm
It's real good that you have Wayne with you. It helps to have someone better than you around. Not that you are bad or anything.......
Looks like the Yak is coming along nicely!
Ron

Cribbs74- Moderator


Posts : 11895
Join date : 2011-10-24
Age : 50
Location : Tuttle, OK
Re: Back to the Yak - Yak-9 Build, Part II
![]() RknRusty Tue Aug 06, 2013 11:50 pm
RknRusty Tue Aug 06, 2013 11:50 pm
Wayne won first place in two events at the Brodak. He's a great coach too. And I am pretty bad. Flying wild random freestyle makes a pilot look more skilled than he is. I didn't know that until I started trying to fly stunts and make it look like it's on rails. The up-side is, you're a lot less likely to crash, just practicing the pattern. I think I wrote above that I'm re-visiting propellers and how I tune this engine. I think that's going to help me be more consistent.Cribbs74 wrote:I think it will be OK, the two at the tip may cause issues if they are not perfectly in line with each other. I would only use one if it were mine though.
It's real good that you have Wayne with you. It helps to have someone better than you around. Not that you are bad or anything.......it makes learning quicker
Looks like the Yak is coming along nicely!
Ron
It is coming along nicely, but more slowly than I'd hoped. I'm just being super careful, trying to be a perfectionist. Once I get this wing out of the way I should pick up the speed and get 'er done. I know I've joked about the wood and instructions as I've been working, so I hope you haven't taken any offense at my wise cracking. I'm enjoying the build and learning a whole lot. Though I rebuilt a good part of the Shoestring, it wasn't like building from the raw kit.
I fondle my Fox Stunt 35 every couple of days and make sure it's oiled up good. That thing has scary compression. I don't use gloves or a stick cranking the Thunder Tiger, but that fox is a bone breaker. I will show it more respect when I stick my hands near it. I've read more about assembling them and checking for binding as you torque the screws, so I'm going to re-check all that before I crank it again. Are you using castor-added Sig 10 in yours? That's what I used for bench running it.
Rusty
_________________
...and never Ever think about how good you are at something...
while you're doing it!
My Hot Rock & Blues Playlist
RknRusty- Rest In Peace
- Posts : 10869
Join date : 2011-08-10
Age : 68
Location : South Carolina, USA
Re: Back to the Yak - Yak-9 Build, Part II
![]() Cribbs74 Wed Aug 07, 2013 12:01 am
Cribbs74 Wed Aug 07, 2013 12:01 am
I think SIG sells some all castor 10% if you want to go that route.
Edit: I don't use a glove or a chicken stick either. I really should however, my Foxes are pretty broken in and very predictable I would use a glove until you get a feel for it. They do some funny stuff and run backward if too rich, then without warning it will pop and run forward. Sometimes they spit the prop during this moment of drama. Ken told me to use a glove as he has been bitten a couple times.
Cribbs74- Moderator
-
Posts : 11895
Join date : 2011-10-24
Age : 50
Location : Tuttle, OK
Re: Back to the Yak - Yak-9 Build, Part II
![]() RknRusty Sat Aug 17, 2013 7:30 pm
RknRusty Sat Aug 17, 2013 7:30 pm

The balsa I bought for the flaps is masquerading as oak. It's super hard, which is good for flaps, but ruined my forked slotting blade on the first hole. I'm using an exacto blade now and it takes some serious muscle to dig into this stuff. I've cut 5 slots so far, and I hope the TE wood is softer. I sure don't want to botch it up. I can cut a new flap if I ruin one, but not the TE. A word of advice, the Dubro slot cutting kit that comes with the 15 pack of hinges is worthless, all except for the hooked digging blade. I couldn't do it without that and so far it's holding up okay.
Okay, break's over. See y'all later.
Last edited by RknRusty on Sat Aug 17, 2013 9:56 pm; edited 2 times in total
_________________
...and never Ever think about how good you are at something...
while you're doing it!
My Hot Rock & Blues Playlist
RknRusty- Rest In Peace
- Posts : 10869
Join date : 2011-08-10
Age : 68
Location : South Carolina, USA
Re: Back to the Yak - Yak-9 Build, Part II
![]() Cribbs74 Sat Aug 17, 2013 8:02 pm
Cribbs74 Sat Aug 17, 2013 8:02 pm
I have had my Dubro tools for years and never had a problem. That must be some wood!
Cribbs74- Moderator
-
Posts : 11895
Join date : 2011-10-24
Age : 50
Location : Tuttle, OK
Re: Back to the Yak - Yak-9 Build, Part II
![]() RknRusty Sat Aug 17, 2013 9:49 pm
RknRusty Sat Aug 17, 2013 9:49 pm
After I get them both fitted up, I'll finish sanding the taper of the flap tip into the curve of the wingtip. I might sew one stitch near the tip end to help prevent it from vibrating. That'll be after I Monokote it.
EDIT: I take back some of the asparagus I cast on the slotting tool. It just doesn't work well on super hard balsa. Sorry Dubro.
_________________
...and never Ever think about how good you are at something...
while you're doing it!
My Hot Rock & Blues Playlist
RknRusty- Rest In Peace
- Posts : 10869
Join date : 2011-08-10
Age : 68
Location : South Carolina, USA
Re: Back to the Yak - Yak-9 Build, Part II
![]() Cribbs74 Sun Aug 18, 2013 3:04 pm
Cribbs74 Sun Aug 18, 2013 3:04 pm
Asparagus...
that's a new one for me.
Cribbs74- Moderator
-
Posts : 11895
Join date : 2011-10-24
Age : 50
Location : Tuttle, OK
Re: Back to the Yak - Yak-9 Build, Part II
![]() RknRusty Sun Aug 18, 2013 3:09 pm
RknRusty Sun Aug 18, 2013 3:09 pm
Cribbs74 wrote:Excellent work!!!
Asparagus...
Never heard the term, "Casting Aspersions"? Kinky Friedman used to sing ... Ain't nobody castin' asparagus on me... in one of his songs. I'll have to put that on in my sig next time. I wonder if anybody ever listens to my songs of the week._________________
...and never Ever think about how good you are at something...
while you're doing it!
My Hot Rock & Blues Playlist
RknRusty- Rest In Peace
- Posts : 10869
Join date : 2011-08-10
Age : 68
Location : South Carolina, USA
Re: Back to the Yak - Yak-9 Build, Part II
![]() RknRusty Sun Nov 10, 2013 8:11 pm
RknRusty Sun Nov 10, 2013 8:11 pm
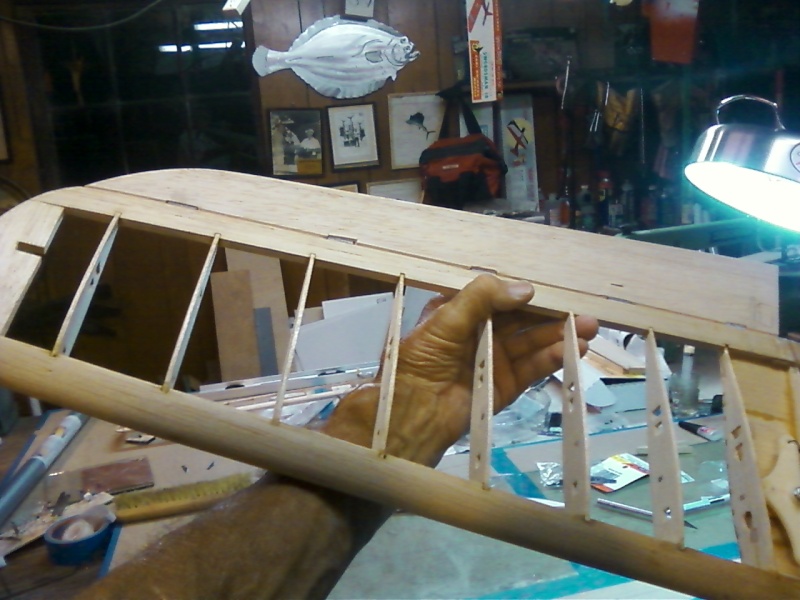
I've put in a few hours since yesterday beginning to finish the Yak wing. I finished opening up the hinge slots on the inboard TE and fit the flaps in place so I could finish sanding the tapered ends to blend in with the wingtips. I also had to file out the hinge grooves for the control lever. This has been a point of some extra thought, due to the mechanics of hinging a flap that has a forward swept hinge line.
When a lever swings a flap or door or anything with an angled hinge line, if there is no lateral relief the hinge will bind and the flap, door or whatever will bind and twist. It took me a while to wrap my head around that problem, and many people advised me to do many different things. Some said, fix the flaps and don't use them. But I've been wanting a flapped plane, so I'm going to make it work. Some said, just glue them in place, it'll work fine. But at best, I think it would stiffen the controls. Others had exotic solutions, such as "Lucky Boxes," which allow lateral relief of the levers without introducing vertical slop. I opted for an in-between idea, which won't be as pretty, but will be functional. I will cut the grooves deep enough that the heavy lever wire is flush with the surface of the under side of the flap, and shape the groove like a narrow triangle wide enough approaching the ends, that when the flap deflects, the levers can have some play and not bind. I'll harden the wood in the cutout with epoxy so the levers hopefully won't wear through and come busting out, and cover them with some epoxy painted ply caps. I'll post pictures before I put it all together. It sounds goofy, but I think it'll work.
Today I finished installing and bracing the bellcrank, put new .028" leadout wires on it, and started covering it with the center sheeting. Just now, looking at the pictures, I hope my bend in the control wire isn't in the way of the exit hole in the sheeting. Luckily I can still remove the wire, because that screw and nut ain't ever coming apart again. It's all epoxied and locked in place. So here are the pictures of where I left it for the day. The flaps are covered with primer and ready for sanding and painting prior to gluing and pinning the hinges in place.


_________________
...and never Ever think about how good you are at something...
while you're doing it!
My Hot Rock & Blues Playlist
RknRusty- Rest In Peace
- Posts : 10869
Join date : 2011-08-10
Age : 68
Location : South Carolina, USA
Re: Back to the Yak - Yak-9 Build, Part II
![]() Cribbs74 Sun Nov 10, 2013 10:22 pm
Cribbs74 Sun Nov 10, 2013 10:22 pm
I never perceived such a thing would be an issue. It makes sense though. I am not sure I fully understand your solution.
How was it done originally? What does the kit say to do? If you posted about this before I apologize I must have missed it.
Ron
Cribbs74- Moderator
-
Posts : 11895
Join date : 2011-10-24
Age : 50
Location : Tuttle, OK
Re: Back to the Yak - Yak-9 Build, Part II
![]() RknRusty Sun Nov 10, 2013 11:07 pm
RknRusty Sun Nov 10, 2013 11:07 pm
Rusty
_________________
...and never Ever think about how good you are at something...
while you're doing it!
My Hot Rock & Blues Playlist
RknRusty- Rest In Peace
- Posts : 10869
Join date : 2011-08-10
Age : 68
Location : South Carolina, USA
Re: Back to the Yak - Yak-9 Build, Part II
![]() Cribbs74 Sun Nov 10, 2013 11:41 pm
Cribbs74 Sun Nov 10, 2013 11:41 pm
With the Clown when set up with full deflection it flares during maneuvers. It looks weird, but it's what it does. I have set the flaps to move less than the elevator and it does much better.
If you think you can make it better go for it. These older flapped designs weren't the best.
Cribbs74- Moderator
-
Posts : 11895
Join date : 2011-10-24
Age : 50
Location : Tuttle, OK
Re: Back to the Yak - Yak-9 Build, Part II
![]() RknRusty Sun Nov 17, 2013 12:56 am
RknRusty Sun Nov 17, 2013 12:56 am
I made the grooves triangular, wider at the top and deep enough to contain the hinge so that it's flush with the surface. Uglier than I meant for it to be, but I taped it up to the TE and tested it and it works.

Here's the hinge laying in the groove. It needs a slight re-shaping. I will secure the pivot point to the TE with a brass loop. When the flaps deflect the hinge arms can slide back and forth to allow free movement. I will harden the inside of the groove and cap it with a rectangle of plywood. This will be on the underside of the flap.

Rusty
_________________
...and never Ever think about how good you are at something...
while you're doing it!
My Hot Rock & Blues Playlist
RknRusty- Rest In Peace
- Posts : 10869
Join date : 2011-08-10
Age : 68
Location : South Carolina, USA
Re: Back to the Yak - Yak-9 Build, Part II
![]() pkrankow Sun Nov 17, 2013 11:09 am
pkrankow Sun Nov 17, 2013 11:09 am
Just a thought. I don't remember how my dad did flaps without a dead straight TE.
Another thought is to use independent controls so the flaps can move separately. You can run the wide through he fuse for one side, and connect it to a trailing link off the control horn on the other flap. You are far enough along I would expect you don't want to significantly change the approach.
Phil

pkrankow- Top Poster

- Posts : 3025
Join date : 2012-10-02
Location : Ohio
Re: Back to the Yak - Yak-9 Build, Part II
![]() roddie Sun Nov 17, 2013 12:01 pm
roddie Sun Nov 17, 2013 12:01 pm
Rog
http://www.clstunt.com/htdocs/dc/dcboard.php?az=set_linear_mode&forum=103&page=3&topic_id=209898&prev_page=show_topic

roddie- Top Poster
- Posts : 8271
Join date : 2013-07-17
Age : 64
Location : N. Smithfield, Rhode Island -

Re: Back to the Yak - Yak-9 Build, Part II
![]() RknRusty Sun Nov 17, 2013 2:25 pm
RknRusty Sun Nov 17, 2013 2:25 pm
I'm glad I'll be starting on the rest of the plane soon. The only real challenge is to mount the wing with no incidence, since the cutout doesn't match the airfoil shape. It fits a wider contour, so I'll tack it in place and wedge Balsa sheet in the gap to get it aligned.
Rusty
_________________
...and never Ever think about how good you are at something...
while you're doing it!
My Hot Rock & Blues Playlist
RknRusty- Rest In Peace
- Posts : 10869
Join date : 2011-08-10
Age : 68
Location : South Carolina, USA
roddie- Top Poster
- Posts : 8271
Join date : 2013-07-17
Age : 64
Location : N. Smithfield, Rhode Island -
Re: Back to the Yak - Yak-9 Build, Part II
![]() Cribbs74 Mon Nov 18, 2013 1:11 am
Cribbs74 Mon Nov 18, 2013 1:11 am
Flapped designs usually have more flap area than needed. I have picture of a flapped Ringmaster that shows what I am referring to.
Edit: Here is a picture, I hope Dee doesn't mind. As you can see the flap was cut on a straight edge out of the existing TE. In your case all you would have to do is glue the flaps on as fixed and then cut the smaller flaps out.

Ron
Cribbs74- Moderator
-
Posts : 11895
Join date : 2011-10-24
Age : 50
Location : Tuttle, OK
Re: Back to the Yak - Yak-9 Build, Part II
![]() roddie Mon Nov 18, 2013 6:36 am
roddie Mon Nov 18, 2013 6:36 am
That's really a nice option... a "tapered" flap... the central wing-section gets the prop-wash anyway... and the rest of the wing's flow is undisturbed. More importantly, it's likely less of an offset for the elevator to cope with, on an "un-flapped" design... IMHOCribbs74 wrote:Another option would be to cut smaller flaps out of the existing flap so they have a straight edge.
Flapped designs usually have more flap area than needed. I have picture of a flapped Ringmaster that shows what I am referring to.
Edit: Here is a picture, I hope Dee doesn't mind. As you can see the flap was cut on a straight edge out of the existing TE. In your case all you would have to do is glue the flaps on as fixed and then cut the smaller flaps out.
Ron
roddie- Top Poster
- Posts : 8271
Join date : 2013-07-17
Age : 64
Location : N. Smithfield, Rhode Island -
Re: Back to the Yak - Yak-9 Build, Part II
![]() RknRusty Mon Nov 18, 2013 3:54 pm
RknRusty Mon Nov 18, 2013 3:54 pm
Rusty
_________________
...and never Ever think about how good you are at something...
while you're doing it!
My Hot Rock & Blues Playlist
RknRusty- Rest In Peace
- Posts : 10869
Join date : 2011-08-10
Age : 68
Location : South Carolina, USA
Re: Back to the Yak - Yak-9 Build, Part II
![]() Cribbs74 Mon Nov 18, 2013 10:02 pm
Cribbs74 Mon Nov 18, 2013 10:02 pm
Your pretty darn smart in my books. I would have built it to bind
Cribbs74- Moderator
-
Posts : 11895
Join date : 2011-10-24
Age : 50
Location : Tuttle, OK
Re: Back to the Yak - Yak-9 Build, Part II
![]() RknRusty Mon Dec 09, 2013 11:42 pm
RknRusty Mon Dec 09, 2013 11:42 pm
Tomorrow is going to be rainy and flying is postponed until Thursday. Watt Moore and Will Davis of the Huntersville gang are coming down to fly with Wayne and me. Watt is the one who built my Clownlikething with the .40 on it. I flew it last week. It's a real floaty plane, kinda wants to go where it wants to go. I didn't like it much. I liked it even less after I knocked the rudder off of it.
Anyway, due to sucky weather the Yak will continue to develop.
Sawdusty Rusty
_________________
...and never Ever think about how good you are at something...
while you're doing it!
My Hot Rock & Blues Playlist
RknRusty- Rest In Peace
- Posts : 10869
Join date : 2011-08-10
Age : 68
Location : South Carolina, USA
Re: Back to the Yak - Yak-9 Build, Part II
![]() RknRusty Tue Dec 10, 2013 10:06 pm
RknRusty Tue Dec 10, 2013 10:06 pm
So after putting the canopy, and doublers on I'm going to sand and seal. I was going to ask about Minwax Polycryllic but saw in the racing thread where Jim used it and liked it. I had planned to buy some dope from Sig, but if the Minwax stuff is good, I'll go with it. I've had a can of it for a year and never used it.
I usually spackle and sand everything smooth, then primer and more sanding before the paint. But if I use the Minwax, should I spackle and sand first, or seal it with the Polycryllic and then spackle the dings?
Rusty
_________________
...and never Ever think about how good you are at something...
while you're doing it!
My Hot Rock & Blues Playlist
RknRusty- Rest In Peace
- Posts : 10869
Join date : 2011-08-10
Age : 68
Location : South Carolina, USA
Page 3 of 9 • 1, 2, 3, 4, 5, 6, 7, 8, 9 ![]()
» Part ID: Back Plate Extension?
» Custom 1963 Cox PT-19 and HELLO!
» Shoestring flights - I brought it home! Now, can I do it again?
» Guillows Cessna 150 build circa 1970 (Build Log)