

 Rules
Rules
by getback Today at 6:17 am
» PT-19 Mayhem at Buder Park...a Decade Ago!!!!
by Kim Today at 6:11 am
» Tired of it all…
by roddie Today at 5:38 am
» Three -- sold out (making two more) Cox .010 Carburetors with wrench
by balogh Today at 12:34 am
» Joe Wagners Sioux
by GallopingGhostler Yesterday at 9:03 pm
» Happy Anzac Day!
by GallopingGhostler Yesterday at 4:16 pm
» Jim Walkers FireBee - This is going to be fun
by rsv1cox Yesterday at 12:27 pm
» Project Cox .049 r/c & Citabrian Champion
by rdw777 Yesterday at 8:14 am
» Revivng Some Childhood Classics
by getback Yesterday at 7:31 am
» Fox .35 Modifications
by Ken Cook Yesterday at 3:16 am
» Introducing our Cox .049 TD Engines
by getback Fri Apr 26, 2024 6:20 am
» Cox powered jet-pump for model Sprint Boat
by roddie Thu Apr 25, 2024 10:25 pm


Back to the Yak - Yak-9 Build, Part II
Page 8 of 9 •  1, 2, 3, 4, 5, 6, 7, 8, 9
 ![]()
Re: Back to the Yak - Yak-9 Build, Part II
![]() RknRusty Fri Feb 28, 2014 5:43 pm
RknRusty Fri Feb 28, 2014 5:43 pm
I have the hardest time flying them that close to the ground.

_________________
...and never Ever think about how good you are at something...
while you're doing it!
My Hot Rock & Blues Playlist

RknRusty- Rest In Peace

- Posts : 10869
Join date : 2011-08-10
Age : 68
Location : South Carolina, USA
Re: Back to the Yak - Yak-9 Build, Part II
![]() Cribbs74 Fri Feb 28, 2014 6:30 pm
Cribbs74 Fri Feb 28, 2014 6:30 pm
RknRusty wrote:Hey Ron, is that an upside down Cardinal in your avie?
I have the hardest time flying them that close to the ground.
You know it!!!!
It's my preferred method of landing when in a stunt coma. That engine runs great, but goes leaner halfway through the tank and the exhaust note does not waver until the engine quits. It makes it hard to know when to level out.
Ron

Cribbs74- Moderator


Posts : 11895
Join date : 2011-10-24
Age : 50
Location : Tuttle, OK
Re: Back to the Yak - Yak-9 Build, Part II
![]() RknRusty Fri Feb 28, 2014 7:57 pm
RknRusty Fri Feb 28, 2014 7:57 pm
 Talk about the attention span of a, 8 year old. It's been known to cause some close calls, but I've been pretty lucky so far. After I re-plumbed the tank recently, it cut off the instant I leveled off after my OH8, the last maneuver. That was close. Now it takes 1/4oz more than it did before.
My Skyray won't lean out until a few laps after I finish the pattern. If I go up to execute just the beginner pattern, I know the gas will run out about 8 laps after the last maneuver. But I only fly one plane, so it's easy to keep track of. If I had a few of them, I might have the same problem you do with untimely surprises.
Rusty
_________________
...and never Ever think about how good you are at something...
while you're doing it!
My Hot Rock & Blues Playlist
RknRusty- Rest In Peace
- Posts : 10869
Join date : 2011-08-10
Age : 68
Location : South Carolina, USA
Re: Back to the Yak - Yak-9 Build, Part II
![]() RknRusty Fri Feb 28, 2014 8:08 pm
RknRusty Fri Feb 28, 2014 8:08 pm
_________________
...and never Ever think about how good you are at something...
while you're doing it!
My Hot Rock & Blues Playlist
RknRusty- Rest In Peace
- Posts : 10869
Join date : 2011-08-10
Age : 68
Location : South Carolina, USA
Re: Back to the Yak - Yak-9 Build, Part II
![]() pkrankow Fri Feb 28, 2014 8:56 pm
pkrankow Fri Feb 28, 2014 8:56 pm
Phil

pkrankow- Top Poster

- Posts : 3025
Join date : 2012-10-02
Location : Ohio
Re: Back to the Yak - Yak-9 Build, Part II
![]() Cribbs74 Fri Feb 28, 2014 9:03 pm
Cribbs74 Fri Feb 28, 2014 9:03 pm
Cribbs74- Moderator
-
Posts : 11895
Join date : 2011-10-24
Age : 50
Location : Tuttle, OK
Re: Back to the Yak - Yak-9 Build, Part II
![]() RknRusty Fri Feb 28, 2014 9:06 pm
RknRusty Fri Feb 28, 2014 9:06 pm
It's a 3/4" PVC tube clamped in a vice. A dowel runs through it with a plate on the end that bolts to the engine mount. There's a jam wedge fixed to the dowel behind the PVC tube so I can lock it in any position 360 degrees around. No pivot though. I'm going to use that when I finish the filets and paint it. Also when I make the rear control linkage.pkrankow wrote:Just mount the whole thing to a pivot so you can get at all sides...
Phil
_________________
...and never Ever think about how good you are at something...
while you're doing it!
My Hot Rock & Blues Playlist
RknRusty- Rest In Peace
- Posts : 10869
Join date : 2011-08-10
Age : 68
Location : South Carolina, USA
Re: Back to the Yak - Yak-9 Build, Part II
![]() RknRusty Fri Feb 28, 2014 9:33 pm
RknRusty Fri Feb 28, 2014 9:33 pm
I've always done that. I just want to pretend like I'm an expert sophisticated builder of fine models. If my friends could see me now. LolCribbs74 wrote:I just hang it by the tailwheel from a string. Engineers.....
Also, let me straighten this engineer thing out. I have an Associate degree in Electronics Engineering Technology from Devry University, Atlanta. So I'm not really an engineer, just a knowitall. In an industrial setting, I would be an engineer's assistant, the hands-on guy that implements the fancy concepts, and figures out why the smoke got out before he/she asked me for help. I actually worked in the office machines industry, Canon equipment to be specific, and later Oce'. First as a field tech, then a master technician/troubleshooter and trainer. I carried a tool box. And later I classroom and lab trained factory techs and also the Japanese techs that came to America to be troubleshooters for stumped dealer techs.
Just setting the record straight. Engineers know a lot more Physics, chemistry and calculus that I learned. My occupational specialties were electromechanical nightmares. I loved it like being paid to play. I got to see the inside of so many types of businesses and industry that I would have never known about otherwise. I even had to work on a machine at Cape Canaveral one time. Stood under the wing of a Space Shuttle, and got to go on a Sperry corp Navy spy ship... they said it wasn't.
Just keeping the smoke in-Rusty
EDIT: I can tell you this much, now that I've used Microballoons twice now, having finished the stab and doubler/cheek edges last night: at least for the 30 minute epoxy I am using, the working time is cut nearly in half before it's unusable. I was able to dump a little alcohol into the cup and rescue the last details. It looks pretty good this morning.
_________________
...and never Ever think about how good you are at something...
while you're doing it!
My Hot Rock & Blues Playlist
RknRusty- Rest In Peace
- Posts : 10869
Join date : 2011-08-10
Age : 68
Location : South Carolina, USA
Re: Back to the Yak - Yak-9 Build, Part II
![]() RknRusty Sun Mar 02, 2014 7:38 pm
RknRusty Sun Mar 02, 2014 7:38 pm
The primer made every imperfection visible. I hope it'll sand out clean, but no matter, I'm spraying the color tomorrow. Great painting weather today, 78 degrees., tomorrow 67. While the white cures, the Reed Speed and Skyray both are getting started.
Now that I've used Microballoons twice, having finished the stab and doubler/cheek edges last night, I've learned that for my 30 minute epoxy, the balloons cut the working time nearly in half before it's unusable. Last night I was able to dump a little alcohol into the cup and rescue the last details. I didn't have the time to make the cheek and doublers quite as pretty as I had hoped, but it still looks pretty good.
Rusty
_________________
...and never Ever think about how good you are at something...
while you're doing it!
My Hot Rock & Blues Playlist
RknRusty- Rest In Peace
- Posts : 10869
Join date : 2011-08-10
Age : 68
Location : South Carolina, USA
Cribbs74- Moderator
-
Posts : 11895
Join date : 2011-10-24
Age : 50
Location : Tuttle, OK
Re: Back to the Yak - Yak-9 Build, Part II
![]() fredvon4 Mon Mar 03, 2014 8:32 am
fredvon4 Mon Mar 03, 2014 8:32 am
Two table spoons into a large mixing cup and a little water to keep it workable for a few minuets (additional water as needed)
Tape out the wing and fuselage then goober the stuff on and shape the fillet with a 6" round nose propeller.
Let set a few seconds then remove the tape and with wet finger blend in the raised lip from the tape removal. Let set a few more minuets and with nose up flood thin CA down top bottom of wing fillet. The spackle soaks up the CA fast and I never need to use insta set spray. This stuff is fine enough grained that I rarely need any sanding other than to blend at trailing edge. Dope, Paint, film, or what ever you finish with sticks to it well
Nothing wrong with epoxy and filler be it talc, microballons, cornstarch, as it usually is a good fuel proof strong joint and nice finishing touch
I find the spackle faster with less mess for the same effect

fredvon4- Top Poster
-
Posts : 4001
Join date : 2011-08-26
Age : 68
Location : Lampasas Texas
Re: Back to the Yak - Yak-9 Build, Part II
![]() RknRusty Mon Mar 03, 2014 10:43 am
RknRusty Mon Mar 03, 2014 10:43 am
Rusty
_________________
...and never Ever think about how good you are at something...
while you're doing it!
My Hot Rock & Blues Playlist
RknRusty- Rest In Peace
- Posts : 10869
Join date : 2011-08-10
Age : 68
Location : South Carolina, USA
Re: Back to the Yak - Yak-9 Build, Part II
![]() RknRusty Wed Mar 05, 2014 10:09 pm
RknRusty Wed Mar 05, 2014 10:09 pm


Too cold and rainy to paint or fly, so I'm spending a seriously anal amount of time detailing every last little thing. Sanding and spackling, filling and blending, and hoping the forecast for nice weather comes true this weekend. By Sunday it should be painted and curing in the house while I move on to my other projects.
Only 25 days to get my Reed Speedster submitted. At least I have an engine for it. I doubt if it'll keep up with anything JP throws at it, but I hope to make up for that with a brilliant fast design. I think I have all of the materials ready to build it.
Rusty
_________________
...and never Ever think about how good you are at something...
while you're doing it!
My Hot Rock & Blues Playlist
RknRusty- Rest In Peace
- Posts : 10869
Join date : 2011-08-10
Age : 68
Location : South Carolina, USA
Re: Back to the Yak - Yak-9 Build, Part II
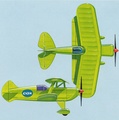
![]() Mark Boesen Wed Mar 05, 2014 10:15 pm
Mark Boesen Wed Mar 05, 2014 10:15 pm
I copied some plans today to used as a rough guides for the planes proportions...but left them at work : ^(...
Yaks looking good, what color you gonna use?
Mark Boesen- Top Poster
- Posts : 3976
Join date : 2011-09-01
Age : 65
Location : Rockford, Il -

Re: Back to the Yak - Yak-9 Build, Part II
![]() RknRusty Wed Mar 05, 2014 10:33 pm
RknRusty Wed Mar 05, 2014 10:33 pm
This is the idea:

_________________
...and never Ever think about how good you are at something...
while you're doing it!
My Hot Rock & Blues Playlist
RknRusty- Rest In Peace
- Posts : 10869
Join date : 2011-08-10
Age : 68
Location : South Carolina, USA
Re: Back to the Yak - Yak-9 Build, Part II
![]() JPvelo Thu Mar 06, 2014 12:36 am
JPvelo Thu Mar 06, 2014 12:36 am
Have you seen these? Not the exact outline around the star but better than no outline.
http://www.majordecals.com/pdf/PAGE-08.pdf
Jim

JPvelo- Diamond Member

- Posts : 1972
Join date : 2011-12-02
Age : 56
Location : Colorado
Re: Back to the Yak - Yak-9 Build, Part II
![]() RknRusty Thu Mar 06, 2014 12:46 am
RknRusty Thu Mar 06, 2014 12:46 am
Close enough, I bookmarked them. Thanks a bunch.JPvelo wrote:Rusty,
Have you seen these? Not the exact outline around the star but better than no outline.
http://www.majordecals.com/pdf/PAGE-08.pdf
Jim
Rusty
_________________
...and never Ever think about how good you are at something...
while you're doing it!
My Hot Rock & Blues Playlist
RknRusty- Rest In Peace
- Posts : 10869
Join date : 2011-08-10
Age : 68
Location : South Carolina, USA
Re: Back to the Yak - Yak-9 Build, Part II
![]() RknRusty Sat Mar 08, 2014 1:52 pm
RknRusty Sat Mar 08, 2014 1:52 pm

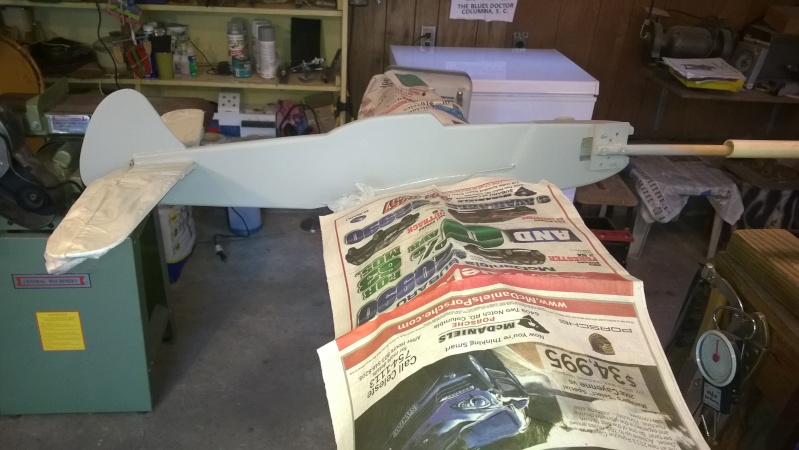
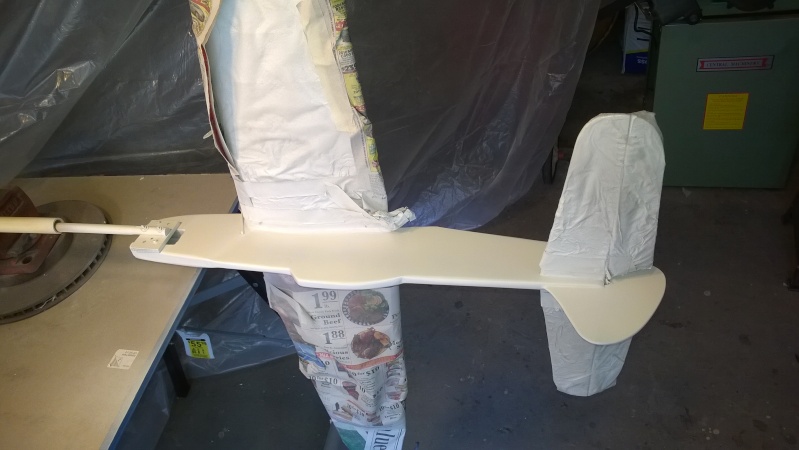
First coat of flat white. Waiting for second and last coat of gloss white in just a few minutes. I'm skipping the Lustrekote, except maybe on the outboard nose. After that I'll add the flap coupler, bottom wing retainer, and its Russian knockoff of the P-51 air scoop.
_________________
...and never Ever think about how good you are at something...
while you're doing it!
My Hot Rock & Blues Playlist
RknRusty- Rest In Peace
- Posts : 10869
Join date : 2011-08-10
Age : 68
Location : South Carolina, USA
Re: Back to the Yak - Yak-9 Build, Part II
![]() Cribbs74 Sat Mar 08, 2014 1:57 pm
Cribbs74 Sat Mar 08, 2014 1:57 pm
Cribbs74- Moderator
-
Posts : 11895
Join date : 2011-10-24
Age : 50
Location : Tuttle, OK
Re: Back to the Yak - Yak-9 Build, Part II
![]() RknRusty Sat Mar 08, 2014 2:11 pm
RknRusty Sat Mar 08, 2014 2:11 pm
I sure hope so. I got a little carried away with the glossy white, but not so much that any runs appeared as far as I can see. It's drying now.Cribbs74 wrote:Cool man, you did a great job on the sanding. Should be a lightweight.
I started cutting the aluminum exhaust pipes. There is a masked area on the cheek where their block will be glued. It's been a good day in the shop so far. 70 degrees and blue sky today. Maybe I'll go fly the Streak in the church yard later on.
_________________
...and never Ever think about how good you are at something...
while you're doing it!
My Hot Rock & Blues Playlist
RknRusty- Rest In Peace
- Posts : 10869
Join date : 2011-08-10
Age : 68
Location : South Carolina, USA
Re: Back to the Yak - Yak-9 Build, Part II
![]() Cribbs74 Sat Mar 08, 2014 2:37 pm
Cribbs74 Sat Mar 08, 2014 2:37 pm
Cribbs74- Moderator
-
Posts : 11895
Join date : 2011-10-24
Age : 50
Location : Tuttle, OK
Re: Back to the Yak - Yak-9 Build, Part II
![]() RknRusty Fri Mar 14, 2014 8:42 pm
RknRusty Fri Mar 14, 2014 8:42 pm
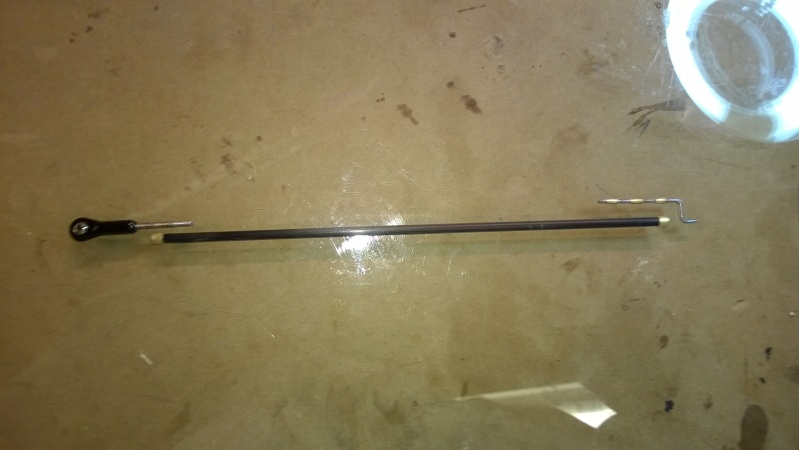
So when I made the long control rod, after gluing, I blocked both ends between weights to keep it from pooting out the pieces. This one will be correctly adjusted when it cures. Just thought I should share that since I know a few of you guys are starting to use CF.
Also I had no fancy barbed Tom Morris type end plugs, so I used three pieces of brass which should capture enough glue between them to retain the 1/16" wire end. Sanded, cleaned with acetone and soldered. The other end is threaded rod and was slightly too tight to go in without splitting the tube, so I collared the rod end, took my 4-40 tap and threaded the inside. Then JB Welded the threaded rod with the ball link already screwed onto it.

The Yak's coming out party with decals and all that pretty cosmetic stuff will come next.
Rusty
_________________
...and never Ever think about how good you are at something...
while you're doing it!
My Hot Rock & Blues Playlist
RknRusty- Rest In Peace
- Posts : 10869
Join date : 2011-08-10
Age : 68
Location : South Carolina, USA
Re: Back to the Yak - Yak-9 Build, Part II
![]() RknRusty Tue Mar 25, 2014 10:21 pm
RknRusty Tue Mar 25, 2014 10:21 pm
Rusty
_________________
...and never Ever think about how good you are at something...
while you're doing it!
My Hot Rock & Blues Playlist
RknRusty- Rest In Peace
- Posts : 10869
Join date : 2011-08-10
Age : 68
Location : South Carolina, USA
Re: Back to the Yak - Yak-9 Build, Part II
![]() Cribbs74 Tue Mar 25, 2014 10:35 pm
Cribbs74 Tue Mar 25, 2014 10:35 pm
Cribbs74- Moderator
-
Posts : 11895
Join date : 2011-10-24
Age : 50
Location : Tuttle, OK
Re: Back to the Yak - Yak-9 Build, Part II
![]() RknRusty Tue Mar 25, 2014 10:39 pm
RknRusty Tue Mar 25, 2014 10:39 pm
I just read at SSW a post Ken made in 2008 saying to start with the balance at the forward leadout. That's about where mine is now, so maybe there's really not a problem. I'm going to run back out to the shop and double check that. I've been going by some posts that said 1.5" behind the LE at the root, but that seems pretty far forward.Cribbs74 wrote:I can't believe it's that tail heavy. Any chance of bring able to slide the engine forward? Have you mounted the tank yet?
_________________
...and never Ever think about how good you are at something...
while you're doing it!
My Hot Rock & Blues Playlist
RknRusty- Rest In Peace
- Posts : 10869
Join date : 2011-08-10
Age : 68
Location : South Carolina, USA
Page 8 of 9 • 1, 2, 3, 4, 5, 6, 7, 8, 9 ![]()
» Part ID: Back Plate Extension?
» Custom 1963 Cox PT-19 and HELLO!
» Shoestring flights - I brought it home! Now, can I do it again?
» Guillows Cessna 150 build circa 1970 (Build Log)