

 Rules
Rules
by rsv1cox Today at 12:27 pm
» Three -- sold out (making two more) Cox .010 Carburetors with wrench
by balogh Today at 11:51 am
» Roddie's flat-bottomed boat..
by roddie Today at 10:11 am
» Project Cox .049 r/c & Citabrian Champion
by rdw777 Today at 8:14 am
» Revivng Some Childhood Classics
by getback Today at 7:31 am
» Fox .35 Modifications
by Ken Cook Today at 3:16 am
» Happy Anzac Day!
by Boats13 Yesterday at 11:03 pm
» Introducing our Cox .049 TD Engines
by getback Yesterday at 6:20 am
» Cox powered jet-pump for model Sprint Boat
by roddie Thu Apr 25, 2024 10:25 pm
» Micro Draco Gets to Fly on a Beautiful Morning.
by rdw777 Thu Apr 25, 2024 8:15 pm
» Jim Walker Firebaby
by rdw777 Thu Apr 25, 2024 8:06 pm
» Hydro-bat by Vic Smeed: engine probs
by GallopingGhostler Thu Apr 25, 2024 5:12 pm


Back to the Yak - Yak-9 Build, Part II
Page 6 of 9 •  1, 2, 3, 4, 5, 6, 7, 8, 9
 ![]()
Re: Back to the Yak - Yak-9 Build, Part II
![]() RknRusty Fri Feb 07, 2014 7:20 pm
RknRusty Fri Feb 07, 2014 7:20 pm
Rusty
_________________
...and never Ever think about how good you are at something...
while you're doing it!
My Hot Rock & Blues Playlist

RknRusty- Rest In Peace

- Posts : 10869
Join date : 2011-08-10
Age : 68
Location : South Carolina, USA
Re: Back to the Yak - Yak-9 Build, Part II
![]() RknRusty Sat Feb 08, 2014 7:54 am
RknRusty Sat Feb 08, 2014 7:54 am
Rusty
_________________
...and never Ever think about how good you are at something...
while you're doing it!
My Hot Rock & Blues Playlist
RknRusty- Rest In Peace
- Posts : 10869
Join date : 2011-08-10
Age : 68
Location : South Carolina, USA
Re: Back to the Yak - Yak-9 Build, Part II
![]() Ken Cook Sat Feb 08, 2014 8:10 am
Ken Cook Sat Feb 08, 2014 8:10 am

Ken Cook- Top Poster

- Posts : 5451
Join date : 2012-03-27
Location : pennsylvania
Re: Back to the Yak - Yak-9 Build, Part II
![]() roddie Sat Feb 08, 2014 9:39 am
roddie Sat Feb 08, 2014 9:39 am

Roddie

roddie- Top Poster
- Posts : 8270
Join date : 2013-07-17
Age : 64
Location : N. Smithfield, Rhode Island -

Re: Back to the Yak - Yak-9 Build, Part II
![]() Mark Boesen Sat Feb 08, 2014 10:31 am
Mark Boesen Sat Feb 08, 2014 10:31 am
Well, I did it and it worked, it worked very well!
Mark Boesen- Top Poster
- Posts : 3976
Join date : 2011-09-01
Age : 65
Location : Rockford, Il -
Re: Back to the Yak - Yak-9 Build, Part II
![]() Ken Cook Sat Feb 08, 2014 12:02 pm
Ken Cook Sat Feb 08, 2014 12:02 pm
Ken Cook- Top Poster
- Posts : 5451
Join date : 2012-03-27
Location : pennsylvania
Re: Back to the Yak - Yak-9 Build, Part II
![]() Mark Boesen Sat Feb 08, 2014 1:12 pm
Mark Boesen Sat Feb 08, 2014 1:12 pm
I'm not sure who it was, I got the impression that its become somewhat of a common option to installing hinges. Like many procedures, there's always several different ways to do the same thing. The glue basically sticks to the wood and locks the hinge in place, any residue on the hinge barrel can be picked off with a xacto knife after drying, if it didn't get wiped off with a damp cloth.
Mark Boesen- Top Poster
- Posts : 3976
Join date : 2011-09-01
Age : 65
Location : Rockford, Il -
Re: Back to the Yak - Yak-9 Build, Part II
![]() RknRusty Mon Feb 10, 2014 11:04 pm
RknRusty Mon Feb 10, 2014 11:04 pm
The flaps are free moving. Very nice fit for a first timer.
I'm not sure I used heavy enough wire from the bellcrank to the flap horn. I can't make it bend by applying pressure to the flap, but maybe I should sleeve it with CF tube. I'm not sure yet how I'm going to make the transition to a 4-40 clevis. I really don't want to cut the sheeting open.
The stab is just stuck in the slot. Still needs wet sanding, clear coat and sewing, and the engine is rubber banded on, but it looks good. And I haven't dropped an exacto knife through the wing yet.
We're about to get a major ice storm, so I probably won't be painting. In fact I expect to lose power tomorrow night or Wednesday.
Rusty
_________________
...and never Ever think about how good you are at something...
while you're doing it!
My Hot Rock & Blues Playlist
RknRusty- Rest In Peace
- Posts : 10869
Join date : 2011-08-10
Age : 68
Location : South Carolina, USA
Re: Back to the Yak - Yak-9 Build, Part II
![]() Cribbs74 Mon Feb 10, 2014 11:41 pm
Cribbs74 Mon Feb 10, 2014 11:41 pm
If you want to transition from wire to to a 4-40 clevis all you need to do is buy a solder 4-40 threaded coupler from the LHS. They work well, just be careful not to dollop any solder balls onto the wing. I use a wet rag for that purpose.
Not much longer to go. Did you decide to ditch the Fox?
Ron

Cribbs74- Moderator


Posts : 11895
Join date : 2011-10-24
Age : 50
Location : Tuttle, OK
Re: Back to the Yak - Yak-9 Build, Part II
![]() RknRusty Tue Feb 11, 2014 2:55 am
RknRusty Tue Feb 11, 2014 2:55 am
I have some 4-40 couplers, just that this wire is thinner than their hole. At the time it seemed like the right stuff. One of the perils if my first 35 sized build. I'll think it over in the light of day first. I don't want to weaken the wing's integrity by cutting the sheeting, and I have plenty of assorted hardware that might solve it for me and be trustworthy. It fit the hole in the bellcrank so I assumed it was okay. That was a long time ago. I have all sorts of different sized threaded rod, couplers, CF and brass tubing. I'll come up with a strong and not too funny looking fix.Cribbs74 wrote:Looks wonderful, I like the way the lucky boxes and hinges worked out. Very clean.
If you want to transition from wire to to a 4-40 clevis all you need to do is buy a solder 4-40 threaded coupler from the LHS. They work well, just be careful not to dollop any solder balls onto the wing. I use a wet rag for that purpose.
Not much longer to go. Did you decide to ditch the Fox?
Ron
No, the Fox is just all oily and on an engine mount. That's the fp25 for the new Skyray. I needed some nose weight so I could prop it on its nose to work on it.
_________________
...and never Ever think about how good you are at something...
while you're doing it!
My Hot Rock & Blues Playlist
RknRusty- Rest In Peace
- Posts : 10869
Join date : 2011-08-10
Age : 68
Location : South Carolina, USA
Re: Back to the Yak - Yak-9 Build, Part II
![]() OVERLORD Tue Feb 11, 2014 4:48 am
OVERLORD Tue Feb 11, 2014 4:48 am
RknRusty wrote:
Rusty, I've been following this thread since the beginning with much interest, in particular the flap construction. I was looking at the picture above and wondered if the U shaped piano wire connecting both flaps shouldn't be straight and not bent as on the picture just because it has 2 hinges. That piano wire cannot articulate normally when fixed to 2 different axis unless you have some play in the hinges. Or do I see that wrong?
Lieven

OVERLORD- Diamond Member

- Posts : 1786
Join date : 2013-03-19
Age : 57
Location : Normandy, France
Re: Back to the Yak - Yak-9 Build, Part II
![]() RknRusty Tue Feb 11, 2014 11:11 am
RknRusty Tue Feb 11, 2014 11:11 am
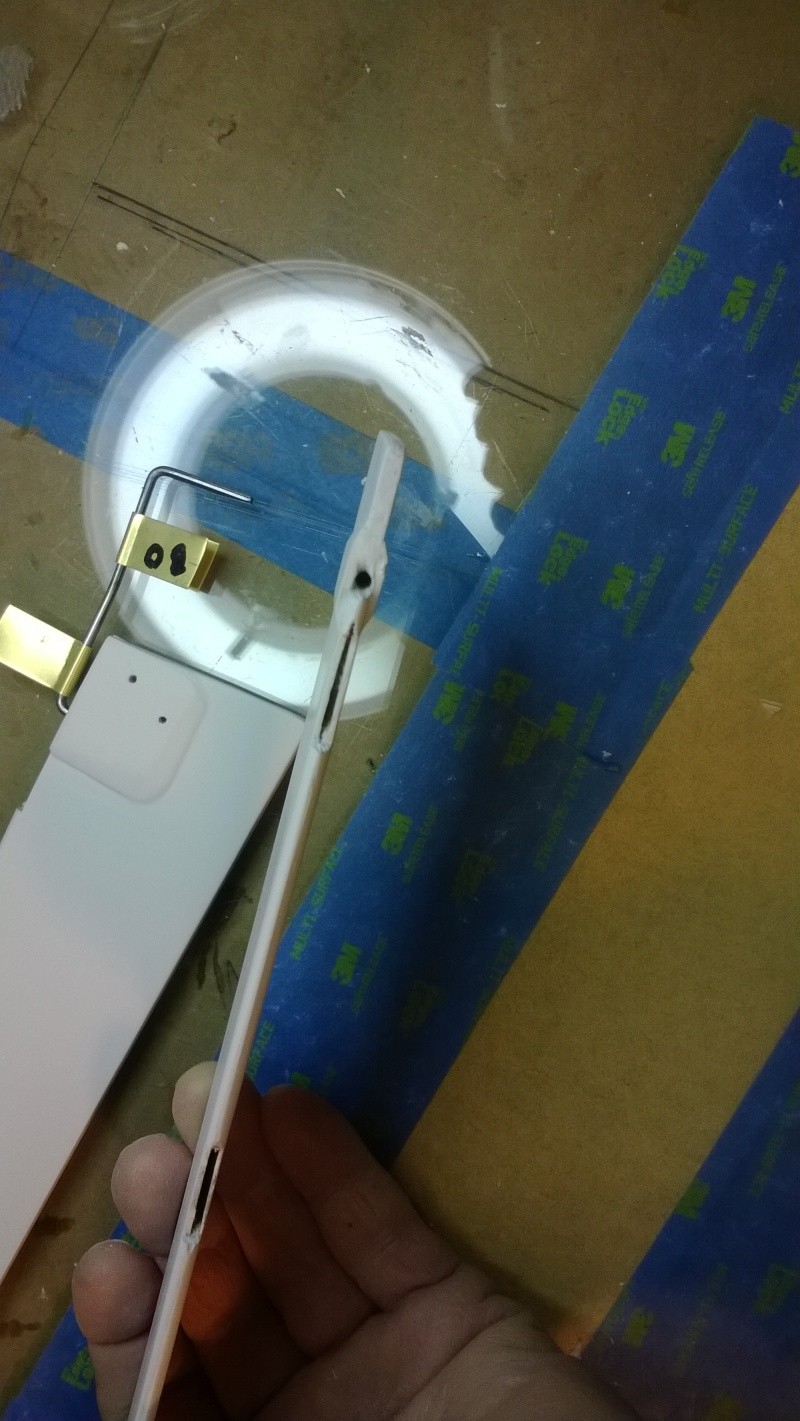
If you're talking about the slight bend between in the center of the wire between the prongs, That is so that it mates flush at the vertex of the angle of the TE... at least in neutral. And yes, it won't rock up and down and stay perfectly flush, but considering the small diameter and width of the two surfaces, and the fairly short throw, there only needs to be a small amount of spare room to keep the shoulders behind each prong from binding against the TE.
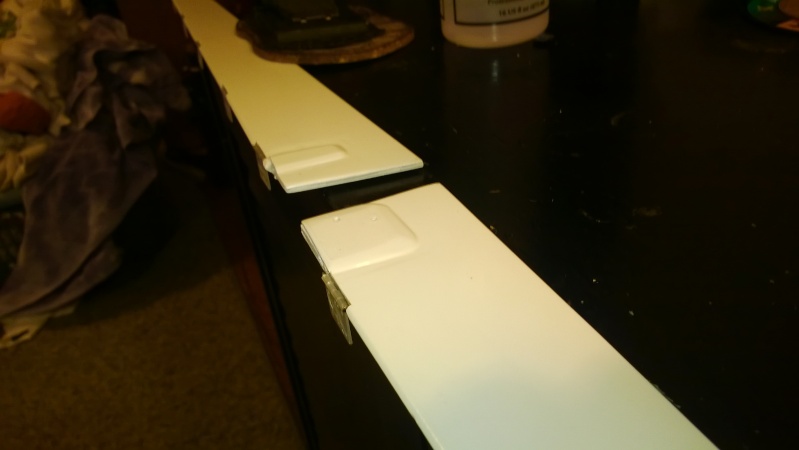
And yes, there is no good "cheap and easy" way to connect two opposing flaps that follow such a forward swept angular hinge line. With a straight TE, it's easy, plug in the coupler and everything moves freely. But Sterling's mission was to make "cheap and easy" kits and this part was meant to work "well enough." A more sophisticated design would have separate control horns and rods to move each flap independently to prevent them from fighting each other for movement. That's where the Lucky Box sort of grooves I cut in the flaps come in.
I never showed a picture of the finished groove, but this is the rough-out:

The triangular groove is allowing the hinge to have lateral "play" as it swings back and forth. There is no glue in there. The caps on top of it as shown in the above post of the finished flap allows no vertical play. That was the first thing I confirmed with a sigh of relief after I put it together.
I hope this answers your question.
Rusty
_________________
...and never Ever think about how good you are at something...
while you're doing it!
My Hot Rock & Blues Playlist
RknRusty- Rest In Peace
- Posts : 10869
Join date : 2011-08-10
Age : 68
Location : South Carolina, USA
Re: Back to the Yak - Yak-9 Build, Part II
![]() RknRusty Tue Feb 11, 2014 11:18 am
RknRusty Tue Feb 11, 2014 11:18 am

_________________
...and never Ever think about how good you are at something...
while you're doing it!
My Hot Rock & Blues Playlist
RknRusty- Rest In Peace
- Posts : 10869
Join date : 2011-08-10
Age : 68
Location : South Carolina, USA
Re: Back to the Yak - Yak-9 Build, Part II
![]() Cribbs74 Tue Feb 11, 2014 12:41 pm
Cribbs74 Tue Feb 11, 2014 12:41 pm
Brass/copper tubing over the existing wire to increase the diameter to have a snug fit with the 4-40 coupler
Or
Solder 4-40 coupler over smaller diameter control wire then wire wrap copper wire overtop of the 4-40 coupler and solder.
Both ways would look clean and give you piece of mind.
Or..... Z bend it and press like you mentioned
Cribbs74- Moderator
-
Posts : 11895
Join date : 2011-10-24
Age : 50
Location : Tuttle, OK
Re: Back to the Yak - Yak-9 Build, Part II
![]() OVERLORD Wed Feb 12, 2014 2:10 am
OVERLORD Wed Feb 12, 2014 2:10 am
Lieven
OVERLORD- Diamond Member
- Posts : 1786
Join date : 2013-03-19
Age : 57
Location : Normandy, France
Re: Back to the Yak - Yak-9 Build, Part II
![]() RknRusty Wed Feb 12, 2014 4:36 am
RknRusty Wed Feb 12, 2014 4:36 am
You're right, and for the same reasons as my other essay. Those were to be retainers to prevent wobble and fly-away as was Ron's concern a ways back. I was hoping that if they were positioned out by the shoulders of the coupler they'd be loose enough not to bind within the limits of throw. But they were clumsy and in the way, so I abandoned them.
As it turns out, everything is snug as a bug in a rug, but with enough room to be free moving. And it will be further blocked in by the yet to be added faux profile air scoop that covers that joint. I feel relieved that if I t try to wiggle the flaps up and down in any way there's no evidence it will be floppy and chattering in flight.
Rusty
_________________
...and never Ever think about how good you are at something...
while you're doing it!
My Hot Rock & Blues Playlist
RknRusty- Rest In Peace
- Posts : 10869
Join date : 2011-08-10
Age : 68
Location : South Carolina, USA
Re: Back to the Yak - Yak-9 Build, Part II
![]() RknRusty Thu Feb 13, 2014 9:21 pm
RknRusty Thu Feb 13, 2014 9:21 pm
The thing that made the link too weak was that I had to jink the wire about a half inch over to meet the horn. This is where it flexed. Had it been straight, it would have been fine.
So I cut it off and soldered this brass tube that will fit the ID of a CF tube. The remaining length of 1.5" to the crank will be plenty stiff enough now. But the next problem is that it's still offset 1/2" to the side of the horn. Here's the first step:

Another problem is that not only does the control rod move front to back, it also moves side to side because of the bellcrank motion. So if I just put a z-bend and wire through the hole in the horn, it may have added some stiffness. So I cut a 5/32" long piece of the same brass that I sleeved the end of the bellcrank wire and soldered it into the top hole of the horn, giving the pushrod some side to side capability. This is the new pushrod passing through the 3/16" brass tube that's soldered into the horn. Notice the 1/2" of play it has for the side to side motion of the rod.:

Now to get to the horn with a straight angle of input. I cut a piece of CF tube that will fit over the above connection. While roughing up the inside I split it with ease. I learned that the ends must be reinforced before doing anything else with it, so brass around each end to hold it together, and then rough up the interior to accept glue. Another brass sleeve just like the one on the crank wire goes on the end of the pushrod and fits into the other end of the CF tube. And here it is all together. Note; this is prior to gluing, and after adjusting for neutral, there is only 1/8" of wire protruding from the end of the CF tube. I should have waited until then to take the photo, because it looks much sturdier that way. I don't think there will be any flex:

I wanted it to be adjustable length, but there is just not enough room to do it without being clunky. I was starting to knock things over. And when I cut the pushrod to length, the end I cut off flew up and punctured the wing, so I postponed JB Welding and aligning neutral for the next visit to the shop. This all looks easy, but it wasn't for me. I fiddled and fooled with it before I fully grasped what I wanted to do, and had a couple of misfires while i was making it up. So that's what I spent my last 5 hours during the great ice storm of 2014 doing.
Rusty
_________________
...and never Ever think about how good you are at something...
while you're doing it!
My Hot Rock & Blues Playlist
RknRusty- Rest In Peace
- Posts : 10869
Join date : 2011-08-10
Age : 68
Location : South Carolina, USA
Re: Back to the Yak - Yak-9 Build, Part II
![]() Cribbs74 Thu Feb 13, 2014 9:41 pm
Cribbs74 Thu Feb 13, 2014 9:41 pm
It will work, but a ball link would be tighter to the control horn and allow the bellcrank to swing through it's range of motion without binding the link.
I consider you a much better builder than myself so please don't think I am being all high and mighty.
Ron
Cribbs74- Moderator
-
Posts : 11895
Join date : 2011-10-24
Age : 50
Location : Tuttle, OK
Re: Back to the Yak - Yak-9 Build, Part II
![]() RknRusty Thu Feb 13, 2014 9:57 pm
RknRusty Thu Feb 13, 2014 9:57 pm
If I'd had an HS I could get to, I would have investigated the idea.
Don't consider me a better builder. By now you have as much experience as I do, at least with this size model. I sure hope I don't run into any other glitches. Hopefully it's just gluing and painting from here on out. I do need to make an adjustable fuel tank mount, but I don't think that'll be a problem.
I have a serious case of Oriental on my mind, with a speed plane and a Skyray between me and it. At least when I get to the Ray, I've already learned some good lessons from the Yak. Just not looking forward to making the rib set, but like everything else, it looks easy.
Rusty
EDIT: I did notice that it is not using that whole half inch of sliding room through the horn bushing, so if I see that it just stays in one happy spot, I may very well end up cutting some of it off and soldering a retainer on the end.
Last edited by RknRusty on Fri Feb 14, 2014 2:22 am; edited 1 time in total
_________________
...and never Ever think about how good you are at something...
while you're doing it!
My Hot Rock & Blues Playlist
RknRusty- Rest In Peace
- Posts : 10869
Join date : 2011-08-10
Age : 68
Location : South Carolina, USA
Re: Back to the Yak - Yak-9 Build, Part II
![]() Cribbs74 Thu Feb 13, 2014 10:11 pm
Cribbs74 Thu Feb 13, 2014 10:11 pm
There is enough room to connect 2 ball links to the same horn. That horn looks to be made for a ball link because the holes are such a good size.
I learned something through this build. Bellcrank final placement is critical.
Anyway, the Oriental will have you flying intermediate in no time. You are a lucky dog!
Cribbs74- Moderator
-
Posts : 11895
Join date : 2011-10-24
Age : 50
Location : Tuttle, OK
Re: Back to the Yak - Yak-9 Build, Part II
![]() RknRusty Thu Feb 13, 2014 10:44 pm
RknRusty Thu Feb 13, 2014 10:44 pm
Cribbs74 wrote:I learned something through this build. Bellcrank final placement is critical.
Anyway, the Oriental will have you flying intermediate in no time. You are a lucky dog!
Yes it is critical. The main reason I have offset is because the flap coupler leg is in line with the bellcrank. I located it all where the plans had it, but now I know I could re-engineer some of those things. When I was building the wing, flap hardware wasn't on my mind, never having had them before. If I had used heavier wire, I wouldn't have had flex at the adjustment bend either. That was my main mistake, underestimating the strength needed for a plane this big.
I am a lucky dog. I so want to jump on that thing now. I've read the instructions a couple of times. There are some things to bolster and modify, but with Ken advising me, I'll be in good shape. Wayne has a Smoothie that is similarly constructed and he's been asking me questions I already know some answers to because Ken has already given me a primer on it.
Maybe I'll work on both projects at the same time. I don't think the little Speed Reedy will consume too much time. I can do 1/2A in the dark now. Yeah, right.

Rusty
_________________
...and never Ever think about how good you are at something...
while you're doing it!
My Hot Rock & Blues Playlist
RknRusty- Rest In Peace
- Posts : 10869
Join date : 2011-08-10
Age : 68
Location : South Carolina, USA
Re: Back to the Yak - Yak-9 Build, Part II
![]() RknRusty Tue Feb 18, 2014 11:15 pm
RknRusty Tue Feb 18, 2014 11:15 pm
The flaps work great, they move by way of gravity when I tilt the plane, so I'm happy with that. It'll be ready for paint tomorrow, so paint and decals go on soon. And the rack of aluminum exhaust pipes.
This low wing allows for any fuel tank I choose. I want to use the Brodak wedge that gave me fits on the SS, but not before I open it up and fix it. It's a 3oz uniflow. Do y'all think that's big enough for the Fox Stunt 35, or should I go with a 4oz tank? I have to ad some adjustment tabs for it. I also have a 4oz clunk like the one on my Skyray, but they're so unsightly, I'm thinking not. I wish I could find a way to snag some exhaust pressure from this muffler-less engine.
I'll have good pictures soon. I see no reason to show more pics of unassembled bits.
Rusty
_________________
...and never Ever think about how good you are at something...
while you're doing it!
My Hot Rock & Blues Playlist
RknRusty- Rest In Peace
- Posts : 10869
Join date : 2011-08-10
Age : 68
Location : South Carolina, USA
Re: Back to the Yak - Yak-9 Build, Part II
![]() Cribbs74 Tue Feb 18, 2014 11:38 pm
Cribbs74 Tue Feb 18, 2014 11:38 pm
4oz will surely give you some breathing room.
You could always tap the backplate, but to be honest the Fox will do fine with standard vent. They have been doing it since the 40's.
Ron
Cribbs74- Moderator
-
Posts : 11895
Join date : 2011-10-24
Age : 50
Location : Tuttle, OK
Re: Back to the Yak - Yak-9 Build, Part II
![]() RknRusty Wed Feb 19, 2014 2:00 am
RknRusty Wed Feb 19, 2014 2:00 am
I have a 4oz metal tank, it's just ugly. But paint will fix that.Cribbs74 wrote:You could always tap the backplate, but to be honest the Fox will do fine with standard vent. They have been doing it since the 40's.
Ron
One reason I run pressure is where we fly, the dry winter grass gets powdered by the prop and fills our tanks through the open vent. Hooking the uniflow vent (or normal vent) to the muffler is a convenient way to keep it clean. I could filter it though.
Rusty
_________________
...and never Ever think about how good you are at something...
while you're doing it!
My Hot Rock & Blues Playlist
RknRusty- Rest In Peace
- Posts : 10869
Join date : 2011-08-10
Age : 68
Location : South Carolina, USA
Re: Back to the Yak - Yak-9 Build, Part II
![]() Ken Cook Wed Feb 19, 2014 4:46 am
Ken Cook Wed Feb 19, 2014 4:46 am
You may make the beginner pattern with 3 oz. of fuel. However, it would be far better to use a larger tank due to your advancement in flying the pattern. It won't be long before you start flying the PAMPA pattern. That being said, 3.5 oz's will not make the PAMPA pattern. Fuel will pretty much be depleted in the overhead 8. You don't want to be running short here as this is where I've witnessed the demise of many planes. It's better to over run then to come home with a Monokote bag of balsa. The 4 oz. tank would benefit you in this situation as you don't have to top it off or you could fly and discover exactly how much fuel is required and withdraw a .25 oz or more if needed. Muffling a old non eared Fox is simple to do. I can provide pictures of strap mufflers I made for them. The Fox case is very fragile and therefore you run the risk of binding the piston if overtightened. Some of the non -eared 50's Fox's don't like mufflers and it will let you know it.
Ken Cook- Top Poster
- Posts : 5451
Join date : 2012-03-27
Location : pennsylvania
Page 6 of 9 • 1, 2, 3, 4, 5, 6, 7, 8, 9 ![]()
» Part ID: Back Plate Extension?
» Custom 1963 Cox PT-19 and HELLO!
» Shoestring flights - I brought it home! Now, can I do it again?
» Guillows Cessna 150 build circa 1970 (Build Log)