

 Rules
Rules
by GallopingGhostler Today at 5:37 pm
» Happy Anzac Day!
by GallopingGhostler Today at 4:16 pm
» Three -- sold out (making two more) Cox .010 Carburetors with wrench
by MauricioB Today at 3:43 pm
» Jim Walkers FireBee - This is going to be fun
by rsv1cox Today at 12:27 pm
» Roddie's flat-bottomed boat..
by roddie Today at 10:11 am
» Project Cox .049 r/c & Citabrian Champion
by rdw777 Today at 8:14 am
» Revivng Some Childhood Classics
by getback Today at 7:31 am
» Fox .35 Modifications
by Ken Cook Today at 3:16 am
» Introducing our Cox .049 TD Engines
by getback Yesterday at 6:20 am
» Cox powered jet-pump for model Sprint Boat
by roddie Thu Apr 25, 2024 10:25 pm
» Micro Draco Gets to Fly on a Beautiful Morning.
by rdw777 Thu Apr 25, 2024 8:15 pm
» Jim Walker Firebaby
by rdw777 Thu Apr 25, 2024 8:06 pm


Back to the Yak - Yak-9 Build, Part II
Page 4 of 9 •  1, 2, 3, 4, 5, 6, 7, 8, 9
 ![]()
Re: Back to the Yak - Yak-9 Build, Part II
![]() Cribbs74 Tue Dec 10, 2013 9:49 pm
Cribbs74 Tue Dec 10, 2013 9:49 pm

Cribbs74- Moderator


Posts : 11895
Join date : 2011-10-24
Age : 50
Location : Tuttle, OK
Re: Back to the Yak - Yak-9 Build, Part II
![]() pkrankow Tue Dec 10, 2013 10:03 pm
pkrankow Tue Dec 10, 2013 10:03 pm
I ordered some cotton flocking from Aircraft Spruce. The stuff is wonderful for thickening epoxy, but not as light as other options.
Phil

pkrankow- Top Poster

- Posts : 3025
Join date : 2012-10-02
Location : Ohio
Re: Back to the Yak - Yak-9 Build, Part II
![]() RknRusty Wed Dec 11, 2013 4:00 am
RknRusty Wed Dec 11, 2013 4:00 am
Thanks.
Rusty
_________________
...and never Ever think about how good you are at something...
while you're doing it!
My Hot Rock & Blues Playlist

RknRusty- Rest In Peace

- Posts : 10869
Join date : 2011-08-10
Age : 68
Location : South Carolina, USA
Re: Back to the Yak - Yak-9 Build, Part II
![]() pkrankow Wed Dec 11, 2013 8:37 am
pkrankow Wed Dec 11, 2013 8:37 am
RknRusty wrote:How about that Minwax/filling/sanding question, anyone got ideas on that?
Thanks.
Rusty
Done it. Prefer clear dope, but the weather allowing me to work outside is another story, so I'll continue to use minwax polycryllic on bashers.
I have used polycryllic straight, I have not tried using cornstarch in it yet. I have sanded, and I have used denatured alcohol to strip the excess (different planes) and find that stripping with denatured alcohol and a scrub pad is easier, and results in an excellent surface. I have also found that a several apply-dry-strip cycles yield better results than putting a couple coats on and taking it down once. The work inside vs work outside might be affecting this too.
The polcryllic is clearly NOT fuel proof. It must be coated with a fuel proof product. I have not tested for exhaust.
I use "Testors Wood and Metal Cement" to fuel proof screw holes by filling and re-drilling the hole. I would expect fuel penetration to cause coating failure, so I take some steps to protect the obvious areas.
I find polycryllic to build a heavier coating than dope + cornstarch. I need to try polcryllic + cornstarch.
You will want to finish sand prior to the first coat of any product you use. You can sand additionally between coats even if stripping the polycryllic, just let it dry first.
Phil
pkrankow- Top Poster
- Posts : 3025
Join date : 2012-10-02
Location : Ohio
Re: Back to the Yak - Yak-9 Build, Part II
![]() RknRusty Wed Dec 11, 2013 10:59 am
RknRusty Wed Dec 11, 2013 10:59 am
I'll take some pictures after I finish working on it tonight. It should start looking like a plane.
Rusty
_________________
...and never Ever think about how good you are at something...
while you're doing it!
My Hot Rock & Blues Playlist
RknRusty- Rest In Peace
- Posts : 10869
Join date : 2011-08-10
Age : 68
Location : South Carolina, USA
Re: Back to the Yak - Yak-9 Build, Part II
![]() RknRusty Thu Dec 12, 2013 8:59 pm
RknRusty Thu Dec 12, 2013 8:59 pm

_________________
...and never Ever think about how good you are at something...
while you're doing it!
My Hot Rock & Blues Playlist
RknRusty- Rest In Peace
- Posts : 10869
Join date : 2011-08-10
Age : 68
Location : South Carolina, USA
Re: Back to the Yak - Yak-9 Build, Part II
![]() roddie Thu Dec 12, 2013 9:05 pm
roddie Thu Dec 12, 2013 9:05 pm
edit: I read back a few comments that I missed.. Where do you find Minwax Polycrylic? I'm looking for a sealer for my speed model... Is this applied with a brush, then sanded smooth? I plan on a Rust-o-leum gloss-white base color.
Is that grey sandable-primer over the Polycrylic in the photo of the ply-doublers Rusty?

roddie- Top Poster
- Posts : 8270
Join date : 2013-07-17
Age : 64
Location : N. Smithfield, Rhode Island -

Re: Back to the Yak - Yak-9 Build, Part II
![]() Cribbs74 Thu Dec 12, 2013 10:40 pm
Cribbs74 Thu Dec 12, 2013 10:40 pm
Ron
Cribbs74- Moderator
-
Posts : 11895
Join date : 2011-10-24
Age : 50
Location : Tuttle, OK
Re: Back to the Yak - Yak-9 Build, Part II
![]() RknRusty Thu Dec 12, 2013 10:42 pm
RknRusty Thu Dec 12, 2013 10:42 pm
Rusty
_________________
...and never Ever think about how good you are at something...
while you're doing it!
My Hot Rock & Blues Playlist
RknRusty- Rest In Peace
- Posts : 10869
Join date : 2011-08-10
Age : 68
Location : South Carolina, USA
Re: Back to the Yak - Yak-9 Build, Part II
![]() RknRusty Thu Dec 12, 2013 10:45 pm
RknRusty Thu Dec 12, 2013 10:45 pm
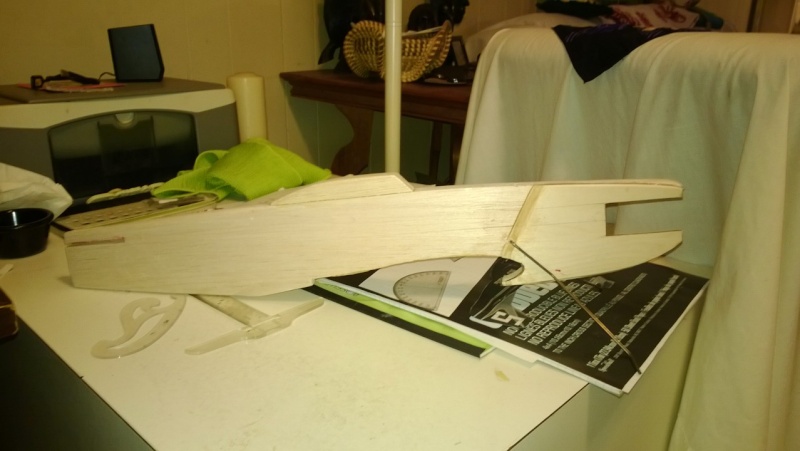
No that's where I beveled the doubler at an angle down to a sharp edge. It's raw wood in the picture. Ken suggested I do that, as it makes that edge less of a stress riser.roddie wrote:...Is that grey sandable-primer over the Polycrylic in the photo of the ply-doublers Rusty?
Rusty
EDIT: Oops, misunderstood the question. Just a funny picture, all raw wood.
_________________
...and never Ever think about how good you are at something...
while you're doing it!
My Hot Rock & Blues Playlist
RknRusty- Rest In Peace
- Posts : 10869
Join date : 2011-08-10
Age : 68
Location : South Carolina, USA
Re: Back to the Yak - Yak-9 Build, Part II
![]() RknRusty Thu Dec 19, 2013 10:04 am
RknRusty Thu Dec 19, 2013 10:04 am
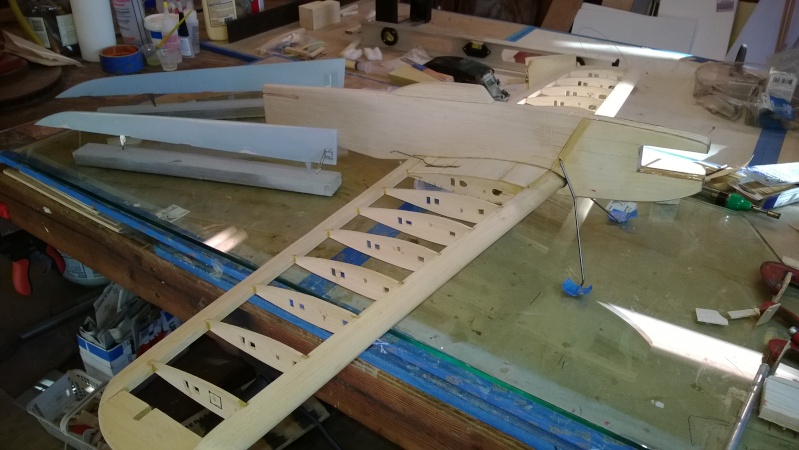
I have to think about what to do next. I think I'll shape and sand the fuse, then go ahead and finish it and paint it, minus the detail markings. I hope that keeps it from changing shape. I've been keeping it pinned under weights to prevent bowing and it seems to be stable. Hopefully the water based Polycryllic won't warp it. I'll apply it very thin, and on one side at a time so I can clamp it down flat while it dries. After the first coat it will hopefully be humidity proof. Whenever I have good painting weather, I'll go ahead and paint the flaps white so they'll be ready to attach. The wing is holding straight nicely so I can Monokote it any time now.
Starting to look like a plane.
_________________
...and never Ever think about how good you are at something...
while you're doing it!
My Hot Rock & Blues Playlist
RknRusty- Rest In Peace
- Posts : 10869
Join date : 2011-08-10
Age : 68
Location : South Carolina, USA
Re: Back to the Yak - Yak-9 Build, Part II
![]() pkrankow Thu Dec 19, 2013 10:29 am
pkrankow Thu Dec 19, 2013 10:29 am
You could block it up and paint it in thirds on both sides if you feel you need to clamp it.
Phil
pkrankow- Top Poster
- Posts : 3025
Join date : 2012-10-02
Location : Ohio
Re: Back to the Yak - Yak-9 Build, Part II
![]() Cribbs74 Thu Dec 19, 2013 1:16 pm
Cribbs74 Thu Dec 19, 2013 1:16 pm
Either way will work though.
Ron
Cribbs74- Moderator
-
Posts : 11895
Join date : 2011-10-24
Age : 50
Location : Tuttle, OK
Re: Back to the Yak - Yak-9 Build, Part II
![]() RknRusty Thu Dec 19, 2013 9:43 pm
RknRusty Thu Dec 19, 2013 9:43 pm
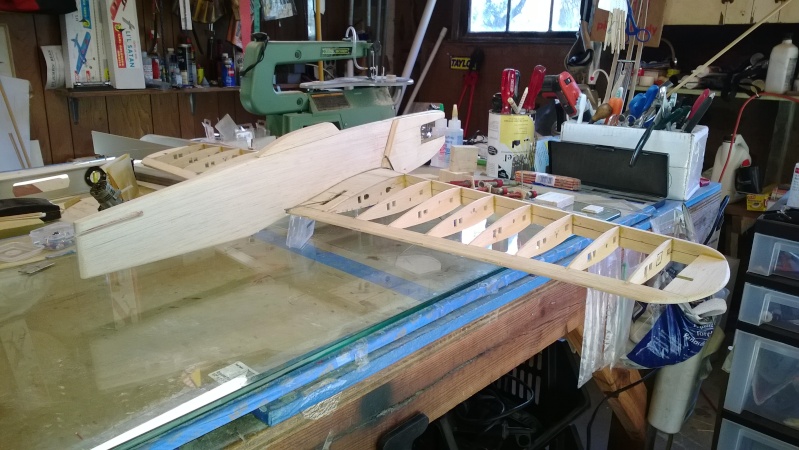
I'll take that as advice. I was looking at everything I can do to make it quick and easy, so I think before I put the sealer on, I'll go ahead and mount the air scoop, tail fin and cheek block(not part of the kit). I'll make the exhaust pipes out of some 1/8" aluminum tub glued into a balsa block. I didn't get much sanding and shaping done today. Wife came home from work early.pkrankow wrote:The argument I have for painting both sides together is that the expansion should even out and keep it straight....
Phil
The air scoop on the underside is shaped nothing like the one on a real Yak, but shaped more to support the underside of the wing. I think I'll shape it realistically and make a less clunky support out of a basswood strip to help secure the wing. I'm also going to add a small scoop on the forward top fuselage. I hope my decals aren't discolored. I hope I can find some small Cyrillic letters for writing on the side... something in Russian like "Hitler is a Pussy." I need to know about what scale size this plane is so I can choose the right decals. Anyone got a guess?
Here's what I think it will look like:
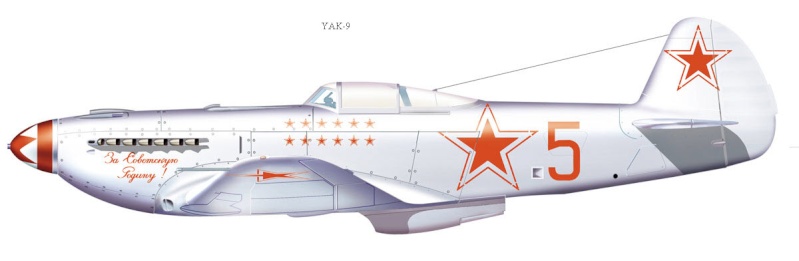
The stab and rudder will be painted separately before assembly. I may or may not ink the panel lines and rivets. If I do, what kind of marker should I use?
Rusty
_________________
...and never Ever think about how good you are at something...
while you're doing it!
My Hot Rock & Blues Playlist
RknRusty- Rest In Peace
- Posts : 10869
Join date : 2011-08-10
Age : 68
Location : South Carolina, USA
Re: Back to the Yak - Yak-9 Build, Part II
![]() pkrankow Fri Dec 20, 2013 7:26 am
pkrankow Fri Dec 20, 2013 7:26 am
Phil
pkrankow- Top Poster
- Posts : 3025
Join date : 2012-10-02
Location : Ohio
Re: Back to the Yak - Yak-9 Build, Part II
![]() RknRusty Fri Dec 20, 2013 10:01 am
RknRusty Fri Dec 20, 2013 10:01 am
Rusty
_________________
...and never Ever think about how good you are at something...
while you're doing it!
My Hot Rock & Blues Playlist
RknRusty- Rest In Peace
- Posts : 10869
Join date : 2011-08-10
Age : 68
Location : South Carolina, USA
Re: Back to the Yak - Yak-9 Build, Part II
![]() Ken Cook Fri Dec 20, 2013 9:19 pm
Ken Cook Fri Dec 20, 2013 9:19 pm

Ken Cook- Top Poster
- Posts : 5451
Join date : 2012-03-27
Location : pennsylvania
Re: Back to the Yak - Yak-9 Build, Part II
![]() RknRusty Fri Dec 20, 2013 9:42 pm
RknRusty Fri Dec 20, 2013 9:42 pm
I got it mostly shaped and sanded today. There are a couple of minor dents in the balsa to spackle and then I'll Minwax it. I had a chance to buy some clear Aerogloss hot fuelproof dope at the HS the other day. I left it there, partly because I couldn't remember if it was butyrate or nitrate, and also because I couldn't really afford it. No other builders go to that shop, so it'll still be there if i decide to get it for the Skyray. Meanwhile I'll just Minwax the Yak. We'll have a couple of warm days over the weekend. I think it will be over 70 and clear tomorrow, so good for applying the sealer. Depends on the family duties at this time of year though. I want to get it sealed soon, all but the inboard doubler where a cheek will go.
Rusty
_________________
...and never Ever think about how good you are at something...
while you're doing it!
My Hot Rock & Blues Playlist
RknRusty- Rest In Peace
- Posts : 10869
Join date : 2011-08-10
Age : 68
Location : South Carolina, USA
Re: Back to the Yak - Yak-9 Build, Part II
![]() RknRusty Mon Dec 23, 2013 7:05 am
RknRusty Mon Dec 23, 2013 7:05 am
So no painting, and I read a good article on Aeromaniacs last night about how great PC is, and am looking forward to starting my first next-level finish. I wish I hadn't already primered my flaps so I could PC them. But they're already slotted for the hinges and I'm not doing that again. Too much like work.
So, I'll shape up the cheek for the inboard side. I haven't decided whether to gouge the meat out of a 1/2" block or just use a 1/4" sheet... strictly a cosmetic choice. I can glue the fin on it and spackle some minor dents, that should be fine with the heater blowing. Crap' it sounds torrential out there. And I can get the Monokote going and cover the wing. It's almost all kit wood, hard as a rock and amazingly straight. I could probably beat someone to death with the dang thing if I had to. If I get really ambitious I can make the exhaust pipe block for the cheek too. I'm sounding really ambitious now, but y'all know how I like to dream big.
In the news, the ISS and crew are having some precarious problems. Of course NASA minimizes it, but it sounds to me like they're just a glitch away from boarding the Soyuz pods. I'll be glad when they get a spare SpaceX Dragon up there. The station cooling system is down to zero redundancy and spacesuits are failing. One suit nearly drowned an Italian astronaut in July, another started filling with water this week for a so-called unrelated reason, and yesterday a spacewalker started freezing and had to come in early. Luckily they were far enough ahead of schedule to get the day's job done.
Okay, my coffee was really strong this morning. See y'all in the funny pages.


Rusty
_________________
...and never Ever think about how good you are at something...
while you're doing it!
My Hot Rock & Blues Playlist
RknRusty- Rest In Peace
- Posts : 10869
Join date : 2011-08-10
Age : 68
Location : South Carolina, USA
Re: Back to the Yak - Yak-9 Build, Part II
![]() JPvelo Mon Dec 23, 2013 7:59 am
JPvelo Mon Dec 23, 2013 7:59 am
Jim

JPvelo- Diamond Member

- Posts : 1972
Join date : 2011-12-02
Age : 56
Location : Colorado
Re: Back to the Yak - Yak-9 Build, Part II
![]() RknRusty Sun Dec 29, 2013 2:48 am
RknRusty Sun Dec 29, 2013 2:48 am
I cleaned the fuse with a rag and acetone and sprayed the silkspan lightly with water. Then brushed a coat of Poly on one side of the fuse. I laid the silk on it and fiddled with it pressing it out with my thumb, having to lift and pull a few times. You have to be pretty quick because a thin coat of poly sets quickly. I did pretty well though, learning where to make cuts to get it to form around curves like the canopy. I left the doublers raw since I am going to put a cheek on one and haven't decided how to fuelproof the engine side. I might buy a bottle of aeroglosss clear or maybe the old thinned epoxy method. I can't put the cheek on before I find where to drill the engine holes. After I had the silkspan as wrinkle free as possible, I painted another coat of poly on it and secured the wrap-around edges. Then I squeeged it off to a minimal coat. Before I started the other side, I had second thoughts. Thinking it's going to be sanded anyway, I brushed on an ultra thin coat over it to make sure all of the silkspan's weave was filled.
Flip and repeat for the other side, and it looks great. Can't see any paper except for a couple of tiny wrinkles, but they are barely visible. Next time I'll have the hang of it. Now I'm all practiced up for when I build the Skyray. After I did the first side, I noticed the warp toards the outboard side had grown. But after I applied the second side it mostly straightened out. I think it's about where it always was. But after it was all tack free, I weighted it to help either hold it in place or hopefully de-warp it further. Up until now, I would never have noticed it during a build.
It should be rock hard after 24 hours and I can sand or alcohol strip as recommended by Phil. Nothing to do but wait now, so I got the Streaks down and went over to the church with my son to fly. Got one run of cox engine flight time, but the needle was stuck to the fuel tube seal and refused to cooperate. We were only using 15% nitro and after flooding it due to needle problems, we gave up flipping and flew BFSII with the Norvel. I got a good flight in, then my son flew. I told him to do a loop. He did, and the pullout went awry and it sporked really really hard. A terrible sound. Liberated the nose from the LE. That was my best flyer. It'll take some thinking. Maybe I'll just cut the wing out and make a new one. Time will tell.
Rusty
_________________
...and never Ever think about how good you are at something...
while you're doing it!
My Hot Rock & Blues Playlist
RknRusty- Rest In Peace
- Posts : 10869
Join date : 2011-08-10
Age : 68
Location : South Carolina, USA
Re: Back to the Yak - Yak-9 Build, Part II
![]() Ken Cook Sun Dec 29, 2013 6:40 am
Ken Cook Sun Dec 29, 2013 6:40 am
The main thing about using white glue is to not allow it to go out into a open bay as the white glue is a terrific primer and this area will flash and shine more than the unglued silkspan. This isn't a issue with solid areas or planked areas. In regards to your doubler, I would seal it up with Ploycrilic and sand smooth and use Rustoleum right over the Poly. Most oil migration takes place through penetrations like landing gear holes and motor mount holes. Sealing those areas are important. Another problematic spot is the end grain of the fuse encapsulated between the doublers. Making sure the engine isn't too tight of fit between motor mount blocks prevents the paint from rubbing off exposing those areas as well. I personally see no need for you to epoxy the doubler as that will just add even further weight. WHile I'm not a advocate of Rustoleum, I know many that use it with good success including yourself. It rapidly deterioated for me and it only took me once to forego using it. And I did let it cure. I haven't used it for a stunter using mild fuels though. Ken
Ken Cook- Top Poster
- Posts : 5451
Join date : 2012-03-27
Location : pennsylvania
Re: Back to the Yak - Yak-9 Build, Part II
![]() RknRusty Sun Dec 29, 2013 9:40 pm
RknRusty Sun Dec 29, 2013 9:40 pm
I have another question. I read (guess where
I checked it today and the poly is rock hard and looks really nice prior to sanding. I unfortunately forgot to weigh it before I had it tack glued onto my painting jig. I would like to know how much weight I added. I test sanded a couple of spots that were a little bumpy where the silkspan overlapped around the canopy. It smooths out pretty quickly.I'm interested to see how well it all smooths out. Tomorrow we have a gathering of about 20 guys at Watt's house to fly and eat and fly from 10 until dark, so I won't get any work done.
Rusty
_________________
...and never Ever think about how good you are at something...
while you're doing it!
My Hot Rock & Blues Playlist
RknRusty- Rest In Peace
- Posts : 10869
Join date : 2011-08-10
Age : 68
Location : South Carolina, USA
Re: Back to the Yak - Yak-9 Build, Part II
![]() Cribbs74 Sun Dec 29, 2013 10:44 pm
Cribbs74 Sun Dec 29, 2013 10:44 pm
Cribbs74- Moderator
-
Posts : 11895
Join date : 2011-10-24
Age : 50
Location : Tuttle, OK
Re: Back to the Yak - Yak-9 Build, Part II
![]() roddie Sun Dec 29, 2013 11:59 pm
roddie Sun Dec 29, 2013 11:59 pm
roddie- Top Poster
- Posts : 8270
Join date : 2013-07-17
Age : 64
Location : N. Smithfield, Rhode Island -
Page 4 of 9 • 1, 2, 3, 4, 5, 6, 7, 8, 9 ![]()
» Part ID: Back Plate Extension?
» Custom 1963 Cox PT-19 and HELLO!
» Shoestring flights - I brought it home! Now, can I do it again?
» Guillows Cessna 150 build circa 1970 (Build Log)