

 Rules
Rules
by rdw777 Today at 8:14 am
» Jim Walkers FireBee - This is going to be fun
by rdw777 Today at 8:10 am
» Three -- sold out (making two more) Cox .010 Carburetors with wrench
by sosam117 Today at 8:07 am
» Revivng Some Childhood Classics
by getback Today at 7:31 am
» Fox .35 Modifications
by Ken Cook Today at 3:16 am
» Happy Anzac Day!
by Boats13 Yesterday at 11:03 pm
» Introducing our Cox .049 TD Engines
by getback Yesterday at 6:20 am
» Roddie's flat-bottomed boat..
by Levent Suberk Yesterday at 12:23 am
» Cox powered jet-pump for model Sprint Boat
by roddie Thu Apr 25, 2024 10:25 pm
» Micro Draco Gets to Fly on a Beautiful Morning.
by rdw777 Thu Apr 25, 2024 8:15 pm
» Jim Walker Firebaby
by rdw777 Thu Apr 25, 2024 8:06 pm
» Hydro-bat by Vic Smeed: engine probs
by GallopingGhostler Thu Apr 25, 2024 5:12 pm


Back to the Yak - Yak-9 Build, Part II
Page 2 of 9 •  1, 2, 3, 4, 5, 6, 7, 8, 9
 ![]()
Re: Back to the Yak - Yak-9 Build, Part II
![]() Ken Cook Fri Jul 19, 2013 4:42 am
Ken Cook Fri Jul 19, 2013 4:42 am

Ken Cook- Top Poster

- Posts : 5451
Join date : 2012-03-27
Location : pennsylvania
Re: Back to the Yak - Yak-9 Build, Part II
![]() RknRusty Fri Jul 19, 2013 5:08 am
RknRusty Fri Jul 19, 2013 5:08 am
_________________
...and never Ever think about how good you are at something...
while you're doing it!
My Hot Rock & Blues Playlist

RknRusty- Rest In Peace

- Posts : 10869
Join date : 2011-08-10
Age : 68
Location : South Carolina, USA
Re: Back to the Yak - Yak-9 Build, Part II
![]() Cribbs74 Fri Jul 19, 2013 8:22 am
Cribbs74 Fri Jul 19, 2013 8:22 am
Ron

Cribbs74- Moderator


Posts : 11895
Join date : 2011-10-24
Age : 50
Location : Tuttle, OK
Re: Back to the Yak - Yak-9 Build, Part II
![]() RknRusty Fri Jul 19, 2013 11:14 pm
RknRusty Fri Jul 19, 2013 11:14 pm
I test fit the wing in the fuse and it's going to take some work to get it to fit the shape of the wing. The wing's LE is a lot wider than the cutout in the fuse and doublers too, and the leading edge in the fuse is cut square instead of curved like the wing. I'll have to be careful not to introduce any unwanted incidence when I start re-shaping the wing seat. Right now there's a gap between the whole top of the wing and the fuselage. This kit would be too much of a challenge for someone who's never built a model before. But it's good for me. I'll be a lot better builder after I get this one finished.
_________________
...and never Ever think about how good you are at something...
while you're doing it!
My Hot Rock & Blues Playlist
RknRusty- Rest In Peace
- Posts : 10869
Join date : 2011-08-10
Age : 68
Location : South Carolina, USA
Re: Back to the Yak - Yak-9 Build, Part II
![]() Cribbs74 Fri Jul 19, 2013 11:34 pm
Cribbs74 Fri Jul 19, 2013 11:34 pm
And just think it was marketed for kids and teenagers! No wonder the views are so varied on this thing.
Cribbs74- Moderator
-
Posts : 11895
Join date : 2011-10-24
Age : 50
Location : Tuttle, OK
Re: Back to the Yak - Yak-9 Build, Part II
![]() Ken Cook Sat Jul 20, 2013 5:38 am
Ken Cook Sat Jul 20, 2013 5:38 am
R/C was quite expensive back in the day and as a teenager for me, it was pretty much out of reach in terms of cost. When I think back to the days where we would just run home after school and grab all of our stuff, it seemed that the most expensive part we had to purchase was the flight batttery. Many times we would share amongst all of us. I can say this, Sterling kits made me several friends and a better modeler due to their contributions to the hobby. Ken
Ken Cook- Top Poster
- Posts : 5451
Join date : 2012-03-27
Location : pennsylvania
Re: Back to the Yak - Yak-9 Build, Part II
![]() RknRusty Sun Jul 28, 2013 9:34 pm
RknRusty Sun Jul 28, 2013 9:34 pm
The bellcrank has a stout platform as I mentioned in an above post, and I used epoxy just for overkill. I have some wiggle room weight-wise since I omitted the rib ripping spar. This is a strong firm wing without that spar, so I'm glad I followed that bit of advice. I had to drill long 1/8" holes through the wingtip for the leadouts to pass through. I inserted 1/8" Nyrod tube through the wingtips for the leadout guides. I sanded the tubes to give the glue some grip. Then inserted the tip into the hole and put Testors airplane glue(green tube; metal, plastic, wood) on the tube and slid it in place. I believe Nyrod is the same stuff that is the yellow extensions on the Killer Bee needle. I left the tube flush with the wingtip, so only a pinhole in the Monokote is needed for the leadout to pass through. It should look neat and clean. I hope that Testors glue will hold them, but they press fit pretty tight anyway.
I guess the next step is to mount the flaps. I originally thought of stitching them, but I've decided not to in case I feel the need to seal the hinge line gap with tape. I haven't decided what kind of hinge to use, but I'll probably go with some sort of fabric. I'm going to search out hinges and look at different types first. I'll be glad to finally get this wing out of the way. Next I'll have to figure out how to make the wing fit the fuse. As I mentioned, the cutout doesn't match the LE as it's square. I might block it up with balsa and re-cut it' I wish I had kept a piece of the leftover LE stock for the shape. The doublers have an LE shape, just not the shape of my LE. I might try to re-shape them with sandpaper and use that to draw the curve. Since the fuse is slightly bowed, a new slab isn't out of the question either. But I'll jump off that bridge when I get to it.
_________________
...and never Ever think about how good you are at something...
while you're doing it!
My Hot Rock & Blues Playlist
RknRusty- Rest In Peace
- Posts : 10869
Join date : 2011-08-10
Age : 68
Location : South Carolina, USA
Re: Back to the Yak - Yak-9 Build, Part II
![]() pkrankow Mon Jul 29, 2013 7:27 am
pkrankow Mon Jul 29, 2013 7:27 am
You can also use nylon, which is available in pretty thin rip-stop versions. I'm not sure what they give in the kits.
Phil

pkrankow- Top Poster
- Posts : 3025
Join date : 2012-10-02
Location : Ohio
Re: Back to the Yak - Yak-9 Build, Part II
![]() JPvelo Mon Jul 29, 2013 8:20 am
JPvelo Mon Jul 29, 2013 8:20 am
Jim

JPvelo- Diamond Member

- Posts : 1972
Join date : 2011-12-02
Age : 56
Location : Colorado
Re: Back to the Yak - Yak-9 Build, Part II
![]() Cribbs74 Mon Jul 29, 2013 8:31 am
Cribbs74 Mon Jul 29, 2013 8:31 am
Cribbs74- Moderator
-
Posts : 11895
Join date : 2011-10-24
Age : 50
Location : Tuttle, OK
Re: Back to the Yak - Yak-9 Build, Part II
![]() RknRusty Mon Jul 29, 2013 10:40 am
RknRusty Mon Jul 29, 2013 10:40 am
As for Monokote hinges, once I tried ironing two strips together with the adhesive on opposite sides, planning to then iron them on in over/under fashion, but I could pull them apart, so I ditched that plan. Maybe I didn't do it right. But it sounds too lightweight for .35 stunter flaps. I could be wrong.
_________________
...and never Ever think about how good you are at something...
while you're doing it!
My Hot Rock & Blues Playlist
RknRusty- Rest In Peace
- Posts : 10869
Join date : 2011-08-10
Age : 68
Location : South Carolina, USA
Re: Back to the Yak - Yak-9 Build, Part II
![]() sdjjadk Mon Jul 29, 2013 8:52 pm
sdjjadk Mon Jul 29, 2013 8:52 pm
Yep you simply make your marks and drill the holes and once covered, you cut away the covering and glue your hinges in.RknRusty wrote:I'd like to try pin hinges. I suppose you make the slots, then cover it and punch through the Monokote into the holes to glue them. I could improvise a slot tool.
I found that the best glue to use is either Tite Bond or Gorilla wood glue as they are water based and easy to clean up. However, I recommend roughing up the hinges with some sandpaper and then cleaning them with rubbing alcohol before gluing.
I used pin hinges in my foam core wing.

Another way to use Monokote as a hinge is to use it like you would use a tape hinge on a foamy. It works great, strong and clean. I've used Monokote hinges on planes as big as a .35 size c/l stunter with no problems.RknRusty wrote:As for Monokote hinges, once I tried ironing two strips together with the adhesive on opposite sides, planning to then iron them on in over/under fashion, but I could pull them apart, so I ditched that plan. Maybe I didn't do it right. But it sounds too lightweight for .35 stunter flaps. I could be wrong.
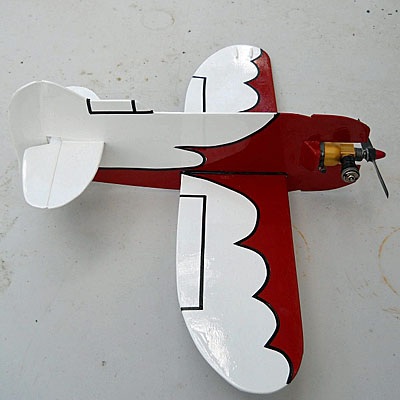
Here is a pic of my Gee Bee with a Monokote hinged elevator. I used one piece of covering for the top and one piece for the bottom on both the stab and elevator.
Shawn

sdjjadk- Platinum Member

- Posts : 640
Join date : 2012-04-07
Location : Southern Maryland
Re: Back to the Yak - Yak-9 Build, Part II
![]() RknRusty Mon Jul 29, 2013 10:14 pm
RknRusty Mon Jul 29, 2013 10:14 pm
_________________
...and never Ever think about how good you are at something...
while you're doing it!
My Hot Rock & Blues Playlist
RknRusty- Rest In Peace
- Posts : 10869
Join date : 2011-08-10
Age : 68
Location : South Carolina, USA
Re: Back to the Yak - Yak-9 Build, Part II
![]() Cribbs74 Tue Jul 30, 2013 9:15 pm
Cribbs74 Tue Jul 30, 2013 9:15 pm
RknRusty wrote:I think Wayne is ready to go most any time I want to. His only problem is the 90 mile round trip he has to do to come to my field. Or even more for me to go to his. He lives an hour from my house. But he told me he can go most Tuesdays or Thursdays, and sometimes on Sunday. So barring other business I have to schedule on those days, we should get some time in. I have tree people coming this Thursday, and company coming this weekend, but I should have some time to work on the Yak.
I'm at the point that I need to figure out how to proceed. I'm going to get pin hinges, and I have my white Monokote. So I guess I should cover the main wing so I can de-warp it before I cut hinge slots. The TE is bowed, but the flap pieces are pretty straight. I think I can cut slots just the same through the covering. What are your thoughts on that? I may just paint the flaps white instead of Monokoting them. That'll make them more ding and dent resistant.
If you want to, you can copy the Yak quote and answer it in the Yak thread.
https://www.coxengineforum.com/t5232-yak-9-build-part-two
Yeah it's just as easy to slot hinges with the covering on. Use something that wipes off easily to mark where you are going to slot on the wing and flap. Also make the slots slightly oversize so you have some wiggle room to line things up.
One more thing, use vaseline or grease on the pins to keep the Epoxy from flowing into the pin area.
Ron
Cribbs74- Moderator
-
Posts : 11895
Join date : 2011-10-24
Age : 50
Location : Tuttle, OK
Re: Back to the Yak - Yak-9 Build, Part II
![]() RknRusty Tue Jul 30, 2013 9:24 pm
RknRusty Tue Jul 30, 2013 9:24 pm
_________________
...and never Ever think about how good you are at something...
while you're doing it!
My Hot Rock & Blues Playlist
RknRusty- Rest In Peace
- Posts : 10869
Join date : 2011-08-10
Age : 68
Location : South Carolina, USA
Re: Back to the Yak - Yak-9 Build, Part II
![]() Cribbs74 Tue Jul 30, 2013 9:33 pm
Cribbs74 Tue Jul 30, 2013 9:33 pm
Cribbs74- Moderator
-
Posts : 11895
Join date : 2011-10-24
Age : 50
Location : Tuttle, OK
Re: Back to the Yak - Yak-9 Build, Part II
![]() sdjjadk Wed Jul 31, 2013 1:27 pm
sdjjadk Wed Jul 31, 2013 1:27 pm
For smaller budgeted builds, a fresh #11 exacto will work just fine. No matter which method you use, I highly recommend a hinge marking tool such as this, http://www3.towerhobbies.com/cgi-bin/wti0001p?&I=LXK262&P=7 They make the chore much easier.
Shawn
sdjjadk- Platinum Member
- Posts : 640
Join date : 2012-04-07
Location : Southern Maryland
Re: Back to the Yak - Yak-9 Build, Part II
![]() RknRusty Wed Jul 31, 2013 1:54 pm
RknRusty Wed Jul 31, 2013 1:54 pm
Thanks Shawn, I was wondering how I was going to find a true centerline. I'm famous for botching measurements. I definitely want to see it all press-fit together and working before I cover itsdjjadk wrote:Hinge slotting tools like the Great Planes Slot Machine are excellent for larger projects or if you do a lot of building.
For smaller budgeted builds, a fresh #11 exacto will work just fine. No matter which method you use, I highly recommend a hinge marking tool such as this, http://www3.towerhobbies.com/cgi-bin/wti0001p?&I=LXK262&P=7 They make the chore much easier.
Shawn
_________________
...and never Ever think about how good you are at something...
while you're doing it!
My Hot Rock & Blues Playlist
RknRusty- Rest In Peace
- Posts : 10869
Join date : 2011-08-10
Age : 68
Location : South Carolina, USA
Re: Back to the Yak - Yak-9 Build, Part II
![]() sdjjadk Wed Jul 31, 2013 3:36 pm
sdjjadk Wed Jul 31, 2013 3:36 pm
Hinging was the one thing I always dreaded. Especially when using the old DuBro slotting kit with the fork blade and the balsa pick and trying to keep the fork blade centered without punching through the sides of the surface. I couldn't tell you how many times I messed up a perfectly good build in the past when trying to make hinge slots.RknRusty wrote:Thanks Shawn, I was wondering how I was going to find a true centerline. I'm famous for botching measurements. I definitely want to see it all press-fit together and working before I cover itsdjjadk wrote:Hinge slotting tools like the Great Planes Slot Machine are excellent for larger projects or if you do a lot of building.
For smaller budgeted builds, a fresh #11 exacto will work just fine. No matter which method you use, I highly recommend a hinge marking tool such as this, http://www3.towerhobbies.com/cgi-bin/wti0001p?&I=LXK262&P=7 They make the chore much easier.
Shawn
That centering tool however, makes a big difference!
Shawn
sdjjadk- Platinum Member
- Posts : 640
Join date : 2012-04-07
Location : Southern Maryland
Re: Back to the Yak - Yak-9 Build, Part II
![]() RknRusty Wed Jul 31, 2013 3:49 pm
RknRusty Wed Jul 31, 2013 3:49 pm
I'm not looking forward to it either. Boring 1/8" leadout holes through the 1/4" or so wingtip blocks was a little hairy too, but I managed to do a neat job of it.sdjjadk wrote:Hinging was the one thing I always dreaded. Especially when using the old DuBro slotting kit with the fork blade and the balsa pick and trying to keep the fork blade centered without punching through the sides of the surface. I couldn't tell you how many times I messed up a perfectly good build in the past when trying to make hinge slots.
That centering tool however, makes a big difference!
Shawn
_________________
...and never Ever think about how good you are at something...
while you're doing it!
My Hot Rock & Blues Playlist
RknRusty- Rest In Peace
- Posts : 10869
Join date : 2011-08-10
Age : 68
Location : South Carolina, USA
Re: Back to the Yak - Yak-9 Build, Part II
![]() sdjjadk Wed Jul 31, 2013 4:11 pm
sdjjadk Wed Jul 31, 2013 4:11 pm
My Uncle got me into this hobby when I was a kid and he taught me some neat building tricks along the way and one of those tricks he showed me when drilling lead out holes like you mentioned (and hopefully this will make sense) was to jig the wing tip in place and then chock a length of brass tubing to the lead out marks and then use the tubing as a drill guide.RknRusty wrote:I'm not looking forward to it either. Boring 1/8" leadout holes through the 1/4" or so wingtip blocks was a little hairy too, but I managed to do a neat job of it.sdjjadk wrote:Hinging was the one thing I always dreaded. Especially when using the old DuBro slotting kit with the fork blade and the balsa pick and trying to keep the fork blade centered without punching through the sides of the surface. I couldn't tell you how many times I messed up a perfectly good build in the past when trying to make hinge slots.
That centering tool however, makes a big difference!
Shawn
Shawn
sdjjadk- Platinum Member
- Posts : 640
Join date : 2012-04-07
Location : Southern Maryland
Re: Back to the Yak - Yak-9 Build, Part II
![]() RknRusty Fri Aug 02, 2013 4:01 am
RknRusty Fri Aug 02, 2013 4:01 am
_________________
...and never Ever think about how good you are at something...
while you're doing it!
My Hot Rock & Blues Playlist
RknRusty- Rest In Peace
- Posts : 10869
Join date : 2011-08-10
Age : 68
Location : South Carolina, USA
Re: Back to the Yak - Yak-9 Build, Part II
![]() Cribbs74 Fri Aug 02, 2013 7:48 am
Cribbs74 Fri Aug 02, 2013 7:48 am
Ron
Cribbs74- Moderator
-
Posts : 11895
Join date : 2011-10-24
Age : 50
Location : Tuttle, OK
Yak-9 Build, part two-(with a little Shoestring included)
![]() RknRusty Sat Aug 03, 2013 11:11 pm
RknRusty Sat Aug 03, 2013 11:11 pm
I also traded a couple of woody 9" props for a 10x3 and a 10x4. I have a new plan(Don't I always!
I'm going to start running the Shoestring engine like it's meant to be run. Trying to get a dependable 4-2 break is too undependable and requires fiddling with the needle on every flight. It works when it works but wastes time and fuel when it doesn't. If I'm going to fly in a contest, I need to know what it's going to do on every run. So I'm going to try a bigger prop that will get the lap times I want and be ready for the vertical climbs and demands of stunts without me gritting and hoping it breaks lean at the right time. It just ain't a Fox, and isn't meant to be, as much as I tried to make it act like one. Some of you told me so.
So, I'm browsing the shop and I hear a voice from the other side of the aisle say, "Hey, I've seen you fly before!" I looked up and there was a tall red headed guy grinning at me saying how cool that exhibition at the Jackson Fliers club I put on was. I had no idea when he was referring to, and I said, "You mean the 1.2A planes?" Yeah, the little ones, they really scoot. Then another dude says, "You fly control line, me too, I thought I was the only one left." And the conversation exploded into everything we could spill. We had a great time comparing notes, and he's a big Flite Streak fan, big and small. He said he has about 60 engines and if I ever build a kit to let him know what I need. He lives at Surfside Beach, near where I go every Summer, and am going again in September. We traded info, and after a half hour of laughing and talking we parted ways. I thought, damn, this is what those guys mean when they talk about visiting hobby shops and meeting up with other like minded people. That was more fun than picking out lingerie with my wife at the mall and sneaking into the dressing room to see how it fits... well, almost. It was super cool to go to a hobby shop and actually talk to someone who understands what it is I do with all this hardware I buy.
So I got home and practiced cutting slots and hinging, e-mailed my new friend so he knows how to contact me. Went out to check the mail and found my Shoestring fuel in a box on the porch. Yesss, great day. Looks like Tuesday is going to be a flying day. I had expected to be out of gas for a few more days. And, the progress on the Yak is about to accelerate. We went to the baseball park to take in a game and a few beers tonight, and tomorrow I will get some building done. And I promise Tuesday, I will turn the camera on and show y'all my new pattern skills.
Okay, this is just a rambling account of my day, but it's all good. Stand by for what happens next. See y'all later.
Rusty
_________________
...and never Ever think about how good you are at something...
while you're doing it!
My Hot Rock & Blues Playlist
RknRusty- Rest In Peace
- Posts : 10869
Join date : 2011-08-10
Age : 68
Location : South Carolina, USA
Re: Back to the Yak - Yak-9 Build, Part II
![]() pkrankow Sat Aug 03, 2013 11:31 pm
pkrankow Sat Aug 03, 2013 11:31 pm
I am sure it feels wonderful. (I have had similar experiences in other hobbies)
Phil
pkrankow- Top Poster
- Posts : 3025
Join date : 2012-10-02
Location : Ohio
Page 2 of 9 • 1, 2, 3, 4, 5, 6, 7, 8, 9 ![]()
» Part ID: Back Plate Extension?
» Custom 1963 Cox PT-19 and HELLO!
» Shoestring flights - I brought it home! Now, can I do it again?
» Guillows Cessna 150 build circa 1970 (Build Log)